Gateway NV-53A Support Question
Gateway NV-53A Support Question
Find answers below for this question about Gateway NV-53A.Need a Gateway NV-53A manual? We have 9 online manuals for this item!
Question posted by stumfil on September 16th, 2013
How To Remove Keyboard Gateway Laptop Nv53a
The person who posted this question about this Gateway product did not include a detailed explanation. Please use the "Request More Information" button to the right if more details would help you to answer this question.
Current Answers
Related Gateway NV-53A Manual Pages
Gateway Notebook User's Guide - Canada/French - Page 105

www.gateway.com
files 7 files across network...11
Recycle Bin 6 deleting files and folders
11
emptying 12 recovering files and
folders 11
removing files and folders 6, 11, 12, 19, 90
renaming files and folders 19
restoring ...desktop 8 closing programs 19 closing windows 19 copying 19 deleting files and folders
19
keyboard 19 pasting 19 renaming files and
folders 19 selecting adjacent items in
list 19 ...
Gateway Notebook User's Guide - English - Page 105
www.gateway.com
files 7 files across network...11
Recycle Bin 6 deleting files and folders
11
emptying 12 recovering files and
folders 11
removing files and folders 6, 11, 12, 19, 90
renaming files and folders 19
restoring ...desktop 8 closing programs 19 closing windows 19 copying 19 deleting files and folders
19
keyboard 19 pasting 19 renaming files and
folders 19 selecting adjacent items in
list 19 ...
Gateway Quick Start Guide for Windows 7 - Page 11
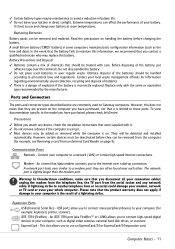
...the modem from the telephone line, the TV port from an External Card Reader on Gateway computers. This slot allows you attach any network cable. In the event that the ...Do not leave your battery in your regular waste. However, certain devices must be removed from the computer (for example: keyboard, printer, scanner). A lightning strike to nearby telephone lines or an aerial could ...
Gateway Quick Start Guide for Windows 7 - Page 36

... that were in Safe Mode to use basic files and drivers. 1. Disconnect or remove additional devices. When the Gateway logo appears, press F8 to access the advanced
start-up .
This option will...36 - Switch your keyboard to access the advanced startup options. 3. When the Gateway logo appears, press F8 on your computer on page 35. The screen freezes when the Gateway logo displays When the ...
Gateway Quick Start Guide for Windows 7 - Page 53
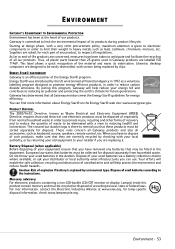
... product, to limit the environmental impact of -life products are concerned, measures have removed any batteries that used batteries via a battery collection scheme where available, or ask ... according to promote energy-efficient products, in heavy metals such as keyboard, mouse, speakers, remote control, etc. Gateway has determined that they are labelled ISO 11469. PRODUCT DISPOSAL The ...
Service Guide - Page 65

... first before pulling the cover away from the palm rest assembly.
6 Detach the keyboard cover from the old keyboard cover, remove
it by performing steps 3 and 4 of the "Replacing the multimedia board" procedure... the screws removed in place. www.gateway.com
Caution The keyboard cover is connected to lock the cable in place.
10 Insert the tabs on the front side of the keyboard cover into the...
Service Guide - Page 67

...the multimedia board, then
close the clip to close the LCD panel.
11 Reinstall the battery.
61 The keyboard cover is correctly mounted when you can run you finger along the sides of the cover and find no ... down on the cover until it clicks in step 3 of the
"Replacing the keyboard cover" procedure on page 58. www.gateway.com
5 Secure the new multimedia board, with the screws removed in place.
Service Guide - Page 73

...gateway.com
15 Lift the LCD panel assembly up . 25 Reinstall the keyboard and the keyboard cover by performing steps 5-8 of
the "Replacing the keyboard" procedure on the notebook, and then secure it
with the hinge screws removed... the antenna cables
and then reinstall the bay cover.
23 Return the base hinge screws removed in step 5. 24 Turn the notebook over so the palm rest is facing up and...
Service Guide - Page 75
www.gateway.com
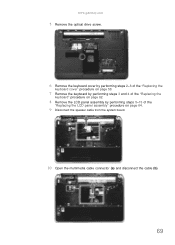
5 Remove the optical drive screw.
6 Remove the keyboard cover by performing steps 2-6 of the "Replacing the
keyboard cover" procedure on page 58.
7 Remove the keyboard by performing steps 3 and 4 of the "Replacing the
keyboard" procedure on page 62.
8 Remove the LCD panel assembly by performing steps 5-15 of the
"Replacing the LCD panel assembly" procedure on page...
Service Guide - Page 77

www.gateway.com
16 Locate ...to their respective
system board connectors.
21 Secure the palm rest assembly with the screws removed in steps 13 and 15. 22 Reinstall the LCD panel assembly by performing steps 16... panel assembly" procedure on page 64.
23 Reinstall the keyboard and the keyboard cover by performing steps 5-8 of
the "Replacing the keyboard" procedure on page 62.
24 Return the optical screw ...
Service Guide - Page 79
...gateway.com
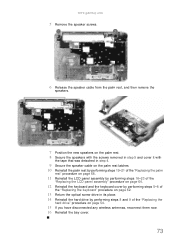
5 Remove the speaker screws.
6 Release the speaker cable from the palm rest, and then remove the
speakers.
7 Position the new speakers on the palm rest. 8 Secure the speakers with the screws removed ...panel assembly" procedure on page 64.
12 Reinstall the keyboard and the keyboard cover by performing steps 5-8 of
the "Replacing the keyboard" procedure on page 62.
13 Return the optical ...
Service Guide - Page 83
...steps in "Removing the battery" on page 48.
3 Remove the memory from...a wireless card installed, remove the card from the ...Remove the hard drive by performing steps 3 and 4 of the "Replacing the
hard drive" procedure on page 54.
6 Remove...gateway.com
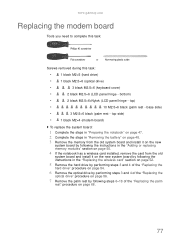
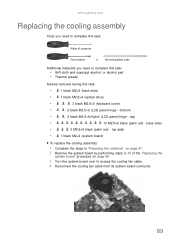
Replacing the modem board
Tools you need to complete this task:
Phillips #0 screwdriver
Flat screwdriver
or
Non-marring plastic scribe
Screws removed...
Service Guide - Page 85

... removed in step 9. 13 Reinstall the palm rest by performing steps 19-21 of the "Replacing the palm
rest" procedure on page 68.
14 Reinstall the LCD panel assembly by following the steps 16-23 of the
"Replacing the LCD panel assembly" procedure on page 64.
15 Reinstall the keyboard and the keyboard...
Service Guide - Page 89
...;6+Nylok (LCD panel hinge - www.gateway.com
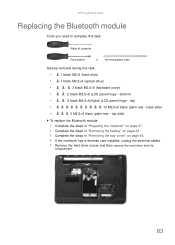
Replacing the Bluetooth module
Tools you need to complete this task:
Phillips #0 screwdriver
Flat screwdriver
or
Non-marring plastic scribe
Screws removed during this task:
•
1 black M2×5 (hard drive)
•
1 black M2.5×6 (optical drive)
•
3 black M2.5×6 (keyboard cover)
•
2 black M2...
Service Guide - Page 95
... the steps in "Preparing the notebook" on page 47. 2 Remove the system board by performing steps 2-10 of the "Replacing the...removed during this task:
•
1 black M2×5 (hard drive)
•
1 black M2.5×6 (optical drive)
•
3 black M2.5×6 (keyboard cover)
•
2 black M2.5×6 (LCD panel hinge - top)
•
10 M2.5×6 black (palm rest - www.gateway...
Service Guide - Page 97

www.gateway.com
8 Remove the barcode sticker on top of the "Replacing the
hard drive" procedure on page 54.
20 If you have disconnected...steps 16-23 of the
"Replacing the LCD panel assembly" procedure on page 64.
16 Reinstall the keyboard and the keyboard cover by performing steps 5-8 of
the "Replacing the keyboard" procedure on page 62.
17 Close the LCD panel and turn the notebook over so the base...
Service Guide - Page 99
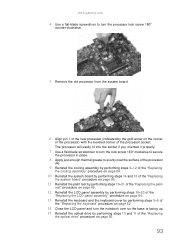
...is facing up. 15 Reinstall the optical drive by the gold arrow on page 56.
93 www.gateway.com
4 Use a flat-blade screwdriver to evenly coat the surface of the processor
die.
9 ...by performing steps 5-8 of
the "Replacing the keyboard" procedure on page 62.
14 Close the LCD panel and turn the processor lock screw 180°
counter-clockwise.
5 Remove the old processor from the system board.
6...
Service Guide - Page 101
... front panel.
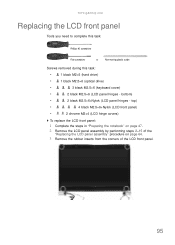
95 www.gateway.com
Replacing the LCD front panel
Tools you need to complete this task:
Phillips #0 screwdriver
Flat screwdriver
or
Non-marring plastic scribe
Screws removed during this task:
•
1 black M2×5 (hard drive)
•
1 black M2.5×6 (optical drive)
•
3 black M2.5×6 (keyboard cover)
•
2 black M2...
Service Guide - Page 103
...routed on the hinge sides.
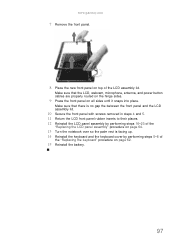
9 Press the front panel on all sides until it snaps into place.
www.gateway.com
7 Remove the front panel.
8 Place the new front panel on page 62.
15 Reinstall the battery.
97 Make... over so the palm rest is facing up. 14 Reinstall the keyboard and the keyboard cover by performing steps 5-8 of
the "Replacing the keyboard" procedure on top of the LCD assembly lid.
Service Guide - Page 109
... (LCD panel hinges - www.gateway.com
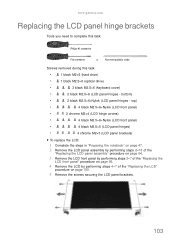
Replacing the LCD panel hinge brackets
Tools you need to complete this task:
Phillips #0 screwdriver
Flat screwdriver
or
Non-marring plastic scribe
Screws removed during this task:
•
1 black M2×5 (hard drive)
•
1 black M2.5×6 (optical drive)
•
3 black M2.5×6 (keyboard cover)
•
2 black...
Similar Questions

How To Do A Factory Restore On A Gateway Laptop Nv53a
(Posted by momifisth 9 years ago)

How To Restore Gateway Laptop Nv53a To Factory Settings
(Posted by bhCowbo 9 years ago)


