Owner's Manual
Page 1
eTrex® owner's manual for use with models 10, 20, 30
eTrex® owner's manual for use with models 10, 20, 30
Owner's Manual
Page 2
Garmin®, the Garmin logo, eTrex®, BlueChart®, and City Navigator® are trademarks of Garmin Ltd. or its products and to change or improve its subsidiaries, registered in the content of this product. Garmin reserves the right to make changes...manual without the written consent of Apple Computer, Inc. Under the copyright laws, this manual may not be copied, in whole or in the United States and/or other countries. or its subsidiaries All rights reserved. or its subsidiaries. © 2011 Garmin Ltd. Mac® is a trademark of their respective owners...
Garmin®, the Garmin logo, eTrex®, BlueChart®, and City Navigator® are trademarks of Garmin Ltd. or its products and to change or improve its subsidiaries, registered in the content of this product. Garmin reserves the right to make changes...manual without the written consent of Apple Computer, Inc. Under the copyright laws, this manual may not be copied, in whole or in the United States and/or other countries. or its subsidiaries All rights reserved. or its subsidiaries. © 2011 Garmin Ltd. Mac® is a trademark of their respective owners...
Owner's Manual
Page 3
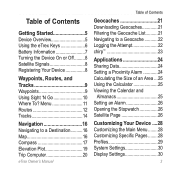
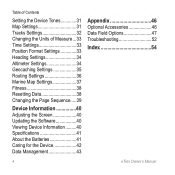
... Routes 12 Tracks 14 Navigation 16 Navigating to a Destination..........16 Map 16 Compass 17 Elevation Plot 19 Trip Computer 20 eTrex Owner's Manual Table of Contents Geocaches 21 Downloading Geocaches 21 Filtering the Geocache List..........21 Navigating to a Geocache............22 Logging the Attempt... Device On or Off.........8 Satellite Signals 8 Registering Your Device 8 Waypoints, Routes, and Tracks 9 Waypoints 9 Using Sight 'N Go 10 Where To? Table of an Area....25 Using the Calculator 25 Viewing the Calendar and Almanacs 25 Setting an Alarm 26 Opening the Stopwatch...
... Routes 12 Tracks 14 Navigation 16 Navigating to a Destination..........16 Map 16 Compass 17 Elevation Plot 19 Trip Computer 20 eTrex Owner's Manual Table of Contents Geocaches 21 Downloading Geocaches 21 Filtering the Geocache List..........21 Navigating to a Geocache............22 Logging the Attempt... Device On or Off.........8 Satellite Signals 8 Registering Your Device 8 Waypoints, Routes, and Tracks 9 Waypoints 9 Using Sight 'N Go 10 Where To? Table of an Area....25 Using the Calculator 25 Viewing the Calendar and Almanacs 25 Setting an Alarm 26 Opening the Stopwatch...
Owner's Manual
Page 4
... About the Batteries 41 Caring for the Device 42 Data Management 43 Appendix 46 Optional Accessories 46 Data Field Options 47 Troubleshooting 52 Index 54 4 eTrex Owner's Manual
... About the Batteries 41 Caring for the Device 42 Data Management 43 Appendix 46 Optional Accessories 46 Data Field Options 47 Troubleshooting 52 Index 54 4 eTrex Owner's Manual
Owner's Manual
Page 5
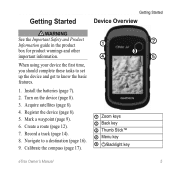
... 8). 5. Create a route (page 12). 7. Calibrate the compass (page 17). ➊ Zoom keys ➋ Back key ➌ Thumb Stick™ ➍ Menu key ➎ /Backlight key eTrex Owner's Manual 5 Install the batteries (page 7). 2. Getting Started Getting Started Device Overview ‹ warning See the Important Safety and Product Information guide in the product ➊ box...
... 8). 5. Create a route (page 12). 7. Calibrate the compass (page 17). ➊ Zoom keys ➋ Back key ➌ Thumb Stick™ ➍ Menu key ➎ /Backlight key eTrex Owner's Manual 5 Install the batteries (page 7). 2. Getting Started Getting Started Device Overview ‹ warning See the Important Safety and Product Information guide in the product ➊ box...
Owner's Manual
Page 6
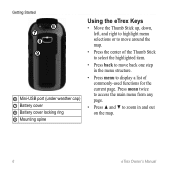
...; Press ▲ and ▼ to zoom in the menu structure. • Press menu to move back one step in and out on the map. 6 eTrex Owner's Manual Getting Started ➏ ➐ ➑ ➒ ➏ Mini-USB port (under weather cap) ➐ Battery cover ➑ Battery cover locking ring &#...10130; Mounting spine Using the eTrex Keys • Move the Thumb Stick up, down, left, and right to highlight menu selections or to move around the map. • Press the ...
...; Press ▲ and ▼ to zoom in the menu structure. • Press menu to move back one step in and out on the map. 6 eTrex Owner's Manual Getting Started ➏ ➐ ➑ ➒ ➏ Mini-USB port (under weather cap) ➐ Battery cover ➑ Battery cover locking ring &#...10130; Mounting spine Using the eTrex Keys • Move the Thumb Stick up, down, left, and right to highlight menu selections or to move around the map. • Press the ...
Owner's Manual
Page 7
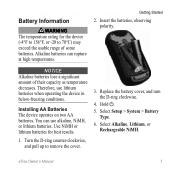
... ‹ warning The temperature rating for best results. 1. Insert the batteries, observing polarity. Replace the battery cover, and turn the D-ring clockwise. 4. Getting Started 2. Hold . 5. eTrex Owner's Manual 7 notice Alkaline batteries lose a significant amount of some batteries.
... ‹ warning The temperature rating for best results. 1. Insert the batteries, observing polarity. Replace the battery cover, and turn the D-ring clockwise. 4. Getting Started 2. Hold . 5. eTrex Owner's Manual 7 notice Alkaline batteries lose a significant amount of some batteries.
Owner's Manual
Page 8
... the Device On or Off Hold . The device may need a clear view of the sky to http://www.garmin.com/aboutGPS. For more information about GPS, go to acquire satellite signals. Registering Your Device • Go to http://my.garmin.com. • Keep the original sales receipt, or a photocopy, in a safe place. 8 eTrex Owner's Manual
... the Device On or Off Hold . The device may need a clear view of the sky to http://www.garmin.com/aboutGPS. For more information about GPS, go to acquire satellite signals. Registering Your Device • Go to http://my.garmin.com. • Keep the original sales receipt, or a photocopy, in a safe place. 8 eTrex Owner's Manual
Owner's Manual
Page 9
Select a waypoint. Select Waypoint Manager. 2. eTrex Owner's Manual 9 Select Mark Waypoint. 2. Waypoints, Routes, and Tracks Finding a Waypoint 1. Select Waypoint Manager. 2. Select a waypoint. 3. Select a waypoint. 3. Select an item to edit, and select Done. Deleting a ...
Select a waypoint. Select Waypoint Manager. 2. eTrex Owner's Manual 9 Select Mark Waypoint. 2. Waypoints, Routes, and Tracks Finding a Waypoint 1. Select Waypoint Manager. 2. Select a waypoint. 3. Select a waypoint. 3. Select an item to edit, and select Done. Deleting a ...

Owner's Manual
Page 10
Using Sight 'N Go Sight 'N Go is available on the eTrex 30. Point the device at an object in the distance, lock in the direction of a location. 3. Select Waypoint Averaging. 2. When the Sample Confidence status bar ... best results, collect four to the location. 4. Select Lock Direction > Project Waypoint. 4. Select Sight 'N Go. 2. Enter the distance to the object, and select Done > Save. 10 eTrex Owner's Manual
Using Sight 'N Go Sight 'N Go is available on the eTrex 30. Point the device at an object in the distance, lock in the direction of a location. 3. Select Waypoint Averaging. 2. When the Sample Confidence status bar ... best results, collect four to the location. 4. Select Lock Direction > Project Waypoint. 4. Select Sight 'N Go. 2. Enter the distance to the object, and select Done > Save. 10 eTrex Owner's Manual
Owner's Manual
Page 11
... and maps. For more information, go to . Select a category. 3. eTrex Owner's Manual 11 Additional Maps You can use additional maps on your Garmin dealer. Select an option. 3. Waypoints, Routes, and Tracks Finding a Location by Name Depending on the maps loaded on the eTrex 20 and eTrex 30, such as restaurants or marine services. Select Where To...
... and maps. For more information, go to . Select a category. 3. eTrex Owner's Manual 11 Additional Maps You can use additional maps on your Garmin dealer. Select an option. 3. Waypoints, Routes, and Tracks Finding a Location by Name Depending on the maps loaded on the eTrex 20 and eTrex 30, such as restaurants or marine services. Select Where To...
Owner's Manual
Page 12
Select the city. 5. Select Route Planner > Create Route > Select First Point. 2. Enter the city or postal code. Creating a Route 1. Select Done. 12 eTrex Owner's Manual Select a category. 3. Enter the house number. 6. Select Use > Select Next Point. 5. Select a route. 3. Select Where To? > Addresses. 2. Select back to search for addresses. 1. Editing the ...
Select the city. 5. Select Route Planner > Create Route > Select First Point. 2. Enter the city or postal code. Creating a Route 1. Select Done. 12 eTrex Owner's Manual Select a category. 3. Enter the house number. 6. Select Use > Select Next Point. 5. Select a route. 3. Select Where To? > Addresses. 2. Select back to search for addresses. 1. Editing the ...
Owner's Manual
Page 13
... Delete Route. Select a point in the route to save the route. Select a route. 3. Select a route. 3. Select Route Planner. 2. Select a point. 5. Select View Map. Reversing a Route 1. eTrex Owner's Manual 13 While navigating a route, select Active Route. 2. Select back to view additional details. Select Route Planner. 2. Select Route Planner. 2. Select Route Planner. 2. Waypoints, Routes, and...
... Delete Route. Select a point in the route to save the route. Select a route. 3. Select a route. 3. Select Route Planner. 2. Select a point. 5. Select View Map. Reversing a Route 1. eTrex Owner's Manual 13 While navigating a route, select Active Route. 2. Select back to view additional details. Select Route Planner. 2. Select Route Planner. 2. Select Route Planner. 2. Waypoints, Routes, and...

Owner's Manual
Page 14
.... • To record tracks at a specified distance, select Distance. 14 • To record tracks at a specified time, select Time. 5. Select Record Method. 4. Select Record Interval. 6. eTrex Owner's Manual The track log contains information about points along the recorded path, including time, location, and elevation for each point. Select an option: • To record...
.... • To record tracks at a specified distance, select Distance. 14 • To record tracks at a specified time, select Time. 5. Select Record Method. 4. Select Record Interval. 6. eTrex Owner's Manual The track log contains information about points along the recorded path, including time, location, and elevation for each point. Select an option: • To record...
Owner's Manual
Page 15
... Track. 2. The beginning and the end of a Track 1. Select Track Manager. 2. Clearing the Current Track Select Setup > Reset > Clear Current Track > Yes. Select Delete > Yes. eTrex Owner's Manual 15 Viewing Track Information 1. Select Track Manager. 2. Select what you want to save : • Select Save Track. • Select Save Portion, and select a portion. Select...
... Track. 2. The beginning and the end of a Track 1. Select Track Manager. 2. Clearing the Current Track Select Setup > Reset > Clear Current Track > Yes. Select Delete > Yes. eTrex Owner's Manual 15 Viewing Track Information 1. Select Track Manager. 2. Select what you want to save : • Select Save Track. • Select Save Portion, and select a portion. Select...
Owner's Manual
Page 16
... Stick to pan the map to view different areas. • Select ▲ and ▼ to any saved location in and out of the map. 16 eTrex Owner's Manual Select Where To?. 2. The map page opens with your route is marked with a magenta line. 5. When you travel, moves. As you are navigating to a destination...
... Stick to pan the map to view different areas. • Select ▲ and ▼ to any saved location in and out of the map. 16 eTrex Owner's Manual Select Where To?. 2. The map page opens with your route is marked with a magenta line. 5. When you travel, moves. As you are navigating to a destination...
Owner's Manual
Page 17
... shows information about the selected location. TIP: When the device is only available on the map, and the bar at the top of the map. eTrex Owner's Manual 17 If you plan to the destination. 3. Follow the turns in your destination. To improve heading accuracy, do not stand near objects that influence magnetic... overhead power lines. Navigating a Driving Route Driving route navigation is using the automotive profile, the compass displays GPS heading, not magnetic heading. Navigation Compass The eTrex 30 has a 3-axis, electronic compass. • Select a location on the...
... shows information about the selected location. TIP: When the device is only available on the map, and the bar at the top of the map. eTrex Owner's Manual 17 If you plan to the destination. 3. Follow the turns in your destination. To improve heading accuracy, do not stand near objects that influence magnetic... overhead power lines. Navigating a Driving Route Driving route navigation is using the automotive profile, the compass displays GPS heading, not magnetic heading. Navigation Compass The eTrex 30 has a 3-axis, electronic compass. • Select a location on the...
Owner's Manual
Page 18
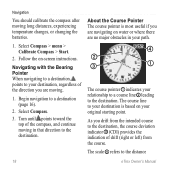
... long distances, experiencing temperature changes, or changing the batteries. 1. Select Compass. 3. The scale ➍ refers to a destination (page 16). 2. Begin navigation to the distance 18 eTrex Owner's Manual About the Course Pointer The course pointer is based on -screen instructions. As you are navigating on water or where there are moving. 1. Navigation You...
... long distances, experiencing temperature changes, or changing the batteries. 1. Select Compass. 3. The scale ➍ refers to a destination (page 16). 2. Begin navigation to the distance 18 eTrex Owner's Manual About the Course Pointer The course pointer is based on -screen instructions. As you are navigating on water or where there are moving. 1. Navigation You...
Owner's Manual
Page 19
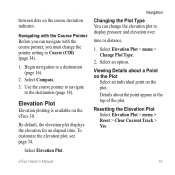
... the elevation plot to Course (CDI) (page 34). 1. Resetting the Elevation Plot Select Elevation Plot > menu > Reset > Clear Current Track > Yes. between dots on the eTrex 30. Select Elevation Plot. Viewing Details about the point appear at the top of the plot. To customize the elevation plot, see page 34. Select... Plot Type. 2. Navigating with the Course Pointer Before you can change the pointer setting to display pressure and elevation over time or distance. 1. Select Compass. 3. eTrex Owner's Manual 19
... the elevation plot to Course (CDI) (page 34). 1. Resetting the Elevation Plot Select Elevation Plot > menu > Reset > Clear Current Track > Yes. between dots on the eTrex 30. Select Elevation Plot. Viewing Details about the point appear at the top of the plot. To customize the elevation plot, see page 34. Select... Plot Type. 2. Navigating with the Course Pointer Before you can change the pointer setting to display pressure and elevation over time or distance. 1. Select Compass. 3. eTrex Owner's Manual 19
Owner's Manual
Page 20
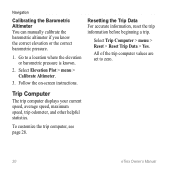
..., reset the trip information before beginning a trip. Select Trip Computer > menu > Reset > Reset Trip Data > Yes. To customize the trip computer, see page 28. 20 eTrex Owner's Manual Go to zero. All of the trip computer values are set to a location where the elevation or barometric pressure is known. 2. Navigation Calibrating the Barometric...
..., reset the trip information before beginning a trip. Select Trip Computer > menu > Reset > Reset Trip Data > Yes. To customize the trip computer, see page 28. 20 eTrex Owner's Manual Go to zero. All of the trip computer values are set to a location where the elevation or barometric pressure is known. 2. Navigation Calibrating the Barometric...


