
User Manual
Page 4
... Paper ...37 Loading Paper for Documents ...37 Loading Paper for Photos ...40 Loading Envelopes ...43 Paper Loading Capacity ...46 Available EPSON Papers...46 Borderless Paper Type Compatibility 48 Paper or Media Type Settings ...49 Placing Originals on the Product ...50 Placing Originals on the... Scanner Glass 50 Copying ...52 Copying Documents or Photos...52 Selecting Print Settings for Copies 53 Paper Type Settings - Copying 54 Paper Size...
... Paper ...37 Loading Paper for Documents ...37 Loading Paper for Photos ...40 Loading Envelopes ...43 Paper Loading Capacity ...46 Available EPSON Papers...46 Borderless Paper Type Compatibility 48 Paper or Media Type Settings ...49 Placing Originals on the Product ...50 Placing Originals on the... Scanner Glass 50 Copying ...52 Copying Documents or Photos...52 Selecting Print Settings for Copies 53 Paper Type Settings - Copying 54 Paper Size...

User Manual
Page 16
1 Document cover 2 Scanner glass 3 Control panel 4 Control panel release bar (beneath) 5 Memory card slot 6 Memory card access light Parent topic: Product Parts Locations 16
1 Document cover 2 Scanner glass 3 Control panel 4 Control panel release bar (beneath) 5 Memory card slot 6 Memory card access light Parent topic: Product Parts Locations 16

User Manual
Page 50
...20 mm) away from each other. 50 Note: You can place multiple originals on the Scanner Glass 1. Slide the original to avoid damaging it. Placing Originals on the Scanner Glass Placing Originals on the scanner glass. Place your original facedown on the product. Placing Originals on the Product Follow the ...instructions here to place your original documents or photos on the scanner glass with the top facing as a writing surface to the edges of your product or use its cover as shown. Caution: Do ...
...20 mm) away from each other. 50 Note: You can place multiple originals on the Scanner Glass 1. Slide the original to avoid damaging it. Placing Originals on the Scanner Glass Placing Originals on the scanner glass. Place your original facedown on the product. Placing Originals on the Product Follow the ...instructions here to place your original documents or photos on the scanner glass with the top facing as a writing surface to the edges of your product or use its cover as shown. Caution: Do ...
User Manual
Page 87
...software, such as necessary. 6. To download Epson Scan, visit Epson's driver download site (U.S. Change the settings as ABBYY FineReader. Do one of the following to open the Epson Software folder, and double-click the EPSON Scan icon. Open the Scanner (Windows) or Select Scanner (Mac OS X) drop-down list and... select the scan button settings you can download and install Epson Scan scanning software. You do this using...
...software, such as necessary. 6. To download Epson Scan, visit Epson's driver download site (U.S. Change the settings as ABBYY FineReader. Do one of the following to open the Epson Software folder, and double-click the EPSON Scan icon. Open the Scanner (Windows) or Select Scanner (Mac OS X) drop-down list and... select the scan button settings you can download and install Epson Scan scanning software. You do this using...
User Manual
Page 123
...an image-editing application such as ABBYY FineReader. Parent topic: Selecting Scan File Settings Scanning with Image Capture, you scan. To download Epson Scan, visit Epson's driver download site (U.S. TIFF (*.tif) A file format created for exchanging data between many programs, such as Image Capture. 2. Note... enhanced quality and a wider color range (does not affect the way the image displays on the scanner glass, your product begins a preview scan. 123 Epson Scan provides additional image adjustment and photo correction features for enhancing scanned images, and provides an interface ...
...an image-editing application such as ABBYY FineReader. Parent topic: Selecting Scan File Settings Scanning with Image Capture, you scan. To download Epson Scan, visit Epson's driver download site (U.S. TIFF (*.tif) A file format created for exchanging data between many programs, such as Image Capture. 2. Note... enhanced quality and a wider color range (does not affect the way the image displays on the scanner glass, your product begins a preview scan. 123 Epson Scan provides additional image adjustment and photo correction features for enhancing scanned images, and provides an interface ...
User Manual
Page 152
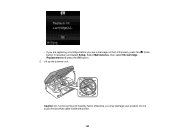
Lift up the scanner unit. home Caution: Do not move the print head by hand; otherwise, you see a message on the LCD screen, press the button if necessary and select Setup. • If you are replacing a cartridge before you may damage your product. Select Maintenance, then select Ink Cartridge Replacement and press the OK button. 2. Do not touch the flat white cable inside the printer. 152
Lift up the scanner unit. home Caution: Do not move the print head by hand; otherwise, you see a message on the LCD screen, press the button if necessary and select Setup. • If you are replacing a cartridge before you may damage your product. Select Maintenance, then select Ink Cartridge Replacement and press the OK button. 2. Do not touch the flat white cable inside the printer. 152
User Manual
Page 155
... a low or expended ink cartridge, you 're finished, press the OK button. Always store ink cartridges with the label facing up the scanner unit and press the ink cartridge down until it in the ink supply port is finished. do not touch the ink supply port or surrounding... area. 8. Parent topic: Replacing Ink Cartridges Related concepts Purchase Epson Ink Cartridges 155 If you see the Ink Cartridge Replacement screen, ink charging is designed to its home position and the printer starts charging ...
... a low or expended ink cartridge, you 're finished, press the OK button. Always store ink cartridges with the label facing up the scanner unit and press the ink cartridge down until it in the ink supply port is finished. do not touch the ink supply port or surrounding... area. 8. Parent topic: Replacing Ink Cartridges Related concepts Purchase Epson Ink Cartridges 155 If you see the Ink Cartridge Replacement screen, ink charging is designed to its home position and the printer starts charging ...

User Manual
Page 174
Parent topic: Adjusting Print Quality Related topics Copying 174 Check the back of the ejected paper to make a copy, but without placing a document on the scanner glass. 3. 2. Repeat as necessary until the paper comes out clean. Use the product control panel to see if it is clean. 4.
Parent topic: Adjusting Print Quality Related topics Copying 174 Check the back of the ejected paper to make a copy, but without placing a document on the scanner glass. 3. 2. Repeat as necessary until the paper comes out clean. Use the product control panel to see if it is clean. 4.
User Manual
Page 175
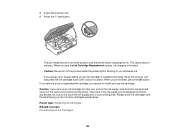
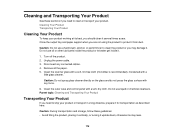
... for transportation as described here. Turn off the product. 2. Disconnect any force. 6. Unplug the power cable. 3. Do not use liquid or chemical cleansers. Clean the scanner glass with a soft, lint-free cloth (microfiber is recommended), moistened with a soft, dry cloth. Cleaning Your Product Transporting Your Product Cleaning Your Product To keep...
... for transportation as described here. Turn off the product. 2. Disconnect any force. 6. Unplug the power cable. 3. Do not use liquid or chemical cleansers. Clean the scanner glass with a soft, lint-free cloth (microfiber is recommended), moistened with a soft, dry cloth. Cleaning Your Product Transporting Your Product Cleaning Your Product To keep...

User Manual
Page 176
... and check to the case with tape. If not, turn on the white flat cable inside the product; Turn off again. 3. Lower the scanner unit. 5. Secure the ink cartridge holder to see if the print head is in the far right position (the home position). Unplug the power cable. 7. &#...
... and check to the case with tape. If not, turn on the white flat cable inside the product; Turn off again. 3. Lower the scanner unit. 5. Secure the ink cartridge holder to see if the print head is in the far right position (the home position). Unplug the power cable. 7. &#...

User Manual
Page 179
... the ink cartridge. If the error continues, check for support. (W-02) Paper is no paper jam, contact Epson for a paper jam. If there is jammed in the product. Epson recommends using an access point, press the button on the access point or click the button on the access point.... (I-60) Your computer may not support WSD (Web Services for Devices). Remove the jammed paper, then press the start button.) (E-02) A fatal scanner error has occurred. The ink pad is not recognized. LCD code Condition/solution (E-01) A fatal error has occurred. Turn off and back on the LCD...
... the ink cartridge. If the error continues, check for support. (W-02) Paper is no paper jam, contact Epson for a paper jam. If there is jammed in the product. Epson recommends using an access point, press the button on the access point or click the button on the access point.... (I-60) Your computer may not support WSD (Web Services for Devices). Remove the jammed paper, then press the start button.) (E-02) A fatal scanner error has occurred. The ink pad is not recognized. LCD code Condition/solution (E-01) A fatal error has occurred. Turn off and back on the LCD...
User Manual
Page 190
Then reload it in the sheet feeder printable side up the scanner unit, and remove the jammed paper and any torn pieces. 190 Parent topic: Solving Paper Problems Related references Paper Jam Problems Paper Loading Capacity Related ...
Then reload it in the sheet feeder printable side up the scanner unit, and remove the jammed paper and any torn pieces. 190 Parent topic: Solving Paper Problems Related references Paper Jam Problems Paper Loading Capacity Related ...

User Manual
Page 191
Lower the scanner unit and press the power button to eject the paper. Parent topic: Solving Paper Problems Related references Paper or Media Type Settings Related tasks Cancelling ...
Lower the scanner unit and press the power button to eject the paper. Parent topic: Solving Paper Problems Related references Paper or Media Type Settings Related tasks Cancelling ...
User Manual
Page 206
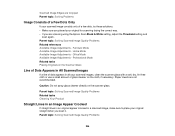
... Cleaning Your Product Straight Lines in an Image Appear Crooked If straight lines in an original appear crooked in all your scanned images, clean the scanner glass with a soft, dry, lint-free cloth or use a small amount of dots appears in a scanned image, make sure to place your original... the correct way. • If you scan it. Paper towels are scanning using the Epson Scan Black & White setting, adjust the Threshold setting and scan again. Professional Mode Related tasks Placing Originals on the Scanner Glass Line of Dots Appears in All Scanned Images If a line of glass cleaner on ...
... Cleaning Your Product Straight Lines in an Image Appear Crooked If straight lines in an original appear crooked in all your scanned images, clean the scanner glass with a soft, dry, lint-free cloth or use a small amount of dots appears in a scanned image, make sure to place your original... the correct way. • If you scan it. Paper towels are scanning using the Epson Scan Black & White setting, adjust the Threshold setting and scan again. Professional Mode Related tasks Placing Originals on the Scanner Glass Line of Dots Appears in All Scanned Images If a line of glass cleaner on ...

User Manual
Page 207
... of your product during scanning. • Your product will not operate properly while tilted at the Edges If you scan it on the Scanner Glass Image is not wrinkled or warped. Parent topic: Solving Scanned Image Quality Problems 207 Place it . Parent topic: Solving Scanned Image... (if available) and try these Epson Scan settings (if available) and try scanning again: • Select the Unsharp Mask setting. • Adjust the Auto Exposure setting. • Increase the Resolution setting. This may prevent the original from laying flat on the scanner glass. • Do not move...
... of your product during scanning. • Your product will not operate properly while tilted at the Edges If you scan it on the Scanner Glass Image is not wrinkled or warped. Parent topic: Solving Scanned Image Quality Problems 207 Place it . Parent topic: Solving Scanned Image... (if available) and try these Epson Scan settings (if available) and try scanning again: • Select the Unsharp Mask setting. • Adjust the Auto Exposure setting. • Increase the Resolution setting. This may prevent the original from laying flat on the scanner glass. • Do not move...

User Manual
Page 208
... printers typically use CMYK (cyan, magenta, yellow, and black). Related topics Selecting Epson Scan Settings Back of Original Image Appears in Scanned Image If an image from differing pitches in the scanner's screen and your original's halftone screen. This is Scanned Upside-Down Your product scans... using this effect, adjust these Epson Scan settings (if available) and try scanning again: • Select the ...
... printers typically use CMYK (cyan, magenta, yellow, and black). Related topics Selecting Epson Scan Settings Back of Original Image Appears in Scanned Image If an image from differing pitches in the scanner's screen and your original's halftone screen. This is Scanned Upside-Down Your product scans... using this effect, adjust these Epson Scan settings (if available) and try scanning again: • Select the ...

User Manual
Page 209
... Related concepts Image Preview Guidelines Related tasks Selecting a Scan Area - Parent topic: Solving Scanned Image Quality Problems Related topics Selecting Epson Scan Settings Scan Area is placed correctly for scanning. Home Mode Selecting a Scan Area - Professional Mode Scanned Image Edges are Cropped... area while viewing a Thumbnail preview in your scanned image, adjust these Epson Scan settings (if available) and try these solutions: • Create a scan area by drawing a marquee on the Scanner Glass Solving Memory Card Problems Check these solutions if you have problems using...
... Related concepts Image Preview Guidelines Related tasks Selecting a Scan Area - Parent topic: Solving Scanned Image Quality Problems Related topics Selecting Epson Scan Settings Scan Area is placed correctly for scanning. Home Mode Selecting a Scan Area - Professional Mode Scanned Image Edges are Cropped... area while viewing a Thumbnail preview in your scanned image, adjust these Epson Scan settings (if available) and try these solutions: • Create a scan area by drawing a marquee on the Scanner Glass Solving Memory Card Problems Check these solutions if you have problems using...
User Manual
Page 216
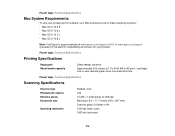
... or www.epson.ca/support (Canada) for the latest in compatibility and drivers for your Mac should use your product and its software, your product. Parent topic: Technical Specifications Mac System Requirements To use one sheet at a time Parent topic: Technical Specifications Scanning Specifications Scanner type Photoelectric device... Flatbed, color CIS 10,200 × 14,040 pixels at 1200 dpi Maximum: 8.5 × 11.7 inches (216 × 297 mm) Scanner glass: US letter or A4 1200 dpi (main scan) 2400 dpi (sub scan) 216 load legalsize or user-defined paper sizes one of these ...
... or www.epson.ca/support (Canada) for the latest in compatibility and drivers for your Mac should use your product and its software, your product. Parent topic: Technical Specifications Mac System Requirements To use one sheet at a time Parent topic: Technical Specifications Scanning Specifications Scanner type Photoelectric device... Flatbed, color CIS 10,200 × 14,040 pixels at 1200 dpi Maximum: 8.5 × 11.7 inches (216 × 297 mm) Scanner glass: US letter or A4 1200 dpi (main scan) 2400 dpi (sub scan) 216 load legalsize or user-defined paper sizes one of these ...

User Manual
Page 225
... of the connectors. this may damage the product. • Do not spill liquid on the document table when placing originals. • Do not open the scanner section while the product is at an angle. • Make sure the back of the product is copying, printing, scanning, or performing any other device... wait until the power light stops flashing before unplugging the product or cutting off power to trap your fingers when closing the document cover or scanner. 225
... of the connectors. this may damage the product. • Do not spill liquid on the document table when placing originals. • Do not open the scanner section while the product is at an angle. • Make sure the back of the product is copying, printing, scanning, or performing any other device... wait until the power light stops flashing before unplugging the product or cutting off power to trap your fingers when closing the document cover or scanner. 225
Product Specifications
Page 4
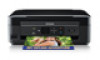
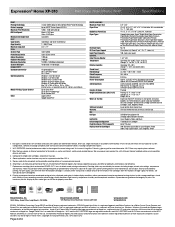
...SmartWay is a registered logomark and Better Products for a Better Future, Epson Connect and Epson iPrint are registered trademarks, EPSON Exceed Your Vision is a service mark of the U.S. Copyright 2013 Epson America, Inc. Expression® Home XP-310 Print | Copy | Scan | Photo | Wi-Fi® ...Specifications PRINT Printing Technology Printer Language Maximum Print Resolution ISO Print Speed† Minimum Ink Droplet Size COPY Copy Quality Copy Quantity Maximum Copy Size SCAN Scanner Type...
...SmartWay is a registered logomark and Better Products for a Better Future, Epson Connect and Epson iPrint are registered trademarks, EPSON Exceed Your Vision is a service mark of the U.S. Copyright 2013 Epson America, Inc. Expression® Home XP-310 Print | Copy | Scan | Photo | Wi-Fi® ...Specifications PRINT Printing Technology Printer Language Maximum Print Resolution ISO Print Speed† Minimum Ink Droplet Size COPY Copy Quality Copy Quantity Maximum Copy Size SCAN Scanner Type...


