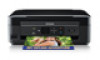
User Manual
Page 3
Inside ...17 Product Parts - Contents XP-310 User's Guide...11 Product Basics ...12 Setting Up the Control Panel ...12 Control Panel Buttons and Lights 12 Adjusting Control Panel Position 13 Changing LCD ..., Tablets, and More 21 Using Epson Email Print ...22 Using the Epson iPrint Mobile App 22 Using Google Cloud Print ...22 Using AirPrint ...23 Wi-Fi Networking ...25 Wi-Fi Infrastructure Mode Setup...25 Selecting Wireless Network Settings From the Control Panel 26 Wi-Fi Direct Mode Setup ...28 Enabling Wi-Fi Direct Mode...
Inside ...17 Product Parts - Contents XP-310 User's Guide...11 Product Basics ...12 Setting Up the Control Panel ...12 Control Panel Buttons and Lights 12 Adjusting Control Panel Position 13 Changing LCD ..., Tablets, and More 21 Using Epson Email Print ...22 Using the Epson iPrint Mobile App 22 Using Google Cloud Print ...22 Using AirPrint ...23 Wi-Fi Networking ...25 Wi-Fi Infrastructure Mode Setup...25 Selecting Wireless Network Settings From the Control Panel 26 Wi-Fi Direct Mode Setup ...28 Enabling Wi-Fi Direct Mode...
User Manual
Page 5
...104 Selecting a Scan Area - Home Mode 98 Available Image Adjustments - Office Mode 106 Available Image Adjustments - Mac OS X ...77 Selecting Page Setup Settings - Home Mode 101 Selecting a Scan Size - Home Mode 102 Scanning in Home Mode ...95 Selecting a Scan Area - Office Mode ... Scan Using the Product Control Panel 85 Changing Default Scan Button Settings 87 Starting a Scan Using the Epson Scan Icon 87 Starting a Scan from a Scanning Program 89 Selecting Epson Scan Settings ...91 Scan Modes...91 Selecting the Scan Mode...92 Scanning in Professional Mode 109 5 Mac...
...104 Selecting a Scan Area - Home Mode 98 Available Image Adjustments - Office Mode 106 Available Image Adjustments - Mac OS X ...77 Selecting Page Setup Settings - Home Mode 101 Selecting a Scan Size - Home Mode 102 Scanning in Home Mode ...95 Selecting a Scan Area - Office Mode ... Scan Using the Product Control Panel 85 Changing Default Scan Button Settings 87 Starting a Scan Using the Epson Scan Icon 87 Starting a Scan from a Scanning Program 89 Selecting Epson Scan Settings ...91 Scan Modes...91 Selecting the Scan Mode...92 Scanning in Professional Mode 109 5 Mac...

User Manual
Page 7
...178 Checking for Software Updates...178 Product Status Messages ...179 Running a Product Check ...180 Resetting Control Panel Defaults ...182 Solving Setup Problems ...183 Noise After Ink Installation ...183 Software Installation Problems ...184 7 Mac OS X 158 Conserving Low Black Ink with Mac OS X... 148 Purchase Epson Ink Cartridges...150 Ink Cartridge Part Numbers ...150 Removing and Installing Ink Cartridges 151 Replacing Ink Cartridges Using a Computer Utility 156...
...178 Checking for Software Updates...178 Product Status Messages ...179 Running a Product Check ...180 Resetting Control Panel Defaults ...182 Solving Setup Problems ...183 Noise After Ink Installation ...183 Software Installation Problems ...184 7 Mac OS X 158 Conserving Low Black Ink with Mac OS X... 148 Purchase Epson Ink Cartridges...150 Ink Cartridge Part Numbers ...150 Removing and Installing Ink Cartridges 151 Replacing Ink Cartridges Using a Computer Utility 156...
User Manual
Page 8
Control Panel Setup Problems ...184 Solving Network Problems ...184 Product Cannot Connect to a Wireless Router or Access Point 185 Network Software Cannot Find Product on a Network 186 Product ...
Control Panel Setup Problems ...184 Solving Network Problems ...184 Product Cannot Connect to a Wireless Router or Access Point 185 Network Software Cannot Find Product on a Network 186 Product ...

User Manual
Page 13
...: Setting Up the Control Panel Changing LCD Screen Language You can adjust the position of the control panel to make it easier to select Printer Setup and press the OK button. Press the arrow buttons to use. • To raise the control panel, lift it up from the bottom. • To... change the language used on the LCD screen. 1. Press the home button, if necessary. 2. You see this screen: 13 Press the arrow buttons to select Setup and press the OK button. 3. Caution: Do not lower the control panel without first squeezing the release bar or you may damage your product.
...: Setting Up the Control Panel Changing LCD Screen Language You can adjust the position of the control panel to make it easier to select Printer Setup and press the OK button. Press the arrow buttons to use. • To raise the control panel, lift it up from the bottom. • To... change the language used on the LCD screen. 1. Press the home button, if necessary. 2. You see this screen: 13 Press the arrow buttons to select Setup and press the OK button. 3. Caution: Do not lower the control panel without first squeezing the release bar or you may damage your product.

User Manual
Page 18
... the Control Panel Changing the Power Off Timer Setting - Windows Changing the Power Off Timer Setting - You can use the product's control panel to select Setup and press the OK button. 18 Press the home button, if necessary. 2. Press the left or right arrow buttons to change the time period before...
... the Control Panel Changing the Power Off Timer Setting - Windows Changing the Power Off Timer Setting - You can use the product's control panel to select Setup and press the OK button. 18 Press the home button, if necessary. 2. Press the left or right arrow buttons to change the time period before...

User Manual
Page 19
Press left or right arrow buttons to select Printer Setup and press the OK button. 4. Click the Maintenance tab and select Printer and Option Information. You see this window: 19 Press the home button to ...
Press left or right arrow buttons to select Printer Setup and press the OK button. 4. Click the Maintenance tab and select Printer and Option Information. You see this window: 19 Press the home button to ...
User Manual
Page 22
... the Google Chrome browser without drivers or cables. Just activate your product's Email Print address. Send an email with attachments to your Epson product. If you are setting up your product for wireless printing as described on the Start Here sheet. 2. You can change these... printing options by default. Visit www.epson.com/connect to learn more about Email Print, check compatibility, and get detailed setup instructions. 3. Note: Both the email and any device that your product is using. 5. You can...
... the Google Chrome browser without drivers or cables. Just activate your product's Email Print address. Send an email with attachments to your Epson product. If you are setting up your product for wireless printing as described on the Start Here sheet. 2. You can change these... printing options by default. Visit www.epson.com/connect to learn more about Email Print, check compatibility, and get detailed setup instructions. 3. Note: Both the email and any device that your product is using. 5. You can...

User Manual
Page 23
...touch running the latest version of iOS. 1. Connect your device to the same network before starting the Google Cloud Print setup. Select the check box to agree to complete setup and print a test page. Click Register. 7. If your product is using Google Cloud Print, or the Google ...Cloud Print website for a list of a web browser. 5. Select the Google Cloud Print Services option. Enter your product for wireless printing as described on your Epson product ...
...touch running the latest version of iOS. 1. Connect your device to the same network before starting the Google Cloud Print setup. Select the check box to agree to complete setup and print a test page. Click Register. 7. If your product is using Google Cloud Print, or the Google ...Cloud Print website for a list of a web browser. 5. Select the Google Cloud Print Services option. Enter your product for wireless printing as described on your Epson product ...
User Manual
Page 25
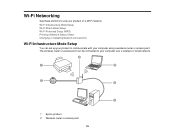
The wireless router or access point can set up your product to communicate with your computer using a wireless router or access point. Wi-Fi Networking See these sections to your computer over a wireless or wired network. 1 Epson product 2 Wireless router or access point 25 Wi-Fi Infrastructure Mode Setup Wi-Fi Direct Mode Setup Wi-Fi Protected Setup (WPS) Printing a Network Status Sheet Changing or Updating Network Connections Wi-Fi Infrastructure Mode Setup You can be connected to use your product on a Wi-Fi network.
The wireless router or access point can set up your product to communicate with your computer using a wireless router or access point. Wi-Fi Networking See these sections to your computer over a wireless or wired network. 1 Epson product 2 Wireless router or access point 25 Wi-Fi Infrastructure Mode Setup Wi-Fi Direct Mode Setup Wi-Fi Protected Setup (WPS) Printing a Network Status Sheet Changing or Updating Network Connections Wi-Fi Infrastructure Mode Setup You can be connected to use your product on a Wi-Fi network.

User Manual
Page 26
... 5 Internet 6 Ethernet cable (used only for backing up or recovering data and settings during or after the warranty period. We recommend that you through network setup. Epson is not responsible for wired connection to select Wi-Fi Setup and press the OK button. To install your network data and settings. 1.
... 5 Internet 6 Ethernet cable (used only for backing up or recovering data and settings during or after the warranty period. We recommend that you through network setup. Epson is not responsible for wired connection to select Wi-Fi Setup and press the OK button. To install your network data and settings. 1.

User Manual
Page 27
... or 123 (numbers and symbols), press the home button. • To delete characters, press the left arrow. • When you want to select Wi-Fi Setup Wizard and press the OK button. 4. If you do not see your wireless network and press the OK button. If you finish entering characters, press... the OK button. 6. 3. Press the arrow buttons to print a network setup report, press the start button. (Otherwise, press the stop button.) 7. Enter your network name as described in the next step. 5.
... or 123 (numbers and symbols), press the home button. • To delete characters, press the left arrow. • When you want to select Wi-Fi Setup Wizard and press the OK button. 4. If you do not see your wireless network and press the OK button. If you finish entering characters, press... the OK button. 6. 3. Press the arrow buttons to print a network setup report, press the start button. (Otherwise, press the stop button.) 7. Enter your network name as described in the next step. 5.
User Manual
Page 28
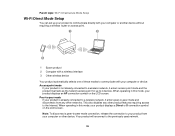
Parent topic: Wi-Fi Infrastructure Mode Setup Wi-Fi Direct Mode Setup You can set up to -peer mode and disconnects from your product displays an AP connection symbol on the LCD screen. When operating in this ... as the network access point for up your product to communicate directly with your computer or another device without requiring a wireless router or access point. 1 Epson product 2 Computer with a wireless interface 3 Other wireless device Your product automatically selects one of these modes to communicate with your computer or device: Access point...
Parent topic: Wi-Fi Infrastructure Mode Setup Wi-Fi Direct Mode Setup You can set up to -peer mode and disconnects from your product displays an AP connection symbol on the LCD screen. When operating in this ... as the network access point for up your product to communicate directly with your computer or another device without requiring a wireless router or access point. 1 Epson product 2 Computer with a wireless interface 3 Other wireless device Your product automatically selects one of these modes to communicate with your computer or device: Access point...

User Manual
Page 29
Press the arrow buttons to select Wi-Fi Direct Setup and press the OK button. 4. Press the down arrow button, then press the OK button to change the password. 5. Press the home button, if necessary. 2. ... see this screen: 3. Enter your product and computer or other devices without a wireless router or access point. 1. Press the arrow buttons to select Wi-Fi Setup and press the OK button. Note: If you change the Wi-Fi Direct password. Enabling Wi-Fi Direct Mode Parent topic: Wi-Fi Networking Enabling...
Press the arrow buttons to select Wi-Fi Direct Setup and press the OK button. 4. Press the down arrow button, then press the OK button to change the password. 5. Press the home button, if necessary. 2. ... see this screen: 3. Enter your product and computer or other devices without a wireless router or access point. 1. Press the arrow buttons to select Wi-Fi Setup and press the OK button. Note: If you change the Wi-Fi Direct password. Enabling Wi-Fi Direct Mode Parent topic: Wi-Fi Networking Enabling...

User Manual
Page 31
Repeat these steps to exit. Parent topic: Wi-Fi Direct Mode Setup Wi-Fi Protected Setup (WPS) If your network uses a WPS-enabled wireless router or access point, you can quickly connect your product to select the Wi-Fi network name (... topic: Wi-Fi Networking Using WPS to Connect to a Network If you have a WPS-enabled router or access point, you can use Wi-Fi Protected Setup (WPS) to connect your product to your product from your computer or wireless device to the network using Wi-Fi Protected...
Repeat these steps to exit. Parent topic: Wi-Fi Direct Mode Setup Wi-Fi Protected Setup (WPS) If your network uses a WPS-enabled wireless router or access point, you can quickly connect your product to select the Wi-Fi network name (... topic: Wi-Fi Networking Using WPS to Connect to a Network If you have a WPS-enabled router or access point, you can use Wi-Fi Protected Setup (WPS) to connect your product to your product from your computer or wireless device to the network using Wi-Fi Protected...
User Manual
Page 32
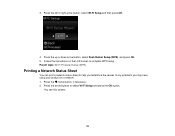
3. Press the up or down arrow button, select Push Button Setup (WPS), and press OK. 5. Follow the instructions on a network. 1. Press the arrow buttons to complete WPS setup. Press the left or right arrow button, select Wi-Fi Setup and then press OK. 4. Press the home button, if necessary. 2. Parent topic: Wi-Fi Protected Setup (WPS) Printing a Network Status Sheet You can print a network status sheet to help you determine the causes of any problems you may have using your product on the LCD screen to select Wi-Fi Setup and press the OK button. You see this screen: 32
3. Press the up or down arrow button, select Push Button Setup (WPS), and press OK. 5. Follow the instructions on a network. 1. Press the arrow buttons to complete WPS setup. Press the left or right arrow button, select Wi-Fi Setup and then press OK. 4. Press the home button, if necessary. 2. Parent topic: Wi-Fi Protected Setup (WPS) Printing a Network Status Sheet You can print a network status sheet to help you determine the causes of any problems you may have using your product on the LCD screen to select Wi-Fi Setup and press the OK button. You see this screen: 32

User Manual
Page 35
.... • Mac OS X: Go to the next step. 2. Do one of your product's SSID (network name) and password, and any network settings selected for the Epson Connect services you may need to solve a problem with your product using the instructions on your network, you change the wireless router you have been..., or install it from the CD that came with your network connection. Press the left or right arrow buttons to select Wi-Fi Setup and press the OK button. Related concepts When to Uninstall Your Product Software Connecting to a New Wi-Fi Router If you change your network connection ...
.... • Mac OS X: Go to the next step. 2. Do one of your product's SSID (network name) and password, and any network settings selected for the Epson Connect services you may need to solve a problem with your product using the instructions on your network, you change the wireless router you have been..., or install it from the CD that came with your network connection. Press the left or right arrow buttons to select Wi-Fi Setup and press the OK button. Related concepts When to Uninstall Your Product Software Connecting to a New Wi-Fi Router If you change your network connection ...
User Manual
Page 73
... OS X Managing Color - Selecting Basic Print Settings - Mac OS X Selecting Printing Preferences - Note: You may need to expand the print window. Mac OS X Selecting Page Setup Settings - See your application's help utility for your screen, the Print option in your product as the Printer setting. 4. Select your application. You see the...
... OS X Managing Color - Selecting Basic Print Settings - Mac OS X Selecting Printing Preferences - Note: You may need to expand the print window. Mac OS X Selecting Page Setup Settings - See your application's help utility for your screen, the Print option in your product as the Printer setting. 4. Select your application. You see the...

User Manual
Page 74
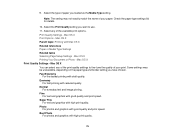
Note: If you do not see these settings in the print window, check for them in your application before printing. Select the Copies and Pages settings as necessary. They may look different, depending on the version of Mac OS X and the application you do not see these settings in the print window, check for them in your application before printing. 6. Select the page setup options: Paper Size and Orientation. Note: The print window may be accessible by selecting Page Setup from the File menu. 74 Note: If you are using. 5.
Note: If you do not see these settings in the print window, check for them in your application before printing. Select the Copies and Pages settings as necessary. They may look different, depending on the version of Mac OS X and the application you do not see these settings in the print window, check for them in your application before printing. 6. Select the page setup options: Paper Size and Orientation. Note: The print window may be accessible by selecting Page Setup from the File menu. 74 Note: If you are using. 5.
User Manual
Page 76
... everyday text and image printing. Super Fine For text and graphics with Mac OS X Related references Paper or Media Type Settings Related tasks Selecting Page Setup Settings - Select the type of your paper. Select the Print Quality setting you want to fine-tune the quality of paper you have chosen. Mac...
... everyday text and image printing. Super Fine For text and graphics with Mac OS X Related references Paper or Media Type Settings Related tasks Selecting Page Setup Settings - Select the type of your paper. Select the Print Quality setting you want to fine-tune the quality of paper you have chosen. Mac...


