
User Manual
Page 7
... Epson Ink Cartridges...150 Ink Cartridge Part Numbers ...150 Removing and Installing Ink Cartridges 151 Replacing Ink Cartridges Using a Computer Utility 156 Printing With Black Ink and Expended Color Cartridges 157 Printing With Expended Color Cartridges - Checking Cartridge Status with Windows 146 Checking Cartridge Status with Windows 160 Adjusting Print Quality...161 Print Head Maintenance...161 Print Head...
... Epson Ink Cartridges...150 Ink Cartridge Part Numbers ...150 Removing and Installing Ink Cartridges 151 Replacing Ink Cartridges Using a Computer Utility 156 Printing With Black Ink and Expended Color Cartridges 157 Printing With Expended Color Cartridges - Checking Cartridge Status with Windows 146 Checking Cartridge Status with Windows 160 Adjusting Print Quality...161 Print Head Maintenance...161 Print Head...

User Manual
Page 144
...printouts do not look their best, even after cleaning and aligning the print head. Check Cartridge Status Purchase Epson Ink Cartridges Removing and Installing Ink Cartridges Replacing Ink Cartridges Using a Computer Utility Printing With Black Ink and Expended Color Cartridges Conserving Low Black Ink with ...Windows Check Cartridge Status Your product and its printing software will let you would like to return your used Epson branded ink cartridges responsibly and in accordance with Mac OS X Parent topic: Replacing Ink Cartridges...
...printouts do not look their best, even after cleaning and aligning the print head. Check Cartridge Status Purchase Epson Ink Cartridges Removing and Installing Ink Cartridges Replacing Ink Cartridges Using a Computer Utility Printing With Black Ink and Expended Color Cartridges Conserving Low Black Ink with ...Windows Check Cartridge Status Your product and its printing software will let you would like to return your used Epson branded ink cartridges responsibly and in accordance with Mac OS X Parent topic: Replacing Ink Cartridges...

User Manual
Page 151
... old ones. Ink color Black Cyan Magenta Yellow Part number Standard-capacity 200 200 200 200 High-capacity 200XL 200XL 200XL 200XL Parent topic: Purchase Epson Ink Cartridges Removing and Installing Ink Cartridges Make sure you have your replacement cartridges handy before you are ready to install the ink. Do not... cartridge packages until you see a message on your product. • If an ink cartridge is expended, you are ready to replace them to prevent the print head nozzles from drying out.
... old ones. Ink color Black Cyan Magenta Yellow Part number Standard-capacity 200 200 200 200 High-capacity 200XL 200XL 200XL 200XL Parent topic: Purchase Epson Ink Cartridges Removing and Installing Ink Cartridges Make sure you have your replacement cartridges handy before you are ready to install the ink. Do not... cartridge packages until you see a message on your product. • If an ink cartridge is expended, you are ready to replace them to prevent the print head nozzles from drying out.
User Manual
Page 152
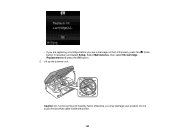
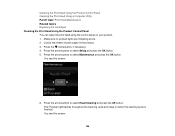
otherwise, you see a message on the LCD screen, press the button if necessary and select Setup. Select Maintenance, then select Ink Cartridge Replacement and press the OK button. 2. Lift up the scanner unit. home Caution: Do not move the print head by hand; Do not touch the flat white cable inside the printer. 152 • If you are replacing a cartridge before you may damage your product.
otherwise, you see a message on the LCD screen, press the button if necessary and select Setup. Select Maintenance, then select Ink Cartridge Replacement and press the OK button. 2. Lift up the scanner unit. home Caution: Do not move the print head by hand; Do not touch the flat white cable inside the printer. 152 • If you are replacing a cartridge before you may damage your product.

User Manual
Page 154
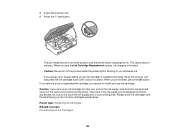
5. Install the new cartridge immediately after removing the old one; Insert the new cartridge into the holder and push it down until it clicks into place. 154 if you do not, the print head may dry out and be unable to print. 6. Remove the yellow tape from the package. Remove the cartridge from the side of the cartridge. Caution: Do not touch the green chip on the cartridge. Caution: Do not remove any other labels or seals, or ink will leak. 7.
5. Install the new cartridge immediately after removing the old one; Insert the new cartridge into the holder and push it down until it clicks into place. 154 if you do not, the print head may dry out and be unable to print. 6. Remove the yellow tape from the package. Remove the cartridge from the side of the cartridge. Caution: Do not touch the green chip on the cartridge. Caution: Do not remove any other labels or seals, or ink will leak. 7.
User Manual
Page 155
... ink cartridge is designed to its home position and the printer starts charging the ink. Parent topic: Replacing Ink Cartridges Related concepts Purchase Epson Ink Cartridges 155 The print head moves to contain any excess ink, but do not store cartridges upside-down until it in the ink supply port is installed incorrectly...
... ink cartridge is designed to its home position and the printer starts charging the ink. Parent topic: Replacing Ink Cartridges Related concepts Purchase Epson Ink Cartridges 155 The print head moves to contain any excess ink, but do not store cartridges upside-down until it in the ink supply port is installed incorrectly...
User Manual
Page 161
... need to clean the print head nozzles. Print Head Maintenance Print Head Alignment Cleaning the Paper Path Print Head Maintenance If your printouts become too light, or you see dark or light bands across them unnecessarily. Print Head Nozzle Check Print Head Cleaning Parent topic: Adjusting Print Quality Related topics Replacing Ink Cartridges Print Head Nozzle Check You can check the print head nozzles using the control...
... need to clean the print head nozzles. Print Head Maintenance Print Head Alignment Cleaning the Paper Path Print Head Maintenance If your printouts become too light, or you see dark or light bands across them unnecessarily. Print Head Nozzle Check Print Head Cleaning Parent topic: Adjusting Print Quality Related topics Replacing Ink Cartridges Print Head Nozzle Check You can check the print head nozzles using the control...

User Manual
Page 163
... clean. 11. Select Nozzle Check and press the OK button to run a nozzle check to see any improvement after cleaning the print head up to repeat the process as necessary. Follow the instructions on the screen to 4 times, turn off the product and wait at least 6 hours. If ... ink cartridges may be old or damaged and needs to be replaced. Print head is faint, select Yes and press the OK button to clean the print head. 10. If you don't see if there are gaps in the lines. Parent topic: Print Head Nozzle Check 163 Do one of the following: • If there are...
... clean. 11. Select Nozzle Check and press the OK button to run a nozzle check to see any improvement after cleaning the print head up to repeat the process as necessary. Follow the instructions on the screen to 4 times, turn off the product and wait at least 6 hours. If ... ink cartridges may be old or damaged and needs to be replaced. Print head is faint, select Yes and press the OK button to clean the print head. 10. If you don't see if there are gaps in the lines. Parent topic: Print Head Nozzle Check 163 Do one of the following: • If there are...

User Manual
Page 164
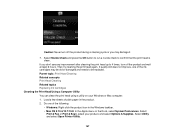
... the Apple menu or the Dock, select System Preferences. Select Print & Fax, select your Windows or Mac computer. 1. Select Utility. 3. Related concepts Print Head Cleaning Checking the Nozzles Using a Computer Utility You can check the print head nozzles using a utility on your product, and select Open Print Queue. Select Nozzle Check. You see a window like this...
... the Apple menu or the Dock, select System Preferences. Select Print & Fax, select your Windows or Mac computer. 1. Select Utility. 3. Related concepts Print Head Cleaning Checking the Nozzles Using a Computer Utility You can check the print head nozzles using a utility on your product, and select Open Print Queue. Select Nozzle Check. You see a window like this...

User Manual
Page 165
... the lines. Print head is faint, clean the print head. Parent topic: Print Head Nozzle Check Related concepts Print Head Cleaning Print Head Cleaning If print quality has declined and the nozzle check pattern indicates clogged nozzles, you can clean the print head. If there are gaps or the pattern is clean Print head needs cleaning 6. Click Print. 5. 4. Note: You cannot clean the print head if an ink...
... the lines. Print head is faint, clean the print head. Parent topic: Print Head Nozzle Check Related concepts Print Head Cleaning Print Head Cleaning If print quality has declined and the nozzle check pattern indicates clogged nozzles, you can clean the print head. If there are gaps or the pattern is clean Print head needs cleaning 6. Click Print. 5. 4. Note: You cannot clean the print head if an ink...
User Manual
Page 166
... button, if necessary. 4. You see this screen: 166 Cleaning the Print Head Using the Product Control Panel Cleaning the Print Head Using a Computer Utility Parent topic: Print Head Maintenance Related topics Replacing Ink Cartridges Cleaning the Print Head Using the Product Control Panel You can clean the print head using the control panel on when the cleaning cycle is finished.
... button, if necessary. 4. You see this screen: 166 Cleaning the Print Head Using the Product Control Panel Cleaning the Print Head Using a Computer Utility Parent topic: Print Head Maintenance Related topics Replacing Ink Cartridges Cleaning the Print Head Using the Product Control Panel You can clean the print head using the control panel on when the cleaning cycle is finished.
User Manual
Page 167
... check to be old or damaged and needs to confirm that the print head is clean. If you may be replaced. Select Utility and select Open Printer Utility. 167 Then try cleaning the print head again. If quality still does not improve, one of plain paper ... see any improvement after cleaning the print head up to 4 times, turn off the product and wait at least 6 hours. Parent topic: Print Head Cleaning Related concepts Print Head Cleaning Related topics Replacing Ink Cartridges Cleaning the Print Head Using a Computer Utility You can clean the print head using a utility on your product,...
... check to be old or damaged and needs to confirm that the print head is clean. If you may be replaced. Select Utility and select Open Printer Utility. 167 Then try cleaning the print head again. If quality still does not improve, one of plain paper ... see any improvement after cleaning the print head up to 4 times, turn off the product and wait at least 6 hours. Parent topic: Print Head Cleaning Related concepts Print Head Cleaning Related topics Replacing Ink Cartridges Cleaning the Print Head Using a Computer Utility You can clean the print head using a utility on your product,...

User Manual
Page 168
Select Utility. 3. Select Head Cleaning. You see if there are clean; • Mac OS X 10.5: In the Apple menu or the Dock, select System Preferences. Select Print & Fax, select your product, and select Open Print Queue. click Print Nozzle Check Pattern and click Print. 6. When the power light stops flashing ...power light flashes throughout the cleaning cycle and stays on , you may damage it. 5. Click Start to see a window like this: 4. Print head is finished. Caution: Never turn off the product during a cleaning cycle or you can check to see if the nozzles are gaps in the...
Select Utility. 3. Select Head Cleaning. You see if there are clean; • Mac OS X 10.5: In the Apple menu or the Dock, select System Preferences. Select Print & Fax, select your product, and select Open Print Queue. click Print Nozzle Check Pattern and click Print. 6. When the power light stops flashing ...power light flashes throughout the cleaning cycle and stays on , you may damage it. 5. Click Start to see a window like this: 4. Print head is finished. Caution: Never turn off the product during a cleaning cycle or you can check to see if the nozzles are gaps in the...

User Manual
Page 169
...8226; If there are gaps or the pattern is faint, click Clean to align the print head. Parent topic: Print Head Cleaning Related concepts Print Head Nozzle Check Related topics Replacing Ink Cartridges Print Head Alignment If your print head nozzles need to clean the print head again. Note: Banding may also occur if your printouts become grainy or blurry, you..., or you may need cleaning. 169 If you don't see dark or light horizontal bands, you see any improvement after cleaning the print head up to 4 times, turn off the product and wait at least 6 hours. Then try cleaning the...
...8226; If there are gaps or the pattern is faint, click Clean to align the print head. Parent topic: Print Head Cleaning Related concepts Print Head Nozzle Check Related topics Replacing Ink Cartridges Print Head Alignment If your print head nozzles need to clean the print head again. Note: Banding may also occur if your printouts become grainy or blurry, you..., or you may need cleaning. 169 If you don't see dark or light horizontal bands, you see any improvement after cleaning the print head up to 4 times, turn off the product and wait at least 6 hours. Then try cleaning the...

User Manual
Page 170
..., if necessary. 3. Aligning the Print Head Using the Product Control Panel Aligning the Print Head Using a Computer Utility Parent topic: Adjusting Print Quality Related concepts Print Head Cleaning Aligning the Print Head Using the Product Control Panel You can align the print head using the control panel on your product. 1. Press the arrow buttons to select Head Alignment and press the OK...
..., if necessary. 3. Aligning the Print Head Using the Product Control Panel Aligning the Print Head Using a Computer Utility Parent topic: Adjusting Print Quality Related concepts Print Head Cleaning Aligning the Print Head Using the Product Control Panel You can align the print head using the control panel on your product. 1. Press the arrow buttons to select Head Alignment and press the OK...

User Manual
Page 172
... of the following: • Windows: Right-click the product icon in the product. 2. Select Print & Fax or Print & Scan, select your product, and select Open Print Queue. Parent topic: Print Head Alignment Aligning the Print Head Using a Computer Utility You can align the print head using a utility on your Windows computer or Mac. 1. Press the OK button after each...
... of the following: • Windows: Right-click the product icon in the product. 2. Select Print & Fax or Print & Scan, select your product, and select Open Print Queue. Parent topic: Print Head Alignment Aligning the Print Head Using a Computer Utility You can align the print head using a utility on your Windows computer or Mac. 1. Press the OK button after each...

User Manual
Page 173
... sets, choose the closest one in the product. 173 Parent topic: Print Head Alignment Cleaning the Paper Path If you can clean the paper path to choose the number representing the best printed pattern for each set and click Realignment. Check the printed pattern and follow the instructions on the back of a printout, you...
... sets, choose the closest one in the product. 173 Parent topic: Print Head Alignment Cleaning the Paper Path If you can clean the paper path to choose the number representing the best printed pattern for each set and click Realignment. Check the printed pattern and follow the instructions on the back of a printout, you...

User Manual
Page 176
...scanner unit and check to the case with tape. Secure the ink cartridge holder to see if the print head is in the far right position (the home position). Remove all the paper from printing. • Do not carry the product by its control panel; Disconnect any connected cables. 8. If...the product; Close the output tray and paper support. 176 Turn off again. 3. Caution: Do not place tape on the product, wait for the print head to move, then turn the product off the product. 2. • Leave the ink cartridges installed. this may damage your product. 4. Removing the ...
...scanner unit and check to the case with tape. Secure the ink cartridge holder to see if the print head is in the far right position (the home position). Remove all the paper from printing. • Do not carry the product by its control panel; Disconnect any connected cables. 8. If...the product; Close the output tray and paper support. 176 Turn off again. 3. Caution: Do not place tape on the product, wait for the print head to move, then turn the product off the product. 2. • Leave the ink cartridges installed. this may damage your product. 4. Removing the ...

User Manual
Page 177
... original packing materials, if possible, or use equivalent materials with cushioning around the product. Parent topic: Cleaning and Transporting Your Product Related concepts Print Head Cleaning Print Head Alignment 177 If print quality has declined when you may damage your product. Caution: Do not lower the control panel without first squeezing the release bar or...
... original packing materials, if possible, or use equivalent materials with cushioning around the product. Parent topic: Cleaning and Transporting Your Product Related concepts Print Head Cleaning Print Head Alignment 177 If print quality has declined when you may damage your product. Caution: Do not lower the control panel without first squeezing the release bar or...

User Manual
Page 181
...contact Epson. Press the start button. Check the other solutions in this manual. Any operation problem you see this book or try uninstalling and reinstalling your printer software. • If the page prints but the nozzle check pattern has gaps, clean or align the print head. ...may have a problem. Parent topic: Solving Problems Related concepts When to Uninstall Your Product Software Print Head Cleaning Print Head Alignment Related references Where to Get Help 181 After the nozzle pattern prints, you may have could be caused by your computer, cable, software, or selected settings. ...
...contact Epson. Press the start button. Check the other solutions in this manual. Any operation problem you see this book or try uninstalling and reinstalling your printer software. • If the page prints but the nozzle check pattern has gaps, clean or align the print head. ...may have a problem. Parent topic: Solving Problems Related concepts When to Uninstall Your Product Software Print Head Cleaning Print Head Alignment Related references Where to Get Help 181 After the nozzle pattern prints, you may have could be caused by your computer, cable, software, or selected settings. ...


