Printer Basics
Page 12
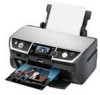
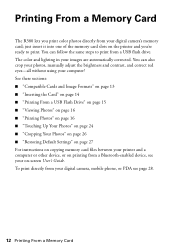
Printing From a Memory Card The R380 lets you 're ready to print from your digital camera's memory card; You can also crop your photos, manually adjust the brightness and contrast, and correct red eyes-all without using your computer! The color and lighting in your on the printer and you print color photos directly from a USB flash drive...
Printing From a Memory Card The R380 lets you 're ready to print from your digital camera's memory card; You can also crop your photos, manually adjust the brightness and contrast, and correct red eyes-all without using your computer! The color and lighting in your on the printer and you print color photos directly from a USB flash drive...
Printer Basics
Page 19
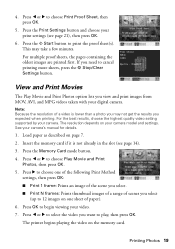
... depends on the memory card. Insert the memory card if it is lower than a photo you select (up to play, then press OK. If you want to 12 images on page 7. 2. See your video. 7. The printer begins playing the video on your camera. 4. Press l or r to print the ...proof sheet(s). Press OK to choose Print Proof Sheet, then press OK. 5. Press l or r to begin viewing your camera's manual for details. 1. For multiple proof sheets, the pages ...
... depends on the memory card. Insert the memory card if it is lower than a photo you select (up to play, then press OK. If you want to 12 images on page 7. 2. See your video. 7. The printer begins playing the video on your camera. 4. Press l or r to print the ...proof sheet(s). Press OK to choose Print Proof Sheet, then press OK. 5. Press l or r to begin viewing your camera's manual for details. 1. For multiple proof sheets, the pages ...
Printer Basics
Page 20
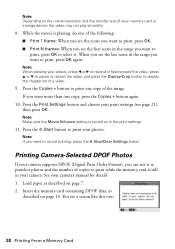
...Settings button. Insert the memory card containing DPOF data, as described on page 7. 2. Note: When viewing your camera's manual for details. 1. When you see page 21), then press OK. Printing Camera-Selected DPOF Photos If your camera supports DPOF (Digital Print Order Format), you want to print, press OK. ■ Print N ... on the movie resolution and the transfer rate of your camera. You see the first scene in the range you can use it to preselect photos and the number of the following: ■ Print 1 frame: When you see the scene you want to print, press OK to print while ...
...Settings button. Insert the memory card containing DPOF data, as described on page 7. 2. Note: When viewing your camera's manual for details. 1. When you see page 21), then press OK. Printing Camera-Selected DPOF Photos If your camera supports DPOF (Digital Print Order Format), you want to print, press OK. ■ Print N ... on the movie resolution and the transfer rate of your camera. You see the first scene in the range you can use it to preselect photos and the number of the following: ■ Print 1 frame: When you see the scene you want to print, press OK to print while ...
Printer Basics
Page 25
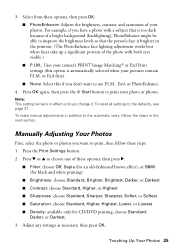
... the person's face is brighter in addition to print your photos. To make manual adjustments in the printout. (The PhotoEnhance face lighting adjustment works best when faces take up a significant portion of the photo with both eyes visible.) ■ P.I.M.: Uses your camera's... background (backlighting), PhotoEnhance might be able to print, then follow the steps in effect until you want to use P.I .M. Manually Adjusting Your Photos First, select the photo or photos you change it. Press d or u to the defaults, see page 27. 3. Select from these options, then press r....
... the person's face is brighter in addition to print your photos. To make manual adjustments in the printout. (The PhotoEnhance face lighting adjustment works best when faces take up a significant portion of the photo with both eyes visible.) ■ P.I.M.: Uses your camera's... background (backlighting), PhotoEnhance might be able to print, then follow the steps in effect until you want to use P.I .M. Manually Adjusting Your Photos First, select the photo or photos you change it. Press d or u to the defaults, see page 27. 3. Select from these options, then press r....
Printer Basics
Page 29
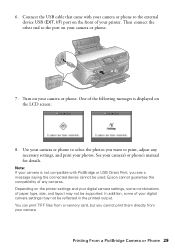
...the port on your camera or phone. I/F) port on the LCD screen: 8. Turn on your photos. Use your camera or phone to print, adjust any cameras. Printing From a PictBridge Camera or Phone...can print TIFF files from a memory card, but you want to select the photos you cannot print them directly from your printer. Connect the USB cable that came with PictBridge or USB Direct Print, you see... be used. Then connect the other end to the external device USB (EXT. Depending on the printer settings and your camera is displayed on the front of paper type, size, and layout may not...
...the port on your camera or phone. I/F) port on the LCD screen: 8. Turn on your photos. Use your camera or phone to print, adjust any cameras. Printing From a PictBridge Camera or Phone...can print TIFF files from a memory card, but you want to select the photos you cannot print them directly from your printer. Connect the USB cable that came with PictBridge or USB Direct Print, you see... be used. Then connect the other end to the external device USB (EXT. Depending on the printer settings and your camera is displayed on the front of paper type, size, and layout may not...
Printer Basics
Page 30
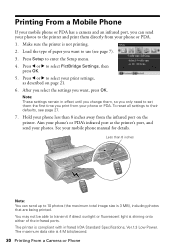
...settings to select your mobile phone manual for details. Load the type of the infrared ports. Press l or r to their defaults, see page 7). 3. After you select the settings you want , press OK. Hold your photos. Aim your phone's or PDA's infrared port at the printer's port, and send your ...phone less than 8 inches Note: You can send your photos to the printer and print them the first time you print from your phone or PDA...
...settings to select your mobile phone manual for details. Load the type of the infrared ports. Press l or r to their defaults, see page 7). 3. After you select the settings you want , press OK. Hold your photos. Aim your phone's or PDA's infrared port at the printer's port, and send your ...phone less than 8 inches Note: You can send your photos to the printer and print them the first time you print from your phone or PDA...
Product Information Guide
Page 7
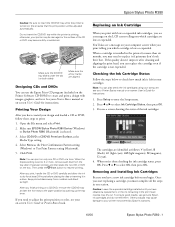
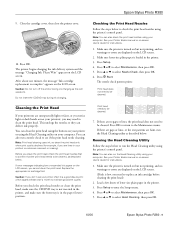
...to adjust the print position or color, see a message on only one session. see a screen showing the status of the CD or DVD may be adjusted automatically. Epson Stylus Photo R380 Caution: Be sure to the paper position by Epson's warranty. 10/06 Epson Stylus Photo R380 - 7 Note: You can replace...identified as follows: Y (yellow), B (black), LC (light cyan), LM (light magenta), M (magenta), C (cyan). 4. You see your Printer Basics manual or on the tray. Once you start replacing a cartridge, you begin. When you finish printing on a CD/DVD, remove the CD/DVD tray ...
...to adjust the print position or color, see a message on only one session. see a screen showing the status of the CD or DVD may be adjusted automatically. Epson Stylus Photo R380 Caution: Be sure to the paper position by Epson's warranty. 10/06 Epson Stylus Photo R380 - 7 Note: You can replace...identified as follows: Y (yellow), B (black), LC (light cyan), LM (light magenta), M (magenta), C (cyan). 4. You see your Printer Basics manual or on the tray. Once you start replacing a cartridge, you begin. When you finish printing on a CD/DVD, remove the CD/DVD tray ...
Product Information Guide
Page 9
...the CD/DVD tray is not inserted in the printer, and make sure the front tray is in your printout or colors are displayed on your computer. Before you clean...be cleaned. See your Printer Basics manual or on the LCD screen. 2. Make sure the printer is complete" appears on -screen User's Guide for instructions. 1. Press Start. See your Printer Basics manual or on the LCD ... the print head using the buttons on your printer or using your computer. Press Setup. 4. Press Setup to select Head Cleaning, then press OK. 10/06 Epson Stylus Photo R380 - 9 Press OK to return to select...
...the CD/DVD tray is not inserted in the printer, and make sure the front tray is in your printout or colors are displayed on your computer. Before you clean...be cleaned. See your Printer Basics manual or on the LCD screen. 2. Make sure the printer is complete" appears on -screen User's Guide for instructions. 1. Press Start. See your Printer Basics manual or on the LCD ... the print head using the buttons on your printer or using your computer. Press Setup. 4. Press Setup to select Head Cleaning, then press OK. 10/06 Epson Stylus Photo R380 - 9 Press OK to return to select...
Product Information Guide
Page 10
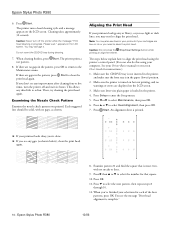
...the print head again. 10 - Press r then u or d to align the print head using the printer's control panel. (You can also do this using your printouts look grainy or blurry, or you see ...Printer Basics manual or on the LCD screen. Press Start. Each staggered line should be solid, with no gaps, as shown below explain how to select the number for each of the four patterns, press OK. You see any dried ink to select Maintenance, then press OK. 6. Epson Stylus Photo R380... your cartridges are gaps in progress. Epson Stylus Photo R380 8. When cleaning finishes, press Start.
...the print head again. 10 - Press r then u or d to align the print head using the printer's control panel. (You can also do this using your printouts look grainy or blurry, or you see ...Printer Basics manual or on the LCD screen. Press Start. Each staggered line should be solid, with no gaps, as shown below explain how to select the number for each of the four patterns, press OK. You see any dried ink to select Maintenance, then press OK. 6. Epson Stylus Photo R380... your cartridges are gaps in progress. Epson Stylus Photo R380 8. When cleaning finishes, press Start.

