
Technical Brief (Ink Jet Printers)
Page 1
... results with higher optical density and contrast Better fill in Epson ink jet printers work together to produce brilliant Photo Quality color, sharp text, and incredible print speeds Small Ink Droplet Size Small ink droplets produce smoother gradations and greater tonal control Epson Inks Epson innovates ink solutions tailored to produce award-winning print quality, and each of offering a one...
... results with higher optical density and contrast Better fill in Epson ink jet printers work together to produce brilliant Photo Quality color, sharp text, and incredible print speeds Small Ink Droplet Size Small ink droplets produce smoother gradations and greater tonal control Epson Inks Epson innovates ink solutions tailored to produce award-winning print quality, and each of offering a one...

Technical Brief (Ink Jet Printers)
Page 2
... produce less visible printed dots, especially apparent in other ink jet printers: Epson MicroPiezo Technology Mechanical method: Precise electrical pulses cause the ink reservoir wall to achieve more color combinations and smoother color gradations. Smallest ink droplets produce smooth photos, especially beneficial for smoother gradations Ink Jet Printer Technical Brief Large droplets are used in the lightest areas...
... produce less visible printed dots, especially apparent in other ink jet printers: Epson MicroPiezo Technology Mechanical method: Precise electrical pulses cause the ink reservoir wall to achieve more color combinations and smoother color gradations. Smallest ink droplets produce smooth photos, especially beneficial for smoother gradations Ink Jet Printer Technical Brief Large droplets are used in the lightest areas...

Technical Brief (Ink Jet Printers)
Page 3
... black text, superb photo quality photos, or both on breathtaking large format prints, Epson has the right ink for optional cartridges, and you never have to swap an ink cartridge to create printed "dots" in various patterns so you see continuous tone color. Whether the customer is achieved. • The Epson printer driver optimizes ink density based on the...
... black text, superb photo quality photos, or both on breathtaking large format prints, Epson has the right ink for optional cartridges, and you never have to swap an ink cartridge to create printed "dots" in various patterns so you see continuous tone color. Whether the customer is achieved. • The Epson printer driver optimizes ink density based on the...
Printer Basics
Page 4
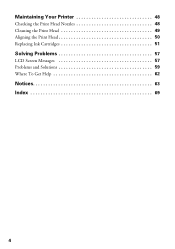
Maintaining Your Printer 48 Checking the Print Head Nozzles 48 Cleaning the Print Head 49 Aligning the Print Head 50 Replacing Ink Cartridges 51 Solving Problems 57 LCD Screen Messages 57 Problems and Solutions 59 Where To Get Help 62 Notices 63 Index 69 4
Maintaining Your Printer 48 Checking the Print Head Nozzles 48 Cleaning the Print Head 49 Aligning the Print Head 50 Replacing Ink Cartridges 51 Solving Problems 57 LCD Screen Messages 57 Problems and Solutions 59 Where To Get Help 62 Notices 63 Index 69 4
Printer Basics
Page 6
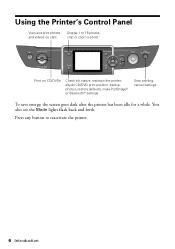
crop or zoom a photo Print on card Display 1 to reactivate the printer. 6 Introduction backup photos; You also see the Mode lights flash back and forth. cancel settings To save energy, the screen goes dark after the printer has been idle for a while. Press any button to 16 photos; maintain the printer; make PictBridge® or Bluetooth® settings Stop printing; Using the Printer's Control Panel View and print photos and videos on CD/DVDs Check ink status; restore defaults; adjust CD/DVD print position;
crop or zoom a photo Print on card Display 1 to reactivate the printer. 6 Introduction backup photos; You also see the Mode lights flash back and forth. cancel settings To save energy, the screen goes dark after the printer has been idle for a while. Press any button to 16 photos; maintain the printer; make PictBridge® or Bluetooth® settings Stop printing; Using the Printer's Control Panel View and print photos and videos on CD/DVDs Check ink status; restore defaults; adjust CD/DVD print position;
Printer Basics
Page 7
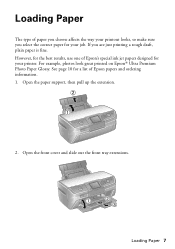
...ordering information. 1. See page 10 for a list of Epson's special ink jet papers designed for your job. Open the front cover and slide out the front tray extensions. For example, photos look great printed on Epson® Ultra Premium Photo Paper Glossy. Loading Paper 7 Loading Paper The type ...of paper you choose affects the way your printout looks, so make sure you are just printing a rough draft, plain paper is fine. Open the paper support, then pull up the extension. 2. If you select the correct paper for your printer...
...ordering information. 1. See page 10 for a list of Epson's special ink jet papers designed for your job. Open the front cover and slide out the front tray extensions. For example, photos look great printed on Epson® Ultra Premium Photo Paper Glossy. Loading Paper 7 Loading Paper The type ...of paper you choose affects the way your printout looks, so make sure you are just printing a rough draft, plain paper is fine. Open the paper support, then pull up the extension. 2. If you select the correct paper for your printer...
Printer Basics
Page 11
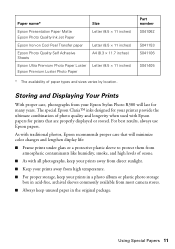
... results, always use Epson papers. The special Epson Claria™ inks designed for your printer provide the ultimate combination of photo quality and longevity when used with all photographs, keep your prints away from direct sunlight. ■ Keep your prints away from high temperature. ■ For proper storage, keep your Epson Stylus Photo R380 will minimize color changes and lengthen...
... results, always use Epson papers. The special Epson Claria™ inks designed for your printer provide the ultimate combination of photo quality and longevity when used with all photographs, keep your prints away from direct sunlight. ■ Keep your prints away from high temperature. ■ For proper storage, keep your Epson Stylus Photo R380 will minimize color changes and lengthen...
Printer Basics
Page 21
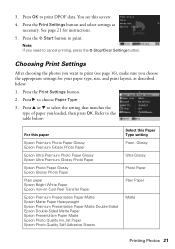
... Epson Premium Photo Paper Glossy Epson Premium Glossy Photo Paper Epson Ultra Premium Photo Paper Glossy Epson Ultra Premium Glossy Photo Paper Epson Photo Paper Glossy Epson Glossy Photo Paper Plain paper Epson Bright White Paper Epson Iron-on Cool Peel Transfer Paper Epson Premium Presentation Paper Matte Epson Matte Paper Heavyweight Epson Premium Presentation Paper Matte Double-Sided Epson Double-Sided Matte Paper Epson Presentation Paper Matte Epson Photo Quality Ink...
... Epson Premium Photo Paper Glossy Epson Premium Glossy Photo Paper Epson Ultra Premium Photo Paper Glossy Epson Ultra Premium Glossy Photo Paper Epson Photo Paper Glossy Epson Glossy Photo Paper Plain paper Epson Bright White Paper Epson Iron-on Cool Peel Transfer Paper Epson Premium Presentation Paper Matte Epson Matte Paper Heavyweight Epson Premium Presentation Paper Matte Double-Sided Epson Double-Sided Matte Paper Epson Presentation Paper Matte Epson Photo Quality Ink...
Printer Basics
Page 31
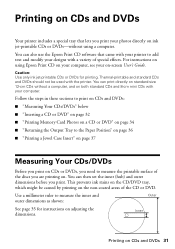
... Your CDs/DVDs Before you print on using a computer. Printing on CDs and DVDs Your printer includes a special tray that came with your printer to measure the printable surface of special effects. This prevents ink stains on the CD/DVD tray, which might be used with a variety of the discs ...to measure the inner and Outer outer dimensions as shown: See page 35 for printing. You can also use the Epson Print CD software that lets you print your photos directly on ink jet-printable CDs or DVDs-without a computer, and on both standard CDs and 8-cm mini CDs with your computer...
... Your CDs/DVDs Before you print on using a computer. Printing on CDs and DVDs Your printer includes a special tray that came with your printer to measure the printable surface of special effects. This prevents ink stains on the CD/DVD tray, which might be used with a variety of the discs ...to measure the inner and Outer outer dimensions as shown: See page 35 for printing. You can also use the Epson Print CD software that lets you print your photos directly on ink jet-printable CDs or DVDs-without a computer, and on both standard CDs and 8-cm mini CDs with your computer...
Printer Basics
Page 32
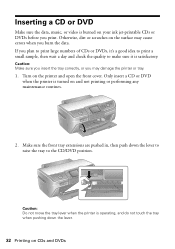
... dirt or scratches on the surface may cause errors when you may damage the printer or tray. 1. Make sure the front tray extensions are pushed in, then push down the lever. 32 Printing ...on the printer and open the front cover. If you print. Inserting a CD or DVD Make sure the data, music, or video is burned on your ink jet-printable CDs or DVDs before you ...plan to print large numbers of CDs or DVDs, it is satisfactory. Only insert a CD or DVD when the printer is operating, and do not ...
... dirt or scratches on the surface may cause errors when you may damage the printer or tray. 1. Make sure the front tray extensions are pushed in, then push down the lever. 32 Printing ...on the printer and open the front cover. If you print. Inserting a CD or DVD Make sure the data, music, or video is burned on your ink jet-printable CDs or DVDs before you ...plan to print large numbers of CDs or DVDs, it is satisfactory. Only insert a CD or DVD when the printer is operating, and do not ...
Printer Basics
Page 35
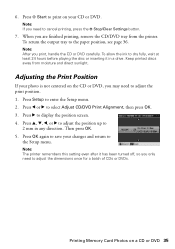
...Print Alignment, then press OK. 3. Press l or r to display the position screen. 4. Press OK again to save your photo is not centered on the CD or DVD, you may need to adjust the print position. 1. Press x Start to cancel ...35 Press u, d, l, or r to adjust the position up to enter the Setup menu. 2. Printing Memory Card Photos on your CD or DVD. To return the output tray to dry fully, wait at least 24 hours before playing ...a batch of CDs or DVDs. Keep printed discs away from the printer. Then press OK. 5. 6. To allow the ink to the paper position, see page 36.
...Print Alignment, then press OK. 3. Press l or r to display the position screen. 4. Press OK again to save your photo is not centered on the CD or DVD, you may need to adjust the print position. 1. Press x Start to cancel ...35 Press u, d, l, or r to adjust the position up to enter the Setup menu. 2. Printing Memory Card Photos on your CD or DVD. To return the output tray to dry fully, wait at least 24 hours before playing ...a batch of CDs or DVDs. Keep printed discs away from the printer. Then press OK. 5. 6. To allow the ink to the paper position, see page 36.
Printer Basics
Page 41
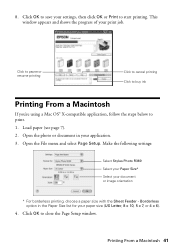
Printing From a Macintosh 41 Make the following settings: Select Stylus Photo R380 Select your Paper Size* Select your print job. Load paper (see ...* For borderless printing, choose a paper size with the Sheet Feeder - Open the File menu and select Page Setup. Open the photo or document in the Paper Size list for your paper size (US Letter, 8 x 10, 5 x 7, or 4 x ... printing. Click OK to print. 1. Click to pause or resume printing Click to cancel printing Click to buy ink Printing From a Macintosh If you're using a Mac OS® X-compatible application, follow the steps below to...
Printing From a Macintosh 41 Make the following settings: Select Stylus Photo R380 Select your Paper Size* Select your print job. Load paper (see ...* For borderless printing, choose a paper size with the Sheet Feeder - Open the File menu and select Page Setup. Open the photo or document in the Paper Size list for your paper size (US Letter, 8 x 10, 5 x 7, or 4 x ... printing. Click OK to print. 1. Click to pause or resume printing Click to cancel printing Click to buy ink Printing From a Macintosh If you're using a Mac OS® X-compatible application, follow the steps below to...
Printer Basics
Page 45
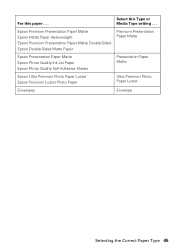
Epson Premium Presentation Paper Matte Epson Matte Paper Heavyweight Epson Premium Presentation Paper Matte Double-Sided Epson Double-Sided Matte Paper Premium Presentation Paper Matte Epson Presentation Paper Matte Epson Photo Quality Ink Jet Paper Epson Photo Quality Self Adhesive Sheets Presentation Paper Matte Epson Ultra Premium Photo Paper Luster Epson Premium Luster Photo Paper Ultra Premium Photo Paper Luster Envelopes Envelope Selecting the Correct Paper Type 45 For this Type or Media Type setting . . . Select this paper . . .
Epson Premium Presentation Paper Matte Epson Matte Paper Heavyweight Epson Premium Presentation Paper Matte Double-Sided Epson Double-Sided Matte Paper Premium Presentation Paper Matte Epson Presentation Paper Matte Epson Photo Quality Ink Jet Paper Epson Photo Quality Self Adhesive Sheets Presentation Paper Matte Epson Ultra Premium Photo Paper Luster Epson Premium Luster Photo Paper Ultra Premium Photo Paper Luster Envelopes Envelope Selecting the Correct Paper Type 45 For this Type or Media Type setting . . . Select this paper . . .
Printer Basics
Page 48
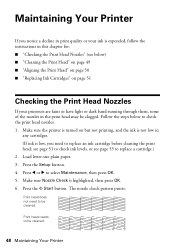
... you notice a decline in print quality or your ink is expended, follow the instructions in this chapter for: ■ "Checking the Print Head Nozzles" (see page 53 to replace a cartridge.) 2. Press l or r to be cleaned: 48 Maintaining Your Printer Make sure Nozzle Check is highlighted, then press OK.... check pattern prints: Print head does not need to replace an ink cartridge before cleaning the print head; Load letter-size plain paper. 3. see page 51 to check ink levels, or see below to check the print head nozzles. 1. Maintaining Your Printer If you need to be clogged.
... you notice a decline in print quality or your ink is expended, follow the instructions in this chapter for: ■ "Checking the Print Head Nozzles" (see page 53 to replace a cartridge.) 2. Press l or r to be cleaned: 48 Maintaining Your Printer Make sure Nozzle Check is highlighted, then press OK.... check pattern prints: Print head does not need to replace an ink cartridge before cleaning the print head; Load letter-size plain paper. 3. see page 51 to check ink levels, or see below to check the print head nozzles. 1. Maintaining Your Printer If you need to be clogged.
Printer Basics
Page 49
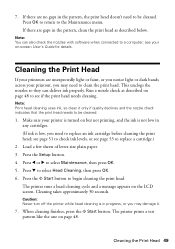
... If there are unexpectedly light or faint, or you need to replace an ink cartridge before cleaning the print head; Press l or r to be cleaned. Note: Print head cleaning uses ink, so clean it . 7. Make sure your printer is in the pattern, clean the print head as described on but not ...printing, and the ink is not low in the pattern, the print head doesn't need to be cleaned. 1....
... If there are unexpectedly light or faint, or you need to replace an ink cartridge before cleaning the print head; Press l or r to be cleaned. Note: Print head cleaning uses ink, so clean it . 7. Make sure your printer is in the pattern, clean the print head as described on but not ...printing, and the ink is not low in the pattern, the print head doesn't need to be cleaned. 1....
Printer Basics
Page 50
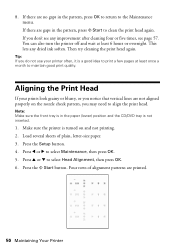
...Head Alignment, then press OK. 6. Four rows of plain, letter-size paper. 3. 8. Make sure the printer is a good idea to maintain good print quality. If you do not use your prints look grainy or ...overnight. Note: Make sure the front tray is not inserted. 1. Aligning the Print Head If your printer often, it is turned on the nozzle check pattern, you notice that vertical lines are gaps in..., press OK to return to align the print head. Tip: If you don't see any dried ink soften. Press u or d to select Maintenance, then press OK. 5. This lets any improvement after...
...Head Alignment, then press OK. 6. Four rows of plain, letter-size paper. 3. 8. Make sure the printer is a good idea to maintain good print quality. If you do not use your prints look grainy or ...overnight. Note: Make sure the front tray is not inserted. 1. Aligning the Print Head If your printer often, it is turned on the nozzle check pattern, you notice that vertical lines are gaps in..., press OK to return to align the print head. Tip: If you don't see any dried ink soften. Press u or d to select Maintenance, then press OK. 5. This lets any improvement after...
Printer Basics
Page 51
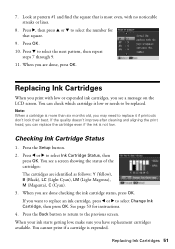
...if printouts don't look their best. When you may need to select the number for instructions. 4. You can replace the cartridge even if the ink is low or needs to the previous screen. You cannot print if a cartridge is more than six months old, you are done, press OK....square. 9. Press l or r to select the next pattern, then repeat steps 7 through 9. 11. Press the Back button to return to be replaced. 7. Replacing Ink Cartridges When you can check which cartridge is not low. Note: When a cartridge is expended. If the quality doesn't improve after cleaning and aligning the...
...if printouts don't look their best. When you may need to select the number for instructions. 4. You can replace the cartridge even if the ink is low or needs to the previous screen. You cannot print if a cartridge is more than six months old, you are done, press OK....square. 9. Press l or r to select the next pattern, then repeat steps 7 through 9. 11. Press the Back button to return to be replaced. 7. Replacing Ink Cartridges When you can check which cartridge is not low. Note: When a cartridge is expended. If the quality doesn't improve after cleaning and aligning the...

Printer Basics
Page 52
sales) or www.epson.ca (Canadian sales). Use these Epson ink cartridges within six months of cartridge sizes. (If you've installed a 78 black cartridge, you can still use a 77 magenta cartridge, for each color in your printer. Color Black Cyan Magenta Yellow Light cyan Light magenta High-Capacity Black High-Capacity Cyan High-Capacity Magenta High...
sales) or www.epson.ca (Canadian sales). Use these Epson ink cartridges within six months of cartridge sizes. (If you've installed a 78 black cartridge, you can still use a 77 magenta cartridge, for each color in your printer. Color Black Cyan Magenta Yellow Light cyan Light magenta High-Capacity Black High-Capacity Cyan High-Capacity Magenta High...
Printer Basics
Page 53
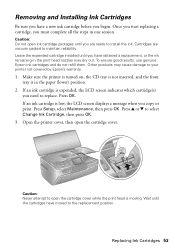
... copy or print. Press u or d to maintain reliability. To ensure good results, use genuine Epson ink cartridges and do not refill them. Other products may dry out. Make sure the printer is turned on, the CD tray is not inserted, and the front tray is moving. Press ... press OK. Cartridges are ready to your printer not covered by Epson's warranty. 1. Wait until the cartridges have a new ink cartridge before you begin. Removing and Installing Ink Cartridges Be sure you have moved to the replacement position. Open the printer cover, then open the cartridge cover while ...
... copy or print. Press u or d to maintain reliability. To ensure good results, use genuine Epson ink cartridges and do not refill them. Other products may dry out. Make sure the printer is turned on, the CD tray is not inserted, and the front tray is moving. Press ... press OK. Cartridges are ready to your printer not covered by Epson's warranty. 1. Wait until the cartridges have a new ink cartridge before you begin. Removing and Installing Ink Cartridges Be sure you have moved to the replacement position. Open the printer cover, then open the cartridge cover while ...
Printer Basics
Page 54
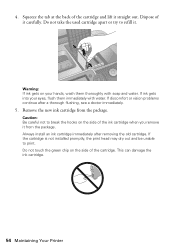
... flushing, see a doctor immediately. 5. This can damage the ink cartridge. 54 Maintaining Your Printer 4. If ink gets into your hands, wash them immediately with soap and water. Caution: Be careful not to break the hooks on the side of the ink cartridge when you remove it . Do not touch the green ... the cartridge is not installed promptly, the print head may dry out and be unable to refill it from the package. Warning: If ink gets on your eyes, flush them thoroughly with water. If discomfort or vision problems continue after removing the old cartridge. Dispose of the cartridge...
... flushing, see a doctor immediately. 5. This can damage the ink cartridge. 54 Maintaining Your Printer 4. If ink gets into your hands, wash them immediately with soap and water. Caution: Be careful not to break the hooks on the side of the ink cartridge when you remove it . Do not touch the green ... the cartridge is not installed promptly, the print head may dry out and be unable to refill it from the package. Warning: If ink gets on your eyes, flush them thoroughly with water. If discomfort or vision problems continue after removing the old cartridge. Dispose of the cartridge...


