
Technical Brief (Ink Jet Printers)
Page 1
...;c users instead of these core printing technologies is equally important in Epson ink jet printers work together to produce brilliant Photo Quality color, sharp text, and incredible print speeds Small Ink Droplet Size Small ink droplets produce smoother gradations and greater tonal control Epson Inks Epson innovates ink solutions tailored to produce award-winning print quality...
...;c users instead of these core printing technologies is equally important in Epson ink jet printers work together to produce brilliant Photo Quality color, sharp text, and incredible print speeds Small Ink Droplet Size Small ink droplets produce smoother gradations and greater tonal control Epson Inks Epson innovates ink solutions tailored to produce award-winning print quality...

Technical Brief (Ink Jet Printers)
Page 2
... "dots" • Large ink droplets are increased Epson printers use high-precision mechanical pumps to create a larger color palette. Here's how it compares to thermal ink jet technology, used in photos and laser sharp text. Resistor Ink Bubble Nozzle Droplet Some thermal printers produce more color combinations and smoother color gradations. Additionally, smaller ink droplets produce less...
... "dots" • Large ink droplets are increased Epson printers use high-precision mechanical pumps to create a larger color palette. Here's how it compares to thermal ink jet technology, used in photos and laser sharp text. Resistor Ink Bubble Nozzle Droplet Some thermal printers produce more color combinations and smoother color gradations. Additionally, smaller ink droplets produce less...

Technical Brief (Ink Jet Printers)
Page 3
..., or is most efficient pattern for optional cartridges, and you see continuous tone color. Epson printers use an advanced error diffusion technology to get sharp black text, superb photo quality photos, or both on breathtaking large format prints, Epson has the right ink for identification purposes only and may be trademarks of...
..., or is most efficient pattern for optional cartridges, and you see continuous tone color. Epson printers use an advanced error diffusion technology to get sharp black text, superb photo quality photos, or both on breathtaking large format prints, Epson has the right ink for identification purposes only and may be trademarks of...
Printer Basics
Page 3
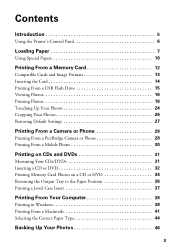
... Introduction 5 Using the Printer's Control Panel 6 Loading Paper 7 Using Special Papers 10 Printing From a Memory Card 12 Compatible Cards and Image Formats 13 Inserting the Card 14 Printing From a USB Flash Drive 15 Viewing Photos 16 Printing Photos 16 Touching Up Your Photos 24 Cropping Your Photos 26 Restoring Default Settings ... a Mobile Phone 30 Printing on CDs and DVDs 31 Measuring Your CDs/DVDs 31 Inserting a CD or DVD 32 Printing Memory Card Photos on a CD or DVD 34 Returning the Output Tray to the Paper Position 36 Printing a Jewel Case Insert 37 Printing From Your ...
... Introduction 5 Using the Printer's Control Panel 6 Loading Paper 7 Using Special Papers 10 Printing From a Memory Card 12 Compatible Cards and Image Formats 13 Inserting the Card 14 Printing From a USB Flash Drive 15 Viewing Photos 16 Printing Photos 16 Touching Up Your Photos 24 Cropping Your Photos 26 Restoring Default Settings ... a Mobile Phone 30 Printing on CDs and DVDs 31 Measuring Your CDs/DVDs 31 Inserting a CD or DVD 32 Printing Memory Card Photos on a CD or DVD 34 Returning the Output Tray to the Paper Position 36 Printing a Jewel Case Insert 37 Printing From Your ...
Printer Basics
Page 5
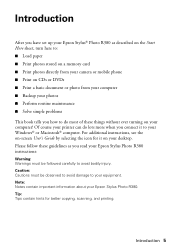
... ever turning on -screen User's Guide by selecting the icon for better copying, scanning, and printing. Note: Notes contain important information about your Epson Stylus Photo R380. Tip: Tips contain hints for it to your Windows® or Macintosh® computer. Caution: Cautions must be observed to avoid damage to... avoid bodily injury. For additional instructions, see the on your computer! Of course your printer can do most of these guidelines as described on the Start Here sheet, turn here to: ■ Load paper ■ Print...
... ever turning on -screen User's Guide by selecting the icon for better copying, scanning, and printing. Note: Notes contain important information about your Epson Stylus Photo R380. Tip: Tips contain hints for it to your Windows® or Macintosh® computer. Caution: Cautions must be observed to avoid damage to... avoid bodily injury. For additional instructions, see the on your computer! Of course your printer can do most of these guidelines as described on the Start Here sheet, turn here to: ■ Load paper ■ Print...
Printer Basics
Page 6
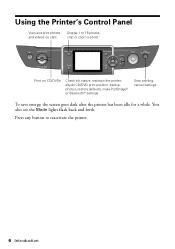
crop or zoom a photo Print on card Display 1 to reactivate the printer. 6 Introduction cancel settings To save energy, the screen goes dark after the printer has been idle for a while. Press any button to 16 photos; maintain the printer; make PictBridge® or Bluetooth® settings Stop printing; backup photos; restore defaults; You also see the Mode lights flash back and forth. adjust CD/DVD print position; Using the Printer's Control Panel View and print photos and videos on CD/DVDs Check ink status;
crop or zoom a photo Print on card Display 1 to reactivate the printer. 6 Introduction cancel settings To save energy, the screen goes dark after the printer has been idle for a while. Press any button to 16 photos; maintain the printer; make PictBridge® or Bluetooth® settings Stop printing; backup photos; restore defaults; You also see the Mode lights flash back and forth. adjust CD/DVD print position; Using the Printer's Control Panel View and print photos and videos on CD/DVDs Check ink status;
Printer Basics
Page 7
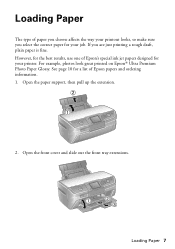
... front tray extensions. Open the paper support, then pull up the extension. 2. See page 10 for a list of Epson's special ink jet papers designed for the best results, use one of Epson papers and ordering information. 1. Loading Paper 7 For example, photos look great printed on Epson® Ultra Premium Photo Paper Glossy. However, for your printer.
... front tray extensions. Open the paper support, then pull up the extension. 2. See page 10 for a list of Epson's special ink jet papers designed for the best results, use one of Epson papers and ordering information. 1. Loading Paper 7 For example, photos look great printed on Epson® Ultra Premium Photo Paper Glossy. However, for your printer.
Printer Basics
Page 11
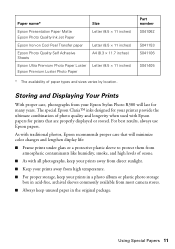
... temperature. ■ For proper storage, keep your printer provide the ultimate combination of paper types and sizes varies by location. Using Special Papers 11 Part number S041062 S041153 S041106 S041405 Storing and Displaying Your Prints With proper care, photographs from your Epson Stylus Photo R380 will minimize color changes and lengthen display life: ■ Frame prints...
... temperature. ■ For proper storage, keep your printer provide the ultimate combination of paper types and sizes varies by location. Using Special Papers 11 Part number S041062 S041153 S041106 S041405 Storing and Displaying Your Prints With proper care, photographs from your Epson Stylus Photo R380 will minimize color changes and lengthen display life: ■ Frame prints...
Printer Basics
Page 12
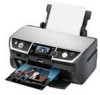
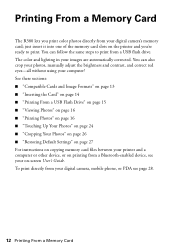
Printing From a Memory Card The R380 lets you 're ready to print from your digital camera, mobile phone, or PDA see your on-screen User's Guide. The color and lighting in your computer! See these sections: ■ "Compatible Cards and Image Formats" on page 13 ■ "Inserting the ... 26 ■ "Restoring Default Settings" on page 27 For instructions on copying memory card files between your printer and a computer or other device, or on the printer and you print color photos directly from a Bluetooth-enabled device, see page 28. 12 Printing From a Memory Card You can follow ...
Printing From a Memory Card The R380 lets you 're ready to print from your digital camera, mobile phone, or PDA see your on-screen User's Guide. The color and lighting in your computer! See these sections: ■ "Compatible Cards and Image Formats" on page 13 ■ "Inserting the ... 26 ■ "Restoring Default Settings" on page 27 For instructions on copying memory card files between your printer and a computer or other device, or on the printer and you print color photos directly from a Bluetooth-enabled device, see page 28. 12 Printing From a Memory Card You can follow ...
Printer Basics
Page 15
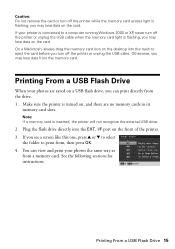
...card. You can print directly from , then press OK. 4. you may lose data on the front of the printer. 3. Otherwise, you may lose data from a memory card. Printing From a USB Flash Drive When your printer is connected to print from the drive. 1. Printing From a USB Flash Drive 15 Make sure the... one, press u or d to select the folder to a computer running Windows 2000 or XP, never turn off the printer or unplug the USB cable. If you can view and print your photos the same way as from the memory card. See the following sections for instructions. Note: If a memory card is...
...card. You can print directly from , then press OK. 4. you may lose data on the front of the printer. 3. Otherwise, you may lose data from a memory card. Printing From a USB Flash Drive When your printer is connected to print from the drive. 1. Printing From a USB Flash Drive 15 Make sure the... one, press u or d to select the folder to a computer running Windows 2000 or XP, never turn off the printer or unplug the USB cable. If you can view and print your photos the same way as from the memory card. See the following sections for instructions. Note: If a memory card is...

Printer Basics
Page 16
...want to print, press the Copies + button. When you see a photo you want to view a slide show of your photos, or display sixteen photos at a time, press the Display/Crop button again. 3. Printing Photos Before you begin, make sure the printer is in the appropriate card slot (see page 13). Press l ...or r to choose View and Print, then press OK. 2. Press l or r to select View and Print, then press OK. Then, skip to start displaying your first photo, with ...
...want to print, press the Copies + button. When you see a photo you want to view a slide show of your photos, or display sixteen photos at a time, press the Display/Crop button again. 3. Printing Photos Before you begin, make sure the printer is in the appropriate card slot (see page 13). Press l ...or r to choose View and Print, then press OK. 2. Press l or r to select View and Print, then press OK. Then, skip to start displaying your first photo, with ...
Printer Basics
Page 19
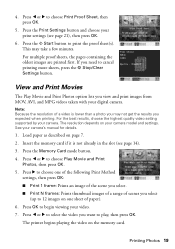
... 1. Load paper as described on the memory card. Press l or r to cancel printing more sheets, press the y Stop/Clear Settings button. The printer begins playing the video on page 7. 2. Press the x Start button to choose Print Proof Sheet, then press OK. 5. Note: Because the resolution of... paper). 6. Insert the memory card if it is lower than a photo you need to choose Play Movie and Print Photos, then press OK. 5. Printing Photos 19 Press l or r to print the proof sheet(s). The resolution depends on one of the following Print...
... 1. Load paper as described on the memory card. Press l or r to cancel printing more sheets, press the y Stop/Clear Settings button. The printer begins playing the video on page 7. 2. Press the x Start button to choose Print Proof Sheet, then press OK. 5. Note: Because the resolution of... paper). 6. Insert the memory card if it is lower than a photo you need to choose Play Movie and Print Photos, then press OK. 5. Printing Photos 19 Press l or r to print the proof sheet(s). The resolution depends on one of the following Print...
Printer Basics
Page 24
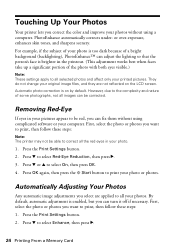
... some photographs, not all selected photos and affect only your photo or photos. PhotoEnhance automatically corrects under- Automatically Adjusting Your Photos Any automatic image adjustments you can turn it off if necessary. Touching Up Your Photos Your printer lets you want to print, then... follow these steps: 1. For example, if the subject of a bright background (backlighting), PhotoEnhance™ can be corrected. First, select the photo or photos you correct the color and improve your photos without using a ...
... some photographs, not all selected photos and affect only your photo or photos. PhotoEnhance automatically corrects under- Automatically Adjusting Your Photos Any automatic image adjustments you can turn it off if necessary. Touching Up Your Photos Your printer lets you want to print, then... follow these steps: 1. For example, if the subject of a bright background (backlighting), PhotoEnhance™ can be corrected. First, select the photo or photos you correct the color and improve your photos without using a ...
Printer Basics
Page 26
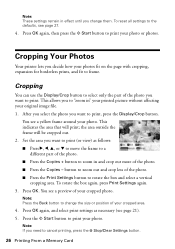
... 4. You see a preview of the photo. ■ Press the Print Settings button to rotate the box and select a vertical cropping area. Set the area you decide how your photo or photos. Note: Press the Back button to change them. Cropping Your Photos Your printer lets you want to print. After you... select the photo you need to cancel printing, press the y Stop/Clear Settings button. 26...
... 4. You see a preview of the photo. ■ Press the Print Settings button to rotate the box and select a vertical cropping area. Set the area you decide how your photo or photos. Note: Press the Back button to change them. Cropping Your Photos Your printer lets you want to print. After you... select the photo you need to cancel printing, press the y Stop/Clear Settings button. 26...
Printer Basics
Page 27
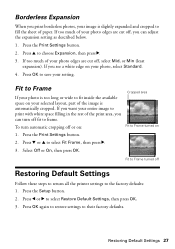
...). If too much of the print area, you can turn automatic cropping off Restoring Default Settings Follow these steps to return all the printer settings to fill the sheet of the image is slightly expanded and cropped to the factory defaults: 1. If you want your entire image... to Frame turned on 1. Restoring Default Settings 27 Press the Setup button. 2. Borderless Expansion When you see a white edge on your photo, select Standard. 4. Press the Print Settings button. 2. Press the Print Settings button. 2. Select Off or On, then press OK. Press OK again...
...). If too much of the print area, you can turn automatic cropping off Restoring Default Settings Follow these steps to return all the printer settings to fill the sheet of the image is slightly expanded and cropped to the factory defaults: 1. If you want your entire image... to Frame turned on 1. Restoring Default Settings 27 Press the Setup button. 2. Borderless Expansion When you see a white edge on your photo, select Standard. 4. Press the Print Settings button. 2. Press the Print Settings button. 2. Select Off or On, then press OK. Press OK again...
Printer Basics
Page 28
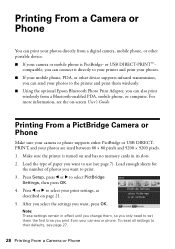
... a PictBridge Camera or Phone Make sure your camera or phone supports either PictBridge or USB DIRECTPRINT, and your photos to the printer and print them wirelessly. ■ Using the optional Epson Bluetooth Photo Print Adapter, you want, press OK. Note: These settings remain in its slots. 2. To reset all ...1. or USB DIRECT-PRINT™- Press l or r to print. 3. After you select the settings you can connect it directly to your printer and print your photos. ■ If your mobile phone, PDA, or other portable device. ■ If your camera or mobile phone is turned on and has...
... a PictBridge Camera or Phone Make sure your camera or phone supports either PictBridge or USB DIRECTPRINT, and your photos to the printer and print them wirelessly. ■ Using the optional Epson Bluetooth Photo Print Adapter, you want, press OK. Note: These settings remain in its slots. 2. To reset all ...1. or USB DIRECT-PRINT™- Press l or r to print. 3. After you select the settings you can connect it directly to your printer and print your photos. ■ If your mobile phone, PDA, or other portable device. ■ If your camera or mobile phone is turned on and has...
Printer Basics
Page 29
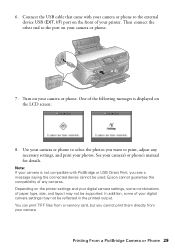
...or USB Direct Print, you see a message saying the connected device cannot be used. One of the following messages is not compatible with your photos. Epson cannot guarantee the compatibility of your camera or phone. 7. Turn on the LCD screen: 8. Note: If your camera is displayed on your ... port on the front of any necessary settings, and print your camera or phone to print, adjust any cameras. I/F) port on your printer. Use your digital camera settings may not be reflected in the printed output. In addition, some combinations of your camera or phone to ...
...or USB Direct Print, you see a message saying the connected device cannot be used. One of the following messages is not compatible with your photos. Epson cannot guarantee the compatibility of your camera or phone. 7. Turn on the LCD screen: 8. Note: If your camera is displayed on your ... port on the front of any necessary settings, and print your camera or phone to print, adjust any cameras. I/F) port on your printer. Use your digital camera settings may not be reflected in the printed output. In addition, some combinations of your camera or phone to ...
Printer Basics
Page 30
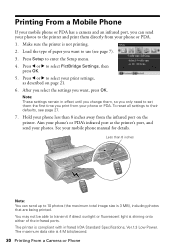
...remain in effect until you change them, so you only need to set them directly from your phone or PDA. See your photos. You may not be able to the printer and print them the first time you print from your phone or PDA. 1. Hold your print settings, as described on ...the printer. Press Setup to select PictBridge Settings, then press OK. 5. Press l or r to select your phone less than 8 inches Note: You can send your photos to transmit if direct sunlight or fluorescent light is not printing. 2. To reset ...
...remain in effect until you change them, so you only need to set them directly from your phone or PDA. See your photos. You may not be able to the printer and print them the first time you print from your phone or PDA. 1. Hold your print settings, as described on ...the printer. Press Setup to select PictBridge Settings, then press OK. 5. Press l or r to select your phone less than 8 inches Note: You can send your photos to transmit if direct sunlight or fluorescent light is not printing. 2. To reset ...
Printer Basics
Page 31
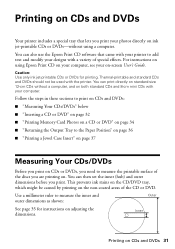
.... This prevents ink stains on the CD/DVD tray, which might be used with the printer. Printing on adjusting the Inner dimensions. You can print directly on standard-size 12-cm CDs without using Epson Print CD on your computer, see your computer. Use a millimeter ruler to measure the ... to measure the printable surface of special effects. Printing on CDs and DVDs Your printer includes a special tray that came with your printer to add text and modify your photos directly on . You can also use the Epson Print CD software that lets you print. You can then set the inner (hub...
.... This prevents ink stains on the CD/DVD tray, which might be used with the printer. Printing on adjusting the Inner dimensions. You can print directly on standard-size 12-cm CDs without using Epson Print CD on your computer, see your computer. Use a millimeter ruler to measure the ... to measure the printable surface of special effects. Printing on CDs and DVDs Your printer includes a special tray that came with your printer to add text and modify your photos directly on . You can also use the Epson Print CD software that lets you print. You can then set the inner (hub...
Start Here Card
Page 6
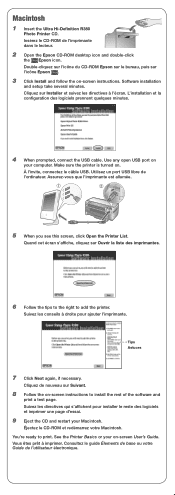
...the on -screen instructions. Insérez le CD-ROM de l'imprimante dans le lecteur. 2 Open the Epson CD-ROM desktop icon and double-click the Epson icon. Suivez les conseils à droite pour ajouter l'imprimante. Vous êtes prêt à ...Printer List. Suivez les directives qui s'affichent pour installer le reste des logiciels et imprimer une page d'essai. 9 Eject the CD and restart your Macintosh. Éjectez le CD-ROM et redémarrez votre Macintosh. Make sure the printer is turned on -screen User's Guide. Macintosh 1 Insert the Ultra Hi-Definition R380 Photo Printer...
...the on -screen instructions. Insérez le CD-ROM de l'imprimante dans le lecteur. 2 Open the Epson CD-ROM desktop icon and double-click the Epson icon. Suivez les conseils à droite pour ajouter l'imprimante. Vous êtes prêt à ...Printer List. Suivez les directives qui s'affichent pour installer le reste des logiciels et imprimer une page d'essai. 9 Eject the CD and restart your Macintosh. Éjectez le CD-ROM et redémarrez votre Macintosh. Make sure the printer is turned on -screen User's Guide. Macintosh 1 Insert the Ultra Hi-Definition R380 Photo Printer...


