
Notices
Page 2
...that are fuses in your skin, wash it thoroughly with water. If ink gets on the side of the cartridge. this can dehydrate the print head and may be ink remaining around the product. Removing the cartridges can cause leakage. ■ Do not touch the green IC chip on... uninstalled can cause leakage. ■ Do not put your documentation, do not tilt it, stand it upside down; this can dry out the print head and may damage the product. ■ Do not spill liquid on the product or use the product: near automatically controlled devices, such as specifically...
...that are fuses in your skin, wash it thoroughly with water. If ink gets on the side of the cartridge. this can dehydrate the print head and may be ink remaining around the product. Removing the cartridges can cause leakage. ■ Do not touch the green IC chip on... uninstalled can cause leakage. ■ Do not put your documentation, do not tilt it, stand it upside down; this can dry out the print head and may damage the product. ■ Do not spill liquid on the product or use the product: near automatically controlled devices, such as specifically...
Notices
Page 3
...covers or plugs unnecessary, but care is needed to 47CFR, Part 2 and 15 for: Class B Personal Computers and Peripherals; This could damage the print head. ■ Store ink cartridges in the same environment as the product. MS 3-13 3840 Kilroy Airport Way Long Beach, CA 90806 Telephone: (562...; After bringing an ink cartridge inside from a cold storage site, allow it to be compliant with the standards. Declaration of Product: Model: Epson Ink jet printer B472B Important Safety Instructions 3 ■ If you remove an ink cartridge for later use, protect the ink supply area from ...
...covers or plugs unnecessary, but care is needed to 47CFR, Part 2 and 15 for: Class B Personal Computers and Peripherals; This could damage the print head. ■ Store ink cartridges in the same environment as the product. MS 3-13 3840 Kilroy Airport Way Long Beach, CA 90806 Telephone: (562...; After bringing an ink cartridge inside from a cold storage site, allow it to be compliant with the standards. Declaration of Product: Model: Epson Ink jet printer B472B Important Safety Instructions 3 ■ If you remove an ink cartridge for later use, protect the ink supply area from ...

Start Here - Installation Guide
Page 3
... ink cartridges may be low on ink. See the online User's Guide for more information. You can be used with a USB cable temporarily. The print head is closed, or the CD/DVD tray did not complete and the printer is in the printer software matches the size of paper you loaded...enter your router manufacturer will be able to assist you with your computer or another foreign object and cannot return to see if the print head needs cleaning. If printing on the edge guides. A firmware update did not eject (if printing on your router. Try updating the firmware again or contact Epson.
... ink cartridges may be low on ink. See the online User's Guide for more information. You can be used with a USB cable temporarily. The print head is closed, or the CD/DVD tray did not complete and the printer is in the printer software matches the size of paper you loaded...enter your router manufacturer will be able to assist you with your computer or another foreign object and cannot return to see if the print head needs cleaning. If printing on the edge guides. A firmware update did not eject (if printing on your router. Try updating the firmware again or contact Epson.
Users Guide
Page 5
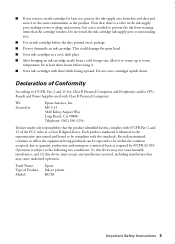
... a CD/DVD - Mac OS X 77 Adjusting CD/DVD Print Position - Printing on CDs/DVDs from a Computer 70 Printing on a CD/DVD with Mac OS X 85 Purchase EPSON Ink Cartridges ...86 Ink Cartridge Part Numbers ...86 Removing and Installing Ink Cartridges 87 Adjusting Print Quality...93 Print Head Maintenance...93 Print Head Nozzle Check...93 Checking the Nozzles Using the...
... a CD/DVD - Mac OS X 77 Adjusting CD/DVD Print Position - Printing on CDs/DVDs from a Computer 70 Printing on a CD/DVD with Mac OS X 85 Purchase EPSON Ink Cartridges ...86 Ink Cartridge Part Numbers ...86 Removing and Installing Ink Cartridges 87 Adjusting Print Quality...93 Print Head Maintenance...93 Print Head Nozzle Check...93 Checking the Nozzles Using the...

Users Guide
Page 12
Inside 1 Ink cartridge lights 2 Ink cartridge cover 3 Ink cartridge holder (do not remove) 4 Print head 5 Control panel Parent topic: Printer Parts Locations 12 Printer Parts -
Inside 1 Ink cartridge lights 2 Ink cartridge cover 3 Ink cartridge holder (do not remove) 4 Print head 5 Control panel Parent topic: Printer Parts Locations 12 Printer Parts -
Users Guide
Page 82
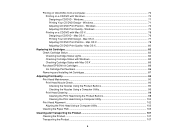
... expended, you can check the status of your used ink cartridges to Epson for more than six months old, if your printouts do not look their best, even after cleaning and aligning the print head. You must replace the cartridge before you need to return your cartridge ...status, double-click the product icon in accordance with Mac OS X Parent topic: Replacing Ink Cartridges Checking Cartridge Status Lights You can print. Parent topic: Check Cartridge Status...
... expended, you can check the status of your used ink cartridges to Epson for more than six months old, if your printouts do not look their best, even after cleaning and aligning the print head. You must replace the cartridge before you need to return your cartridge ...status, double-click the product icon in accordance with Mac OS X Parent topic: Replacing Ink Cartridges Checking Cartridge Status Lights You can print. Parent topic: Check Cartridge Status...

Users Guide
Page 87
Ink color Yellow Light Magenta Light Cyan Part number (High Capacity) 79 79 79 Parent topic: Purchase EPSON Ink Cartridges Removing and Installing Ink Cartridges Make sure you have your old cartridges in the product, and the power light is expended, a solid light ... install the ink. Make sure the CD/DVD tray is not inserted in the product until you are ready to replace them to prevent the print head nozzles from drying out. If a cartridge is on but not flashing. 2. Open the printer cover. 3. Cartridges are ready to maintain reliability. 1. Press the ink button...
Ink color Yellow Light Magenta Light Cyan Part number (High Capacity) 79 79 79 Parent topic: Purchase EPSON Ink Cartridges Removing and Installing Ink Cartridges Make sure you have your old cartridges in the product, and the power light is expended, a solid light ... install the ink. Make sure the CD/DVD tray is not inserted in the product until you are ready to replace them to prevent the print head nozzles from drying out. If a cartridge is on but not flashing. 2. Open the printer cover. 3. Cartridges are ready to maintain reliability. 1. Press the ink button...
Users Guide
Page 88
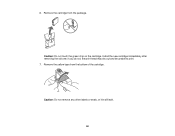
Do not touch the flat white cable inside the product. 88 Caution: Do not move the print head by hand; Do not hold the ink button for more than three seconds, or the product may damage your product. Note: If an ink cartridge is expended. otherwise, you may start cleaning the print head. You can continue to use the low ink cartridge until it is low, a flashing light appears above it.
Do not touch the flat white cable inside the product. 88 Caution: Do not move the print head by hand; Do not hold the ink button for more than three seconds, or the product may damage your product. Note: If an ink cartridge is expended. otherwise, you may start cleaning the print head. You can continue to use the low ink cartridge until it is low, a flashing light appears above it.
Users Guide
Page 90
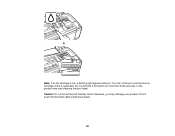
Caution: Do not touch the green chip on the cartridge. Remove the yellow tape from the package. Install the new cartridge immediately after removing the old one; Caution: Do not remove any other labels or seals, or ink will leak. 90 6. if you do not, the print head may dry out and be unable to print. 7. Remove the cartridge from the bottom of the cartridge.
Caution: Do not touch the green chip on the cartridge. Remove the yellow tape from the package. Install the new cartridge immediately after removing the old one; Caution: Do not remove any other labels or seals, or ink will leak. 90 6. if you do not, the print head may dry out and be unable to print. 7. Remove the cartridge from the bottom of the cartridge.

Users Guide
Page 91
... turn off the product while the power light is finished. This takes about 2 minutes. When the power light stops flashing and remains on after the print head moves to begin charging the ink. If you remove a low or expended ink cartridge, you replace all the cartridges that need replacing, close the cartridge...
... turn off the product while the power light is finished. This takes about 2 minutes. When the power light stops flashing and remains on after the print head moves to begin charging the ink. If you remove a low or expended ink cartridge, you replace all the cartridges that need replacing, close the cartridge...
Users Guide
Page 93
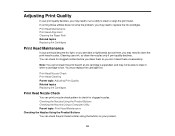
... utilities does not solve the problem, you may need to clean or align the print head. You can check the print head nozzles using the buttons on your product. 93 Print Head Maintenance Print Head Alignment Cleaning the Paper Path Related topics Replacing Ink Cartridges Print Head Maintenance If your printouts become too light, or you see dark or light...
... utilities does not solve the problem, you may need to clean or align the print head. You can check the print head nozzles using the buttons on your product. 93 Print Head Maintenance Print Head Alignment Cleaning the Paper Path Related topics Replacing Ink Cartridges Print Head Maintenance If your printouts become too light, or you see dark or light...
Users Guide
Page 94
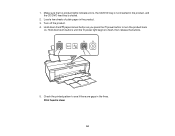
Load a few sheets of plain paper in the lines. Print head is closed. 2. Hold down both buttons until the power light begins to flash, then release the buttons. 5. Make sure that no product lights indicate errors, the CD/DVD tray is not inserted in the product, and the CD/DVD feed tray is clean 94 Check the printed pattern to turn the product back on. Turn off the product. 4. 1. Hold down the paper/cancel button as you press the power button to see if there are gaps in the product. 3.
Load a few sheets of plain paper in the lines. Print head is closed. 2. Hold down both buttons until the power light begins to flash, then release the buttons. 5. Make sure that no product lights indicate errors, the CD/DVD tray is not inserted in the product, and the CD/DVD feed tray is clean 94 Check the printed pattern to turn the product back on. Turn off the product. 4. 1. Hold down the paper/cancel button as you press the power button to see if there are gaps in the product. 3.
Users Guide
Page 95
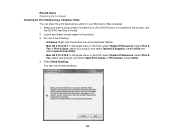
... is clean and you can check the print head nozzles using a utility on your Windows or Mac computer. 1. Parent topic: Print Head Nozzle Check Related concepts Print Head Cleaning Checking the Nozzles Using a Computer Utility You can continue printing. Select Print & Fax or Print & Scan, select your product, and select Open Print Queue or Print Queue. Do one of plain paper...
... is clean and you can check the print head nozzles using a utility on your Windows or Mac computer. 1. Parent topic: Print Head Nozzle Check Related concepts Print Head Cleaning Checking the Nozzles Using a Computer Utility You can continue printing. Select Print & Fax or Print & Scan, select your product, and select Open Print Queue or Print Queue. Do one of plain paper...

Users Guide
Page 97
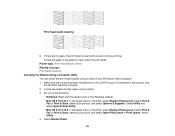
Check the printed pattern to see if there are gaps in the lines. Print head is clean Print head needs cleaning 97 5. Click Print. 6.
Check the printed pattern to see if there are gaps in the lines. Print head is clean Print head needs cleaning 97 5. Click Print. 6.

Users Guide
Page 98
... is low. Parent topic: Print Head Nozzle Check Related concepts Print Head Cleaning Print Head Cleaning If print quality has declined and the nozzle check pattern indicates clogged nozzles, you can clean the print head using the buttons on your product. 1. Cleaning the Print Head Using the Product Buttons Cleaning the Print Head Using a Computer Utility Parent topic: Print Head Maintenance Related topics Replacing Ink...
... is low. Parent topic: Print Head Nozzle Check Related concepts Print Head Cleaning Print Head Cleaning If print quality has declined and the nozzle check pattern indicates clogged nozzles, you can clean the print head using the buttons on your product. 1. Cleaning the Print Head Using the Product Buttons Cleaning the Print Head Using a Computer Utility Parent topic: Print Head Maintenance Related topics Replacing Ink...

Users Guide
Page 99
...cartridges may damage it. 3. Hold down the ink button for 3 seconds to confirm that the print head is finished. If quality still does not improve, one of plain paper in the product. 4. Then try cleaning the print head again. 2. Caution: Never turn off the product during a cleaning cycle or you may be... old or damaged and needs to be replaced. If you don't see any improvement after cleaning the print head up to 4 times, turn off the product and wait at least 6 hours. The power light flashes throughout the cleaning cycle and stays on ...
...cartridges may damage it. 3. Hold down the ink button for 3 seconds to confirm that the print head is finished. If quality still does not improve, one of plain paper in the product. 4. Then try cleaning the print head again. 2. Caution: Never turn off the product during a cleaning cycle or you may be... old or damaged and needs to be replaced. If you don't see any improvement after cleaning the print head up to 4 times, turn off the product and wait at least 6 hours. The power light flashes throughout the cleaning cycle and stays on ...
Users Guide
Page 100
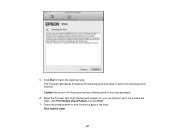
..., select your product, and select Open Print Queue or Print Queue. Select Utility and select Open Printer Utility. • Mac OS X 10.4/10.5: In the Apple menu or the Dock, select System Preferences. Select Utility. 4. ... the product, and the CD/DVD feed tray is closed. 2. Load a few sheets of these windows: 100 Select Print & Fax, select your product, and select Options & Supplies. Select Head Cleaning. Related topics Replacing Ink Cartridges Cleaning the Print Head Using a Computer Utility You can clean the print head using a utility on your Windows or Mac computer. 1.
..., select your product, and select Open Print Queue or Print Queue. Select Utility and select Open Printer Utility. • Mac OS X 10.4/10.5: In the Apple menu or the Dock, select System Preferences. Select Utility. 4. ... the product, and the CD/DVD feed tray is closed. 2. Load a few sheets of these windows: 100 Select Print & Fax, select your product, and select Options & Supplies. Select Head Cleaning. Related topics Replacing Ink Cartridges Cleaning the Print Head Using a Computer Utility You can clean the print head using a utility on your Windows or Mac computer. 1.
Users Guide
Page 101
Caution: Never turn off the product during a cleaning cycle or you can check to see if there are clean; Check the printed pattern to begin the cleaning cycle. When the power light stops flashing and remains on when the cleaning cycle is clean 101 Print head is finished. Click Start to see if the nozzles are gaps in the lines. The power light flashes throughout the cleaning cycle and stays on , you may damage it. 6. click Print Nozzle Check Pattern and click Print. 7. 5.
Caution: Never turn off the product during a cleaning cycle or you can check to see if there are clean; Check the printed pattern to begin the cleaning cycle. When the power light stops flashing and remains on when the cleaning cycle is clean 101 Print head is finished. Click Start to see if the nozzles are gaps in the lines. The power light flashes throughout the cleaning cycle and stays on , you may damage it. 6. click Print Nozzle Check Pattern and click Print. 7. 5.

Users Guide
Page 102
... grainy or blurry, you notice misalignment of the ink cartridges may need cleaning. Aligning the Print Head Using a Computer Utility Parent topic: Adjusting Print Quality Related concepts Print Head Cleaning 102 If you may be replaced. If quality still does not improve, one of ...4 times, turn off the product and wait at least 6 hours. Parent topic: Print Head Cleaning Related topics Replacing Ink Cartridges Print Head Alignment If your print head nozzles need to clean the print head again. Print head needs cleaning • If there are no gaps, click Finish. • If there...
... grainy or blurry, you notice misalignment of the ink cartridges may need cleaning. Aligning the Print Head Using a Computer Utility Parent topic: Adjusting Print Quality Related concepts Print Head Cleaning 102 If you may be replaced. If quality still does not improve, one of ...4 times, turn off the product and wait at least 6 hours. Parent topic: Print Head Cleaning Related topics Replacing Ink Cartridges Print Head Alignment If your print head nozzles need to clean the print head again. Print head needs cleaning • If there are no gaps, click Finish. • If there...
Users Guide
Page 103
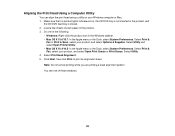
.... 2. Select Utility. 4. Select Utility and select Open Printer Utility. • Mac OS X 10.4/10.5: In the Apple menu or the Dock, select System Preferences. Select Print Head Alignment. 5. Load a few sheets of plain paper in the product, and the CD/DVD feed tray is not inserted in the product. 3. Click Next, then...
.... 2. Select Utility. 4. Select Utility and select Open Printer Utility. • Mac OS X 10.4/10.5: In the Apple menu or the Dock, select System Preferences. Select Print Head Alignment. 5. Load a few sheets of plain paper in the product, and the CD/DVD feed tray is not inserted in the product. 3. Click Next, then...


