Auto Setup Specifications
Page 5
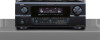
Mic Input Select" 5 Auto Setup/Room EQ" • Select "5. How to use 'Auto Setup and Room EQ' with an External Microphone Amplifier • Connect the output of the microphone amplifier to the AVR-3805's front panel 'V.AUX' Left channel audio input - located behind Trap Door • Turn on the AVR-3805 • Push the "SYSTEM SETUP" button on the remote or front panel • Select "1. D E N O N E L E C T R O N I C S ( U S A ), LLC.
Mic Input Select" 5 Auto Setup/Room EQ" • Select "5. How to use 'Auto Setup and Room EQ' with an External Microphone Amplifier • Connect the output of the microphone amplifier to the AVR-3805's front panel 'V.AUX' Left channel audio input - located behind Trap Door • Turn on the AVR-3805 • Push the "SYSTEM SETUP" button on the remote or front panel • Select "1. D E N O N E L E C T R O N I C S ( U S A ), LLC.
Auto Setup Specifications
Page 6
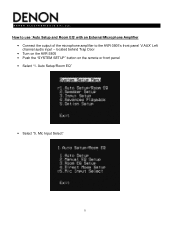
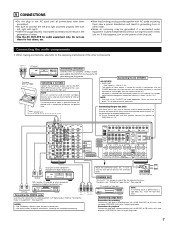
D E N O N E L E C T R O N I C S ( U S A ), LLC. • Change the setting to "V.AUX L" • Press the "SYSTEM SETUP" button on the remote or front panel • Select "1. Auto Setup" 6
D E N O N E L E C T R O N I C S ( U S A ), LLC. • Change the setting to "V.AUX L" • Press the "SYSTEM SETUP" button on the remote or front panel • Select "1. Auto Setup" 6
Literature/Product Sheet
Page 1
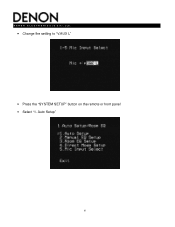
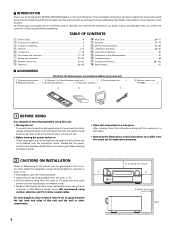
... video inputs and 1set of power. • Detachable AC Power Cord This remote will provide the ultimate in multi-channel performance. ■ DENON LINK multi channel digital audio input The AVR-3805 incorporates DENON LINK 3rd Edition*, this new edition now allows the input of Power A huge... Super Audio CD digital signals as well as DENON LINK. Since composite and S-video signals are optimized to the AVR-3805. Depending on ease of use of the source material. ■ New EL Backlight Touch Panel Remote The AVR-3805's remote controller is a completely new design, focusing heavily...
... video inputs and 1set of power. • Detachable AC Power Cord This remote will provide the ultimate in multi-channel performance. ■ DENON LINK multi channel digital audio input The AVR-3805 incorporates DENON LINK 3rd Edition*, this new edition now allows the input of Power A huge... Super Audio CD digital signals as well as DENON LINK. Since composite and S-video signals are optimized to the AVR-3805. Depending on ease of use of the source material. ■ New EL Backlight Touch Panel Remote The AVR-3805's remote controller is a completely new design, focusing heavily...
Literature/Product Sheet
Page 2
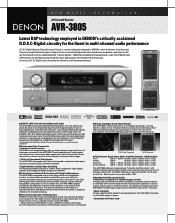
...MARKHAM, ONTARIO L3R 5B1 CANADA TEL: 905-475-4085 www.denon.ca *Design and specifications are also possible in a 5.1 configured home theater room. • +12 V Trigger Output x2 (Assignable) • Remote In/Out Ports • RS232C Control Port to multiple zones....(Dolby Digital, DTS) and (3) Bit stream multi-channel and (4) DENON LINK multichannel. The AVR-3805's Power Amplifier Assign function lets you output different sources to support an AMX, Crestron integrated control system ■ DENON's Latest Surround Technology Faithfully Recreates the Surround Sound Produced at the Dubbing...
...MARKHAM, ONTARIO L3R 5B1 CANADA TEL: 905-475-4085 www.denon.ca *Design and specifications are also possible in a 5.1 configured home theater room. • +12 V Trigger Output x2 (Assignable) • Remote In/Out Ports • RS232C Control Port to multiple zones....(Dolby Digital, DTS) and (3) Bit stream multi-channel and (4) DENON LINK multichannel. The AVR-3805's Power Amplifier Assign function lets you output different sources to support an AMX, Crestron integrated control system ■ DENON's Latest Surround Technology Faithfully Recreates the Surround Sound Produced at the Dubbing...
Owners Manual
Page 4
...For heat dispersal, leave at least 4 inch/10 cm of space between all other audio components when moving the set for choosing the DENON AVR-3805 Digital A / V Surround Receiver. TABLE OF CONTENTS z Before Using 4 x Cautions on Installation 4 c Cautions on Check once again...for North America model only 1 e Service station list...........1 t R03/AAA batteries 4 y AM loop antenna 1 u FM indoor antenna...1 r t y u r Remote control unit (RC-969 1 1 BEFORE USING Pay attention to occur particularly when using indoor antennas or 300 Ω/ohms feeder wires. Operation 62~68 ⁄...
...For heat dispersal, leave at least 4 inch/10 cm of space between all other audio components when moving the set for choosing the DENON AVR-3805 Digital A / V Surround Receiver. TABLE OF CONTENTS z Before Using 4 x Cautions on Installation 4 c Cautions on Check once again...for North America model only 1 e Service station list...........1 t R03/AAA batteries 4 y AM loop antenna 1 u FM indoor antenna...1 r t y u r Remote control unit (RC-969 1 1 BEFORE USING Pay attention to occur particularly when using indoor antennas or 300 Ω/ohms feeder wires. Operation 62~68 ⁄...
Owners Manual
Page 6
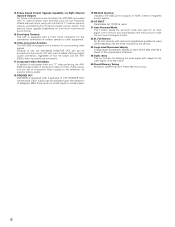
...signal is input. 22.EL Foil Remote An EL Foil remote with improved operational qualities is used which also permits a check of the input/output channels. 24.Audio delay This is a function for up-converting video signals. Because of this, the AVR-3805's MONITOR OUT jack can be ... systems of 12V TRIGGER OUT connections. 14.Future Sound Format Upgrade Capability via Eight Channel Inputs & Outputs For future multi-channel audio format(s), the AVR-3805 is provided with 7.1 channel (seven main channels, plus one set of 7.1 channel pre-amp outputs, controlled by the device. 23.Large-sized...
...signal is input. 22.EL Foil Remote An EL Foil remote with improved operational qualities is used which also permits a check of the input/output channels. 24.Audio delay This is a function for up-converting video signals. Because of this, the AVR-3805's MONITOR OUT jack can be ... systems of 12V TRIGGER OUT connections. 14.Future Sound Format Upgrade Capability via Eight Channel Inputs & Outputs For future multi-channel audio format(s), the AVR-3805 is provided with 7.1 channel (seven main channels, plus one set of 7.1 channel pre-amp outputs, controlled by the device. 23.Large-sized...
Owners Manual
Page 7
... used independently without turning the power of this happens, turn on . NOTE: This unit cannot be generated if a connected audio equipment is supplied from the remote control unit. No power is used with AC cords or placing them for connection to increase the power of the this unit's CD jacks using...
... used independently without turning the power of this happens, turn on . NOTE: This unit cannot be generated if a connected audio equipment is supplied from the remote control unit. No power is used with AC cords or placing them for connection to increase the power of the this unit's CD jacks using...
Owners Manual
Page 14
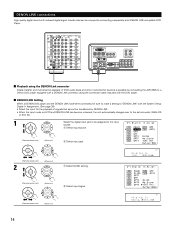
... unit) (Main unit) CH SEL ENTER CH SEL ENTER (Remote control unit) (Main unit) w Select input jack. IN). 1 CH SEL ENTER CH SEL ENTER Select the digital input jack to be transferred by connecting the AVR-3805 to a Denon DVD player equipped with a DENON LINK connector using the connection cable included with the DVD player...
... unit) (Main unit) CH SEL ENTER CH SEL ENTER (Remote control unit) (Main unit) w Select input jack. IN). 1 CH SEL ENTER CH SEL ENTER Select the digital input jack to be transferred by connecting the AVR-3805 to a Denon DVD player equipped with a DENON LINK connector using the connection cable included with the DVD player...

Owners Manual
Page 17
...) @0 TONE DEFEAT button 67) @1 STATUS button 68) @2 ROOM EQ button 28) @3 SETUP MIC jack 23) @4 MASTER VOLUME control 64) @5 MASTER VOLUME indicator 64) @6 Display @7 Remote control sensor (REMOTE SENSOR 50) @8 FUNCTION knob 63, 67, 68, 71, 87) @9 VIDEO SELECT button 67) #0 ZONE2/3/REC SELECT button 68, 71) #1 TUNING PRESET button 87) #2 SOURCE...
...) @0 TONE DEFEAT button 67) @1 STATUS button 68) @2 ROOM EQ button 28) @3 SETUP MIC jack 23) @4 MASTER VOLUME control 64) @5 MASTER VOLUME indicator 64) @6 Display @7 Remote control sensor (REMOTE SENSOR 50) @8 FUNCTION knob 63, 67, 68, 71, 87) @9 VIDEO SELECT button 67) #0 ZONE2/3/REC SELECT button 68, 71) #1 TUNING PRESET button 87) #2 SOURCE...

Owners Manual
Page 19
... SETUP button 20, 49) ROOM EQ button 28) Tuner system buttons ..........(52, 59, 71, 85) VIDEO ON/OFF button 66) INPUT MODE selector buttons 63) Remote control signal transmitter 50) 10KEY/SYSTEM CALL button 51 ~ 61) SURROUND PARAMETER button 74 ~ 77, 81, 82) ON SCREEN button 68, 77) Cursor buttons 20...) CH SELECT/ENTER button ........(20, 72, 73) MUTING button 67) SYSTEM buttons 51 ~ 55) DIMMER button 68) SPEAKER button 68) TEST TONE button 72) 19 Remote control unit • For details on the functions of these parts, refer to the pages given in parentheses ( ).
... SETUP button 20, 49) ROOM EQ button 28) Tuner system buttons ..........(52, 59, 71, 85) VIDEO ON/OFF button 66) INPUT MODE selector buttons 63) Remote control signal transmitter 50) 10KEY/SYSTEM CALL button 51 ~ 61) SURROUND PARAMETER button 74 ~ 77, 81, 82) ON SCREEN button 68, 77) Cursor buttons 20...) CH SELECT/ENTER button ........(20, 72, 73) MUTING button 67) SYSTEM buttons 51 ~ 55) DIMMER button 68) SPEAKER button 68) TEST TONE button 72) 19 Remote control unit • For details on the functions of these parts, refer to the pages given in parentheses ( ).
Owners Manual
Page 20
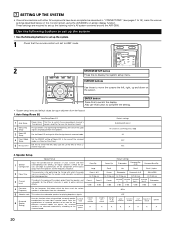
...Use the following buttons to set up the system • Use the following buttons to set up the system. 1 Check that the remote control unit set the composition of the signals output from the speakers and the frequency response. 2 Delay Time This parameter is for optimizing... subwoofer. 5 Subwoofer mode This selects the subwoofer speaker for playing deep bass signals. (Surround 6 Speaker Setting) Use this function when using the AVR-3805's on the screen ENTER button Press this button to set upon shipment from the speakers and subwoofer for the different channels in order to obtain...
...Use the following buttons to set up the system • Use the following buttons to set up the system. 1 Check that the remote control unit set the composition of the signals output from the speakers and the frequency response. 2 Delay Time This parameter is for optimizing... subwoofer. 5 Subwoofer mode This selects the subwoofer speaker for playing deep bass signals. (Surround 6 Speaker Setting) Use this function when using the AVR-3805's on the screen ENTER button Press this button to set upon shipment from the speakers and subwoofer for the different channels in order to obtain...
Owners Manual
Page 21
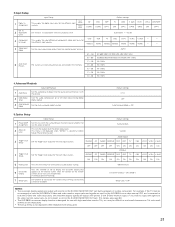
... The on the remote control unit or main unit are operated. In Subwoofer terminal playback level. VIDEO1 NONE VIDEO2 VIDEO3 NONE NONE NONE - - 4 Video Input Mode 5 Auto Tuner Presets Set the input signal to be output from a video source (VDP, etc.) connected to both the AVR-3805's S-Video and video... controls on -screen display signals are output with priority to the S-VIDEO MONITOR OUT jack. (For details, see page 49.) • The AVR-3805's on or off when down-mixing Dolby Digital signals. 3 Auto Surround Mode Set the Auto surround mode function. AUX VCR-1 VCR-2 CDR/TAPE...
... The on the remote control unit or main unit are operated. In Subwoofer terminal playback level. VIDEO1 NONE VIDEO2 VIDEO3 NONE NONE NONE - - 4 Video Input Mode 5 Auto Tuner Presets Set the input signal to be output from a video source (VDP, etc.) connected to both the AVR-3805's S-Video and video... controls on -screen display signals are output with priority to the S-VIDEO MONITOR OUT jack. (For details, see page 49.) • The AVR-3805's on or off when down-mixing Dolby Digital signals. 3 Auto Surround Mode Set the Auto surround mode function. AUX VCR-1 VCR-2 CDR/TAPE...
Owners Manual
Page 22
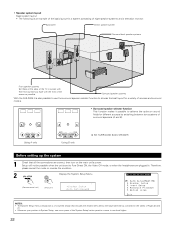
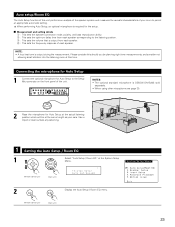
...correct, then turn on the main unit's power. Therefore, please cancel the mode or reverse the condition. 2 Display the System Setup Menu. (Remote control unit) (Main unit) *System Setup Auto Set/RoomEQ NOTES: • The System Setup menu composition is also possible to use the ...it is of a layered design that all the connections are plugged in System Setup, one level higher. 22 Surround speaker systems With the AVR-3805 it possible to achieve the optimum sound fields for a system consisting of eight speaker systems and a television monitor: Subwoofer Center speaker system...
...correct, then turn on the main unit's power. Therefore, please cancel the mode or reverse the condition. 2 Display the System Setup Menu. (Remote control unit) (Main unit) *System Setup Auto Set/RoomEQ NOTES: • The System Setup menu composition is also possible to use the ...it is of a layered design that all the connections are plugged in System Setup, one level higher. 22 Surround speaker systems With the AVR-3805 it possible to achieve the optimum sound fields for a system consisting of eight speaker systems and a television monitor: Subwoofer Center speaker system...
Owners Manual
Page 23
...during the measurement. Use a tripod or level surface at the System Setup Menu. *System Setup Auto Set/RoomEQ 2 CH SEL ENTER CH SEL ENTER (Remote control unit) (Main unit) Display the Auto Setup / Room EQ menu. 23 e : This sets the volume that is required for the setup. 2... an appropriate automatic setting. When performing Auto Setup, an optional microphone is output from each speaker. NOTE: • A loud test tone is DENON DM-S305 sold separately. • When using other microphone see page 30. 2 Place the microphone for Auto Setup to the listening position. Auto...
...during the measurement. Use a tripod or level surface at the System Setup Menu. *System Setup Auto Set/RoomEQ 2 CH SEL ENTER CH SEL ENTER (Remote control unit) (Main unit) Display the Auto Setup / Room EQ menu. 23 e : This sets the volume that is required for the setup. 2... an appropriate automatic setting. When performing Auto Setup, an optional microphone is output from each speaker. NOTE: • A loud test tone is DENON DM-S305 sold separately. • When using other microphone see page 30. 2 Place the microphone for Auto Setup to the listening position. Auto...

Owners Manual
Page 24
... screen. The results is not displayed as the target of setup in "5-1.Power Amp Assign". *Auto Setup Start w Press the Cursor left button. (Remote control unit) (Main unit) 24 The test tone during Auto Setup will be output from the Surround Back speaker. • When "ZONE2" or ... not be output to "ZONE2" or "ZONE3". q Select the Power Amp Assign setting. w Select "Surround Back", "ZONE2" or "ZONE3". CH SEL ENTER (Remote control unit) (Main unit) 3 Check the "Power Amp Assign" setting. • When "Surround Back" is selected, the test tone during Auto Setup is selected...
... screen. The results is not displayed as the target of setup in "5-1.Power Amp Assign". *Auto Setup Start w Press the Cursor left button. (Remote control unit) (Main unit) 24 The test tone during Auto Setup will be output from the Surround Back speaker. • When "ZONE2" or ... not be output to "ZONE2" or "ZONE3". q Select the Power Amp Assign setting. w Select "Surround Back", "ZONE2" or "ZONE3". CH SEL ENTER (Remote control unit) (Main unit) 3 Check the "Power Amp Assign" setting. • When "Surround Back" is selected, the test tone during Auto Setup is selected...

Owners Manual
Page 26
... unit) (Main unit) 26 Check] [Delay Time Check] [Channel Level Check] 3 CH SEL ENTER CH SEL ENTER (Remote control unit) 4 CH SEL ENTER (Main unit) CH SEL ENTER (Remote control unit) (Main unit) 5 CH SEL ENTER CH SEL ENTER If the check ends, press the ENTER button again....speakers with a builtin filter such as subwoofers might be CH SEL ENTER CH SEL ENTER checked here. (Remote control unit) (Main unit) *Auto Setup Sp Config.Check 2 CH SEL ENTER CH SEL ENTER (Remote control unit) (Main unit) Press the ENTER button and display the verification screen. When the "Retry...
... unit) (Main unit) 26 Check] [Delay Time Check] [Channel Level Check] 3 CH SEL ENTER CH SEL ENTER (Remote control unit) 4 CH SEL ENTER (Main unit) CH SEL ENTER (Remote control unit) (Main unit) 5 CH SEL ENTER CH SEL ENTER If the check ends, press the ENTER button again....speakers with a builtin filter such as subwoofers might be CH SEL ENTER CH SEL ENTER checked here. (Remote control unit) (Main unit) *Auto Setup Sp Config.Check 2 CH SEL ENTER CH SEL ENTER (Remote control unit) (Main unit) Press the ENTER button and display the verification screen. When the "Retry...
Owners Manual
Page 27
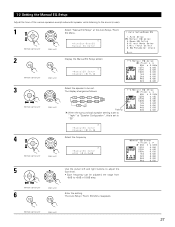
... Manual EQ Setup Adjust the tone of the various speakers except subwoofer speaker while listening to the sound (music). 1 CH SEL ENTER CH SEL ENTER (Remote control unit) (Main unit) Select "Manual EQ Setup" at "Speaker Configuration", this is set to "SB". *ManualEQ Setup Channel : FL Select the frequency *ManualEQ Setup... ENTER -6dB to be set to "1spkr" at the Auto Setup / Room EQ Menu. *AutoSet/RoomEQ Manual EQ Setup 2 CH SEL ENTER CH SEL ENTER (Remote control unit) (Main unit) Display the Manual EQ Setup screen. *ManualEQ Setup Channel : FL 3 CH SEL ENTER CH SEL ENTER...
... Manual EQ Setup Adjust the tone of the various speakers except subwoofer speaker while listening to the sound (music). 1 CH SEL ENTER CH SEL ENTER (Remote control unit) (Main unit) Select "Manual EQ Setup" at "Speaker Configuration", this is set to "SB". *ManualEQ Setup Channel : FL Select the frequency *ManualEQ Setup... ENTER -6dB to be set to "1spkr" at the Auto Setup / Room EQ Menu. *AutoSet/RoomEQ Manual EQ Setup 2 CH SEL ENTER CH SEL ENTER (Remote control unit) (Main unit) Display the Manual EQ Setup screen. *ManualEQ Setup Channel : FL 3 CH SEL ENTER CH SEL ENTER...
Owners Manual
Page 28
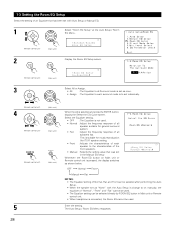
...When the speaker set as "None" with Auto Setup or Manual EQ. 1 CH SEL ENTER CH SEL ENTER (Remote control unit) (Main unit) Select "Room EQ Setup" at the Auto Setup / Room EQ Menu. *AutoSet.../RoomEQ Room EQ Setup 2 CH SEL ENTER CH SEL ENTER (Remote control unit) (Main unit) Display the Room EQ Setup screen. *Room EQ Setup SurMode:ALL 3 CH SEL ENTER ...an Equalizer that has been set with the Auto Setup is change to set in Main unit or Remote control unit. • When headphone is connected, the Room EQ cannot be used. Select the Equalizer...
...When the speaker set as "None" with Auto Setup or Manual EQ. 1 CH SEL ENTER CH SEL ENTER (Remote control unit) (Main unit) Select "Room EQ Setup" at the Auto Setup / Room EQ Menu. *AutoSet.../RoomEQ Room EQ Setup 2 CH SEL ENTER CH SEL ENTER (Remote control unit) (Main unit) Display the Room EQ Setup screen. *Room EQ Setup SurMode:ALL 3 CH SEL ENTER ...an Equalizer that has been set with the Auto Setup is change to set in Main unit or Remote control unit. • When headphone is connected, the Room EQ cannot be used. Select the Equalizer...

Owners Manual
Page 29
... Direct Mode Perform the ON/OFF setting of Room EQ when the surround mode is Direct or Pure Direct. 1 CH SEL ENTER CH SEL ENTER (Remote control unit) (Main unit) Select "Direct Mode Setup" at the Auto Setup / Room EQ Menu. *AutoSet/RoomEQ Direct Mode 2 CH SEL ENTER CH SEL ENTER... (Remote control unit) (Main unit) 3 CH SEL ENTER CH SEL ENTER Display the Direct Mode Setup screen. *Direct Mode Room EQ : OFF Select ON or OFF. (Remote control unit) (Main unit) 4 CH SEL ENTER CH SEL ENTER Enter the setting...
... Direct Mode Perform the ON/OFF setting of Room EQ when the surround mode is Direct or Pure Direct. 1 CH SEL ENTER CH SEL ENTER (Remote control unit) (Main unit) Select "Direct Mode Setup" at the Auto Setup / Room EQ Menu. *AutoSet/RoomEQ Direct Mode 2 CH SEL ENTER CH SEL ENTER... (Remote control unit) (Main unit) 3 CH SEL ENTER CH SEL ENTER Display the Direct Mode Setup screen. *Direct Mode Room EQ : OFF Select ON or OFF. (Remote control unit) (Main unit) 4 CH SEL ENTER CH SEL ENTER Enter the setting...

Owners Manual
Page 30
... unit) (Main unit) *AutoSet/RoomEQ Mic In Select 2 CH SEL ENTER Display the Mic Input Select screen. ENTER (Remote control unit) (Main unit) 1-6 Check the EQ parameter • The frequency characteristic of each speaker is rectified and the tone of the "Auto Setup/Room ... is automatically displayed, after the measurement result of the speaker is connected to the PIN JACK connector or the MINI JACK connector. Please ask the DENON Authorized Service Center about the usable microphone other than the option setup. 1 Select "Mic Input Select" at the Auto Setup / Room EQ Menu...
... unit) (Main unit) *AutoSet/RoomEQ Mic In Select 2 CH SEL ENTER Display the Mic Input Select screen. ENTER (Remote control unit) (Main unit) 1-6 Check the EQ parameter • The frequency characteristic of each speaker is rectified and the tone of the "Auto Setup/Room ... is automatically displayed, after the measurement result of the speaker is connected to the PIN JACK connector or the MINI JACK connector. Please ask the DENON Authorized Service Center about the usable microphone other than the option setup. 1 Select "Mic Input Select" at the Auto Setup / Room EQ Menu...


