Auto Setup Room EQ Features
Page 1
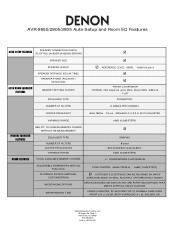
... up to 2kHz, above 2kHz -3dB/oct) - C. AVR-985S/2805/3805 Auto-Setup and Room EQ Features AUTO SETUP FEATURES SPEAKER CONNECTION... 8 band 63/125/250/500/1k/2k/4k/8kHz ±6dB (0.5dB/STEPS) 4 - FRONT/NORMAL/FLAT/MANUAL ADJUSTABLE PARAMETERS WITH EQ FUNCTION PLAYBACK SOURCE MATERIAL CUSTOMIZATION MICROPHONE OPTIONS MEASUREMENT TIME TONE CONTROL (BASS/TREBLE) - ±... - DIFFERENT EQ SETTINGS CAN BE ASSIGNED BY INPUT SURROUND MODE AS WELL AS DIRECT OR PURE DIRECT MODES DENON DESIGNED DM-S305 OR ANY 3RD PARTY MICROPHONE THAT MEETS SUPPLIED SPECIFICATIONS UNDER 3 MINUTES, 30 SECONDS FOR 10 ...
... up to 2kHz, above 2kHz -3dB/oct) - C. AVR-985S/2805/3805 Auto-Setup and Room EQ Features AUTO SETUP FEATURES SPEAKER CONNECTION... 8 band 63/125/250/500/1k/2k/4k/8kHz ±6dB (0.5dB/STEPS) 4 - FRONT/NORMAL/FLAT/MANUAL ADJUSTABLE PARAMETERS WITH EQ FUNCTION PLAYBACK SOURCE MATERIAL CUSTOMIZATION MICROPHONE OPTIONS MEASUREMENT TIME TONE CONTROL (BASS/TREBLE) - ±... - DIFFERENT EQ SETTINGS CAN BE ASSIGNED BY INPUT SURROUND MODE AS WELL AS DIRECT OR PURE DIRECT MODES DENON DESIGNED DM-S305 OR ANY 3RD PARTY MICROPHONE THAT MEETS SUPPLIED SPECIFICATIONS UNDER 3 MINUTES, 30 SECONDS FOR 10 ...
Serial Protocol
Page 9
... change ONLY DOLBY PL2 mode ROOM EQ mode direct change TUNER Frequency UP/DOWN , direct change --- ****.** kHz at AM band (>050000 is AM.) ****.** MHz at AVR model PARAMETER setting TONE DEFEAT ON/OFF SURROUND BACK SP MODE set ---MTRX ON = SURR.EX ON = DSCRT ON (@THX) (@ES DSCRT) CINEMA EQ. ON... EQ.ON CINEMA EQ.OFF MODE : MUSIC MODE : CINEMA MODE : GAME MODE : PRO LOGIC ROOM EQ:NORMAL ROOM EQ:FRONT ROOM EQ:FLAT ROOM EQ:MANUAL ROOM EQ:OFF UP DOWN ****** (6 digits) UP DOWN **(PRESET No.) AM FM AUTO...
... change ONLY DOLBY PL2 mode ROOM EQ mode direct change TUNER Frequency UP/DOWN , direct change --- ****.** kHz at AM band (>050000 is AM.) ****.** MHz at AVR model PARAMETER setting TONE DEFEAT ON/OFF SURROUND BACK SP MODE set ---MTRX ON = SURR.EX ON = DSCRT ON (@THX) (@ES DSCRT) CINEMA EQ. ON... EQ.ON CINEMA EQ.OFF MODE : MUSIC MODE : CINEMA MODE : GAME MODE : PRO LOGIC ROOM EQ:NORMAL ROOM EQ:FRONT ROOM EQ:FLAT ROOM EQ:MANUAL ROOM EQ:OFF UP DOWN ****** (6 digits) UP DOWN **(PRESET No.) AM FM AUTO...

Serial Protocol
Page 12
EVENT TF TP PARAMETER ****** (6 digits) **(PRESET No.) function TUNER Frequency change ---Band set to AM FM ---Band set to FM AUTO ---Tuning mode set to AUTO mode MANUAL ---Tuning mode set to No.** TM AM TUNER BAND , MODE change kHz at AM band ****.** MHz at AM) TPA1 (PRESET No."A1") TMAM TMFM TMAUTO TMMANUAL *RES. ? ? - 12 - example TF105000 (1050.00kHz at FM band TUNER PRESET change to MANUAL mode *RES. : NOT returns '? ' parameters as RESPONSE.
EVENT TF TP PARAMETER ****** (6 digits) **(PRESET No.) function TUNER Frequency change ---Band set to AM FM ---Band set to FM AUTO ---Tuning mode set to AUTO mode MANUAL ---Tuning mode set to No.** TM AM TUNER BAND , MODE change kHz at AM band ****.** MHz at AM) TPA1 (PRESET No."A1") TMAM TMFM TMAUTO TMMANUAL *RES. ? ? - 12 - example TF105000 (1050.00kHz at FM band TUNER PRESET change to MANUAL mode *RES. : NOT returns '? ' parameters as RESPONSE.

Serial Protocol
Page 15
EVENT PS PARAMETER ROOM EQ:NORMAL ROOM EQ:FRONT ROOM EQ:FLAT ROOM EQ:MANUAL ROOM EQ:OFF function ROOM EQ mode change *RES. : NOT returns '? ' parameters as RESPONSE. example PSROOM EQ:NORMAL PSROOM EQ:FRONT PSROOM EQ:FLAT PSROOM EQ:MANUAL PSROOM EQ:OFF *RES. ? ? ? ? ? - 15 -
EVENT PS PARAMETER ROOM EQ:NORMAL ROOM EQ:FRONT ROOM EQ:FLAT ROOM EQ:MANUAL ROOM EQ:OFF function ROOM EQ mode change *RES. : NOT returns '? ' parameters as RESPONSE. example PSROOM EQ:NORMAL PSROOM EQ:FRONT PSROOM EQ:FLAT PSROOM EQ:MANUAL PSROOM EQ:OFF *RES. ? ? ? ? ? - 15 -

Auto Setup Specifications
Page 4
... Left (FL) speaker starts, check the Sound Pressure Level at the Listening Point with an SPL Meter. D E N O N E L E C T R O N I C S ( U S A ), LLC. • Set the Parameter "Test Tone" to 'Manual' and "Test Tone Start" to the RMS Volt Meter • Adjust the "microphone amplifier's gain" as the RMS Volt Meter becomes about 120[mV RMS...
... Left (FL) speaker starts, check the Sound Pressure Level at the Listening Point with an SPL Meter. D E N O N E L E C T R O N I C S ( U S A ), LLC. • Set the Parameter "Test Tone" to 'Manual' and "Test Tone Start" to the RMS Volt Meter • Adjust the "microphone amplifier's gain" as the RMS Volt Meter becomes about 120[mV RMS...

Auto Setup Specifications
Page 7
D E N O N E L E C T R O N I C S ( U S A ), LLC. • Start "Auto-Setup" Once Auto Setup and Room EQ has completed, please continue with 'System Setup' as described in the Owner's Manual. 7
D E N O N E L E C T R O N I C S ( U S A ), LLC. • Start "Auto-Setup" Once Auto Setup and Room EQ has completed, please continue with 'System Setup' as described in the Owner's Manual. 7

Owners Manual
Page 1
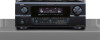
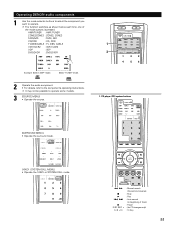
Be sure to offer, read these instructions carefully and use the set properly. "SERIAL NO. PLEASE RECORD UNIT SERIAL NUMBER ATTACHED TO THE REAR OF THE CABINET FOR FUTURE REFERENCE" AV SURROUND RECEIVER AVR-3805 OPERATING INSTRUCTIONS CH SEL ENTER 2 We greatly appreciate your purchase of the AVR-3805. 2 To be sure you take maximum advantage of all the features the AVR-3805 has to keep this manual for future reference, should any questions or problems arise.
Be sure to offer, read these instructions carefully and use the set properly. "SERIAL NO. PLEASE RECORD UNIT SERIAL NUMBER ATTACHED TO THE REAR OF THE CABINET FOR FUTURE REFERENCE" AV SURROUND RECEIVER AVR-3805 OPERATING INSTRUCTIONS CH SEL ENTER 2 We greatly appreciate your purchase of the AVR-3805. 2 To be sure you take maximum advantage of all the features the AVR-3805 has to keep this manual for future reference, should any questions or problems arise.
Owners Manual
Page 4
...the following parts are not problems with the connection cords. We recommend using this unit: • Moving the set for choosing the DENON AVR-3805 Digital A / V Surround Receiver. This remarkable component has been engineered to provide superb surround sound listening with home theater sources such... is provided with an immense array of features, we recommend that before you begin hookup and operation that you review the contents of this manual before using outdoor antennas and 75 Ω/ohms coaxial cables. Always set . • Before turning the power switch on Handling 5 v...
...the following parts are not problems with the connection cords. We recommend using this unit: • Moving the set for choosing the DENON AVR-3805 Digital A / V Surround Receiver. This remarkable component has been engineered to provide superb surround sound listening with home theater sources such... is provided with an immense array of features, we recommend that before you begin hookup and operation that you review the contents of this manual before using outdoor antennas and 75 Ω/ohms coaxial cables. Always set . • Before turning the power switch on Handling 5 v...
Owners Manual
Page 20
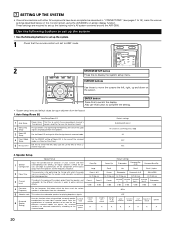
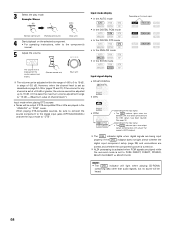
...EQ 1 Auto Setup Power Amp Set this to switch the surround back channel's Assignment power amplifier for use for zone2 or zone3. 2 Manual EQ Setup This parameter is for optimizing the Room EQ with which the audio signals are produced from the speakers. 3 Room EQ Setup Set...A A A A A A A A 20 CURSOR buttons Use these to move the cursors the left, right, up the listening room's AV system centered around the AVR-3805. 7 SETTING UP THE SYSTEM • Once all connections with which the audio signals are produced from the speakers and subwoofer according to the listening position...
...EQ 1 Auto Setup Power Amp Set this to switch the surround back channel's Assignment power amplifier for use for zone2 or zone3. 2 Manual EQ Setup This parameter is for optimizing the Room EQ with which the audio signals are produced from the speakers. 3 Room EQ Setup Set...A A A A A A A A 20 CURSOR buttons Use these to move the cursors the left, right, up the listening room's AV system centered around the AVR-3805. 7 SETTING UP THE SYSTEM • Once all connections with which the audio signals are produced from the speakers and subwoofer according to the listening position...
Owners Manual
Page 27
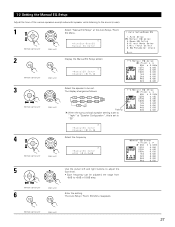
The display changes as follows. The Auto Setup / Room EQ Menu reappears. (Remote control unit) (Main unit) 27 1-2 Setting the Manual EQ Setup Adjust the tone of the various speakers except subwoofer speaker while listening to +6dB in 0.5dB step. (Remote control unit) 6 CH SEL ENTER...the surround back speaker setting is set to "1spkr" at the Auto Setup / Room EQ Menu. *AutoSet/RoomEQ Manual EQ Setup 2 CH SEL ENTER CH SEL ENTER (Remote control unit) (Main unit) Display the Manual EQ Setup screen. *ManualEQ Setup Channel : FL 3 CH SEL ENTER CH SEL ENTER (Remote control unit) (...
The display changes as follows. The Auto Setup / Room EQ Menu reappears. (Remote control unit) (Main unit) 27 1-2 Setting the Manual EQ Setup Adjust the tone of the various speakers except subwoofer speaker while listening to +6dB in 0.5dB step. (Remote control unit) 6 CH SEL ENTER...the surround back speaker setting is set to "1spkr" at the Auto Setup / Room EQ Menu. *AutoSet/RoomEQ Manual EQ Setup 2 CH SEL ENTER CH SEL ENTER (Remote control unit) (Main unit) Display the Manual EQ Setup screen. *ManualEQ Setup Channel : FL 3 CH SEL ENTER CH SEL ENTER (Remote control unit) (...
Owners Manual
Page 28
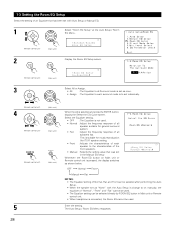
...Main unit or Remote control unit. • When headphone is connected, the Room EQ cannot be selected directly by ROOM EQ button in the Manual EQ setup Whenever the Room EQ button on Main unit or Remote control unit is not used . OFF Normal Front *Room EQ Setup RoomEQ ... Curve screen. Select the Equalizer setting. • OFF :The Equalizer is pressed, the display switches as "None" with the Auto Setup is change to on manually, the equalizer of "Normal", "Front" and "Flat" cannot be used. • The Equalizer setting can be used . • Normal :Adjust the frequency response ...
...Main unit or Remote control unit. • When headphone is connected, the Room EQ cannot be selected directly by ROOM EQ button in the Manual EQ setup Whenever the Room EQ button on Main unit or Remote control unit is not used . OFF Normal Front *Room EQ Setup RoomEQ ... Curve screen. Select the Equalizer setting. • OFF :The Equalizer is pressed, the display switches as "None" with the Auto Setup is change to on manually, the equalizer of "Normal", "Front" and "Flat" cannot be used. • The Equalizer setting can be used . • Normal :Adjust the frequency response ...

Owners Manual
Page 35
... ENTER CH SEL ENTER CH SEL ENTER (Remote control unit) (Main unit) (Remote control unit) (Main unit) 35 Select "Auto" or "Manual". *Channel Level T.Tone: Auto • Auto: Adjust the level while listening to the test tones produced automatically from each speaker. •.... Sp.: B Adjusts the balance of the playback level between the channels when using surround speakers A and B at the same time. When the "Manual" mode is being produced from each speaker. Sp.: A+B Adjusts the balance of the playback level between the channels when using surround speaker B. • Surr...
... ENTER CH SEL ENTER CH SEL ENTER (Remote control unit) (Main unit) (Remote control unit) (Main unit) 35 Select "Auto" or "Manual". *Channel Level T.Tone: Auto • Auto: Adjust the level while listening to the test tones produced automatically from each speaker. •.... Sp.: B Adjusts the balance of the playback level between the channels when using surround speakers A and B at the same time. When the "Manual" mode is being produced from each speaker. Sp.: A+B Adjusts the balance of the playback level between the channels when using surround speaker B. • Surr...
Owners Manual
Page 42
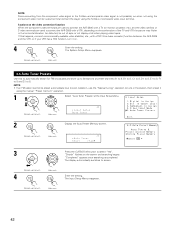
... and searching begins. "Completed" appears once searching is not possible, so when not using the component video monitor output terminal connect the player using the manual "Preset memory" operation. 1 Select "Auto Tuner Presets"at preset channels A1 to 8, B1 to 8, C1 to 8, D1 to 8, E1 to 8, F1 to ... a TV (or monitor, projector, etc.) and the video (yellow) or S video terminals are used to connect the AVR-3805 with a TBC (time base corrector) function between the AVR-3805 and the VTR, or if your VTR has a TBC function, turn it using the S-Video or composite video input terminal. CH ...
... and searching begins. "Completed" appears once searching is not possible, so when not using the component video monitor output terminal connect the player using the manual "Preset memory" operation. 1 Select "Auto Tuner Presets"at preset channels A1 to 8, B1 to 8, C1 to 8, D1 to 8, E1 to 8, F1 to ... a TV (or monitor, projector, etc.) and the video (yellow) or S video terminals are used to connect the AVR-3805 with a TBC (time base corrector) function between the AVR-3805 and the VTR, or if your VTR has a TBC function, turn it using the S-Video or composite video input terminal. CH ...
Owners Manual
Page 51
...; Operate the surround mode. [10KEY / SYSTEM CALL MENU] • Operate the 10KEY or SYSTEM CALL mode. 6, 7 2 1 8, 9 3 DISC SKIP + 0~9, +10 : Manual search (forward and reverse) : Stop : Play : Auto search (to operate. Operating DENON audio components 1 Use the mode selector buttons to select the component you want to beginning of the mode buttons is...
...; Operate the surround mode. [10KEY / SYSTEM CALL MENU] • Operate the 10KEY or SYSTEM CALL mode. 6, 7 2 1 8, 9 3 DISC SKIP + 0~9, +10 : Manual search (forward and reverse) : Stop : Play : Auto search (to operate. Operating DENON audio components 1 Use the mode selector buttons to select the component you want to beginning of the mode buttons is...

Owners Manual
Page 52
...(CDR) system buttons TUNING +, - : Tuning up /down CHA~G : Preset channel range 1~8 : Preset channel 52 6, 7 2 1 8, 9 3 0~9, +10 : Manual search (forward and reverse) : Stop : Play : Auto search (to beginning of track) : Pause : 10 Key Tuner system buttons 6 : Rewind 7 : Fast forward ...2 : Stop 1 : Forward Play 3 : Pause 0 : Reverse Play A/B : Switch between AUTO and MANUAL MEMORY : Preset memory SHIFT : Switch preset channel range CHANNEL +, - : Preset channel up /down BAND : Switch between AM and FM bands MODE : Switch...
...(CDR) system buttons TUNING +, - : Tuning up /down CHA~G : Preset channel range 1~8 : Preset channel 52 6, 7 2 1 8, 9 3 0~9, +10 : Manual search (forward and reverse) : Stop : Play : Auto search (to beginning of track) : Pause : 10 Key Tuner system buttons 6 : Rewind 7 : Fast forward ...2 : Stop 1 : Forward Play 3 : Pause 0 : Reverse Play A/B : Switch between AUTO and MANUAL MEMORY : Preset memory SHIFT : Switch preset channel range CHANNEL +, - : Preset channel up /down BAND : Switch between AM and FM bands MODE : Switch...

Owners Manual
Page 54
...angle 0~9, +10 : 10 key 1 2. Digital video disc player (DVD), Digital video disc recorder (DVD R) system buttons SOURCE ON : Power on /Standby 6, 7 : Manual search (forward and reverse) 2 : Stop 1 : Play 8, 9 : Auto search (cue) 3 : Pause 0~9, +10 : 10 key NOTE: • For the...(for the component you want to manufacturer. Video disc player (VDP) system buttons 54 SOURCE ON : Power on SOURCE OFF : Power off (DENON DVD only) 6, 7 : Manual search (forward and reverse) 2 : Stop 1 : Play 8, 9 : Auto search (to beginning of the various components. 2 Operate the ...
...angle 0~9, +10 : 10 key 1 2. Digital video disc player (DVD), Digital video disc recorder (DVD R) system buttons SOURCE ON : Power on /Standby 6, 7 : Manual search (forward and reverse) 2 : Stop 1 : Play 8, 9 : Auto search (cue) 3 : Pause 0~9, +10 : 10 key NOTE: • For the...(for the component you want to manufacturer. Video disc player (VDP) system buttons 54 SOURCE ON : Power on SOURCE OFF : Power off (DENON DVD only) 6, 7 : Manual search (forward and reverse) 2 : Stop 1 : Play 8, 9 : Auto search (to beginning of the various components. 2 Operate the ...

Owners Manual
Page 55
... buttons 4. Monitor TV (TV),digital broadcast satellite (DBS) tuner and cable (CABLE) system buttons SOURCE ON 6, 7 2 1 3 0~9, +10 : Power on/Standby : Manual search (forward and reverse) : Stop : Play : Pause : 10 key SOURCE ON 6, 7 SETUP TOP MENU MENU RETURN •,ª, 0, 1 ENTER DISPLAY Channel +,... - 0~9, +10 TV/VCR VOL +,- : Power on/standby : Manual search (forward and reverse) : Setup : Top menu : Menu : Return : Cursor up,down,left and right : Enter : Switch display : Switch channels +,- :...
... buttons 4. Monitor TV (TV),digital broadcast satellite (DBS) tuner and cable (CABLE) system buttons SOURCE ON 6, 7 2 1 3 0~9, +10 : Power on/Standby : Manual search (forward and reverse) : Stop : Play : Pause : 10 key SOURCE ON 6, 7 SETUP TOP MENU MENU RETURN •,ª, 0, 1 ENTER DISPLAY Channel +,... - 0~9, +10 TV/VCR VOL +,- : Power on/standby : Manual search (forward and reverse) : Setup : Top menu : Menu : Return : Cursor up,down,left and right : Enter : Switch display : Switch channels +,- :...

Owners Manual
Page 58
For example, when the CD mode is set and the set to the punch through mode in the AMP mode, the CD mode's PLAY, STOP, MANUAL SEARCH, AUTO SEARCH, PAUSE and DISC SKIP buttons' signals are sent in the AMP, ZONE2, ZONE3, TV, DBS and CABLE modes. NOTES: • The remote ...
For example, when the CD mode is set and the set to the punch through mode in the AMP mode, the CD mode's PLAY, STOP, MANUAL SEARCH, AUTO SEARCH, PAUSE and DISC SKIP buttons' signals are sent in the AMP, ZONE2, ZONE3, TV, DBS and CABLE modes. NOTES: • The remote ...
Owners Manual
Page 64
... value of 0.5 dB. Input signal display • DOLBY DIGITAL • DTS • PCM Depending on the input signal. • The DSD indicator lights when the DENON LINK have been connected and the DSD signals have been inputted. (See page 14) Depending on the input signal. • The HDCD indicator lights when... heard. 64 indicator will light when playing CD-ROMs containing data other than audio signals, but no sound will be adjusted up to the component's manual. 5 Adjust the volume.
... value of 0.5 dB. Input signal display • DOLBY DIGITAL • DTS • PCM Depending on the input signal. • The DSD indicator lights when the DENON LINK have been connected and the DSD signals have been inputted. (See page 14) Depending on the input signal. • The HDCD indicator lights when... heard. 64 indicator will light when playing CD-ROMs containing data other than audio signals, but no sound will be adjusted up to the component's manual. 5 Adjust the volume.

Owners Manual
Page 68
... when the setting for using both surround speakers A and B is output in the System Setup Menu. 1 1 1 Using the dimmer function • Use this to the manual of that operation appears on the display. Such information as shown below each time the SPEAKER button is performed, a description of the component on the...
... when the setting for using both surround speakers A and B is output in the System Setup Menu. 1 1 1 Using the dimmer function • Use this to the manual of that operation appears on the display. Such information as shown below each time the SPEAKER button is performed, a description of the component on the...


