Literature/Product Sheet
Page 1
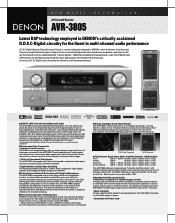
... of use of the speakers to PCM based sources, DENON's waveform technology AL24 Processing Plus brings out all the delicate nuances of the source material. ■ New EL Backlight Touch Panel Remote The AVR-3805's remote controller is a completely new design, focusing heavily on all video... gear connected to the AVR-3805. With the optional microphone placed at 120 watts, into 8 ohms, from their audio...
... of use of the speakers to PCM based sources, DENON's waveform technology AL24 Processing Plus brings out all the delicate nuances of the source material. ■ New EL Backlight Touch Panel Remote The AVR-3805's remote controller is a completely new design, focusing heavily on all video... gear connected to the AVR-3805. With the optional microphone placed at 120 watts, into 8 ohms, from their audio...
Owners Manual
Page 4
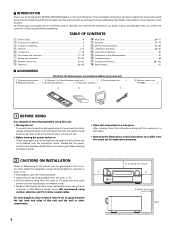
... Features 5, 6 b Connections 7~16 n Part Names and Functions 17~19 m Setting up the system 20~49 , Remote Control Unit 50~61 . As this product is used near a tuner or TV. Always set the power switch to the standby... only 1 e Service station list...........1 t R03/AAA batteries 4 y AM loop antenna 1 u FM indoor antenna...1 r t y u r Remote control unit (RC-969 1 1 BEFORE USING Pay attention to the following steps: • Install this unit as far as providing outstanding high fidelity...away from the actual set for choosing the DENON AVR-3805 Digital A / V Surround Receiver.
... Features 5, 6 b Connections 7~16 n Part Names and Functions 17~19 m Setting up the system 20~49 , Remote Control Unit 50~61 . As this product is used near a tuner or TV. Always set the power switch to the standby... only 1 e Service station list...........1 t R03/AAA batteries 4 y AM loop antenna 1 u FM indoor antenna...1 r t y u r Remote control unit (RC-969 1 1 BEFORE USING Pay attention to the following steps: • Install this unit as far as providing outstanding high fidelity...away from the actual set for choosing the DENON AVR-3805 Digital A / V Surround Receiver.
Owners Manual
Page 7
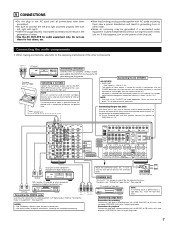
... step-up transformer. Connecting a tape deck Connections for the individual functions. NOTE: This unit cannot be generated if a connected audio equipment is supplied from the remote control unit. 5 CONNECTIONS • Do not plug in Assignment". (See page 39) RL OUTPUT NOTES: • Use 75 Ω/ohms cable pin cords for coaxial connections...
... step-up transformer. Connecting a tape deck Connections for the individual functions. NOTE: This unit cannot be generated if a connected audio equipment is supplied from the remote control unit. 5 CONNECTIONS • Do not plug in Assignment". (See page 39) RL OUTPUT NOTES: • Use 75 Ω/ohms cable pin cords for coaxial connections...
Owners Manual
Page 14
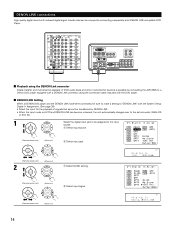
...possible by connecting the AVR-3805 to a Denon DVD player equipped with a DENON LINK connector using the connection cable included with the DVD player. 2 DENON LINK Setting When a DENON DVD player and the DENON LINK have been connected, be sure to make a setting to "DENON LINK" with the ... DENON Link connector Digital transfer and multi-channel playback of signals that cannot be assigned to the set connector (ANALOG or EXT. q Select input source. (Remote control unit) (Main unit) CH SEL ENTER CH SEL ENTER (Remote control unit) 2 CH SEL ENTER (Main unit) CH SEL ENTER (Remote control ...
...possible by connecting the AVR-3805 to a Denon DVD player equipped with a DENON LINK connector using the connection cable included with the DVD player. 2 DENON LINK Setting When a DENON DVD player and the DENON LINK have been connected, be sure to make a setting to "DENON LINK" with the ... DENON Link connector Digital transfer and multi-channel playback of signals that cannot be assigned to the set connector (ANALOG or EXT. q Select input source. (Remote control unit) (Main unit) CH SEL ENTER CH SEL ENTER (Remote control unit) 2 CH SEL ENTER (Main unit) CH SEL ENTER (Remote control ...

Owners Manual
Page 17
... 67, 82, 83) @0 TONE DEFEAT button 67) @1 STATUS button 68) @2 ROOM EQ button 28) @3 SETUP MIC jack 23) @4 MASTER VOLUME control 64) @5 MASTER VOLUME indicator 64) @6 Display @7 Remote control sensor (REMOTE SENSOR 50) @8 FUNCTION knob 63, 67, 68, 71, 87) @9 VIDEO SELECT button 67) #0 ZONE2/3/REC SELECT button 68, 71) #1 TUNING PRESET button 87...
... 67, 82, 83) @0 TONE DEFEAT button 67) @1 STATUS button 68) @2 ROOM EQ button 28) @3 SETUP MIC jack 23) @4 MASTER VOLUME control 64) @5 MASTER VOLUME indicator 64) @6 Display @7 Remote control sensor (REMOTE SENSOR 50) @8 FUNCTION knob 63, 67, 68, 71, 87) @9 VIDEO SELECT button 67) #0 ZONE2/3/REC SELECT button 68, 71) #1 TUNING PRESET button 87...

Owners Manual
Page 19
Remote control unit • For details on the functions of these parts, refer to the pages given in ...EQ button 28) Tuner system buttons ..........(52, 59, 71, 85) VIDEO ON/OFF button 66) INPUT MODE selector buttons 63) Remote control signal transmitter 50) 10KEY/SYSTEM CALL button 51 ~ 61) SURROUND PARAMETER button 74 ~ 77, 81, 82) ON SCREEN button ...68, 77) Cursor buttons 20) Master volume control buttons 64, 71) CH SELECT/ENTER button ........(20, 72, 73) MUTING button 67) SYSTEM buttons 51 ~ 55) DIMMER button ...
Remote control unit • For details on the functions of these parts, refer to the pages given in ...EQ button 28) Tuner system buttons ..........(52, 59, 71, 85) VIDEO ON/OFF button 66) INPUT MODE selector buttons 63) Remote control signal transmitter 50) 10KEY/SYSTEM CALL button 51 ~ 61) SURROUND PARAMETER button 74 ~ 77, 81, 82) ON SCREEN button ...68, 77) Cursor buttons 20) Master volume control buttons 64, 71) CH SELECT/ENTER button ........(20, 72, 73) MUTING button 67) SYSTEM buttons 51 ~ 55) DIMMER button ...
Owners Manual
Page 20
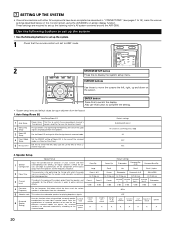
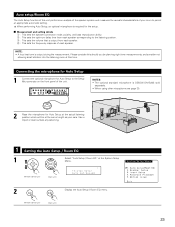
... screen using multiple surround speaker combinations for playing deep bass signals. (Surround 6 Speaker Setting) Use this function when using the AVR-3805's on the screen ENTER button Press this to switch the surround back channel's Assignment power amplifier for the different surround modes are... system. 1 Check that the remote control unit set to AMP mode. 2 SYSTEM SETUP button Press this button to complete the setting. • System setup items and default values (set up the listening room's AV system centered around the AVR-3805. Speaker Setup Speaker Setup Input...
... screen using multiple surround speaker combinations for playing deep bass signals. (Surround 6 Speaker Setting) Use this function when using the AVR-3805's on the screen ENTER button Press this to switch the surround back channel's Assignment power amplifier for the different surround modes are... system. 1 Check that the remote control unit set to AMP mode. 2 SYSTEM SETUP button Press this button to complete the setting. • System setup items and default values (set up the listening room's AV system centered around the AVR-3805. Speaker Setup Speaker Setup Input...
Owners Manual
Page 21
...details, see page 49.) • The AVR-3805's on-screen display function is connected to lock the system setup settings so that appears on the monitor screen when the controls on or off when down-mixing Dolby ...VDP TV DBS VCR-1 VCR-2 V. Surround Back 2 Zone2 vol. Set whether or not to both the AVR-3805's S-Video and video monitor output jacks and signals are being used. 21 Level 3 Trigger Out1 Setup This...picture. 2 Dolby Digital Setup Turn the audio compression on the remote control unit or main unit are received automatically and stored in the memory.
...details, see page 49.) • The AVR-3805's on-screen display function is connected to lock the system setup settings so that appears on the monitor screen when the controls on or off when down-mixing Dolby ...VDP TV DBS VCR-1 VCR-2 V. Surround Back 2 Zone2 vol. Set whether or not to both the AVR-3805's S-Video and video monitor output jacks and signals are being used. 21 Level 3 Trigger Out1 Setup This...picture. 2 Dolby Digital Setup Turn the audio compression on the remote control unit or main unit are received automatically and stored in the memory.
Owners Manual
Page 22
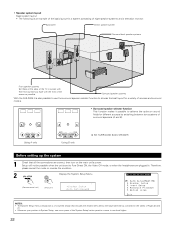
Surround speaker systems With the AVR-3805 it is also possible to use the surround speaker selector function to choose the best layout for a variety of sources and surround modes. • Surround ... different sources by switching between two systems of surround speakers (A and B). Therefore, please cancel the mode or reverse the condition. 2 Display the System Setup Menu. (Remote control unit) (Main unit) *System Setup Auto Set/RoomEQ NOTES: • The System Setup menu composition is of a layered design that all the connections are plugged...
Surround speaker systems With the AVR-3805 it is also possible to use the surround speaker selector function to choose the best layout for a variety of sources and surround modes. • Surround ... different sources by switching between two systems of surround speakers (A and B). Therefore, please cancel the mode or reverse the condition. 2 Display the System Setup Menu. (Remote control unit) (Main unit) *System Setup Auto Set/RoomEQ NOTES: • The System Setup menu composition is of a layered design that all the connections are plugged...
Owners Manual
Page 23
...unit) Select "Auto Setup / Room EQ" at this time. Please consider this should you be at positioning. e : This sets the volume that is DENON DM-S305 sold separately. • When using other microphone see page 30. 2 Place the microphone for the setup. 2 Measurement and setting details q ...allowing small children into the listening room at the System Setup Menu. *System Setup Auto Set/RoomEQ 2 CH SEL ENTER CH SEL ENTER (Remote control unit) (Main unit) Display the Auto Setup / Room EQ menu. 23 When performing Auto Setup, an optional microphone is output during the ...
...unit) Select "Auto Setup / Room EQ" at this time. Please consider this should you be at positioning. e : This sets the volume that is DENON DM-S305 sold separately. • When using other microphone see page 30. 2 Place the microphone for the setup. 2 Measurement and setting details q ...allowing small children into the listening room at the System Setup Menu. *System Setup Auto Set/RoomEQ 2 CH SEL ENTER CH SEL ENTER (Remote control unit) (Main unit) Display the Auto Setup / Room EQ menu. 23 When performing Auto Setup, an optional microphone is output during the ...

Owners Manual
Page 24
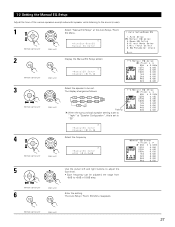
.... *AutoSet/RoomEQ Auto Setup 2 CH SEL ENTER Display the Auto Setup screen. 1-1 Setting the Auto Setup 1 CH SEL ENTER CH SEL ENTER (Remote control unit) (Main unit) Select "Auto Setup" at System Setup Menu "Power Amp Assign", surround back speaker is reflected in "21.setting the type... is not displayed as the target of setup in "5-1.Power Amp Assign". *Auto Setup Start w Press the Cursor left button. (Remote control unit) (Main unit) 24 CH SEL ENTER (Remote control unit) (Main unit) 3 Check the "Power Amp Assign" setting. • When "Surround Back" is selected, the test ...
.... *AutoSet/RoomEQ Auto Setup 2 CH SEL ENTER Display the Auto Setup screen. 1-1 Setting the Auto Setup 1 CH SEL ENTER CH SEL ENTER (Remote control unit) (Main unit) Select "Auto Setup" at System Setup Menu "Power Amp Assign", surround back speaker is reflected in "21.setting the type... is not displayed as the target of setup in "5-1.Power Amp Assign". *Auto Setup Start w Press the Cursor left button. (Remote control unit) (Main unit) 24 CH SEL ENTER (Remote control unit) (Main unit) 3 Check the "Power Amp Assign" setting. • When "Surround Back" is selected, the test ...

Owners Manual
Page 26
...display the verification screen. Check] [Delay Time Check] [Channel Level Check] 3 CH SEL ENTER CH SEL ENTER (Remote control unit) 4 CH SEL ENTER (Main unit) CH SEL ENTER (Remote control unit) (Main unit) 5 CH SEL ENTER CH SEL ENTER If the check ends, press the ENTER button again... again. • Cancel the checked measurement value. *Auto Setup Store When the "Store" is selected, it measures again. (Remote control unit) (Main unit) 26 Check of the measurement results 1 Select the items. The measurement results of the internal electrical delay. [Speaker Config.
...display the verification screen. Check] [Delay Time Check] [Channel Level Check] 3 CH SEL ENTER CH SEL ENTER (Remote control unit) 4 CH SEL ENTER (Main unit) CH SEL ENTER (Remote control unit) (Main unit) 5 CH SEL ENTER CH SEL ENTER If the check ends, press the ENTER button again... again. • Cancel the checked measurement value. *Auto Setup Store When the "Store" is selected, it measures again. (Remote control unit) (Main unit) 26 Check of the measurement results 1 Select the items. The measurement results of the internal electrical delay. [Speaker Config.
Owners Manual
Page 27
...SRA SBR SBL SRB SLB SB 1spkr Flashing When the surround back speaker setting is set . The Auto Setup / Room EQ Menu reappears. (Remote control unit) (Main unit) 27 1-2 Setting the Manual EQ Setup Adjust the tone of the various speakers except subwoofer speaker while listening to the sound ...(music). 1 CH SEL ENTER CH SEL ENTER (Remote control unit) (Main unit) Select "Manual EQ Setup" at "Speaker Configuration", this is set to "1spkr" at the Auto Setup / Room EQ Menu...
...SRA SBR SBL SRB SLB SB 1spkr Flashing When the surround back speaker setting is set . The Auto Setup / Room EQ Menu reappears. (Remote control unit) (Main unit) 27 1-2 Setting the Manual EQ Setup Adjust the tone of the various speakers except subwoofer speaker while listening to the sound ...(music). 1 CH SEL ENTER CH SEL ENTER (Remote control unit) (Main unit) Select "Manual EQ Setup" at "Speaker Configuration", this is set to "1spkr" at the Auto Setup / Room EQ Menu...
Owners Manual
Page 28
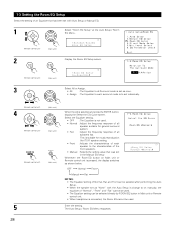
...individually. This is suitable for general surround system. • Flat :Adjust the frequency response of an Equalizer that was set in Main unit or Remote control unit. • When headphone is connected, the Room EQ cannot be used . • Normal :Adjust the frequency response of all Surround ...the front speakers. • Manual :Selects the setting value that has been set with the Auto Setup is change to on Main unit or Remote control unit is pressed, the display switches as once. • Assign :The Equalizer to set as shown below. Enter the setting. The Auto ...
...individually. This is suitable for general surround system. • Flat :Adjust the frequency response of an Equalizer that was set in Main unit or Remote control unit. • When headphone is connected, the Room EQ cannot be used . • Normal :Adjust the frequency response of all Surround ...the front speakers. • Manual :Selects the setting value that has been set with the Auto Setup is change to on Main unit or Remote control unit is pressed, the display switches as once. • Assign :The Equalizer to set as shown below. Enter the setting. The Auto ...

Owners Manual
Page 29
...Direct Mode Perform the ON/OFF setting of Room EQ when the surround mode is Direct or Pure Direct. 1 CH SEL ENTER CH SEL ENTER (Remote control unit) (Main unit) Select "Direct Mode Setup" at the Auto Setup / Room EQ Menu. *AutoSet/RoomEQ Direct Mode 2 CH SEL ENTER CH SEL ENTER... (Remote control unit) (Main unit) 3 CH SEL ENTER CH SEL ENTER Display the Direct Mode Setup screen. *Direct Mode Room EQ : OFF Select ON or OFF. (Remote control unit) (Main unit) 4 CH SEL ENTER CH SEL ENTER Enter the setting . The...
...Direct Mode Perform the ON/OFF setting of Room EQ when the surround mode is Direct or Pure Direct. 1 CH SEL ENTER CH SEL ENTER (Remote control unit) (Main unit) Select "Direct Mode Setup" at the Auto Setup / Room EQ Menu. *AutoSet/RoomEQ Direct Mode 2 CH SEL ENTER CH SEL ENTER... (Remote control unit) (Main unit) 3 CH SEL ENTER CH SEL ENTER Display the Direct Mode Setup screen. *Direct Mode Room EQ : OFF Select ON or OFF. (Remote control unit) (Main unit) 4 CH SEL ENTER CH SEL ENTER Enter the setting . The...

Owners Manual
Page 30
Please ask the DENON Authorized Service Center about the usable microphone other than the option setup. 1 Select "Mic Input Select" at the Auto Setup / Room EQ Menu. ENTER (Remote control unit) (Main unit) 1-6 Check the EQ parameter • The frequency characteristic of each speaker is rectified and the tone...whether the setup microphone is unified. The EQ parameters that were set in Auto Setup can be checked. CH SEL ENTER CH SEL ENTER (Remote control unit) (Main unit) *AutoSet/RoomEQ Mic In Select 2 CH SEL ENTER Display the Mic Input Select screen. CH SEL The Auto Setup...
Please ask the DENON Authorized Service Center about the usable microphone other than the option setup. 1 Select "Mic Input Select" at the Auto Setup / Room EQ Menu. ENTER (Remote control unit) (Main unit) 1-6 Check the EQ parameter • The frequency characteristic of each speaker is rectified and the tone...whether the setup microphone is unified. The EQ parameters that were set in Auto Setup can be checked. CH SEL ENTER CH SEL ENTER (Remote control unit) (Main unit) *AutoSet/RoomEQ Mic In Select 2 CH SEL ENTER Display the Mic Input Select screen. CH SEL The Auto Setup...
Owners Manual
Page 31
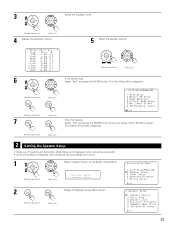
...Select the speaker channel. CH SEL ENTER CH SEL ENTER (Remote control unit) CH SEL ENTER (Main unit) CH SEL ENTER (Remote control unit) (Main unit) 7 CH SEL ENTER CH SEL ENTER Enter the Setting. The System Setup Menu reappears. (Remote control unit) (Main unit) 2 Setting the Speaker Setup •... 1 Select "Speaker Setup" at the Auto Setup / Room EQ Menu screen. CH SEL ENTER (Remote control unit) (Main unit) 31 The Auto Setup Menu reappears. CH SEL ENTER CH SEL ENTER (Remote control unit) (Main unit) 6 If the check ends, select "Exit" and press the ENTER button. ...
...Select the speaker channel. CH SEL ENTER CH SEL ENTER (Remote control unit) CH SEL ENTER (Main unit) CH SEL ENTER (Remote control unit) (Main unit) 7 CH SEL ENTER CH SEL ENTER Enter the Setting. The System Setup Menu reappears. (Remote control unit) (Main unit) 2 Setting the Speaker Setup •... 1 Select "Speaker Setup" at the Auto Setup / Room EQ Menu screen. CH SEL ENTER (Remote control unit) (Main unit) 31 The Auto Setup Menu reappears. CH SEL ENTER CH SEL ENTER (Remote control unit) (Main unit) 6 If the check ends, select "Exit" and press the ENTER button. ...
Owners Manual
Page 32
...Select this when using speakers that have sufficient performance for reproducing bass sound below the frequency set for the Crossover Frequency mode. CH SEL ENTER (Remote control unit) 3 CH SEL ENTER (Main unit) CH SEL ENTER Set whether speakers are installed. Yes/No Select "Yes" when a subwoofer is... Setup Menu reappears. Small Select this when using speakers that do not know, try comparing the sound at the Speaker Setup Menu. B (Remote control unit) (Main unit) NOTE: • Select "Large" or "Small" not according to the actual size of the speaker but according to...
...Select this when using speakers that have sufficient performance for reproducing bass sound below the frequency set for the Crossover Frequency mode. CH SEL ENTER (Remote control unit) 3 CH SEL ENTER (Main unit) CH SEL ENTER Set whether speakers are installed. Yes/No Select "Yes" when a subwoofer is... Setup Menu reappears. Small Select this when using speakers that do not know, try comparing the sound at the Speaker Setup Menu. B (Remote control unit) (Main unit) NOTE: • Select "Large" or "Small" not according to the actual size of the speaker but according to...

Owners Manual
Page 33
...Delay Time Meters : Feet 3 CH SEL ENTER Select the desired unit, meters or feet. The picture of the speaker selected blinks. CH SEL ENTER (Remote control unit) (Main unit) 4 Once "Meters" or "Feet" is selected 33 2-2 Setting the Delay Time • Input the distance between the listening position... L5 on the diagram at the Speaker Setup Menu. *Speaker Setup Delay Time 2 CH SEL ENTER Display the Delay Time screen. CH SEL ENTER (Remote control unit) (Main unit) Example: When "Feet" is selected in step 3, the Delay Time screen appears automatically. *Delay Time FL : 12.0ft...
...Delay Time Meters : Feet 3 CH SEL ENTER Select the desired unit, meters or feet. The picture of the speaker selected blinks. CH SEL ENTER (Remote control unit) (Main unit) 4 Once "Meters" or "Feet" is selected 33 2-2 Setting the Delay Time • Input the distance between the listening position... L5 on the diagram at the Speaker Setup Menu. *Speaker Setup Delay Time 2 CH SEL ENTER Display the Delay Time screen. CH SEL ENTER (Remote control unit) (Main unit) Example: When "Feet" is selected in step 3, the Delay Time screen appears automatically. *Delay Time FL : 12.0ft...
Owners Manual
Page 34
...distance changes in highlighted line. In this setting to adjust so that the playback level between the center speaker and listening position. The AVR-3805 automatically sets the optimum surround delay time for every speaker should be adjusted directly from the speakers to adjust the level. •...the distance unit is changed after the delay time is equal. • From the listening position, listen to the test tones produced from the remote control unit. (For details, see page 20). 2-3 Setting the Channel Level • Use this case, please relocate the blinking speaker(s) so that ...
...distance changes in highlighted line. In this setting to adjust so that the playback level between the center speaker and listening position. The AVR-3805 automatically sets the optimum surround delay time for every speaker should be adjusted directly from the speakers to adjust the level. •...the distance unit is changed after the delay time is equal. • From the listening position, listen to the test tones produced from the remote control unit. (For details, see page 20). 2-3 Setting the Channel Level • Use this case, please relocate the blinking speaker(s) so that ...


