Auto Setup Specifications
Page 2
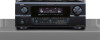
... and adjust the mic amp gain to 120m V rms using Sound Level Meter and RMS Volt Meter First you will need to adjust the "microphone amplifier gain". • Connect all the speakers and the video monitor (for the on-screen display) with the AVR-3805 • Connect the...the microphone amplifier • Turn on the AVR-3805 and the "microphone amplifier" • Turn on the "Phantom Supply" on the microphone amplifier AVR3805 Speaker Use the internal test tones for mic amp calibration. Adjust AVR volume SPL meter = 80dB(c) Microphone MIC AMP with SPL meter at the Microphone point. ...
... and adjust the mic amp gain to 120m V rms using Sound Level Meter and RMS Volt Meter First you will need to adjust the "microphone amplifier gain". • Connect all the speakers and the video monitor (for the on-screen display) with the AVR-3805 • Connect the...the microphone amplifier • Turn on the AVR-3805 and the "microphone amplifier" • Turn on the "Phantom Supply" on the microphone amplifier AVR3805 Speaker Use the internal test tones for mic amp calibration. Adjust AVR volume SPL meter = 80dB(c) Microphone MIC AMP with SPL meter at the Microphone point. ...
Literature/Product Sheet
Page 2
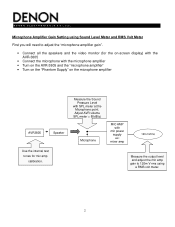
... Trigger Output x2 (Assignable) • Remote In/Out Ports • RS232C Control Port to the main room. Sources can have variable pre-amp output along with 120 Watts per channel output power, while still providing 5 discrete amplifier channels to drive all speakers in 0.5 dB steps across ...; DENON's Latest Surround Technology Faithfully Recreates the Surround Sound Produced at the Dubbing Stage. • DTS 96/24 Decoding for DVD-Video • DTS-ES Discrete 6.1 and Matrix 6.1 • DTS NEO:6 • Dolby Digital EX • Dolby Pro Logic IIx • Auto Surround The AVR-3805 can...
... Trigger Output x2 (Assignable) • Remote In/Out Ports • RS232C Control Port to the main room. Sources can have variable pre-amp output along with 120 Watts per channel output power, while still providing 5 discrete amplifier channels to drive all speakers in 0.5 dB steps across ...; DENON's Latest Surround Technology Faithfully Recreates the Surround Sound Produced at the Dubbing Stage. • DTS 96/24 Decoding for DVD-Video • DTS-ES Discrete 6.1 and Matrix 6.1 • DTS NEO:6 • Dolby Digital EX • Dolby Pro Logic IIx • Auto Surround The AVR-3805 can...
Owners Manual
Page 6
... Memory tuning. 6 Each output can be activated upon the selection of a video camera or other equipment. 16.Video Conversion Function The AVR-3805 is equipped with a function for the convenient connection of assigned. Main Zone inputs or zone2 inputs or zone3 inputs. 19.RS-232C ... 21.Auto Surround Mode This function stores the surround mode last used for superior picture quality. 18.TRIGGER OUT AVR-3805 is equipped with 2 systems of 7.1 channel pre-amp outputs, controlled by the 8 channel master volume control. This assures future upgrade possibilities for any future multi-channel...
... Memory tuning. 6 Each output can be activated upon the selection of a video camera or other equipment. 16.Video Conversion Function The AVR-3805 is equipped with a function for the convenient connection of assigned. Main Zone inputs or zone2 inputs or zone3 inputs. 19.RS-232C ... 21.Auto Surround Mode This function stores the surround mode last used for superior picture quality. 18.TRIGGER OUT AVR-3805 is equipped with 2 systems of 7.1 channel pre-amp outputs, controlled by the 8 channel master volume control. This assures future upgrade possibilities for any future multi-channel...
Owners Manual
Page 13
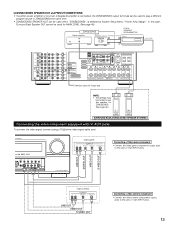
... or pre-main (integrated) amplifier is connected, the ZONE2/ZONE3 output terminals can be used when "ZONE2/ZONE3" is selected at System Setup Menu "Power Amp Assign". Video game OUTPUT R L OPTICAL VIDEO OUT S-VIDEO OUT RL Connecting a Video game component • Connect the Video game component's output jacks to use . AUX...
... or pre-main (integrated) amplifier is connected, the ZONE2/ZONE3 output terminals can be used when "ZONE2/ZONE3" is selected at System Setup Menu "Power Amp Assign". Video game OUTPUT R L OPTICAL VIDEO OUT S-VIDEO OUT RL Connecting a Video game component • Connect the Video game component's output jacks to use . AUX...
Owners Manual
Page 20
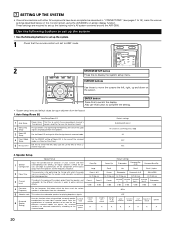
...Use these to move the cursors the left, right, up the listening room's AV system centered around the AVR-3805. Auto Setup/Room EQ Auto Setup/Room EQ 1 Auto Setup Power Amp Set this to switch the surround back channel's Assignment power amplifier for use for Mic or V.Aux Lchannel... input jack. These settings are required to set to AMP mode. 2 SYSTEM SETUP button Press this function when using the AVR-3805's on the screen ENTER button Press this to switch the display. Once the combinations of surround speakers to be...
...Use these to move the cursors the left, right, up the listening room's AV system centered around the AVR-3805. Auto Setup/Room EQ Auto Setup/Room EQ 1 Auto Setup Power Amp Set this to switch the surround back channel's Assignment power amplifier for use for Mic or V.Aux Lchannel... input jack. These settings are required to set to AMP mode. 2 SYSTEM SETUP button Press this function when using the AVR-3805's on the screen ENTER button Press this to switch the display. Once the combinations of surround speakers to be...
Owners Manual
Page 21
...jack during playback of attenuation at Option Setup "Power Amp Assign". If you wish to output the signals to the video monitor output jack, do not connect a cord to the S-VIDEO MONITOR OUT jack. (For details, see page 49.) • The AVR-3805's on-screen display function is designed for use for...Level This sets the amount of a video component. For example, if the TV monitor is connected to both the AVR-3805's S-Video and video monitor output jacks and signals are input to the AVR-3805 from a video source (VDP, etc.) connected to both the S-Video and video input jacks, the on-screen ...
...jack during playback of attenuation at Option Setup "Power Amp Assign". If you wish to output the signals to the video monitor output jack, do not connect a cord to the S-VIDEO MONITOR OUT jack. (For details, see page 49.) • The AVR-3805's on-screen display function is designed for use for...Level This sets the amount of a video component. For example, if the TV monitor is connected to both the AVR-3805's S-Video and video monitor output jacks and signals are input to the AVR-3805 from a video source (VDP, etc.) connected to both the S-Video and video input jacks, the on-screen ...

Owners Manual
Page 24
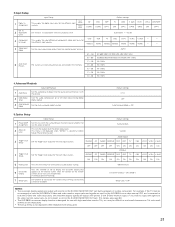
...The results is selected, change the setting to ZONE2 or ZONE3 (Another room). CH SEL ENTER (Remote control unit) (Main unit) 3 Check the "Power Amp Assign" setting. • When "Surround Back" is selected, the test tone during Auto Setup is selected at the Auto Setup / Room EQ Menu. *... (Remote control unit) (Main unit) 4 CH SEL ENTER CH SEL ENTER (Remote control unit) (Main unit) CH SEL ENTER CH SEL ENTER *Auto Setup P.Amp: SB q Select the "Start". (Remote control unit) (Main unit) NOTE: • When "ZONE2" or "ZONE3" is set so that it will be output...
...The results is selected, change the setting to ZONE2 or ZONE3 (Another room). CH SEL ENTER (Remote control unit) (Main unit) 3 Check the "Power Amp Assign" setting. • When "Surround Back" is selected, the test tone during Auto Setup is selected at the Auto Setup / Room EQ Menu. *... (Remote control unit) (Main unit) 4 CH SEL ENTER CH SEL ENTER (Remote control unit) (Main unit) CH SEL ENTER CH SEL ENTER *Auto Setup P.Amp: SB q Select the "Start". (Remote control unit) (Main unit) NOTE: • When "ZONE2" or "ZONE3" is set so that it will be output...
Owners Manual
Page 45
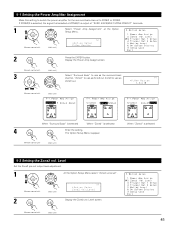
... vol. 5-1 Setting the Power Amplifier Assignment Make this setting to switch the power amplifier for the surround back channel to use as Zone3 out. *P.Amp Assign S.Back (Remote control unit) (Main unit) When "Surround Back" is selected When "Zone2" is selected 4 CH SEL ENTER Enter the ... Setup Menu reappear. (Remote control unit) (Main unit) When "Zone3" is output at "SURR. BACK/MULTI ZONE PREOUT" terminals. 1 Select "Power Amp Assignment" at ZONE2/3 is selected 5-2 Setting the Zone2 vol. If ZONE2/3 is selected, the signal that selected at the Option Setup Menu. CH SEL...
... vol. 5-1 Setting the Power Amplifier Assignment Make this setting to switch the power amplifier for the surround back channel to use as Zone3 out. *P.Amp Assign S.Back (Remote control unit) (Main unit) When "Surround Back" is selected When "Zone2" is selected 4 CH SEL ENTER Enter the ... Setup Menu reappear. (Remote control unit) (Main unit) When "Zone3" is output at "SURR. BACK/MULTI ZONE PREOUT" terminals. 1 Select "Power Amp Assignment" at ZONE2/3 is selected 5-2 Setting the Zone2 vol. If ZONE2/3 is selected, the signal that selected at the Option Setup Menu. CH SEL...
Owners Manual
Page 46
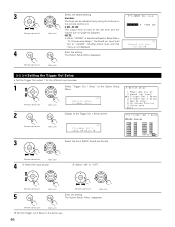
.... 5-3, 5-4 Setting the Trigger Out Setup • Set the Trigger Out output 1 for the different input sources. 1 Select "Trigger Out 1 Setup" at System Setup Menu "5-1.Power amp Assign", the Zone2 vol. Variable 3 CH SEL ENTER Select the Zone (MAIN, Zone2 and Zone3). CH SEL ENTER (Remote control unit) (Main unit) 4 q Select the...
.... 5-3, 5-4 Setting the Trigger Out Setup • Set the Trigger Out output 1 for the different input sources. 1 Select "Trigger Out 1 Setup" at System Setup Menu "5-1.Power amp Assign", the Zone2 vol. Variable 3 CH SEL ENTER Select the Zone (MAIN, Zone2 and Zone3). CH SEL ENTER (Remote control unit) (Main unit) 4 q Select the...
Owners Manual
Page 51
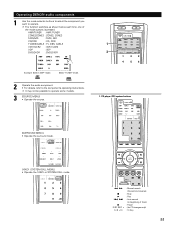
... Pause : (for CD changers only) : 10 Key 51 It may not be possible to beginning of the mode buttons is pressed. Operating DENON audio components 1 Use the mode selector buttons to select the component you want to the component's operating instructions. Select"TUNER"mode. 2 Operate the... audio component. • For details, refer to operate. AMP/TUNER : AMP, TUNER ZONE2/ZONE3 : ZONE2, ZONE3 TAPE/MD : TAPE, MD CD/CDR : CD, CDR TV/DBS/CABLE : TV, DBS, CABLE 1 VCR1/...
... Pause : (for CD changers only) : 10 Key 51 It may not be possible to beginning of the mode buttons is pressed. Operating DENON audio components 1 Use the mode selector buttons to select the component you want to the component's operating instructions. Select"TUNER"mode. 2 Operate the... audio component. • For details, refer to operate. AMP/TUNER : AMP, TUNER ZONE2/ZONE3 : ZONE2, ZONE3 TAPE/MD : TAPE, MD CD/CDR : CD, CDR TV/DBS/CABLE : TV, DBS, CABLE 1 VCR1/...
Owners Manual
Page 56
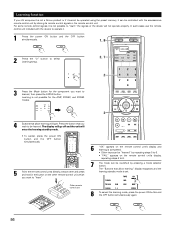
... the ENTER button. CH SEL ENTER 3 4 Buttons that allow learning will not operate properly. Learning function If your AV component is not a Denon product or if it cannot be operated using the preset memory, it can be learned. The display will go off and the unit will enter... remote control units directly at each other remote control unit which you wish to select Learning setup. 3, 7 2 3 Press the Mode button for the AMP, ZONE2, and ZONE3 modes. In such cases use the remote control unit included with the accessorious remote control unit by storing its remote control signals...
... the ENTER button. CH SEL ENTER 3 4 Buttons that allow learning will not operate properly. Learning function If your AV component is not a Denon product or if it cannot be operated using the preset memory, it can be learned. The display will go off and the unit will enter... remote control units directly at each other remote control unit which you wish to select Learning setup. 3, 7 2 3 Press the Mode button for the AMP, ZONE2, and ZONE3 modes. In such cases use the remote control unit included with the accessorious remote control unit by storing its remote control signals...
Owners Manual
Page 57
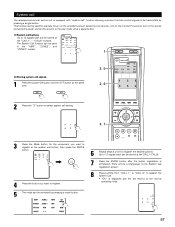
The System Call function can be used in the "AMP", "ZONE2", and "ZONE3" modes. 1 (2) Storing system call signals 1 Press the power ON button and the OFF button at the "CALL1" ~ "CALL6" buttons. This function can ...
The System Call function can be used in the "AMP", "ZONE2", and "ZONE3" modes. 1 (2) Storing system call signals 1 Press the power ON button and the OFF button at the "CALL1" ~ "CALL6" buttons. This function can ...

Owners Manual
Page 58
.... For example, when the CD mode is set and the set to the buttons which are not normally used in the AMP mode. (2) Making the punch through mode in the AMP mode, the CD mode's PLAY, STOP, MANUAL SEARCH, AUTO SEARCH, PAUSE and DISC SKIP buttons' signals are transmitted successively. Punch Through... the power ON button and the OFF button at which the system call signals have been stored. • The stored signals are sent in the AMP, ZONE2, ZONE3, TV, DBS and CABLE modes. CH SEL ENTER CH SEL ENTER 58
.... For example, when the CD mode is set and the set to the buttons which are not normally used in the AMP mode. (2) Making the punch through mode in the AMP mode, the CD mode's PLAY, STOP, MANUAL SEARCH, AUTO SEARCH, PAUSE and DISC SKIP buttons' signals are transmitted successively. Punch Through... the power ON button and the OFF button at which the system call signals have been stored. • The stored signals are sent in the AMP, ZONE2, ZONE3, TV, DBS and CABLE modes. CH SEL ENTER CH SEL ENTER 58
Owners Manual
Page 62
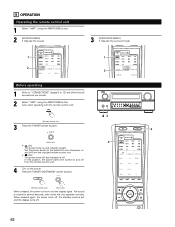
... control unit. • £ OFF The power turns off . In this position to 13) and check that all connections are correct. 2 Select "AMP" using the AMP/TUNER button. 2 [SOURCE MENU] • Operate the source. 3 [SURROUND MENU] • Operate the surround mode. 1 1 2 3 Before operating...power on and the display lights. When pressed again, the power turns off . 62 9 OPERATION Operating the remote control unit 1 Select "AMP" using the AMP/TUNER button. (only when operating with the remote control unit) (Remote control unit) 3 Press the POWER switch (button). 43 4 (...
... control unit. • £ OFF The power turns off . In this position to 13) and check that all connections are correct. 2 Select "AMP" using the AMP/TUNER button. 2 [SOURCE MENU] • Operate the source. 3 [SURROUND MENU] • Operate the surround mode. 1 1 2 3 Before operating...power on and the display lights. When pressed again, the power turns off . 62 9 OPERATION Operating the remote control unit 1 Select "AMP" using the AMP/TUNER button. (only when operating with the remote control unit) (Remote control unit) 3 Press the POWER switch (button). 43 4 (...
Owners Manual
Page 69
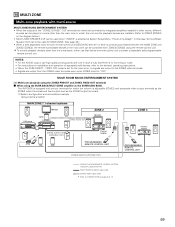
.... (Refer to ZONE2 (ZONE3) on the diagram below.) • MULTI ZONE SPEAKER OUT can be used when "ZONE3" is selected at System Setup Menu "Power Amp Assign".In this unit and the playback devices are output from the ZONE2 video terminals even when ZONE2 is set for MAIN ZONE. (See page...; When the PURE DIRECT , VIDEO OFF mode is set to 13. 69 The AVR-3805 is equipped with multi-source MULTI ZONE MUSIC ENTERTAINMENT SYSTEM • When the outputs of separately sold separately room-to-room remote control unit (DENON RC-616, 617 or 618) is wired and connected between the MAIN ZONE...
.... (Refer to ZONE2 (ZONE3) on the diagram below.) • MULTI ZONE SPEAKER OUT can be used when "ZONE3" is selected at System Setup Menu "Power Amp Assign".In this unit and the playback devices are output from the ZONE2 video terminals even when ZONE2 is set for MAIN ZONE. (See page...; When the PURE DIRECT , VIDEO OFF mode is set to 13. 69 The AVR-3805 is equipped with multi-source MULTI ZONE MUSIC ENTERTAINMENT SYSTEM • When the outputs of separately sold separately room-to-room remote control unit (DENON RC-616, 617 or 618) is wired and connected between the MAIN ZONE...

Owners Manual
Page 70
... ZONE2 output terminals. (1) System configuration and connections example. In this case, Surround Back PREOUT and speaker out cannot be used for MAIN ZONE. • The AVR-3805 is equipped with preout terminals for which the volume is adjustable (ZONE 2, MULTI ZONE) and speaker out terminals for which the volume is selected at...
... ZONE2 output terminals. (1) System configuration and connections example. In this case, Surround Back PREOUT and speaker out cannot be used for MAIN ZONE. • The AVR-3805 is equipped with preout terminals for which the volume is adjustable (ZONE 2, MULTI ZONE) and speaker out terminals for which the volume is selected at...

Owners Manual
Page 71
... can be set to the above . 21 FUNCTION ZONE2 SOURCE NOTES: • The signals of ZONE2 OUT can be turn off "SOURCE ON/OFF"button (AMP mode) 71 dB (MINIMUM) 5 When the ZONE2 SOURCE function is not possible in a different room (ZONE2, ZONE3 mode) 1 Press the "ON" button. 3 2 Press the ZONE2...
... can be set to the above . 21 FUNCTION ZONE2 SOURCE NOTES: • The signals of ZONE2 OUT can be turn off "SOURCE ON/OFF"button (AMP mode) 71 dB (MINIMUM) 5 When the ZONE2 SOURCE function is not possible in a different room (ZONE2, ZONE3 mode) 1 Press the "ON" button. 3 2 Press the ZONE2...

Owners Manual
Page 73
..., C and FR) or the rear channels (SL, SR, SBL and SBR) together. To play in the PL IIx mode, set "Sp.Back" at the Power Amp Assign setting. 1 4~6 3 1 1 Select the Dolby Pro Logic IIx mode. (Remote control unit) (Remote control unit) (Main unit) 2 Play a program source with the mark. • For...
..., C and FR) or the rear channels (SL, SR, SBL and SBR) together. To play in the PL IIx mode, set "Sp.Back" at the Power Amp Assign setting. 1 4~6 3 1 1 Select the Dolby Pro Logic IIx mode. (Remote control unit) (Remote control unit) (Main unit) 2 Play a program source with the mark. • For...

Owners Manual
Page 85
... . (Remote control unit) If tuning does not stop at the desired station, use to the "Manual tuning" operation. 4 2 Manual tuning 1 Set the input function to AMP or TUNER. Check that the remote control unit is tuned in. Auto tuning 1 Set the input function to "TUNER". 1 (Remote control unit) (Main unit) 2 Watching...
... . (Remote control unit) If tuning does not stop at the desired station, use to the "Manual tuning" operation. 4 2 Manual tuning 1 Set the input function to AMP or TUNER. Check that the remote control unit is tuned in. Auto tuning 1 Set the input function to "TUNER". 1 (Remote control unit) (Main unit) 2 Watching...
Owners Manual
Page 98
... the output level for the speaker terminals. ---dB(minimum) 6 On Screen Display 7 Setup Lock This sets whether or not to prevent flickering. 4.Option Setup 1 Power AMP Assignment 2 Zone2 vol.
... the output level for the speaker terminals. ---dB(minimum) 6 On Screen Display 7 Setup Lock This sets whether or not to prevent flickering. 4.Option Setup 1 Power AMP Assignment 2 Zone2 vol.


