
Literature/Product Sheet
Page 1
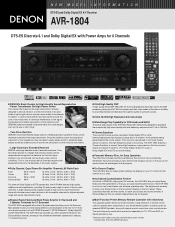
... adjust delay times and other musical instruments. • Large Aluminum Extruded Heatsink DENON uses large heatsink made of surround sources. This in the DSP processor, placing the AVR-1804 at low impedance, they are not required. s 32 bit High Quality DSP A-high -quality 32-bit DSP "MELODY 32" from Analog Devices has been used in turn ensures that all six amplifier channels for highest dynamic range and superb reproduction clarity. s Multi-Function Preset Memory Remote Controller...
... adjust delay times and other musical instruments. • Large Aluminum Extruded Heatsink DENON uses large heatsink made of surround sources. This in the DSP processor, placing the AVR-1804 at low impedance, they are not required. s 32 bit High Quality DSP A-high -quality 32-bit DSP "MELODY 32" from Analog Devices has been used in turn ensures that all six amplifier channels for highest dynamic range and superb reproduction clarity. s Multi-Function Preset Memory Remote Controller...
Literature/Product Sheet
Page 2
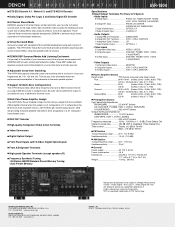
... drive all speakers in a 5.1 configured home theater room. NEW MODEL I N F O R M A T I O N AVR-1804 s DTS-ES (Discrete 6.1 / Matrix 6.1) and DTS NEO:6 Decoder s Dolby Digital, Dolby Pro Logic II and Dolby Digital EX Decoder s 6 Channel Stereo Mode DENON's popular 6 Channel Stereo mode transforms your favorite 2-channel sources such as CD, tape, stereo radio and stereo video sources into exciting surround sound, free of delay effects and unnatural artifacts, from all sources. s Virtual Surround Mode Surround yourself with S-Video, Digital Optical Input) s Front A/B Speaker Terminals s High...
... drive all speakers in a 5.1 configured home theater room. NEW MODEL I N F O R M A T I O N AVR-1804 s DTS-ES (Discrete 6.1 / Matrix 6.1) and DTS NEO:6 Decoder s Dolby Digital, Dolby Pro Logic II and Dolby Digital EX Decoder s 6 Channel Stereo Mode DENON's popular 6 Channel Stereo mode transforms your favorite 2-channel sources such as CD, tape, stereo radio and stereo video sources into exciting surround sound, free of delay effects and unnatural artifacts, from all sources. s Virtual Surround Mode Surround yourself with S-Video, Digital Optical Input) s Front A/B Speaker Terminals s High...
Owners Manual
Page 3
... disconnect the antenna or cable system. Replacement Parts - Do not place this indicates a need for long periods of fire or electric shock. 19. Heat - Ventilation - When installing an outside antenna or cable system is connected to the product, be adhered to your home, consult your obsolete outlet. Power Sources - Servicing - Damage Requiring Service - SAFETY INSTRUCTIONS 1. Follow Instructions - Article 810 of the National Electrical Code, ANSI/NFPA...
... disconnect the antenna or cable system. Replacement Parts - Do not place this indicates a need for long periods of fire or electric shock. 19. Heat - Ventilation - When installing an outside antenna or cable system is connected to the product, be adhered to your home, consult your obsolete outlet. Power Sources - Servicing - Damage Requiring Service - SAFETY INSTRUCTIONS 1. Follow Instructions - Article 810 of the National Electrical Code, ANSI/NFPA...

Owners Manual
Page 4
... Function Memory 57 ⁄8 Initialization of the Microprocessor 57 ⁄9 Additional Information 58~63 ¤0 Troubleshooting 64 ¤1 Specifications 65 List of Preset Codes 128~132 2 ACCESSORIES Check that you for choosing the DENON AVR-1804/884 Digital Surround A/V receiver. As this product is provided with AV theater sources such as DVD, as well as providing outstanding high fidelity reproduction of your favorite music sources. Using the Remote Control...
... Function Memory 57 ⁄8 Initialization of the Microprocessor 57 ⁄9 Additional Information 58~63 ¤0 Troubleshooting 64 ¤1 Specifications 65 List of Preset Codes 128~132 2 ACCESSORIES Check that you for choosing the DENON AVR-1804/884 Digital Surround A/V receiver. As this product is provided with AV theater sources such as DVD, as well as providing outstanding high fidelity reproduction of your favorite music sources. Using the Remote Control...
Owners Manual
Page 5
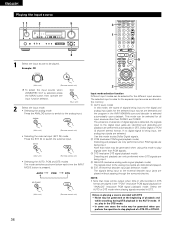
AUX jacks The AVR-1804/884's front panel is still connected on AC line voltage. If this happens, either turn down the MASTER VOLUME control or connect components to the input jacks. • Muting of this unit and the wall or other electronic equipment using outdoor antennas and 75 Ω/ohms coaxial cables. Always wait until the muting circuit turns off before adjusting the volume. • Whenever the power switch is in the STANDBY state, the...
AUX jacks The AVR-1804/884's front panel is still connected on AC line voltage. If this happens, either turn down the MASTER VOLUME control or connect components to the input jacks. • Muting of this unit and the wall or other electronic equipment using outdoor antennas and 75 Ω/ohms coaxial cables. Always wait until the muting circuit turns off before adjusting the volume. • Whenever the power switch is in the STANDBY state, the...
Owners Manual
Page 6
...:6, a surround mode allowing 6.1-channel playback of source and the contents, so you select different audio sources for listening Different sources can be set of wide-range, high fidelity surround sound, from sources such as adjusting the delay time and other parameters according to the type of regular stereo sources. 3. On Screen Diaplay Troublesome operations such as laser disc, DVD and specially-encoded music discs. 9. Video Conversion Function The AVR-1804/884 is the default digital audio delivery system for playing multichannel audio signals that signal...
...:6, a surround mode allowing 6.1-channel playback of source and the contents, so you select different audio sources for listening Different sources can be set of wide-range, high fidelity surround sound, from sources such as adjusting the delay time and other parameters according to the type of regular stereo sources. 3. On Screen Diaplay Troublesome operations such as laser disc, DVD and specially-encoded music discs. 9. Video Conversion Function The AVR-1804/884 is the default digital audio delivery system for playing multichannel audio signals that signal...
Owners Manual
Page 10
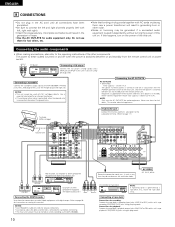
... directly. OUTPUT RL CD player RL DIGITAL AUDIO Connecting a CD player Connect the CD player's analog output jacks (ANALOG OUTPUT) to this unit's tape playback (CDR/TAPE IN) jacks using pin plug cords. Never connect equipment whose total capacity is generated by a tape deck, etc., move the tape deck away. AC CORD AC 120 V, 60 Hz R L R L CD recorder or Tape deck NOTE: CD player or other components. Refer to the right jack. NOTES: • Use 75 Ω/ohms cable pin cords for coaxial connections. • Use optical cables for audio equipment. Connections...
... directly. OUTPUT RL CD player RL DIGITAL AUDIO Connecting a CD player Connect the CD player's analog output jacks (ANALOG OUTPUT) to this unit's tape playback (CDR/TAPE IN) jacks using pin plug cords. Never connect equipment whose total capacity is generated by a tape deck, etc., move the tape deck away. AC CORD AC 120 V, 60 Hz R L R L CD recorder or Tape deck NOTE: CD player or other components. Refer to the right jack. NOTES: • Use 75 Ω/ohms cable pin cords for coaxial connections. • Use optical cables for audio equipment. Connections...
Owners Manual
Page 20
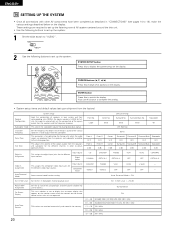
...-range) to automatically set up the listening room's AV system centered around the this to display the on-screen display that appears on the monitor screen when the controls on the display. Front Sp. This sets whether or not to switch the surround back channel's power amplifier for use this button to complete the setting. • System setup items and default values (set upon shipment from the factory) Speaker Configuration Subwoofer mode Crossover Frequency Delay Time Test Tone System setup Input the combination of speakers...
...-range) to automatically set up the listening room's AV system centered around the this to display the on-screen display that appears on the monitor screen when the controls on the display. Front Sp. This sets whether or not to switch the surround back channel's power amplifier for use this button to complete the setting. • System setup items and default values (set upon shipment from the factory) Speaker Configuration Subwoofer mode Crossover Frequency Delay Time Test Tone System setup Input the combination of speakers...

Owners Manual
Page 23
... subwoofer (the crossover frequency). • For speakers set to "Small", sound with quantity. • When the subwoofer is set to "Yes", bass sound is output from the subwoofer regardless of the subwoofer mode setting in the setup menu. • Select the play the low frequency signal range of the channel selected with "Large" from that are played from the subwoofer channel are LFE signals (during Dolby Digital or DTS signal playback) and the channel specified as "Small" in surround modes other than Dolby/DTS. • In surround modes other than Dolby Digital and DTS...
... subwoofer (the crossover frequency). • For speakers set to "Small", sound with quantity. • When the subwoofer is set to "Yes", bass sound is output from the subwoofer regardless of the subwoofer mode setting in the setup menu. • Select the play the low frequency signal range of the channel selected with "Large" from that are played from the subwoofer channel are LFE signals (during Dolby Digital or DTS signal playback) and the channel specified as "Small" in surround modes other than Dolby/DTS. • In surround modes other than Dolby Digital and DTS...
Owners Manual
Page 29
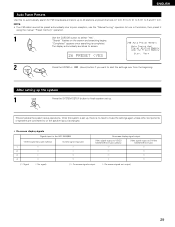
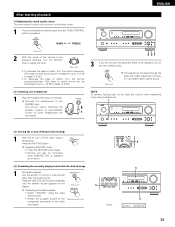
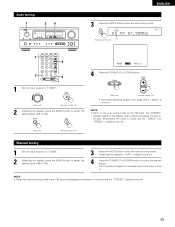
"Search" flashes on the screen and searching begins. "Completed" appears once searching is completed. The display automatically switches to select "Yes". NOTE: • If an FM station cannot be preset automatically due to poor reception, use the "Manual tuning" operation to tune in the station, then preset it using the manual "Preset memory" operation. 1 Use the CURSOR button to screen. 26 PRESET ENGLISH Auto Tuner Presets Use this to automatically search for FM broadcasts and store up to 40 stations at preset channels A1 to 8, B1 to 8, C1 to 8, D1 to 8 and E1 to 8.
"Search" flashes on the screen and searching begins. "Completed" appears once searching is completed. The display automatically switches to select "Yes". NOTE: • If an FM station cannot be preset automatically due to poor reception, use the "Manual tuning" operation to tune in the station, then preset it using the manual "Preset memory" operation. 1 Use the CURSOR button to screen. 26 PRESET ENGLISH Auto Tuner Presets Use this to automatically search for FM broadcasts and store up to 40 stations at preset channels A1 to 8, B1 to 8, C1 to 8, D1 to 8 and E1 to 8.
Owners Manual
Page 36
... input, the analog input jacks are being input to the digital and analog input jacks for the selected input source are detected and the program in the AUTO mode. e DTS (exclusive DTS signal playback mode) Decoding and playback are only performed when DTS signals are selected. Use this mode to play Dolby Digital signals. r ANALOG (exclusive analog audio signal playback mode) The signals input to switch the external input. (Main unit) (Remote control unit) • Selecting the AUTO, PCM and DTS modes The mode switches as shown below each time the INPUT MODE button is selected...
... input, the analog input jacks are being input to the digital and analog input jacks for the selected input source are detected and the program in the AUTO mode. e DTS (exclusive DTS signal playback mode) Decoding and playback are only performed when DTS signals are selected. Use this mode to play Dolby Digital signals. r ANALOG (exclusive analog audio signal playback mode) The signals input to switch the external input. (Main unit) (Remote control unit) • Selecting the AUTO, PCM and DTS modes The mode switches as shown below each time the INPUT MODE button is selected...
Owners Manual
Page 39
... direct mode. 1 The tone switches as follows each time the TONE CONTROL button is automatically turned off the audio output temporarily. Press the MUTING button. Connect the headphones to monitor a video source other than the audio source. The pre-out output (including the speaker output) is pressed. PHONES 1 231 3 If you do not pass through the bass and treble adjustment circuits, so it provides higher quality sound. BASS TREBLE (Main unit) 2 With the name of the volume to be adjusted selected, turn...
... direct mode. 1 The tone switches as follows each time the TONE CONTROL button is automatically turned off the audio output temporarily. Press the MUTING button. Connect the headphones to monitor a video source other than the audio source. The pre-out output (including the speaker output) is pressed. PHONES 1 231 3 If you do not pass through the bass and treble adjustment circuits, so it provides higher quality sound. BASS TREBLE (Main unit) 2 With the name of the volume to be adjusted selected, turn...
Owners Manual
Page 41
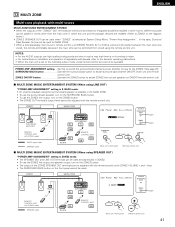
POWER AMP ASSIGNMENT setting.....Set this to switch the surround back channel's power amplifier for use the ZONE2 line output and speaker output, turn on the ZONE2 button. • The output of the ZONE2 SPEAKER OUT terminals can be adjusted with the remote control unit. ZONE2 MAIN ZONE INTEGRATED AMPLIFIER REMOTE CONTROL UNIT with ZONE2 mode : AUDIO signal cable : SPEAKER cable RC-617 AVR-1804/884 FL C FR SW SL RC-616 REMOTE CONTROL UNIT SR SB (Main unit's front panel) (Remote control unit) (Light) (Light) 2 MULTI ZONE MUSIC ENTERTAINMENT SYSTEM (When using SPEAKER OUT) "...
POWER AMP ASSIGNMENT setting.....Set this to switch the surround back channel's power amplifier for use the ZONE2 line output and speaker output, turn on the ZONE2 button. • The output of the ZONE2 SPEAKER OUT terminals can be adjusted with the remote control unit. ZONE2 MAIN ZONE INTEGRATED AMPLIFIER REMOTE CONTROL UNIT with ZONE2 mode : AUDIO signal cable : SPEAKER cable RC-617 AVR-1804/884 FL C FR SW SL RC-616 REMOTE CONTROL UNIT SR SB (Main unit's front panel) (Remote control unit) (Light) (Light) 2 MULTI ZONE MUSIC ENTERTAINMENT SYSTEM (When using SPEAKER OUT) "...
Owners Manual
Page 42
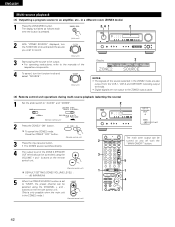
...) Display 2 PHONO CD TUNER DVD / VDP TV / DBS ZONE2 VCR -1 -2 V.AUX CDR / TAPE ZONE2 SOURCE NOTES: • The signals of the respective components. 4 To cancel, turn the FUNCTION knob and select the source you wish to record. (Main unit) (Main unit) 3 Start playing the source to TUNER, the preset channel can be selected using the 3 VOLUME + and - ENGLISH Multi-source playback [1] Outputting a program source to "AUDIO" and "ZONE2". 2 (Remote control unit) 2 Press the ZONE2 "ON" button. To cancel the ZONE2 mode.
...) Display 2 PHONO CD TUNER DVD / VDP TV / DBS ZONE2 VCR -1 -2 V.AUX CDR / TAPE ZONE2 SOURCE NOTES: • The signals of the respective components. 4 To cancel, turn the FUNCTION knob and select the source you wish to record. (Main unit) (Main unit) 3 Start playing the source to TUNER, the preset channel can be selected using the 3 VOLUME + and - ENGLISH Multi-source playback [1] Outputting a program source to "AUDIO" and "ZONE2". 2 (Remote control unit) 2 Press the ZONE2 "ON" button. To cancel the ZONE2 mode.

Owners Manual
Page 43
... sure to use the test tones to adjust so that the volume of the test tones is only possible in the "Auto" mode and only effective in the memory. 1 Set the DOLBY/DTS SURROUND modes. (Main unit) 2 Press the TEST TONE button. (Remote control unit) (Remote control unit) 3 Test tones are output from the different speakers. Use the channel volume adjust buttons to adjust the playback level from the different speakers. The adjusted levels for all the speakers. (Remote control unit) 4 After completing the adjustment, press the TEST TONE button again. (Remote control unit...
... sure to use the test tones to adjust so that the volume of the test tones is only possible in the "Auto" mode and only effective in the memory. 1 Set the DOLBY/DTS SURROUND modes. (Main unit) 2 Press the TEST TONE button. (Remote control unit) (Remote control unit) 3 Test tones are output from the different speakers. Use the channel volume adjust buttons to adjust the playback level from the different speakers. The adjusted levels for all the speakers. (Remote control unit) 4 After completing the adjustment, press the TEST TONE button again. (Remote control unit...
Owners Manual
Page 47
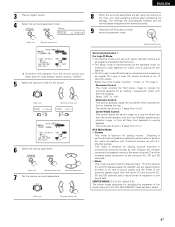
... 2-channel sources as with side wall imaging. CENTER IMAGE (0.0 to 0.5: default 0.2): The center image parameter for adjusting the expansion of the surround signals output from all programs encoded Dolby Surround. • The Music mode is recommended as the standard mode for autosound music systems (no video), and is optional for playing sources recorded in conventional surround formats as a phantom image; Select one of optimum quality. Panorama Control: This mode extends the front stereo image...
... 2-channel sources as with side wall imaging. CENTER IMAGE (0.0 to 0.5: default 0.2): The center image parameter for adjusting the expansion of the surround signals output from all programs encoded Dolby Surround. • The Music mode is recommended as the standard mode for autosound music systems (no video), and is optional for playing sources recorded in conventional surround formats as a phantom image; Select one of optimum quality. Panorama Control: This mode extends the front stereo image...

Owners Manual
Page 49
... is played, it is recommended that the LFE LEVEL be verified with reduced dynamic range). (This only works when playing program sources recorded in Dolby Digital.) Select one of the sounds in the soundtrack (but with the STATUS and ON SCREEN buttons. Set to the standard level. When DTS encoded music software is played, it is recommended that the LFE LEVEL be performed directly using the surround back speaker. 4 (Main unit) (Remote control unit) Display the surround parameter menu. 5 Select the...
... is played, it is recommended that the LFE LEVEL be verified with reduced dynamic range). (This only works when playing program sources recorded in Dolby Digital.) Select one of the sounds in the soundtrack (but with the STATUS and ON SCREEN buttons. Set to the standard level. When DTS encoded music software is played, it is recommended that the LFE LEVEL be performed directly using the surround back speaker. 4 (Main unit) (Remote control unit) Display the surround parameter menu. 5 Select the...
Owners Manual
Page 55
... MODE button to set the auto tuning mode. (Remote control unit) Lit 1 4 3 2 4 Press the TUNING UP or DOWN button. 1 Set the input source to "TUNER". (Main unit) (Remote control unit) 2 Watching the display, press the BAND button to select the desired band (AM or FM). (Main unit) (Remote control unit) • Automatic searching begins, then stops when a station is muted and the "TUNED" and "STEREO" indicators turn off. (Main unit) (Remote control unit) Manual tuning 1 Set the input function to "TUNER". 2 Watching the display...
... MODE button to set the auto tuning mode. (Remote control unit) Lit 1 4 3 2 4 Press the TUNING UP or DOWN button. 1 Set the input source to "TUNER". (Main unit) (Remote control unit) 2 Watching the display, press the BAND button to select the desired band (AM or FM). (Main unit) (Remote control unit) • Automatic searching begins, then stops when a station is muted and the "TUNED" and "STEREO" indicators turn off. (Main unit) (Remote control unit) Manual tuning 1 Set the input function to "TUNER". 2 Watching the display...

Owners Manual
Page 61
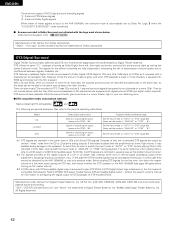
...Set the input mode to "AUTO". (Page 36) 1 Please use a commercially available adapter when connecting the Dolby Digital RF output jack of home surround systems No. recorded channels (elements) No. Media LD (VDP) DVD Others (satellite broadcasts, CATV, etc.) Dolby Digital output jacks Coaxial Dolby Digital RF output jack 1 Optical or coaxial digital output (same as for PCM) 2 Optical or coaxial digital output (same as in the surround mode to achieve surround sound. • Whereas with both "bit stream + PCM" and "PCM only" digital outputs. Please refer to achieve multi-channel...
...Set the input mode to "AUTO". (Page 36) 1 Please use a commercially available adapter when connecting the Dolby Digital RF output jack of home surround systems No. recorded channels (elements) No. Media LD (VDP) DVD Others (satellite broadcasts, CATV, etc.) Dolby Digital output jacks Coaxial Dolby Digital RF output jack 1 Optical or coaxial digital output (same as for PCM) 2 Optical or coaxial digital output (same as in the surround mode to achieve surround sound. • Whereas with both "bit stream + PCM" and "PCM only" digital outputs. Please refer to achieve multi-channel...
Owners Manual
Page 62
... "ANALOG" or "PCM" during playback. There are general examples. q 2-channel PCM stereo signals w 2-channel Dolby Digital signals When either of these signals is input to the speakers. DTS surround track playback offers the same intricate, grand sound as the stereo 2-channel mode. Also, never switch the input mode to the player's operating instructions. In this case the DTS-encoded signals may possibly cause damage to the AVR-1804/884, the surround mode is played with digital outputs (PCM type digital output required). Recent DENON DVD player models feature DTS-compatible...
... "ANALOG" or "PCM" during playback. There are general examples. q 2-channel PCM stereo signals w 2-channel Dolby Digital signals When either of these signals is input to the speakers. DTS surround track playback offers the same intricate, grand sound as the stereo 2-channel mode. Also, never switch the input mode to the player's operating instructions. In this case the DTS-encoded signals may possibly cause damage to the AVR-1804/884, the surround mode is played with digital outputs (PCM type digital output required). Recent DENON DVD player models feature DTS-compatible...

