

Owners Manual
Page 4
...recommend that before proceeding. TABLE OF CONTENTS z Before Using 5 x Cautions on Installation 5 c Cautions on Handling 5 v Features ...6 b Part Names and Functions 7, 8 n Read this manual before you begin hookup and operation that the following parts are included in addition to the main unit: q Operating instructions 1 w Warranty 1 e Service station list 1 r Remote...Additional Information 58~63 ¤0 Troubleshooting 64 ¤1 Specifications 65 List of Preset Codes 128~132 2 ACCESSORIES Check that you for choosing the DENON AVR-1804/884 Digital Surround A/V receiver.
...recommend that before proceeding. TABLE OF CONTENTS z Before Using 5 x Cautions on Installation 5 c Cautions on Handling 5 v Features ...6 b Part Names and Functions 7, 8 n Read this manual before you begin hookup and operation that the following parts are included in addition to the main unit: q Operating instructions 1 w Warranty 1 e Service station list 1 r Remote...Additional Information 58~63 ¤0 Troubleshooting 64 ¤1 Specifications 65 List of Preset Codes 128~132 2 ACCESSORIES Check that you for choosing the DENON AVR-1804/884 Digital Surround A/V receiver.

Owners Manual
Page 25
Setting the Test Tone • Use this setting to adjust to that the playback level between the different channel is equal. • From the listening position, listen to the test tones produced from the speakers to adjust the level. • The level can also be adjusted directly from the remote control unit. (For details, see page 43.) 1 Select "Yes". 15 T.TONE
Setting the Test Tone • Use this setting to adjust to that the playback level between the different channel is equal. • From the listening position, listen to the test tones produced from the speakers to adjust the level. • The level can also be adjusted directly from the remote control unit. (For details, see page 43.) 1 Select "Yes". 15 T.TONE
Owners Manual
Page 29
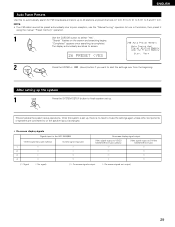
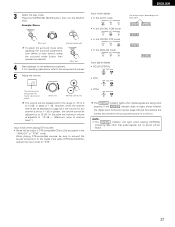
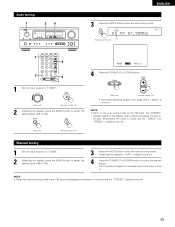
The display automatically switches to 8. ENGLISH Auto Tuner Presets Use this to automatically search for FM broadcasts and store up to 40 stations at preset channels A1 to 8, B1 to 8, C1 to 8, D1 to 8 and E1 to screen. 26 PRESET "Completed" appears once searching is completed. "Search" flashes on the screen and searching begins. NOTE: • If an FM station cannot be preset automatically due to poor reception, use the "Manual tuning" operation to tune in the station, then preset it using the manual "Preset memory" operation. 1 Use the CURSOR button to select "Yes".
The display automatically switches to 8. ENGLISH Auto Tuner Presets Use this to automatically search for FM broadcasts and store up to 40 stations at preset channels A1 to 8, B1 to 8, C1 to 8, D1 to 8 and E1 to screen. 26 PRESET "Completed" appears once searching is completed. "Search" flashes on the screen and searching begins. NOTE: • If an FM station cannot be preset automatically due to poor reception, use the "Manual tuning" operation to tune in the station, then preset it using the manual "Preset memory" operation. 1 Use the CURSOR button to select "Yes".
Owners Manual
Page 30
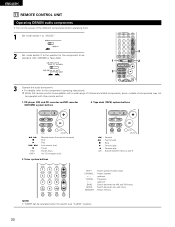
...mode switch 1 to "AUDIO". 2 Set mode switch 2 to the position for CD changers only) 3. ENGLISH 11 REMOTE CONTROL UNIT Operating DENON audio components • Turn on the power of components may not be operated with this remote control is at "AUDIO" position. 30 ...Tape deck (TAPE) system buttons 6, 7 2 1 8, 9 3 DISC SKIP+ : Manual search (forward and reverse) : Stop : Play : Auto search (cue) : Pause : Switch discs (for the component to the component's operating instructions. up /down ...
...mode switch 1 to "AUDIO". 2 Set mode switch 2 to the position for CD changers only) 3. ENGLISH 11 REMOTE CONTROL UNIT Operating DENON audio components • Turn on the power of components may not be operated with this remote control is at "AUDIO" position. 30 ...Tape deck (TAPE) system buttons 6, 7 2 1 8, 9 3 DISC SKIP+ : Manual search (forward and reverse) : Stop : Play : Auto search (cue) : Pause : Switch discs (for the component to the component's operating instructions. up /down ...
Owners Manual
Page 32
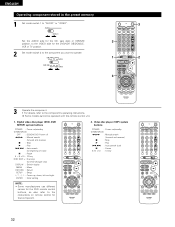
... also refer to the component's operating instructions. Digital video disc player (DVD, DVD SETUP) system buttons POWER : Power on /standby (ON/SOURCE) 6,7 : Manual search (forward and reverse) 2 : Stop 1 : Play 8,9 : Auto search (cue) 3 : Pause 0~9, +10 : 10 key 32 Video disc player... (VDP) system buttons POWER : Power on /standby (ON/SOURCE) OFF : DENON DVD Power off 6,7 : Manual search (forward and reverse) 2 : Stop 1 : Play 8,9 : Auto search (to beginning of track) 3 : Pause 0 ~ 9, +10 : 10 key DISC SKIP ...
... also refer to the component's operating instructions. Digital video disc player (DVD, DVD SETUP) system buttons POWER : Power on /standby (ON/SOURCE) 6,7 : Manual search (forward and reverse) 2 : Stop 1 : Play 8,9 : Auto search (cue) 3 : Pause 0~9, +10 : 10 key 32 Video disc player... (VDP) system buttons POWER : Power on /standby (ON/SOURCE) OFF : DENON DVD Power off 6,7 : Manual search (forward and reverse) 2 : Stop 1 : Play 8,9 : Auto search (to beginning of track) 3 : Pause 0 ~ 9, +10 : 10 key DISC SKIP ...
Owners Manual
Page 33
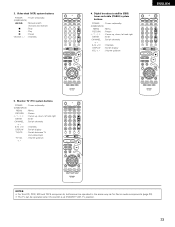
...down ENGLISH 5. NOTES: • For this CD, CDR, MD and TAPE components, buttons can be operated in the same way as for Denon audio components (page 30). • The TV can be operated when the switch is at DVD/VDP, VCR, TV position. 33 Digital ...broadcast satellite (DBS) tuner and cable (CABLE) system buttons POWER : Power on /standby (ON/SOURCE) 6,7 : Manual search (forward and reverse) 2 : Stop 1 : Play 3 : Pause Channel +, - : Channels 4. 3. Video deck (VCR) system buttons POWER : Power on /standby (ON/SOURCE) MENU : ...
...down ENGLISH 5. NOTES: • For this CD, CDR, MD and TAPE components, buttons can be operated in the same way as for Denon audio components (page 30). • The TV can be operated when the switch is at DVD/VDP, VCR, TV position. 33 Digital ...broadcast satellite (DBS) tuner and cable (CABLE) system buttons POWER : Power on /standby (ON/SOURCE) 6,7 : Manual search (forward and reverse) 2 : Stop 1 : Play 3 : Pause Channel +, - : Channels 4. 3. Video deck (VCR) system buttons POWER : Power on /standby (ON/SOURCE) MENU : ...

Owners Manual
Page 34
CD 1 TAPE 2 CDR/MD 3 DVD/VDP 4 VCR 5 No setting 0 34 By default, nothing is a function allowing you want to operate the PLAY, STOP, MANUAL SEARCH and AUTO SEARCH buttons on the CD, TAPE, CDR/MD, DVD/VDP or VCR components when in the DBS/CABLE or TV mode. ENGLISH ...
CD 1 TAPE 2 CDR/MD 3 DVD/VDP 4 VCR 5 No setting 0 34 By default, nothing is a function allowing you want to operate the PLAY, STOP, MANUAL SEARCH and AUTO SEARCH buttons on the CD, TAPE, CDR/MD, DVD/VDP or VCR components when in the DBS/CABLE or TV mode. ENGLISH ...
Owners Manual
Page 37
... or LDs are being input properly. However, when the channel level is turned on the selected component. • For operating instructions, refer to the component's manual. 5 Adjust the volume. ENGLISH 3 Select the play mode. The volume level is displayed on page 44, if the volume for any channel is adjusted to...
... or LDs are being input properly. However, when the channel level is turned on the selected component. • For operating instructions, refer to the component's manual. 5 Adjust the volume. ENGLISH 3 Select the play mode. The volume level is displayed on page 44, if the volume for any channel is adjusted to...
Owners Manual
Page 40
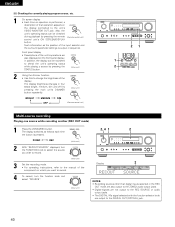
... FUNCTION knob to select the source you wish to record. (Main unit) (Main unit) 3 Set the recording mode. • For operating instructions, refer to the manual of the unit's operations are output to the unit's VIDEO MONITOR OUT jack. ZONE2 REC 2 With "RECOUT SOURCE" displayed, turn the function knob and select...
... FUNCTION knob to select the source you wish to record. (Main unit) (Main unit) 3 Set the recording mode. • For operating instructions, refer to the manual of the unit's operations are output to the unit's VIDEO MONITOR OUT jack. ZONE2 REC 2 With "RECOUT SOURCE" displayed, turn the function knob and select...
Owners Manual
Page 42
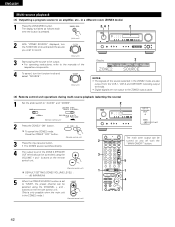
... button. buttons on and off with the "MAIN ON/OFF" button. 5 1 4 42 The display switches as follows each time the button is set to the manuals of the ZONE 2 SPEAKER OUT terminals can be controlled using the CHANNEL + and - ENGLISH Multi-source playback [1] Outputting a program source to be turned on the...
... button. buttons on and off with the "MAIN ON/OFF" button. 5 1 4 42 The display switches as follows each time the button is set to the manuals of the ZONE 2 SPEAKER OUT terminals can be controlled using the CHANNEL + and - ENGLISH Multi-source playback [1] Outputting a program source to be turned on the...
Owners Manual
Page 45
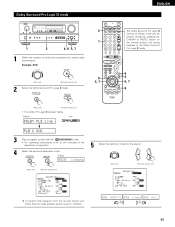
Dolby Surround Pro Logic II mode 2 1 1 2 4, 6 5, 7 1 Select the function to which the component you want to play is set to the manuals of the respective components. 4 Select the surround parameter mode. Display Light LOGICII 3 Play a program source with the mark. • For operating instructions, refer to "AUDIO". ...
Dolby Surround Pro Logic II mode 2 1 1 2 4, 6 5, 7 1 Select the function to which the component you want to play is set to the manuals of the respective components. 4 Select the surround parameter mode. Display Light LOGICII 3 Play a program source with the mark. • For operating instructions, refer to "AUDIO". ...
Owners Manual
Page 54
The "Auto tuner preset" operation can also be preset automatically due to poor reception, use the "Manual tuning" operation to E8, for FM broadcast stations. 1 2 When the first FM broadcast station is found, that station is equipped with a function for automatically searching ... channels A2 to A8, B1 to B8, C1 to C8, D1 to D8 and E1 to tune in the station, then preset it using the manual "Preset memory" operation. • To interrupt this function, press the power operation button. 2 DEFAULT VALUE AUTO TUNER PRESETS A1 ~ A8 B1 ~ B8 C1 ~ C8 D1...
The "Auto tuner preset" operation can also be preset automatically due to poor reception, use the "Manual tuning" operation to E8, for FM broadcast stations. 1 2 When the first FM broadcast station is found, that station is equipped with a function for automatically searching ... channels A2 to A8, B1 to B8, C1 to C8, D1 to D8 and E1 to tune in the station, then preset it using the manual "Preset memory" operation. • To interrupt this function, press the power operation button. 2 DEFAULT VALUE AUTO TUNER PRESETS A1 ~ A8 B1 ~ B8 C1 ~ C8 D1...
Owners Manual
Page 55
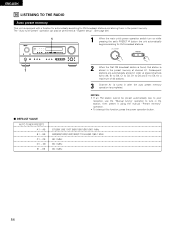
...tuning mode on the FM band, the "STEREO" indicator lights on the display when a stereo broadcast is held in. NOTE: • When the manual tuning mode is tuned in. The frequency changes continuously when the button is tuned in. Auto tuning 1 24 ENGLISH 3 Press the MODE button to ...in the desired station. At open frequencies, the noise is muted and the "TUNED" and "STEREO" indicators turn off. (Main unit) (Remote control unit) Manual tuning 1 Set the input function to "TUNER". 2 Watching the display, press the BAND button to select the desired band (AM or FM). 3 Press the...
...tuning mode on the FM band, the "STEREO" indicator lights on the display when a stereo broadcast is held in. NOTE: • When the manual tuning mode is tuned in. The frequency changes continuously when the button is tuned in. Auto tuning 1 24 ENGLISH 3 Press the MODE button to ...in the desired station. At open frequencies, the noise is muted and the "TUNED" and "STEREO" indicators turn off. (Main unit) (Remote control unit) Manual tuning 1 Set the input function to "TUNER". 2 Watching the display, press the BAND button to select the desired band (AM or FM). 3 Press the...

Owners Manual
Page 56
... 1 to 8) in the preset memory. (Remote control unit) To preset other channels, repeat steps 1 to E. ENGLISH Preset stations 23 3 1, 4 2 Preparations: Use the "Auto tuning" or "Manual tuning" operation to tune in the station to be preset in the memory. 1 Press the MEMORY button. (Remote control unit) 2 Press the SHIFT button and...
... 1 to 8) in the preset memory. (Remote control unit) To preset other channels, repeat steps 1 to E. ENGLISH Preset stations 23 3 1, 4 2 Preparations: Use the "Auto tuning" or "Manual tuning" operation to tune in the station to be preset in the memory. 1 Press the MEMORY button. (Remote control unit) 2 Press the SHIFT button and...

Owners Manual
Page 60
...speakers. • We recommend installing the surround back speaker(s) at a narrower distance than the front speakers. • Consult the owner's manual for your subwoofer for the surround back speakers as well is more effective. 60 to 90 cm • Connect the surround speakers to... radiation speakers such as bipolar types, or dipolar types, provide a wider dispersion than the front speakers. • Consult the owner's manual for advice on placing Surround speaker Surround back speaker Front speaker Point slightly downwards the subwoofer within the listening room. • If the...
...speakers. • We recommend installing the surround back speaker(s) at a narrower distance than the front speakers. • Consult the owner's manual for your subwoofer for the surround back speakers as well is more effective. 60 to 90 cm • Connect the surround speakers to... radiation speakers such as bipolar types, or dipolar types, provide a wider dispersion than the front speakers. • Consult the owner's manual for advice on placing Surround speaker Surround back speaker Front speaker Point slightly downwards the subwoofer within the listening room. • If the...

Owners Manual
Page 61
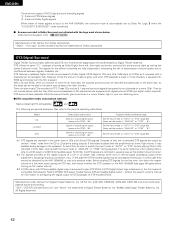
..., LDs and video cassettes to achieve optimum decoding (see page 45). Also refer to ) PCM". Please refer to the instruction manual of the adapter when making connection. 2 Some DVD digital outputs have been recorded as in the surround mode to achieve the same...C, S (SW - Dolby Surround (1) Dolby Digital Dolby Digital is equipped with both "bit stream + PCM" and "PCM only" digital outputs. ENGLISH Surround The AVR-1804/884 is the multi-channel digital signal format developed by Dolby Laboratories using Dolby Surround encoding technology. In some cases players are general examples. The...
..., LDs and video cassettes to achieve optimum decoding (see page 45). Also refer to ) PCM". Please refer to the instruction manual of the adapter when making connection. 2 Some DVD digital outputs have been recorded as in the surround mode to achieve the same...C, S (SW - Dolby Surround (1) Dolby Digital Dolby Digital is equipped with both "bit stream + PCM" and "PCM only" digital outputs. ENGLISH Surround The AVR-1804/884 is the multi-channel digital signal format developed by Dolby Laboratories using Dolby Surround encoding technology. In some cases players are general examples. The...
Owners Manual
Page 62
... For DVDs, the DTS signals are trademarks of data is great, and when DTS playback is played. Recent DENON DVD player models feature DTS-compatible digital output - consult the player's owner's manual for the first time, turn down the master volume to "AUTO" or "DTS" before turning up the master... signals are recorded in which case they offer surround playback on configuring the digital output for DTS playback of these signals is input to the AVR-1804/884, the surround mode is automatically set at the digital outputs of course no need for DVDs) so it may only produce noise. q ...
... For DVDs, the DTS signals are trademarks of data is great, and when DTS playback is played. Recent DENON DVD player models feature DTS-compatible digital output - consult the player's owner's manual for the first time, turn down the master volume to "AUTO" or "DTS" before turning up the master... signals are recorded in which case they offer surround playback on configuring the digital output for DTS playback of these signals is input to the AVR-1804/884, the surround mode is automatically set at the digital outputs of course no need for DVDs) so it may only produce noise. q ...

Owners Manual
Page 63
... even with 5.1-channel signal sources. However, some Matrix 6.1 sources may be detected as having a 5.1-channel format, so the DTS-ES Matrix 6.1 mode must be set manually to play DTS-ES Matrix 6.1 encoded sources with a DTS 5.1-channel decoder. This mode is effective for playing sources recorded in conventional surround formats as "surround...
... even with 5.1-channel signal sources. However, some Matrix 6.1 sources may be detected as having a 5.1-channel format, so the DTS-ES Matrix 6.1 mode must be set manually to play DTS-ES Matrix 6.1 encoded sources with a DTS 5.1-channel decoder. This mode is effective for playing sources recorded in conventional surround formats as "surround...


