
Owner's Manual
Page 10
... and Replacing Parts 129 Before You Begin 129 Recommended Tools 129 Turning Off Your Computer 129 Before Working Inside Your Computer 130 Hard Drive 131 Removing the Hard Drive 132 Replacing the Hard Drive 133 Returning a Hard Drive to Dell 133 Center Control Cover and Hinge Covers 134 Removing the Center Control...
... and Replacing Parts 129 Before You Begin 129 Recommended Tools 129 Turning Off Your Computer 129 Before Working Inside Your Computer 130 Hard Drive 131 Removing the Hard Drive 132 Replacing the Hard Drive 133 Returning a Hard Drive to Dell 133 Center Control Cover and Hinge Covers 134 Removing the Center Control...
Owner's Manual
Page 22
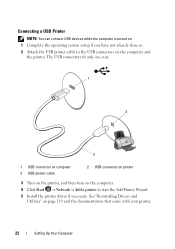
...The USB connectors fit only one way. 1 2 3 1 USB connector on computer 3 USB printer cable 2 USB connector on printer 3 Turn on the printer, and then turn on page 119 and the documentation that came with your printer. 22 Setting Up Your Computer See "Reinstalling Drivers and Utilities" on the ... a printer to the USB connectors on the computer and the printer. Connecting a USB Printer NOTE: You can connect USB devices while the computer is turned on. 1 Complete the operating system setup if you have not already done so. 2 Attach the USB printer cable to start the Add Printer Wizard....
...The USB connectors fit only one way. 1 2 3 1 USB connector on computer 3 USB printer cable 2 USB connector on printer 3 Turn on the printer, and then turn on page 119 and the documentation that came with your printer. 22 Setting Up Your Computer See "Reinstalling Drivers and Utilities" on the ... a printer to the USB connectors on the computer and the printer. Connecting a USB Printer NOTE: You can connect USB devices while the computer is turned on. 1 Complete the operating system setup if you have not already done so. 2 Attach the USB printer cable to start the Add Printer Wizard....
Owner's Manual
Page 26
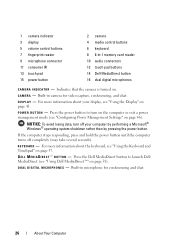
D I C R O P H O N E S - If the computer stops responding, press and hold the power button until the computer turns off your display, see "Configuring Power Management Settings" on page 46). Press the Dell MediaDirect button to turn off completely (may take several seconds). D U A L D I G I T A L M I S P L A Y - Built-in camera for conferencing and chat. 26 About Your Computer Indicates that the camera...
D I C R O P H O N E S - If the computer stops responding, press and hold the power button until the computer turns off your display, see "Configuring Power Management Settings" on page 46). Press the Dell MediaDirect button to turn off completely (may take several seconds). D U A L D I G I T A L M I S P L A Y - Built-in camera for conferencing and chat. 26 About Your Computer Indicates that the camera...
Owner's Manual
Page 29
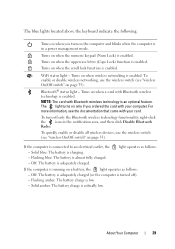
...Lock) is enabled. Flashing amber: The battery charge is almost fully charged. - The blue lights located above the keyboard indicate the following: Turns on when you ordered the card with Bluetooth wireless technology is in the notification area, and then click Disable Bluetooth Radio. WiFi status light.... To quickly enable or disable all wireless devices, use the wireless switch (see "wireless On/Off switch" on page 33). Turns on page 33). A Turns on a battery, the light operates as follows: If the computer is running on when the uppercase letter (Caps Lock) function is...
...Lock) is enabled. Flashing amber: The battery charge is almost fully charged. - The blue lights located above the keyboard indicate the following: Turns on when you ordered the card with Bluetooth wireless technology is in the notification area, and then click Disable Bluetooth Radio. WiFi status light.... To quickly enable or disable all wireless devices, use the wireless switch (see "wireless On/Off switch" on page 33). Turns on page 33). A Turns on a battery, the light operates as follows: If the computer is running on when the uppercase letter (Caps Lock) function is...
Owner's Manual
Page 30
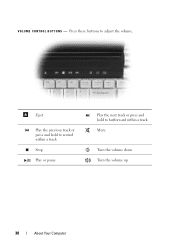
V O L U M E C O N T R O L B U T T O N S - Press these buttons to fastforward within a track Mute Turn the volume down Turn the volume up 30 About Your Computer Eject Play the previous track or press and hold to rewind within a track Stop Play or pause Play the next track or press and hold to adjust the volume.
V O L U M E C O N T R O L B U T T O N S - Press these buttons to fastforward within a track Mute Turn the volume down Turn the volume up 30 About Your Computer Eject Play the previous track or press and hold to rewind within a track Stop Play or pause Play the next track or press and hold to adjust the volume.

Owner's Manual
Page 31
... connector 3 VGA connector 5 HDMI connector 7 hard drive 2 USB connector (2) 4 network connector (RJ-45) 6 IEEE 1394a connector A C A D A P T E R C O N N E C T O R - You can connect the AC adapter with your computer turned on or off.
... connector 3 VGA connector 5 HDMI connector 7 hard drive 2 USB connector (2) 4 network connector (RJ-45) 6 IEEE 1394a connector A C A D A P T E R C O N N E C T O R - You can connect the AC adapter with your computer turned on or off.

Owner's Manual
Page 33
... A R D S L O T - Supports one ExpressCard. O P T I C A L D R I T C H - NOTE: The S-Video port does not support audio. Lets you attach a commercially available antitheft device to rapidly turn off : Disables wireless devices. 2 on any wireless devices such as a mouse, keyboard, or printer. W I R E L E S S O N / O F F S W I V E - You can scan for a wireless... local area network (WLAN) in the slot. Connects your vicinity. When enabled through Dell QuickSet, this switch can also use the headphone port at the front of the system to connect to a TV....
... A R D S L O T - Supports one ExpressCard. O P T I C A L D R I T C H - NOTE: The S-Video port does not support audio. Lets you attach a commercially available antitheft device to rapidly turn off : Disables wireless devices. 2 on any wireless devices such as a mouse, keyboard, or printer. W I R E L E S S O N / O F F S W I V E - You can scan for a wireless... local area network (WLAN) in the slot. Connects your vicinity. When enabled through Dell QuickSet, this switch can also use the headphone port at the front of the system to connect to a TV....
Owner's Manual
Page 34
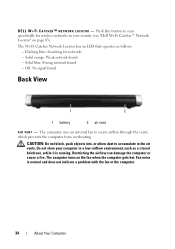
CAUTION: Do not block, push objects into, or allow dust to scan specifically for networks - Do not store your vicinity (see "Dell Wi-Fi Catcher™ Network Locator" on the fan when the computer gets hot. Solid orange: Weak network found - The Wi-Fi Catcher... as follows: - Flashing blue: Searching for wireless networks in the air vents. Restricting the airflow can damage the computer or cause a fire.The computer turns on page 83). The computer uses an internal fan to create airflow through the vents, which prevents the computer from overheating. F I C A T C H E R ...
CAUTION: Do not block, push objects into, or allow dust to scan specifically for networks - Do not store your vicinity (see "Dell Wi-Fi Catcher™ Network Locator" on the fan when the computer gets hot. Solid orange: Weak network found - The Wi-Fi Catcher... as follows: - Flashing blue: Searching for wireless networks in the air vents. Restricting the airflow can damage the computer or cause a fire.The computer turns on page 83). The computer uses an internal fan to create airflow through the vents, which prevents the computer from overheating. F I C A T C H E R ...
Owner's Manual
Page 35
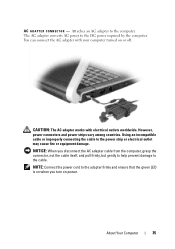
CAUTION: The AC adapter works with your computer turned on power. NOTICE: When you turn on or off. Attaches an AC adapter to the cable. You can connect the AC adapter with electrical outlets worldwide. NOTE: Connect the power cord ...
CAUTION: The AC adapter works with your computer turned on power. NOTICE: When you turn on or off. Attaches an AC adapter to the cable. You can connect the AC adapter with electrical outlets worldwide. NOTE: Connect the power cord ...
Owner's Manual
Page 41
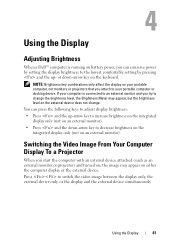
...the brightness level, the Brightness Meter may appear on either the computer display or the external device. Using the Display Adjusting Brightness When a Dell™ computer is connected to an external monitor and you start the computer with an external device attached (such as an external monitor ...or projector) and turned on, the image may appear, but the brightness level on the external device does not change. Press to decrease brightness on the integrated...
...the brightness level, the Brightness Meter may appear on either the computer display or the external device. Using the Display Adjusting Brightness When a Dell™ computer is connected to an external monitor and you start the computer with an external device attached (such as an external monitor ...or projector) and turned on, the image may appear, but the brightness level on the external device does not change. Press to decrease brightness on the integrated...

Owner's Manual
Page 48
...with the computer in reverse order. 48 Using a Battery NOTICE: If you have up to 1 minute to replace the battery with your Dell computer. Replace the battery only with your computer. To remove the battery: 1 Ensure that the computer is designed to avoid possible connector ...damage. CAUTION: Before performing these procedures, turn off . 2 Slide the battery-bay latch release on the bottom of fire or explosion. The battery is turned off the computer, disconnect the AC adapter from the electrical outlet and the computer,...
...with the computer in reverse order. 48 Using a Battery NOTICE: If you have up to 1 minute to replace the battery with your Dell computer. Replace the battery only with your computer. To remove the battery: 1 Ensure that the computer is designed to avoid possible connector ...damage. CAUTION: Before performing these procedures, turn off . 2 Slide the battery-bay latch release on the bottom of fire or explosion. The battery is turned off the computer, disconnect the AC adapter from the electrical outlet and the computer,...
Owner's Manual
Page 58
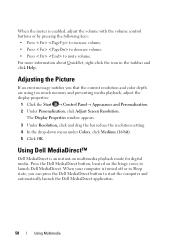
... the bar reduce the resolution setting. 4 In the drop-down menu under Colors, click Medium (16 bit). 5 Click OK. Press the Dell MediaDirect button, located on multimedia playback mode for digital media. When your computer is enabled, adjust the volume with the volume control buttons or ...8226; Press to mute volume. When the meter is turned off or in the taskbar and click Help. Adjusting the Picture If an error message notifies you can press the Dell MediaDirect button to launch Dell MediaDirect. Using Dell MediaDirect™ Dell MediaDirect is an instant-on the hinge cover, to ...
... the bar reduce the resolution setting. 4 In the drop-down menu under Colors, click Medium (16 bit). 5 Click OK. Press the Dell MediaDirect button, located on multimedia playback mode for digital media. When your computer is enabled, adjust the volume with the volume control buttons or ...8226; Press to mute volume. When the meter is turned off or in the taskbar and click Help. Adjusting the Picture If an error message notifies you can press the Dell MediaDirect button to launch Dell MediaDirect. Using Dell MediaDirect™ Dell MediaDirect is an instant-on the hinge cover, to ...

Owner's Manual
Page 62
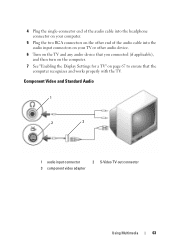
... S-Video input connector on your TV. 62 Using Multimedia S-Video and Standard Audio 1 2 1 audio connector 2 S-Video TV-out connector 1 2 1 standard S-Video cable 2 standard audio cable 1 Turn off the computer and the TV and/or audio device that you can connect an S-Video cable directly to connect.
... S-Video input connector on your TV. 62 Using Multimedia S-Video and Standard Audio 1 2 1 audio connector 2 S-Video TV-out connector 1 2 1 standard S-Video cable 2 standard audio cable 1 Turn off the computer and the TV and/or audio device that you can connect an S-Video cable directly to connect.
Owner's Manual
Page 63
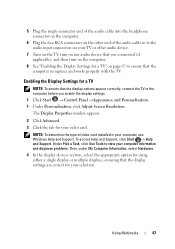
... other end of the audio cable into the audio input connectors on your TV or other audio device. 6 Turn on the TV and any audio device that you connected (if applicable), and then turn on the computer. 7 See "Enabling the Display Settings for a TV" on page 67 to ensure that the computer...
... other end of the audio cable into the audio input connectors on your TV or other audio device. 6 Turn on the TV and any audio device that you connected (if applicable), and then turn on the computer. 7 See "Enabling the Display Settings for a TV" on page 67 to ensure that the computer...
Owner's Manual
Page 64
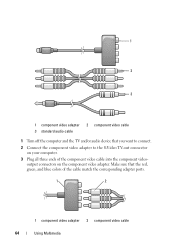
Make sure that you want to connect. 2 Connect the component video adapter to the S-Video TV-out connector on the component video adapter. 1 2 3 1 component video adapter 3 standard audio cable 2 component video cable 1 Turn off the computer and the TV and/or audio device that the red, green, and blue colors of the component video cable into the component videooutput connectors on your computer. 3 Plug all three ends of the cable match the corresponding adapter ports. 1 2 1 component video adapter 2 component video cable 64 Using Multimedia
Make sure that you want to connect. 2 Connect the component video adapter to the S-Video TV-out connector on the component video adapter. 1 2 3 1 component video adapter 3 standard audio cable 2 component video cable 1 Turn off the computer and the TV and/or audio device that the red, green, and blue colors of the component video cable into the component videooutput connectors on your computer. 3 Plug all three ends of the cable match the corresponding adapter ports. 1 2 1 component video adapter 2 component video cable 64 Using Multimedia

Owner's Manual
Page 65
... other end of the component video cable into the audio input connectors on your TV or audio device. 7 Turn on the TV, turn on any audio device that you connected (if applicable), and then turn on the computer. 8 See "Enabling the Display Settings for a TV" on the TV. Make sure that the red...
... other end of the component video cable into the audio input connectors on your TV or audio device. 7 Turn on the TV, turn on any audio device that you connected (if applicable), and then turn on the computer. 8 See "Enabling the Display Settings for a TV" on the TV. Make sure that the red...
Owner's Manual
Page 66
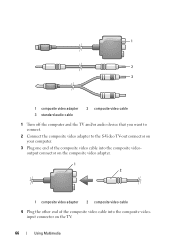
1 2 3 1 composite video adapter 3 standard audio cable 2 composite video cable 1 Turn off the computer and the TV and/or audio device that you want to connect. 2 Connect the composite video adapter to the S-Video TV-out connector on your computer. 3 Plug one end of the composite video cable into the composite videooutput connector on the composite video adapter. 1 2 1 composite video adapter 2 composite video cable 4 Plug the other end of the composite video cable into the composite videoinput connector on the TV. 66 Using Multimedia
1 2 3 1 composite video adapter 3 standard audio cable 2 composite video cable 1 Turn off the computer and the TV and/or audio device that you want to connect. 2 Connect the composite video adapter to the S-Video TV-out connector on your computer. 3 Plug one end of the composite video cable into the composite videooutput connector on the composite video adapter. 1 2 1 composite video adapter 2 composite video cable 4 Plug the other end of the composite video cable into the composite videoinput connector on the TV. 66 Using Multimedia
Owner's Manual
Page 67
...NOTE: To determine the type of the audio cable in to the audio input connectors on your TV or other audio device. 7 Turn on the TV, turn on the computer. 8 See "Enabling the Display Settings for your computer, see Windows Help and Support. 5 Plug the single-connector ... display or multiple displays, ensuring that the display options appear correctly, connect the TV to the computer before you connected (if applicable), and then turn on any audio device that you enable the display settings. 1 Click Start → Control Panel →Appearance and Personalization. 1 Under Personalization, ...
...NOTE: To determine the type of the audio cable in to the audio input connectors on your TV or other audio device. 7 Turn on the TV, turn on the computer. 8 See "Enabling the Display Settings for your computer, see Windows Help and Support. 5 Plug the single-connector ... display or multiple displays, ensuring that the display options appear correctly, connect the TV to the computer before you connected (if applicable), and then turn on any audio device that you enable the display settings. 1 Click Start → Control Panel →Appearance and Personalization. 1 Under Personalization, ...
Owner's Manual
Page 69
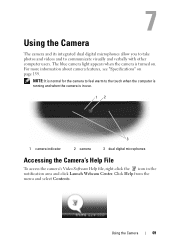
... integrated dual digital microphones allow you to take photos and videos and to the touch when the computer is running and when the camera is turned on page 159. The blue camera light appears when the camera is in use. 12 3 1 camera indicator 2 camera 3 dual digital microphones Accessing the Camera's Help...
... integrated dual digital microphones allow you to take photos and videos and to the touch when the computer is running and when the camera is turned on page 159. The blue camera light appears when the camera is in use. 12 3 1 camera indicator 2 camera 3 dual digital microphones Accessing the Camera's Help...
Owner's Manual
Page 70
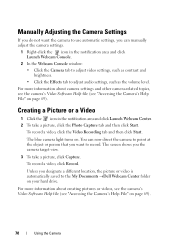
The blue camera light turns on page 69). 70 Using the Camera To record a video, click Record. For more information about camera settings and other camera-related topics, see the ... tab to adjust audio settings, such as the volume level. Manually Adjusting the Camera Settings If you do not want to the My Documents →Dell Webcam Center folder on your hard drive. For more information about creating pictures or videos, see the camera's Video Software Help file (see "Accessing the...
The blue camera light turns on page 69). 70 Using the Camera To record a video, click Record. For more information about camera settings and other camera-related topics, see the ... tab to adjust audio settings, such as the volume level. Manually Adjusting the Camera Settings If you do not want to the My Documents →Dell Webcam Center folder on your hard drive. For more information about creating pictures or videos, see the camera's Video Software Help file (see "Accessing the...


