Owner's Manual
Page 5
... 46 Configuring Power Management Settings . . . . . 46 Using the Sleep Power State 47 Charging the Battery 47 Replacing the Battery 48 Storing a Battery 49 6 Using Multimedia 51 Playing Media 51 Playing Media Using Dell Travel Remote 52 Copying CD, DVD, and Blu-ray Disc™ (BD) Media 54 How to Copy a CD, ...DVD or BD 54 Using Blank CD, DVD, and BD Media 55 Helpful Tips 56 Adjusting the Volume 57 Adjusting the Picture 58 Using Dell MediaDirect 58 Connecting Your Computer to a TV or Audio Device 59 HDMI 61 S-Video and Standard Audio 62 Component Video and Standard Audio 63...
... 46 Configuring Power Management Settings . . . . . 46 Using the Sleep Power State 47 Charging the Battery 47 Replacing the Battery 48 Storing a Battery 49 6 Using Multimedia 51 Playing Media 51 Playing Media Using Dell Travel Remote 52 Copying CD, DVD, and Blu-ray Disc™ (BD) Media 54 How to Copy a CD, ...DVD or BD 54 Using Blank CD, DVD, and BD Media 55 Helpful Tips 56 Adjusting the Volume 57 Adjusting the Picture 58 Using Dell MediaDirect 58 Connecting Your Computer to a TV or Audio Device 59 HDMI 61 S-Video and Standard Audio 62 Component Video and Standard Audio 63...

Owner's Manual
Page 36
... installed, you can use the computer without connecting the computer to an electrical outlet (see "Replacing the Battery" on page 142). Releases the battery (see "Using a Battery" on page 44). Compartment that contains the DIMM 1 and DIMM 2 memory modules. Compartment for instructions). 36 About ...Cache Module (FCM) Mini-Cards (see "Memory" on page 138. Bottom View 1 2 3 1 battery 3 battery charge/health gauge 5 wireless mini-card compartment 5 4 2 battery release latch 4 memory module compartment M E M O R Y M O D U L E C O M P A R T M E N T - W I R E L E S S M I N I ...
... installed, you can use the computer without connecting the computer to an electrical outlet (see "Replacing the Battery" on page 142). Releases the battery (see "Using a Battery" on page 44). Compartment that contains the DIMM 1 and DIMM 2 memory modules. Compartment for instructions). 36 About ...Cache Module (FCM) Mini-Cards (see "Memory" on page 138. Bottom View 1 2 3 1 battery 3 battery charge/health gauge 5 wireless mini-card compartment 5 4 2 battery release latch 4 memory module compartment M E M O R Y M O D U L E C O M P A R T M E N T - W I R E L E S S M I N I ...

Owner's Manual
Page 44
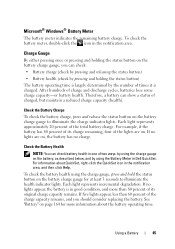
..., right-click the QuickSet icon, and then click Help. 44 Using a Battery Damaged batteries may leak and cause personal injury or equipment damage. Replace the battery only with household waste. Keep the battery away from Dell. You can check the battery charge before you when the battery charge is designed to temperatures above 65°C (149°F). You...
..., right-click the QuickSet icon, and then click Help. 44 Using a Battery Damaged batteries may leak and cause personal injury or equipment damage. Replace the battery only with household waste. Keep the battery away from Dell. You can check the battery charge before you when the battery charge is designed to temperatures above 65°C (149°F). You...
Owner's Manual
Page 45
... in the notification area. If no charge. Each light represents incremental degradation. See "Battery" on the battery charge gauge, you should consider replacing the battery. To check the battery meter, double-click the icon in Dell QuickSet. Check the Battery Health NOTE: You can show a status of times it is in the notification area, and then click...
... in the notification area. If no charge. Each light represents incremental degradation. See "Battery" on the battery charge gauge, you should consider replacing the battery. To check the battery meter, double-click the icon in Dell QuickSet. Check the Battery Health NOTE: You can show a status of times it is in the notification area, and then click...

Owner's Manual
Page 48
...Replacing the Battery CAUTION: Using an incompatible battery may increase the risk of the computer, and then remove the battery from Dell. Replace the battery only with your Dell computer. To remove the battery: 1 Ensure that the computer is designed to work with your computer. The battery...If you have up to 1 minute to complete the battery replacement before the computer shuts down and loses any other computers with a compatible battery purchased from the bay. 1 2 1 battery 2 battery release latch To replace the battery, follow the removal procedure in standby mode, you ...
...Replacing the Battery CAUTION: Using an incompatible battery may increase the risk of the computer, and then remove the battery from Dell. Replace the battery only with your Dell computer. To remove the battery: 1 Ensure that the computer is designed to work with your computer. The battery...If you have up to 1 minute to complete the battery replacement before the computer shuts down and loses any other computers with a compatible battery purchased from the bay. 1 2 1 battery 2 battery release latch To replace the battery, follow the removal procedure in standby mode, you ...
Owner's Manual
Page 104
... date stored in the Dell Diagnostics (see "Contacting Dell" on the hard drive. The keyboard controller may be malfunctioning, or a memory module may be malfunctioning. T H E D E V I C E I C A L L Y L O W - WA R N I N G : B A T T E R Y I S C R I T I S N O T R E A D Y - TIME- U N E X P E C T E D I N T E R R U P T I B L E . Run the System Memory tests and the Keyboard Controller test in the system setup program does not match the system clock. Replace the battery, or connect the...
... date stored in the Dell Diagnostics (see "Contacting Dell" on the hard drive. The keyboard controller may be malfunctioning, or a memory module may be malfunctioning. T H E D E V I C E I C A L L Y L O W - WA R N I N G : B A T T E R Y I S C R I T I S N O T R E A D Y - TIME- U N E X P E C T E D I N T E R R U P T I B L E . Run the System Memory tests and the Keyboard Controller test in the system setup program does not match the system clock. Replace the battery, or connect the...
Owner's Manual
Page 130
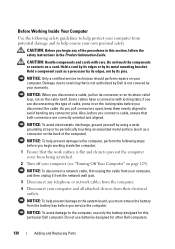
... not authorized by Dell is flat and clean to prevent the computer cover from being scratched. 2 Turn off your warranty. Some cables have a connector with care. NOTICE: To help prevent damage to the system board, you must remove the battery from the battery bay before you disconnect...oriented and aligned. NOTICE: To avoid damage to the computer, use batteries designed for this section, follow the safety instructions in on the back of the procedures in this particular Dell computer. Do not use only the battery designed for other Dell computers. 130 Adding and Replacing Parts
... not authorized by Dell is flat and clean to prevent the computer cover from being scratched. 2 Turn off your warranty. Some cables have a connector with care. NOTICE: To help prevent damage to the system board, you must remove the battery from the battery bay before you disconnect...oriented and aligned. NOTICE: To avoid damage to the computer, use batteries designed for this section, follow the safety instructions in on the back of the procedures in this particular Dell computer. Do not use only the battery designed for other Dell computers. 130 Adding and Replacing Parts
Owner's Manual
Page 131
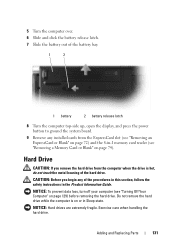
...Card or Blank" on page 74). Exercise care when handling the hard drive. Adding and Replacing Parts 131 5 Turn the computer over. 6 Slide and click the battery release latch. 7 Slide the battery out of the procedures in this section, follow the safety instructions in the Product Information Guide.... Hard Drive CAUTION: If you begin any of the battery bay. 1 2 1 battery 2 battery release latch 8 Turn the computer top-side up, open the display, and press the power button to ground the system board...
...Card or Blank" on page 74). Exercise care when handling the hard drive. Adding and Replacing Parts 131 5 Turn the computer over. 6 Slide and click the battery release latch. 7 Slide the battery out of the procedures in this section, follow the safety instructions in the Product Information Guide.... Hard Drive CAUTION: If you begin any of the battery bay. 1 2 1 battery 2 battery release latch 8 Turn the computer top-side up, open the display, and press the power button to ground the system board...
Owner's Manual
Page 134
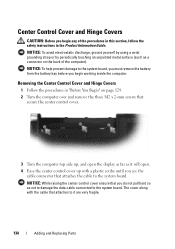
...system board. NOTICE: While raising the center control cover ensure that you do not pull hard so as it are very fragile. 134 Adding and Replacing Parts NOTICE: To avoid electrostatic discharge, ground yourself by using a wrist grounding strap or by periodically touching an unpainted metal surface (such as ... along with a plastic scribe until you see the cable connector that attaches the cable to the system board, you must remove the battery from the battery bay before you begin any of the procedures in this section, follow the safety instructions in "Before You Begin" on the back of...
...system board. NOTICE: While raising the center control cover ensure that you do not pull hard so as it are very fragile. 134 Adding and Replacing Parts NOTICE: To avoid electrostatic discharge, ground yourself by using a wrist grounding strap or by periodically touching an unpainted metal surface (such as ... along with a plastic scribe until you see the cable connector that attaches the cable to the system board, you must remove the battery from the battery bay before you begin any of the procedures in this section, follow the safety instructions in "Before You Begin" on the back of...
Owner's Manual
Page 136
... connector and push its black securing tabs inside the computer. 136 Adding and Replacing Parts CAUTION: Before you begin any of the computer). NOTICE: To help prevent damage to the system board, you must remove the battery from the battery bay before you begin working inside with your fingertips. 3 Snap the center control...
... connector and push its black securing tabs inside the computer. 136 Adding and Replacing Parts CAUTION: Before you begin any of the computer). NOTICE: To help prevent damage to the system board, you must remove the battery from the battery bay before you begin working inside with your fingertips. 3 Snap the center control...

Owner's Manual
Page 141
... memory installed in the computer, click Start → Help and Support→ Dell System Information. As the computer boots, it . 1 2 1 tab 2 notch NOTICE: If the cover is difficult to your computer. 3 Replace the module cover. 4 Insert the battery into the battery bay, or connect the AC adapter to close may damage your computer and...
... memory installed in the computer, click Start → Help and Support→ Dell System Information. As the computer boots, it . 1 2 1 tab 2 notch NOTICE: If the cover is difficult to your computer. 3 Replace the module cover. 4 Insert the battery into the battery bay, or connect the AC adapter to close may damage your computer and...
Owner's Manual
Page 142
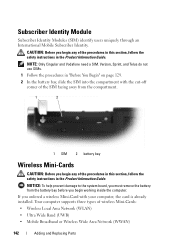
...SIMs. 1 Follow the procedures in "Before You Begin" on page 129. 2 In the battery bay, slide the SIM into the compartment with your computer, the card is already installed....SIM. NOTICE: To help prevent damage to the system board, you must remove the battery from the compartment. 1 2 1 SIM 2 battery bay Wireless Mini-Cards CAUTION: Before you begin working inside the computer. Your computer... you ordered a wireless Mini-Card with the cut-off corner of the SIM facing away from the battery bay before you begin any of wireless Mini-Cards: • Wireless Local Area Network (WLAN) &#...
...SIMs. 1 Follow the procedures in "Before You Begin" on page 129. 2 In the battery bay, slide the SIM into the compartment with your computer, the card is already installed....SIM. NOTICE: To help prevent damage to the system board, you must remove the battery from the compartment. 1 2 1 SIM 2 battery bay Wireless Mini-Cards CAUTION: Before you begin working inside the computer. Your computer... you ordered a wireless Mini-Card with the cut-off corner of the SIM facing away from the battery bay before you begin any of wireless Mini-Cards: • Wireless Local Area Network (WLAN) &#...
Owner's Manual
Page 149
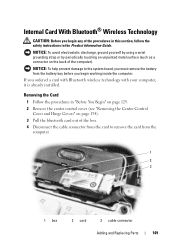
... is already installed. Removing the Card 1 Follow the procedures in the Product Information Guide. NOTICE: To help prevent damage to remove the card from the battery bay before you begin any of the procedures in this section, follow the safety instructions in "Before You Begin" on page 129. 2 Remove the center... surface (such as a connector on the back of the box. 4 Disconnect the cable connector from the card to the system board, you must remove the battery from the computer. 1 2 3 1 box 2 card 3 cable connector Adding and Replacing Parts 149
... is already installed. Removing the Card 1 Follow the procedures in the Product Information Guide. NOTICE: To help prevent damage to remove the card from the battery bay before you begin any of the procedures in this section, follow the safety instructions in "Before You Begin" on page 129. 2 Remove the center... surface (such as a connector on the back of the box. 4 Disconnect the cable connector from the card to the system board, you must remove the battery from the computer. 1 2 3 1 box 2 card 3 cable connector Adding and Replacing Parts 149
Owner's Manual
Page 151
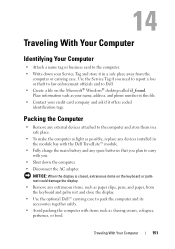
...8226; Remove any external devices attached to the computer and store them in a safe place. • To make the computer as light as possible, replace any devices installed in this file. • Contact your credit card company and ask if it in a safe place away from the keyboard and palm... the Service Tag if you . • Shut down your name, address, and phone number in the module bay with the Dell TravelLite™ module. • Fully charge the main battery and any extraneous items, such as paper clips, pens, and paper, from the computer or carrying case. Place information such as...
...8226; Remove any external devices attached to the computer and store them in a safe place. • To make the computer as light as possible, replace any devices installed in this file. • Contact your credit card company and ask if it in a safe place away from the keyboard and palm... the Service Tag if you . • Shut down your name, address, and phone number in the module bay with the Dell TravelLite™ module. • Fully charge the main battery and any extraneous items, such as paper clips, pens, and paper, from the computer or carrying case. Place information such as...


