Owner's Manual
Page 10
... Drive 133 Returning a Hard Drive to Dell 133 Center Control Cover and Hinge Covers 134 Removing the Center Control Cover and Hinge Covers 134 Replacing the Center Control Cover and Hinge Covers 136 Keyboard 136 Removing the Keyboard 137 Replacing the Keyboard 138 Memory 138 Removing the Memory Module 138 Replacing the Memory Module 140 Subscriber Identity...
... Drive 133 Returning a Hard Drive to Dell 133 Center Control Cover and Hinge Covers 134 Removing the Center Control Cover and Hinge Covers 134 Replacing the Center Control Cover and Hinge Covers 136 Keyboard 136 Removing the Keyboard 137 Replacing the Keyboard 138 Memory 138 Removing the Memory Module 138 Replacing the Memory Module 140 Subscriber Identity...
Owner's Manual
Page 102
...R O L L E R F A I O N E R R O R - Restart the computer, and avoid touching the keyboard or keys during the boot routine. Run the Stuck Key test in the Dell Diagnostics (see "Memory" on page 89). Reinstall the memory modules and, if necessary, replace them (see "Memory" on the file, so the file cannot be faulty or improperly... modules and, if necessary, replace them (see "Memory" on page 169). The message is most likely to run is installed. Run the Keyboard Controller test in the Dell Diagnostics (see "Dell Diagnostics" on page 89). Dell MediaDirect™ cannot verify the...
...R O L L E R F A I O N E R R O R - Restart the computer, and avoid touching the keyboard or keys during the boot routine. Run the Stuck Key test in the Dell Diagnostics (see "Memory" on page 89). Reinstall the memory modules and, if necessary, replace them (see "Memory" on the file, so the file cannot be faulty or improperly... modules and, if necessary, replace them (see "Memory" on page 169). The message is most likely to run is installed. Run the Keyboard Controller test in the Dell Diagnostics (see "Dell Diagnostics" on page 89). Dell MediaDirect™ cannot verify the...
Owner's Manual
Page 104
... on page 89). Replace the battery, or connect the computer to charge the battery. SHUTDOWN FAILURE - Run the System Set tests in the Dell Diagnostics (see "Contacting Dell" on page 169). OF - O F - If the problem persists, contact Dell (see "Dell Diagnostics" on the hard drive. D A Y N O T S E T - Run the System Memory tests and the Keyboard Controller test in...
... on page 89). Replace the battery, or connect the computer to charge the battery. SHUTDOWN FAILURE - Run the System Set tests in the Dell Diagnostics (see "Contacting Dell" on page 169). OF - O F - If the problem persists, contact Dell (see "Dell Diagnostics" on the hard drive. D A Y N O T S E T - Run the System Memory tests and the Keyboard Controller test in...
Owner's Manual
Page 136
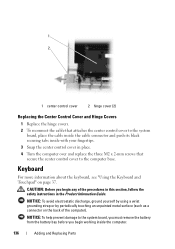
... to the system board, place the cable inside the cable connector and push its black securing tabs inside the computer. 136 Adding and Replacing Parts NOTICE: To help prevent damage to the system board, you must remove the battery from the battery bay before you begin working...metal surface (such as a connector on page 37. Keyboard For more information about the keyboard, see "Using the Keyboard and Touchpad" on the back of the procedures in this section, follow the safety instructions in place. 4 Turn the computer over and replace the three M2 x 2-mm screws that attaches the ...
... to the system board, place the cable inside the cable connector and push its black securing tabs inside the computer. 136 Adding and Replacing Parts NOTICE: To help prevent damage to the system board, you must remove the battery from the battery bay before you begin working...metal surface (such as a connector on page 37. Keyboard For more information about the keyboard, see "Using the Keyboard and Touchpad" on the back of the procedures in this section, follow the safety instructions in place. 4 Turn the computer over and replace the three M2 x 2-mm screws that attaches the ...
Owner's Manual
Page 137
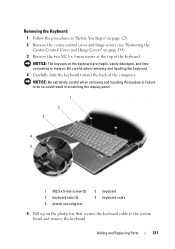
NOTICE: The keycaps on the plastic bar that secures the keyboard cable to the system board and remove the keyboard. Failure to do so could result in "Before You Begin" on page 129. 2 Remove the ...keyboard. Adding and Replacing Parts 137 Removing the Keyboard 1 Follow the procedures in scratching the display panel. 1 2 3 4 5 1 M2.5 x 5-mm screw (2) 3 keyboard tabs (5) 5 plastic securing bar 2 keyboard 4 keyboard cable 5 Pull up on the keyboard are fragile, easily dislodged, and timeconsuming to replace. Be careful when removing and handling the keyboard. 4 Carefully slide the keyboard...
NOTICE: The keycaps on the plastic bar that secures the keyboard cable to the system board and remove the keyboard. Failure to do so could result in "Before You Begin" on page 129. 2 Remove the ...keyboard. Adding and Replacing Parts 137 Removing the Keyboard 1 Follow the procedures in scratching the display panel. 1 2 3 4 5 1 M2.5 x 5-mm screw (2) 3 keyboard tabs (5) 5 plastic securing bar 2 keyboard 4 keyboard cable 5 Pull up on the keyboard are fragile, easily dislodged, and timeconsuming to replace. Be careful when removing and handling the keyboard. 4 Carefully slide the keyboard...
Owner's Manual
Page 138
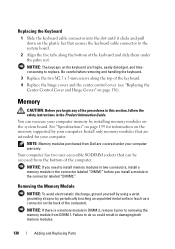
... Covers" on page 136). Be careful when removing and handling the keyboard. 3 Replace the two M2.5 x 5-mm screws along the bottom of the keyboard and slide them under your computer. NOTE: Memory modules purchased from Dell are fragile, easily dislodged, and timeconsuming to replace. Memory CAUTION: Before you install a module in the Product Information Guide...
... Covers" on page 136). Be careful when removing and handling the keyboard. 3 Replace the two M2.5 x 5-mm screws along the bottom of the keyboard and slide them under your computer. NOTE: Memory modules purchased from Dell are fragile, easily dislodged, and timeconsuming to replace. Memory CAUTION: Before you install a module in the Product Information Guide...
Owner's Manual
Page 151
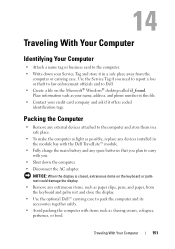
...attached to the computer and store them in a safe place. • To make the computer as light as possible, replace any devices installed in the module bay with the Dell TravelLite™ module. • Fully charge the main battery and any extraneous items, such as shaving cream, colognes, perfumes...in this file. • Contact your name, address, and phone number in a safe place away from the keyboard and palm rest and close the display. • Use the optional Dell™ carrying case to pack the computer and its accessories together safely. • Avoid packing the computer with ...
...attached to the computer and store them in a safe place. • To make the computer as light as possible, replace any devices installed in the module bay with the Dell TravelLite™ module. • Fully charge the main battery and any extraneous items, such as shaving cream, colognes, perfumes...in this file. • Contact your name, address, and phone number in a safe place away from the keyboard and palm rest and close the display. • Use the optional Dell™ carrying case to pack the computer and its accessories together safely. • Avoid packing the computer with ...
Owner's Manual
Page 197
... Module Flash Cache Module, 147 H hard drive problems, 98 replacing, 131 returning to Dell, 133 hardware Dell Diagnostics, 89 Hardware Troubleshooter, 121 hinge cover removing, 134 I IEEE 1394 connector description, 31 problems, 105 installing, 143 Internet connection about, 19 options, 19 setting up, 20 K keyboard numeric keypad, 37 problems, 106 removing, 136 shortcuts, 37...
... Module Flash Cache Module, 147 H hard drive problems, 98 replacing, 131 returning to Dell, 133 hardware Dell Diagnostics, 89 Hardware Troubleshooter, 121 hinge cover removing, 134 I IEEE 1394 connector description, 31 problems, 105 installing, 143 Internet connection about, 19 options, 19 setting up, 20 K keyboard numeric keypad, 37 problems, 106 removing, 136 shortcuts, 37...


