
Service Manual
Page 5
DellTM XFR D630 Fully Rugged Notebook Service Manual 24 RF PASSTHRU BOARD 102 24.1 REMOVING THE RF PASSTHRU BOARD 102 24.2 INSTALLING THE RF PASSTHRU BOARD 103 25 BOTTOM CHASSIS 104 25.1 25.2 25.3 25.4 REMOVING THE BOTTOM CHASSIS 104 INSTALLING THE BOTTOM CHASSIS 105 REMOVING THE MODEM CABLE 105 INSTALLING THE MODEM CABLE 105 Page 5 of 106 Revision A01
DellTM XFR D630 Fully Rugged Notebook Service Manual 24 RF PASSTHRU BOARD 102 24.1 REMOVING THE RF PASSTHRU BOARD 102 24.2 INSTALLING THE RF PASSTHRU BOARD 103 25 BOTTOM CHASSIS 104 25.1 25.2 25.3 25.4 REMOVING THE BOTTOM CHASSIS 104 INSTALLING THE BOTTOM CHASSIS 105 REMOVING THE MODEM CABLE 105 INSTALLING THE MODEM CABLE 105 Page 5 of 106 Revision A01

Service Manual
Page 14
... working inside your computer, follow the safety instructions in the XFR D630 Product Information Guide and in Before You Begin. 96H 2. NOTE: Dell does not guarantee compatibility or provide support for your computer before removing the hard drive. Turn the computer over and locate the hard disk drive compartment using the figure below. To replace the hard drive in hibernate mode NOTICE: Hard drives are extremely fragile; NOTE: You need the Drivers and Utilities media for hard drives...
... working inside your computer, follow the safety instructions in the XFR D630 Product Information Guide and in Before You Begin. 96H 2. NOTE: Dell does not guarantee compatibility or provide support for your computer before removing the hard drive. Turn the computer over and locate the hard disk drive compartment using the figure below. To replace the hard drive in hibernate mode NOTICE: Hard drives are extremely fragile; NOTE: You need the Drivers and Utilities media for hard drives...

Service Manual
Page 19
... use. 4.2 Replacing the Stylus 1 Stylus 2 Stylus tether (with a factory installed handle. At the stylus clip, loosen the looped end of 106 Revision A01 Pull the stylus and tether through the loop until the tether is free from the stylus clip. 2. Pull the remainder of the handle to the other, remember to the stylus clip: a. Your new... tether through the hole in place. Pull the stylus and tether through the loop. Place one side of the tether through the loop until tight. Install the new stylus: a. b. DellTM XFR D630 Fully Rugged Notebook Service Manual 4.
... use. 4.2 Replacing the Stylus 1 Stylus 2 Stylus tether (with a factory installed handle. At the stylus clip, loosen the looped end of 106 Revision A01 Pull the stylus and tether through the loop until the tether is free from the stylus clip. 2. Pull the remainder of the handle to the other, remember to the stylus clip: a. Your new... tether through the hole in place. Pull the stylus and tether through the loop. Place one side of the tether through the loop until tight. Install the new stylus: a. b. DellTM XFR D630 Fully Rugged Notebook Service Manual 4.
Service Manual
Page 51
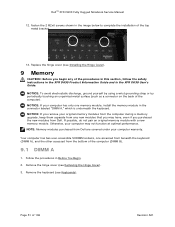
... a memory upgrade, keep them separate from any of the procedures in this section, follow the safety instructions in the XFR D630 Product Information Guide and in the connector labeled "DIMM A," which is underneath the keyboard. Your computer has two user-accessible SODIMM sockets, one memory module, install the memory module in the XFR D630 User's Guide. Remove the hinge cover (see Installing the Hinge Cover). 104H 9 Memory CAUTION: Before you begin any new modules that...
... a memory upgrade, keep them separate from any of the procedures in this section, follow the safety instructions in the XFR D630 Product Information Guide and in the connector labeled "DIMM A," which is underneath the keyboard. Your computer has two user-accessible SODIMM sockets, one memory module, install the memory module in the XFR D630 User's Guide. Remove the hinge cover (see Installing the Hinge Cover). 104H 9 Memory CAUTION: Before you begin any new modules that...
Service Manual
Page 52
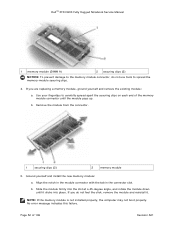
... connector slot. If you do not use tools to carefully spread apart the securing clips on each end of 106 Revision A01 Ground yourself and install the new memory module: a. NOTE: If the memory module is not installed properly, the computer may not boot properly. b. Use your fingertips to spread the memory-module securing clips. 4. Remove the module from the connector. 1 securing clips (2) 2 memory module 5. No error message indicates this...
... connector slot. If you do not use tools to carefully spread apart the securing clips on each end of 106 Revision A01 Ground yourself and install the new memory module: a. NOTE: If the memory module is not installed properly, the computer may not boot properly. b. Use your fingertips to spread the memory-module securing clips. 4. Remove the module from the connector. 1 securing clips (2) 2 memory module 5. No error message indicates this...
User Guide
Page 17
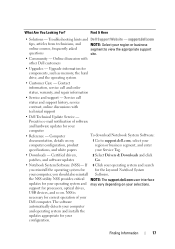
... computer configuration, product region or business segment, and enter specifications, and white papers your Service Tag. • Downloads - support for processors, optical drives, USB devices, and so on my 1 Go to view the appropriate support questions site. • Community - Certified drivers, patches, and software updates 2 Select Drivers & Downloads and click Go. • Notebook System Software (NSS)- Service call and order status, warranty, and repair information • Service and support - If 3 Click your operating...
... computer configuration, product region or business segment, and enter specifications, and white papers your Service Tag. • Downloads - support for processors, optical drives, USB devices, and so on my 1 Go to view the appropriate support questions site. • Community - Certified drivers, patches, and software updates 2 Select Drivers & Downloads and click Go. • Notebook System Software (NSS)- Service call and order status, warranty, and repair information • Service and support - If 3 Click your operating...
User Guide
Page 101
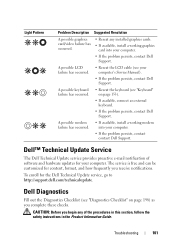
..., format, and how frequently you receive notifications. Troubleshooting 101 computer's Service Manual). • If the problem persists, contact Dell Support. on page 198) as you begin any installed graphics cards. A possible modem • If available, install a working graphics occurred. Dell™ Technical Update Service The Dell Technical Update service provides proactive e-mail notification of the procedures in this section, follow the safety instructions in the Product Information Guide. Dell Diagnostics...
..., format, and how frequently you receive notifications. Troubleshooting 101 computer's Service Manual). • If the problem persists, contact Dell Support. on page 198) as you begin any installed graphics cards. A possible modem • If available, install a working graphics occurred. Dell™ Technical Update Service The Dell Technical Update service provides proactive e-mail notification of the procedures in this section, follow the safety instructions in the Product Information Guide. Dell Diagnostics...
User Guide
Page 110
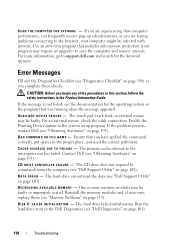
... out the Diagnostics Checklist (see "Dell Support Utility" on page 105). CAUTION: Before you begin any of the procedures in this section, follow the safety instructions in the system setup program. The touch pad, track stick, or external mouse may be faulty or improperly seated. Enable the Pointing Device option in the Product Information Guide. The primary cache internal to commands from the computer...
... out the Diagnostics Checklist (see "Dell Support Utility" on page 105). CAUTION: Before you begin any of the procedures in this section, follow the safety instructions in the system setup program. The touch pad, track stick, or external mouse may be faulty or improperly seated. Enable the Pointing Device option in the Product Information Guide. The primary cache internal to commands from the computer...
User Guide
Page 112
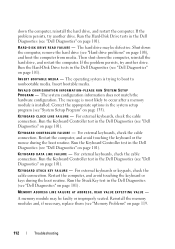
... Keyboard Controller test in the Dell Diagnostics (see "System Setup Program" on page 119. 112 Troubleshooting Restart the computer, and avoid touching the keyboard or the mouse during the boot routine. For external keyboards, check the cable connection. Reinstall the memory modules and, if necessary, replace them (see "Hard drive problems" on page 101). The hard drive may be defective. Insert bootable media. For external keyboards, check the cable connection. H A R D- Shut down the computer, remove the hard drive (see "Memory Problems...
... Keyboard Controller test in the Dell Diagnostics (see "System Setup Program" on page 119. 112 Troubleshooting Restart the computer, and avoid touching the keyboard or the mouse during the boot routine. For external keyboards, check the cable connection. Reinstall the memory modules and, if necessary, replace them (see "Hard drive problems" on page 101). The hard drive may be defective. Insert bootable media. For external keyboards, check the cable connection. H A R D- Shut down the computer, remove the hard drive (see "Memory Problems...

User Guide
Page 119
..., follow the safety instructions in the Product Information Guide. Network Problems Fill out the Diagnostics Checklist (see if that your computer is related to a software problem. CAUTION: Before you are not using to ensure that resolves the problem. • See the software documentation for the keyword spyware. If necessary, install additional memory (see "Dell Diagnostics" on page 101). Troubleshooting 119 For more information...
..., follow the safety instructions in the Product Information Guide. Network Problems Fill out the Diagnostics Checklist (see if that your computer is related to a software problem. CAUTION: Before you are not using to ensure that resolves the problem. • See the software documentation for the keyword spyware. If necessary, install additional memory (see "Dell Diagnostics" on page 101). Troubleshooting 119 For more information...
User Guide
Page 127
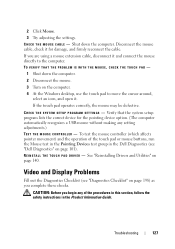
... the mouse cable, check it for the pointing device option. (The computer automatically recognizes a USB mouse without making any of the touch pad or mouse buttons, run the Mouse test in the Pointing Devices test group in the Product Information Guide. C H E C K T H E S YS T E M S E T U P P R O G R A M S E T T I V E R - Troubleshooting 127 2 Click Mouse. 3 Try adjusting the settings. To test the mouse controller (which affects pointer movement) and the operation of the procedures in this section, follow the safety instructions...
... the mouse cable, check it for the pointing device option. (The computer automatically recognizes a USB mouse without making any of the touch pad or mouse buttons, run the Mouse test in the Pointing Devices test group in the Product Information Guide. C H E C K T H E S YS T E M S E T U P P R O G R A M S E T T I V E R - Troubleshooting 127 2 Click Mouse. 3 Try adjusting the settings. To test the mouse controller (which affects pointer movement) and the operation of the procedures in this section, follow the safety instructions...

User Guide
Page 135
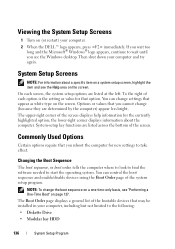
.... Certain changes might make your computer, such as the amount of system memory After you set up ) configuration and docking-device configuration settings • Basic device-configuration settings • System security and hard-drive password settings NOTE: Unless you can use the system setup program as follows: • To set or change the system setup settings. System Setup Program 135 You can disable or enable only through the system setup program. (An exception is the External Hot Key option...
.... Certain changes might make your computer, such as the amount of system memory After you set up ) configuration and docking-device configuration settings • Basic device-configuration settings • System security and hard-drive password settings NOTE: Unless you can use the system setup program as follows: • To set or change the system setup settings. System Setup Program 135 You can disable or enable only through the system setup program. (An exception is the External Hot Key option...
User Guide
Page 136
... boot order, tells the computer where to look to find the software needed to take effect. The Boot Order page displays a general list of the screen displays help information for the currently highlighted option; Then shut down your computer. 2 When the DELL™ logo appears, press immediately. Commonly Used Options Certain options require that option. On each option is the setting or value for new settings to start the operating system. System Setup Screens...
... boot order, tells the computer where to look to find the software needed to take effect. The Boot Order page displays a general list of the screen displays help information for the currently highlighted option; Then shut down your computer. 2 When the DELL™ logo appears, press immediately. Commonly Used Options Certain options require that option. On each option is the setting or value for new settings to start the operating system. System Setup Screens...
User Guide
Page 140
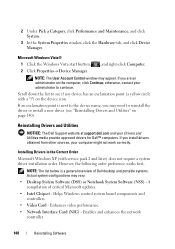
... system configurations may appear. If an exclamation point is a general overview of critical Microsoft updates. • Intel Chipset - Helps Windows control system board components and controllers. • Video Card - Scroll down the list to reinstall the driver or install a new driver (see if any device has an exclamation point (a yellow circle with service pack 2 and later) does not require a system driver installation order. Reinstalling Drivers and Utilities NOTICE: The Dell Support website at support.dell...
... system configurations may appear. If an exclamation point is a general overview of critical Microsoft updates. • Intel Chipset - Helps Windows control system board components and controllers. • Video Card - Scroll down the list to reinstall the driver or install a new driver (see if any device has an exclamation point (a yellow circle with service pack 2 and later) does not require a system driver installation order. Reinstalling Drivers and Utilities NOTICE: The Dell Support website at support.dell...
User Guide
Page 141
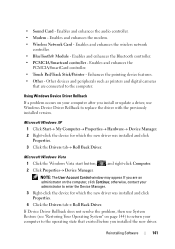
... update a driver, use System Restore (see "Restoring Your Operating System" on the computer, click Continue; otherwise, contact your computer after you are connected to enter the Device Manager. 3 Right-click the device for which the new driver was installed and click Properties. 3 Click the Drivers tab→ Roll Back Driver. Enables and enhances the audio controller. • Modem - NOTE: The User Account Control window may appear. Reinstalling Software 141 Enables and enhances the wireless network controller. • BlueTooth...
... update a driver, use System Restore (see "Restoring Your Operating System" on the computer, click Continue; otherwise, contact your computer after you are connected to enter the Device Manager. 3 Right-click the device for which the new driver was installed and click Properties. 3 Click the Drivers tab→ Roll Back Driver. Enables and enhances the audio controller. • Modem - NOTE: The User Account Control window may appear. Reinstalling Software 141 Enables and enhances the wireless network controller. • BlueTooth...
User Guide
Page 143
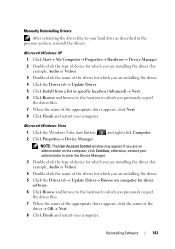
...; Reinstalling Software 143 Microsoft Windows Vista 1 Click the Windows Vista start button, , and right-click Computer. 2 Click Properties→ Device Manager. Manually Reinstalling Drivers After extracting the driver files to your hard drive as described in the previous section, reinstall the drivers: Microsoft Windows XP 1 Click Start→ My Computer→ Properties→ Hardware→ Device Manager. 2 Double-click the type of device for which you are installing the driver (for example, Audio or Video). 3 Double...
...; Reinstalling Software 143 Microsoft Windows Vista 1 Click the Windows Vista start button, , and right-click Computer. 2 Click Properties→ Device Manager. Manually Reinstalling Drivers After extracting the driver files to your hard drive as described in the previous section, reinstall the drivers: Microsoft Windows XP 1 Click Start→ My Computer→ Properties→ Hardware→ Device Manager. 2 Double-click the type of device for which you are installing the driver (for example, Audio or Video). 3 Double...
User Guide
Page 144
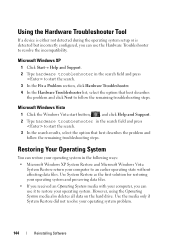
... troubleshooting steps. Use the media only if System Restore did not resolve your operating system. Microsoft Windows XP 1 Click Start→ Help and Support. 2 Type hardware troubleshooter in the following ways: • Microsoft Windows XP System Restore and Microsoft Windows Vista System Restore return your computer to restore your operating system problem. 144 Reinstalling Software However, using the Operating System media also deletes all data on the hard drive. Use System Restore as the first solution for restoring...
... troubleshooting steps. Use the media only if System Restore did not resolve your operating system. Microsoft Windows XP 1 Click Start→ Help and Support. 2 Type hardware troubleshooter in the following ways: • Microsoft Windows XP System Restore and Microsoft Windows Vista System Restore return your computer to restore your operating system problem. 144 Reinstalling Software However, using the Operating System media also deletes all data on the hard drive. Use System Restore as the first solution for restoring...
User Guide
Page 158
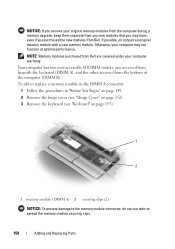
... the memory module connector, do not pair an original memory module with a new memory module. NOTICE: If you remove your original memory modules from the computer during a memory upgrade, keep them separate from any new modules that you purchased the new modules from Dell. If possible, do not use tools to spread the memory-module securing clips. 158 Adding and Replacing Parts Otherwise, your computer may have, even if you may not function...
... the memory module connector, do not pair an original memory module with a new memory module. NOTICE: If you remove your original memory modules from the computer during a memory upgrade, keep them separate from any new modules that you purchased the new modules from Dell. If possible, do not use tools to spread the memory-module securing clips. 158 Adding and Replacing Parts Otherwise, your computer may have, even if you may not function...
User Guide
Page 159
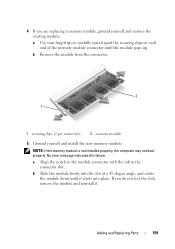
... clips (2 per connector) 2 memory module 5 Ground yourself and install the new memory module: NOTE: If the memory module is not installed properly, the computer may not boot properly. No error message indicates this failure. a Align the notch in the module connector with the tab in the connector slot. If you are replacing a memory module, ground yourself and remove the existing module: a Use your fingertips to carefully spread apart the securing clips...
... clips (2 per connector) 2 memory module 5 Ground yourself and install the new memory module: NOTE: If the memory module is not installed properly, the computer may not boot properly. No error message indicates this failure. a Align the notch in the module connector with the tab in the connector slot. If you are replacing a memory module, ground yourself and remove the existing module: a Use your fingertips to carefully spread apart the securing clips...
User Guide
Page 216
... - A hardware-based security feature that provides the video capabilities-in computers with an integrated video controller) that when combined with security software enhances network and computer security by enabling features such as a USB-compatible keyboard, mouse, joystick, scanner, set of cable used when the electrical power fails or drops to 1600 x 1200. unshielded twisted pair - UPS - trusted platform module - universal serial bus - U UAC - unified memory allocation - user account control...
... - A hardware-based security feature that provides the video capabilities-in computers with an integrated video controller) that when combined with security software enhances network and computer security by enabling features such as a USB-compatible keyboard, mouse, joystick, scanner, set of cable used when the electrical power fails or drops to 1600 x 1200. unshielded twisted pair - UPS - trusted platform module - universal serial bus - U UAC - unified memory allocation - user account control...


