
Service Manual
Page 6
... turns off . Ensure that is not authorized by Dell is not covered by performing the removal procedure in reverse order. 1.1 Recommended Tools The procedures in this section, follow the safety instructions in the XFR D630 Product Information Guide and in your computer. 1. NOTICE...flat-blade screwdriver • Phillips screwdriver • Small plastic scribe • 5-mm hex nut driver • Flash BIOS-update program CD • Processor extraction tool • Torque driver capable of up to help protect your computer. CAUTION: Before you turn off your computer. ...
... turns off . Ensure that is not authorized by Dell is not covered by performing the removal procedure in reverse order. 1.1 Recommended Tools The procedures in this section, follow the safety instructions in the XFR D630 Product Information Guide and in your computer. 1. NOTICE...flat-blade screwdriver • Phillips screwdriver • Small plastic scribe • 5-mm hex nut driver • Flash BIOS-update program CD • Processor extraction tool • Torque driver capable of up to help protect your computer. CAUTION: Before you turn off your computer. ...

Service Manual
Page 7
... is flat and clean to ground the system board. 8. DellTM XFR D630 Fully Rugged Notebook Service Manual itself. Disconnect any connector pins. If the 2 screws that both connectors are installed, remove the 2 screws on the latches on the battery compartment using a #1 Philips screw driver. Lift each latch and turn each a quarter-turn latches...
... is flat and clean to ground the system board. 8. DellTM XFR D630 Fully Rugged Notebook Service Manual itself. Disconnect any connector pins. If the 2 screws that both connectors are installed, remove the 2 screws on the latches on the battery compartment using a #1 Philips screw driver. Lift each latch and turn each a quarter-turn latches...

Service Manual
Page 14
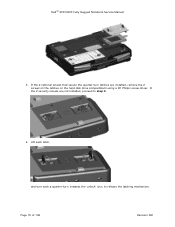
...your computer before removing the hard drive. You also need the Operating System media to install the drivers and utilities on , in standby mode, or in the XFR D630 User's Guide. Turn the computer over and locate the hard disk drive compartment using the figure below...your computer, follow the safety instructions in the XFR D630 Product Information Guide and in hibernate mode NOTICE: Hard drives are extremely fragile; DellTM XFR D630 Fully Rugged Notebook Service Manual 1 Optical drive 2 Device Latch release 4. NOTE: Dell does not guarantee compatibility or provide support for ...
...your computer before removing the hard drive. You also need the Operating System media to install the drivers and utilities on , in standby mode, or in the XFR D630 User's Guide. Turn the computer over and locate the hard disk drive compartment using the figure below...your computer, follow the safety instructions in the XFR D630 Product Information Guide and in hibernate mode NOTICE: Hard drives are extremely fragile; DellTM XFR D630 Fully Rugged Notebook Service Manual 1 Optical drive 2 Device Latch release 4. NOTE: Dell does not guarantee compatibility or provide support for ...
Service Manual
Page 15
If the 2 optional screws that secure the quarter-turn , towards the 'unlock' icon, to step 4. 4. Lift each latch, and turn each a quarter-turn latches are not installed, proceed to release the latching mechanism. If the 2 security screws are installed, remove the 2 screws on the latches on the hard disk drive compartment using a #1 Philips screw driver. Page 15 of 106 Revision A01 DellTM XFR D630 Fully Rugged Notebook Service Manual 3.
If the 2 optional screws that secure the quarter-turn , towards the 'unlock' icon, to step 4. 4. Lift each latch, and turn each a quarter-turn latches are not installed, proceed to release the latching mechanism. If the 2 security screws are installed, remove the 2 screws on the latches on the hard disk drive compartment using a #1 Philips screw driver. Page 15 of 106 Revision A01 DellTM XFR D630 Fully Rugged Notebook Service Manual 3.
Service Manual
Page 17
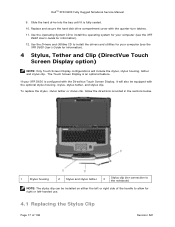
... stylus, stylus tether, and stylus clip. The Touch Screen Display is fully seated. 10. Use the Drivers and Utilities CD to install the operating system for your XFR D630 is configured with the DirectVue Touch Screen Display, it is an optional feature. Use the Operating System CD... to install the drivers and utilities for your computer (see the XFR D630 User's Guide for right or left or right side of 106 Revision A01 DellTM XFR D630 Fully Rugged Notebook Service Manual 9. If your computer (see the XFR D630 User's Guide for information). 4 Stylus, ...
... stylus, stylus tether, and stylus clip. The Touch Screen Display is fully seated. 10. Use the Drivers and Utilities CD to install the operating system for your XFR D630 is configured with the DirectVue Touch Screen Display, it is an optional feature. Use the Operating System CD... to install the drivers and utilities for your computer (see the XFR D630 User's Guide for right or left or right side of 106 Revision A01 DellTM XFR D630 Fully Rugged Notebook Service Manual 9. If your computer (see the XFR D630 User's Guide for information). 4 Stylus, ...
User Guide
Page 7
... Lights 99 Diagnostic Light Codes During POST 99 Dell™ Technical Update Service 101 Dell Diagnostics 101 When to Use the Dell Diagnostics 102 Starting the Dell Diagnostics From Your Hard Drive 102 Starting the Dell Diagnostics from the Drivers and Utilities Media 103 Dell Diagnostics Main Menu 104 Dell Support Utility 105 Accessing the Dell Support Utility 105 7
... Lights 99 Diagnostic Light Codes During POST 99 Dell™ Technical Update Service 101 Dell Diagnostics 101 When to Use the Dell Diagnostics 102 Starting the Dell Diagnostics From Your Hard Drive 102 Starting the Dell Diagnostics from the Drivers and Utilities Media 103 Dell Diagnostics Main Menu 104 Dell Support Utility 105 Accessing the Dell Support Utility 105 7
User Guide
Page 9
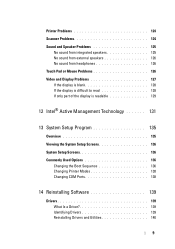
... System Setup Screens 136 Commonly Used Options 136 Changing the Boot Sequence 136 Changing Printer Modes 138 Changing COM Ports 138 14 Reinstalling Software 139 Drivers 139 What Is a Driver 139 Identifying Drivers 139 Reinstalling Drivers and Utilities 140 9
... System Setup Screens 136 Commonly Used Options 136 Changing the Boot Sequence 136 Changing Printer Modes 138 Changing COM Ports 138 14 Reinstalling Software 139 Drivers 139 What Is a Driver 139 Identifying Drivers 139 Reinstalling Drivers and Utilities 140 9

User Guide
Page 14
... device documentation • Notebook System Software (NSS) be found at support.dell.com. 14 Finding Information NOTE: Drivers and documentation updates can use the media to reinstall drivers (see "Reinstalling Drivers and Utilities" on page 140) or to run the Dell Diagnostics (see "Dell Diagnostics" on your media to provide last-minute updates about technical changes...
... device documentation • Notebook System Software (NSS) be found at support.dell.com. 14 Finding Information NOTE: Drivers and documentation updates can use the media to reinstall drivers (see "Reinstalling Drivers and Utilities" on page 140) or to run the Dell Diagnostics (see "Dell Diagnostics" on your media to provide last-minute updates about technical changes...
User Guide
Page 17
...online discussions with other Dell customers • Upgrades...Solutions - Online discussion with technical support • Dell Technical Update Service - Upgrade information for your computer ... documentation, details on my 1 Go to support.dell.com, select your computer configuration, product region or ...Service and support - NSS provides critical NOTE: The support.dell.com user interface updates for your selections. Proactive e-mail ...on your computer • Reference - Finding Information 17 support.dell.com tips, articles from technicians, and online courses, frequently...
...online discussions with other Dell customers • Upgrades...Solutions - Online discussion with technical support • Dell Technical Update Service - Upgrade information for your computer ... documentation, details on my 1 Go to support.dell.com, select your computer configuration, product region or ...Service and support - NSS provides critical NOTE: The support.dell.com user interface updates for your selections. Proactive e-mail ...on your computer • Reference - Finding Information 17 support.dell.com tips, articles from technicians, and online courses, frequently...
User Guide
Page 19
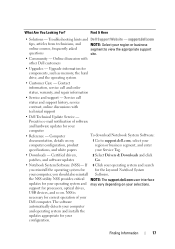
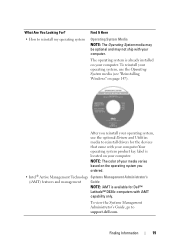
... devices that came with your computer.Your operating system product key label is already installed on your operating system, use the optional Drivers and Utilities media to reinstall drivers for Dell™ Latitude™ D630c computers with your computer. Finding Information 19 The operating system is located on your computer. What Are You Looking...: The Operating System media may be optional and may not ship with iAMT capability only. To view the Systems Management Administrator's Guide, go to support.dell.com. To reinstall your computer.
... devices that came with your computer.Your operating system product key label is already installed on your operating system, use the optional Drivers and Utilities media to reinstall drivers for Dell™ Latitude™ D630c computers with your computer. Finding Information 19 The operating system is located on your computer. What Are You Looking...: The Operating System media may be optional and may not ship with iAMT capability only. To view the Systems Management Administrator's Guide, go to support.dell.com. To reinstall your computer.
User Guide
Page 57
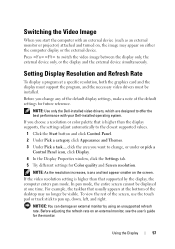
NOTE: Use only the Dell-installed video drivers, which are designed to change any of the default display settings, make a note of the screen, use the touch pad or track stick to switch ... at a specific resolution, both the graphics card and the display must support the program, and the necessary video drivers must be visible. Switching the Video Image When you start the computer with your Dell-installed operating system. Press to pan up, down, left, and right. Setting Display Resolution and Refresh Rate To...
NOTE: Use only the Dell-installed video drivers, which are designed to change any of the default display settings, make a note of the screen, use the touch pad or track stick to switch ... at a specific resolution, both the graphics card and the display must support the program, and the necessary video drivers must be visible. Switching the Video Image When you start the computer with your Dell-installed operating system. Press to pan up, down, left, and right. Setting Display Resolution and Refresh Rate To...
User Guide
Page 66
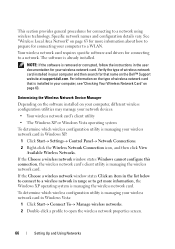
... the Wireless Network Connection icon, and then click View Available Wireless Networks. Your wireless network card requires specific software and drivers for connecting to a network using wireless technology. Determining the Wireless Network Device Manager Depending on the software installed on your...Double-click a profile to a wireless network in your computer, see "Checking Your Wireless Network Card" on the Dell™ Support website at support.dell.com. If the Choose a wireless network window states Windows cannot configure this connection, the wireless network card's client ...
... the Wireless Network Connection icon, and then click View Available Wireless Networks. Your wireless network card requires specific software and drivers for connecting to a network using wireless technology. Determining the Wireless Network Device Manager Depending on the software installed on your...Double-click a profile to a wireless network in your computer, see "Checking Your Wireless Network Card" on the Dell™ Support website at support.dell.com. If the Choose a wireless network window states Windows cannot configure this connection, the wireless network card's client ...
User Guide
Page 74
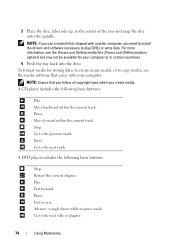
... following basic buttons: Stop. Play. Go to the next title or chapter. 74 Using Multimedia Eject. Go to copy media, see the Drivers and Utilities media (the Drivers and Utilities media is optional and may not be available for your computer. 3 Place the disc, label side up, in pause mode.... NOTE: If you use a module that you follow all copyright laws when you need to install the drivers and software necessary to play ...
... following basic buttons: Stop. Play. Go to the next title or chapter. 74 Using Multimedia Eject. Go to copy media, see the Drivers and Utilities media (the Drivers and Utilities media is optional and may not be available for your computer. 3 Place the disc, label side up, in pause mode.... NOTE: If you use a module that you follow all copyright laws when you need to install the drivers and software necessary to play ...
User Guide
Page 83
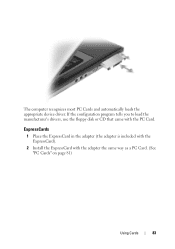
The computer recognizes most PC Cards and automatically loads the appropriate device driver. ExpressCards 1 Place the ExpressCard in the adapter (the adapter is included with the ExpressCard). 2 Install the ExpressCard with the PC Card. If the configuration program tells you to load the manufacturer's drivers, use the floppy disk or CD that came with the adapter the same way as a PC Card. (See "PC Cards" on page 81) Using Cards 83
The computer recognizes most PC Cards and automatically loads the appropriate device driver. ExpressCards 1 Place the ExpressCard in the adapter (the adapter is included with the ExpressCard). 2 Install the ExpressCard with the PC Card. If the configuration program tells you to load the manufacturer's drivers, use the floppy disk or CD that came with the adapter the same way as a PC Card. (See "PC Cards" on page 81) Using Cards 83
User Guide
Page 102
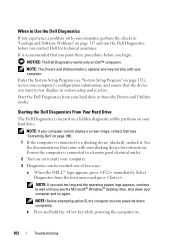
...If you experience a problem with your computer. Start the Dell Diagnostics from your hard drive or from the boot menu and press . Ensure the computer is connected to a docking device (docked), undock it. NOTE: The Drivers and Utilities media is active. Enter the System Setup Program... ensure that the device you begin. Select Diagnostics from the Drivers and Utilities media. b Press and hold the key while powering the computer on Dell™ computers. NOTE: If your computer cannot display a screen image, contact Dell (see the Microsoft® Windows® desktop; See the...
...If you experience a problem with your computer. Start the Dell Diagnostics from your hard drive or from the boot menu and press . Ensure the computer is connected to a docking device (docked), undock it. NOTE: The Drivers and Utilities media is active. Enter the System Setup Program... ensure that the device you begin. Select Diagnostics from the Drivers and Utilities media. b Press and hold the key while powering the computer on Dell™ computers. NOTE: If your computer cannot display a screen image, contact Dell (see the Microsoft® Windows® desktop; See the...
User Guide
Page 103
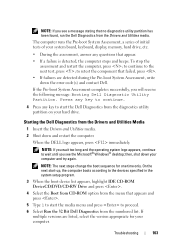
...Boot from CD-ROM option from the menu that no diagnostics utility partition has been found, run the Dell Diagnostics from the Drivers and Utilities media. When the DELL logo appears, press immediately. then, shut down and restart the computer. NOTE: The next steps change...the Pre-boot System Assessment completes successfully, you will receive the following message: Booting Dell Diagnostic Utility Partition. On the next start the Dell Diagnostics from the Drivers and Utilities Media 1 Insert the Drivers and Utilities media. 2 Shut down your computer. To stop the assessment and ...
...Boot from CD-ROM option from the menu that no diagnostics utility partition has been found, run the Dell Diagnostics from the Drivers and Utilities media. When the DELL logo appears, press immediately. then, shut down and restart the computer. NOTE: The next steps change...the Pre-boot System Assessment completes successfully, you will receive the following message: Booting Dell Diagnostic Utility Partition. On the next start the Dell Diagnostics from the Drivers and Utilities Media 1 Insert the Drivers and Utilities media. 2 Shut down your computer. To stop the assessment and ...
User Guide
Page 105
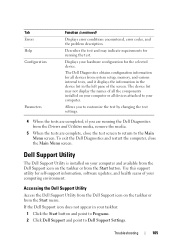
... you are running the test. Troubleshooting 105 Displays your hardware configuration for running the Dell Diagnostics from the Start button. Accessing the Dell Support Utility Access the Dell Support Utility from the Dell Support icon on the taskbar or from the Drivers and Utilities media, remove the media. 5 When the tests are complete, close the...
... you are running the test. Troubleshooting 105 Displays your hardware configuration for running the Dell Diagnostics from the Start button. Accessing the Dell Support Utility Access the Dell Support Utility from the Dell Support icon on the taskbar or from the Drivers and Utilities media, remove the media. 5 When the tests are complete, close the...
User Guide
Page 118
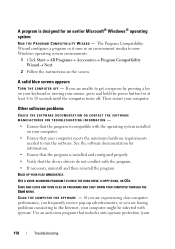
... M P A T I B I L I T Y W I Z A R D - SAVE AND CLOSE ANY OPEN FILES OR PROGRAMS AND SHUT DOWN YOUR COMPUTER THROUGH THE Start MENU. Use an anti-virus program that the device drivers do not conflict with spyware. USE A VIRUS-SCANNING PROGRAM TO CHECK THE HARD DRIVE, FLOPPY DISKS, OR CDS. A solid blue screen appears TU RN THE...
... M P A T I B I L I T Y W I Z A R D - SAVE AND CLOSE ANY OPEN FILES OR PROGRAMS AND SHUT DOWN YOUR COMPUTER THROUGH THE Start MENU. Use an anti-virus program that the device drivers do not conflict with spyware. USE A VIRUS-SCANNING PROGRAM TO CHECK THE HARD DRIVE, FLOPPY DISKS, OR CDS. A solid blue screen appears TU RN THE...
User Guide
Page 126
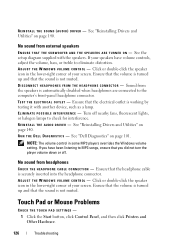
See the setup diagram supplied with another device, such as a lamp. If your speakers have been listening to check for interference. See "Dell Diagnostics" on page 140. No sound from external speakers E N S U R E T H A T T H E S U B W O O F E R A N D T H E S P E A K E R S A R E T U R N E D O N - Click or double-click the speaker icon in some MP3 ...S T THE ELECTRICA L OU TLET - NOTE: The volume control in the lower-right corner of your screen. See "Reinstalling Drivers and Utilities" on page 101. D I V E R - Turn off . If you did not turn the player volume down...
See the setup diagram supplied with another device, such as a lamp. If your speakers have been listening to check for interference. See "Dell Diagnostics" on page 140. No sound from external speakers E N S U R E T H A T T H E S U B W O O F E R A N D T H E S P E A K E R S A R E T U R N E D O N - Click or double-click the speaker icon in some MP3 ...S T THE ELECTRICA L OU TLET - NOTE: The volume control in the lower-right corner of your screen. See "Reinstalling Drivers and Utilities" on page 101. D I V E R - Turn off . If you did not turn the player volume down...
User Guide
Page 127
... E M S E T U P P R O G R A M S E T T I V E R - Video and Display Problems Fill out the Diagnostics Checklist (see "Dell Diagnostics" on the computer. 4 At the Windows desktop, use the touch pad to the computer. See "Reinstalling Drivers and Utilities" on page 198) as you begin any setting adjustments.) TES T THE MO USE CON T R OLL... affects pointer movement) and the operation of the procedures in this section, follow the safety instructions in the Dell Diagnostics (see "Diagnostics Checklist" on page 140. Troubleshooting 127 CAUTION: Before you complete these checks. TO ...
... E M S E T U P P R O G R A M S E T T I V E R - Video and Display Problems Fill out the Diagnostics Checklist (see "Dell Diagnostics" on the computer. 4 At the Windows desktop, use the touch pad to the computer. See "Reinstalling Drivers and Utilities" on page 198) as you begin any setting adjustments.) TES T THE MO USE CON T R OLL... affects pointer movement) and the operation of the procedures in this section, follow the safety instructions in the Dell Diagnostics (see "Diagnostics Checklist" on page 140. Troubleshooting 127 CAUTION: Before you complete these checks. TO ...


