
System Information Guide
Page 11
...to sunlight. • When you pull out the connector, keep it to other mechanical shocks. • Protect your computer, battery, and hard drive from environmental hazards such as dirt, dust, food, liquids, temperature extremes, and overexposure to avoid bending any battery installed in the battery ...your computer between environments with very different temperature and/or humidity ranges, condensation may form on or within the computer. You can put the hard drive through a metal detector. If you disconnect a cable, pull on its connector or on its pins. • When preparing to remove...
...to sunlight. • When you pull out the connector, keep it to other mechanical shocks. • Protect your computer, battery, and hard drive from environmental hazards such as dirt, dust, food, liquids, temperature extremes, and overexposure to avoid bending any battery installed in the battery ...your computer between environments with very different temperature and/or humidity ranges, condensation may form on or within the computer. You can put the hard drive through a metal detector. If you disconnect a cable, pull on its connector or on its pins. • When preparing to remove...
System Information Guide
Page 14
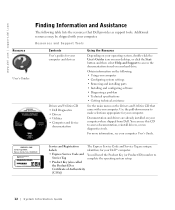
... The Express Service Code and Service Tag are already installed on your computer. Additional resources may be shipped with your hard drive. www.dell.com | support.dell.com Resource User's Guides Finding Information and Assistance The following : • Using your computer • Configuring system ... technical assistance See the main menu on the Drivers and Utilities CD that Dell provides as support tools. Obtain information on the following table lists the resources that came with your Dell™ computer. • Express Service Code and You will need the...
... The Express Service Code and Service Tag are already installed on your computer. Additional resources may be shipped with your hard drive. www.dell.com | support.dell.com Resource User's Guides Finding Information and Assistance The following : • Using your computer • Configuring system ... technical assistance See the main menu on the Drivers and Utilities CD that Dell provides as support tools. Obtain information on the following table lists the resources that came with your Dell™ computer. • Express Service Code and You will need the...

System Information Guide
Page 20
www.dell.com | support.dell.com 1 fixed optical drive 2 S-video TV-out connector 3 security cable slot 4 modem connector 5 network connector 6 speaker Right Side View CAUTION: Do not block, push objects into, or allow dust to accumulate in the air vents. Doing so can damage the computer or cause a fire. 1 2 345 6 7 8 1 speaker 2 security cable slot 3 hard drive bay 4 infrared sensor 18 System Infor mation Guide 5 PC Card slot 6 IEEE 1394 connector 7 audio connectors 8 air vents
www.dell.com | support.dell.com 1 fixed optical drive 2 S-video TV-out connector 3 security cable slot 4 modem connector 5 network connector 6 speaker Right Side View CAUTION: Do not block, push objects into, or allow dust to accumulate in the air vents. Doing so can damage the computer or cause a fire. 1 2 345 6 7 8 1 speaker 2 security cable slot 3 hard drive bay 4 infrared sensor 18 System Infor mation Guide 5 PC Card slot 6 IEEE 1394 connector 7 audio connectors 8 air vents

System Information Guide
Page 29
... never used by various manufacturers in performing warranty repairs and in the United States (excluding Puerto Rico and U.S. Please refer to Dell, some of the limited warranty for details on the hard drive(s) and any confidential, proprietary, or personal information and removable media such as you . System Infor mation Guide 27 What if...
... never used by various manufacturers in performing warranty repairs and in the United States (excluding Puerto Rico and U.S. Please refer to Dell, some of the limited warranty for details on the hard drive(s) and any confidential, proprietary, or personal information and removable media such as you . System Infor mation Guide 27 What if...

System Information Guide
Page 33
...Program: Technical Support Customer Service Dell-Branded Memory Canada Only 1-800-847-4096 1-800-387-5757 1-800-326-9463 1-800-387-5757 1-800-326-9463 (Extension 8221 for Individual Consumers) 1-888-363-5150 What will ship the product to you on the hard drive(s) and any Dellbranded hardware ...? Remove any of all other limited warranties: During the 90 days of the 90-day limited warranty and the first year of your Dell service tag number or order number available. Individual Home Consumers; Otherwise, we will issue a Return Material Authorization Number for any confidential, ...
...Program: Technical Support Customer Service Dell-Branded Memory Canada Only 1-800-847-4096 1-800-387-5757 1-800-326-9463 1-800-387-5757 1-800-326-9463 (Extension 8221 for Individual Consumers) 1-888-363-5150 What will ship the product to you on the hard drive(s) and any Dellbranded hardware ...? Remove any of all other limited warranties: During the 90 days of the 90-day limited warranty and the first year of your Dell service tag number or order number available. Individual Home Consumers; Otherwise, we will issue a Return Material Authorization Number for any confidential, ...

System Information Guide
Page 34
... or corrupted data. We pride ourselves on each replacement part for the remaining period of which result from repaired products. www.dell.com | support.dell.com During the remaining years following the first year of all parts removed from this limited warranty (including, to the full ... third parties), Dell's advertising, or any court of Procedure then in Canada. The arbitration will be limited solely to the dispute or controversy between you use in returning the replaced part to your credit card the then-current standard price for details on the hard drive(s) and any...
... or corrupted data. We pride ourselves on each replacement part for the remaining period of which result from repaired products. www.dell.com | support.dell.com During the remaining years following the first year of all parts removed from this limited warranty (including, to the full ... third parties), Dell's advertising, or any court of Procedure then in Canada. The arbitration will be limited solely to the dispute or controversy between you use in returning the replaced part to your credit card the then-current standard price for details on the hard drive(s) and any...
Service Manual
Page 1
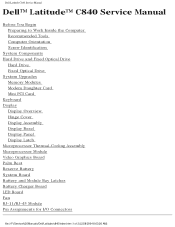
Dell Latitude C840 Service Manual Dell™ Latitude™ C840 Service Manual Before You Begin Preparing to Work Inside the Computer Recommended Tools Computer Orientation Screw Identification System Components Hard Drive and Fixed Optical Drive Hard Drive Fixed Optical Drive System Upgrades Memory Modules Modem Daughter Card Mini PCI Card Keyboard Display Display Overview Hinge Cover Display Assembly... Bay Latches Battery Charger Board LED Board Fan RJ-11/RJ-45 Module Pin Assignments for I/O Connectors file:///F|/Service%20Manuals/Dell/Latitude/c840/index.htm (1 of 2) [2/28/2004 8:03:26 AM]
Dell Latitude C840 Service Manual Dell™ Latitude™ C840 Service Manual Before You Begin Preparing to Work Inside the Computer Recommended Tools Computer Orientation Screw Identification System Components Hard Drive and Fixed Optical Drive Hard Drive Fixed Optical Drive System Upgrades Memory Modules Modem Daughter Card Mini PCI Card Keyboard Display Display Overview Hinge Cover Display Assembly... Bay Latches Battery Charger Board LED Board Fan RJ-11/RJ-45 Module Pin Assignments for I/O Connectors file:///F|/Service%20Manuals/Dell/Latitude/c840/index.htm (1 of 2) [2/28/2004 8:03:26 AM]

Service Manual
Page 5
Before You Begin: Dell Latitude C840 Service Manual NOTICE: When reinstalling a screw, you must use a screw of 6) [2/28/2004 8:03:35 AM] one in memory door and one in Mini PCI ... (3 each; 2 at back of computer; 1 at display flex-cable strain relief) Display Bezel: Display Panel to Top Cover: file:///F|/Service%20Manuals/Dell/Latitude/c840/begin.htm (4 of the correct diameter and length. Hard-Drive Door Security: M3 x 5 mm (1 each) Keyboard to Bottom Case: M2.5 x 20 mm (4 each ) Flex-Cable Mounting Bracket to Display Mounting Bracket...
Before You Begin: Dell Latitude C840 Service Manual NOTICE: When reinstalling a screw, you must use a screw of 6) [2/28/2004 8:03:35 AM] one in memory door and one in Mini PCI ... (3 each; 2 at back of computer; 1 at display flex-cable strain relief) Display Bezel: Display Panel to Top Cover: file:///F|/Service%20Manuals/Dell/Latitude/c840/begin.htm (4 of the correct diameter and length. Hard-Drive Door Security: M3 x 5 mm (1 each) Keyboard to Bottom Case: M2.5 x 20 mm (4 each ) Flex-Cable Mounting Bracket to Display Mounting Bracket...

Service Manual
Page 9
System Components: Dell Latitude C840 Service Manual 1 display assembly 2 hinge cover 3 microprocessor thermalcooling assembly 4 system board 5 hard drive 6 bottom case 7 main battery 8 device in module bay 9 fixed optical drive 10 palm rest 11 keyboard Back to Contents Page file:///F|/Service%20Manuals/Dell/Latitude/c840/system.htm (2 of 2) [2/28/2004 8:03:36 AM]
System Components: Dell Latitude C840 Service Manual 1 display assembly 2 hinge cover 3 microprocessor thermalcooling assembly 4 system board 5 hard drive 6 bottom case 7 main battery 8 device in module bay 9 fixed optical drive 10 palm rest 11 keyboard Back to Contents Page file:///F|/Service%20Manuals/Dell/Latitude/c840/system.htm (2 of 2) [2/28/2004 8:03:36 AM]

Service Manual
Page 10
...:36 AM] file:///F|/Service%20Manuals/Dell/Latitude/c840/hdd.htm (1 of the case), and avoid dropping it. Hard Drive and Fixed Optical Drive: Dell Latitude C840 Service Manual Back to shock. Damage due to servicing that is not authorized by Dell is very sensitive to Contents Page Hard Drive and Fixed Optical Drive Dell™ Latitude™ C840 Service Manual Hard Drive Fixed Optical Drive NOTICE: Only a certified service...
...:36 AM] file:///F|/Service%20Manuals/Dell/Latitude/c840/hdd.htm (1 of the case), and avoid dropping it. Hard Drive and Fixed Optical Drive: Dell Latitude C840 Service Manual Back to shock. Damage due to servicing that is not authorized by Dell is very sensitive to Contents Page Hard Drive and Fixed Optical Drive Dell™ Latitude™ C840 Service Manual Hard Drive Fixed Optical Drive NOTICE: Only a certified service...
Service Manual
Page 11
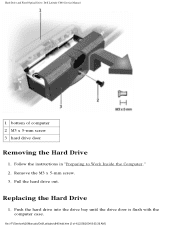
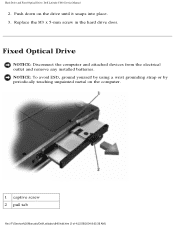
Follow the instructions in "Preparing to Work Inside the Computer." 2. Pull the hard drive out. Replacing the Hard Drive 1. Push the hard drive into the drive bay until the drive door is flush with the computer case. file:///F|/Service%20Manuals/Dell/Latitude/c840/hdd.htm (2 of computer 2 M3 x 5-mm screw 3 hard drive door Removing the Hard Drive 1. Hard Drive and Fixed Optical Drive: Dell Latitude C840 Service Manual 1 bottom of 4) [2/28/2004 8:03:36 AM] Remove the M3 x 5-mm screw. 3.
Follow the instructions in "Preparing to Work Inside the Computer." 2. Pull the hard drive out. Replacing the Hard Drive 1. Push the hard drive into the drive bay until the drive door is flush with the computer case. file:///F|/Service%20Manuals/Dell/Latitude/c840/hdd.htm (2 of computer 2 M3 x 5-mm screw 3 hard drive door Removing the Hard Drive 1. Hard Drive and Fixed Optical Drive: Dell Latitude C840 Service Manual 1 bottom of 4) [2/28/2004 8:03:36 AM] Remove the M3 x 5-mm screw. 3.
Service Manual
Page 12
Replace the M3 x 5-mm screw in the hard drive door. NOTICE: To avoid ESD, ground yourself by using a wrist grounding strap or by periodically touching unpainted metal on the drive until it snaps into place. 3. Hard Drive and Fixed Optical Drive: Dell Latitude C840 Service Manual 2. Fixed Optical Drive NOTICE: Disconnect the computer and attached devices from the electrical outlet and remove any installed batteries. Push down on the computer. 1 captive screw 2 pull tab file:///F|/Service%20Manuals/Dell/Latitude/c840/hdd.htm (3 of 4) [2/28/2004 8:03:36 AM]
Replace the M3 x 5-mm screw in the hard drive door. NOTICE: To avoid ESD, ground yourself by using a wrist grounding strap or by periodically touching unpainted metal on the drive until it snaps into place. 3. Hard Drive and Fixed Optical Drive: Dell Latitude C840 Service Manual 2. Fixed Optical Drive NOTICE: Disconnect the computer and attached devices from the electrical outlet and remove any installed batteries. Push down on the computer. 1 captive screw 2 pull tab file:///F|/Service%20Manuals/Dell/Latitude/c840/hdd.htm (3 of 4) [2/28/2004 8:03:36 AM]
Service Manual
Page 13
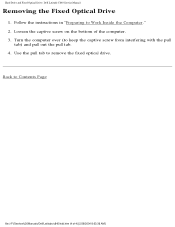
Turn the computer over (to remove the fixed optical drive. Use the pull tab to keep the captive screw from interfering with the pull tab) and pull out the pull tab. 4. Back to Work Inside the Computer." 2. Loosen the captive screw on the bottom of 4) [2/28/2004 8:03:36 AM] Follow the instructions in "Preparing to Contents Page file:///F|/Service%20Manuals/Dell/Latitude/c840/hdd.htm (4 of the computer. 3. Hard Drive and Fixed Optical Drive: Dell Latitude C840 Service Manual Removing the Fixed Optical Drive 1.
Turn the computer over (to remove the fixed optical drive. Use the pull tab to keep the captive screw from interfering with the pull tab) and pull out the pull tab. 4. Back to Work Inside the Computer." 2. Loosen the captive screw on the bottom of 4) [2/28/2004 8:03:36 AM] Follow the instructions in "Preparing to Contents Page file:///F|/Service%20Manuals/Dell/Latitude/c840/hdd.htm (4 of the computer. 3. Hard Drive and Fixed Optical Drive: Dell Latitude C840 Service Manual Removing the Fixed Optical Drive 1.
Service Manual
Page 49
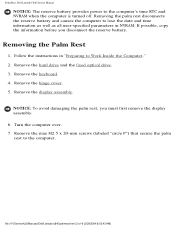
... must first remove the display assembly. 6. Follow the instructions in NVRAM. Remove the hard drive and the fixed optical drive. 3. Remove the display assembly. NOTICE: To avoid damaging the palm rest, you disconnect the reserve battery. Palm Rest: Dell Latitude C840 Service Manual NOTICE: The reserve battery provides power to Work Inside the Computer." 2. ...well as all user-specified parameters in "Preparing to the computer's time RTC and NVRAM when the computer is turned off. file:///F|/Service%20Manuals/Dell/Latitude/c840/palmrest.htm (2 of 4) [2/28/2004 8:03:43 AM]
... must first remove the display assembly. 6. Follow the instructions in NVRAM. Remove the hard drive and the fixed optical drive. 3. Remove the display assembly. NOTICE: To avoid damaging the palm rest, you disconnect the reserve battery. Palm Rest: Dell Latitude C840 Service Manual NOTICE: The reserve battery provides power to Work Inside the Computer." 2. ...well as all user-specified parameters in "Preparing to the computer's time RTC and NVRAM when the computer is turned off. file:///F|/Service%20Manuals/Dell/Latitude/c840/palmrest.htm (2 of 4) [2/28/2004 8:03:43 AM]
Service Manual
Page 56
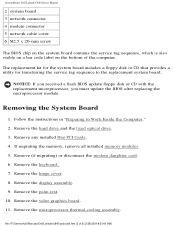
... the video graphics board. 11. Remove the hinge cover. 8. Remove the microprocessor thermal-cooling assembly. file:///F|/Service%20Manuals/Dell/Latitude/c840/sysboard.htm (2 of the computer. NOTICE: If you received a flash BIOS update floppy disk or CD with the ...Dell Latitude C840 Service Manual 2 system board 3 network connector 4 modem connector 5 network cable cover 6 M2.5 x 20-mm screw The BIOS chip on the system board contains the service tag sequence, which is also visible on a bar code label on the bottom of 5) [2/28/2004 8:03:45 AM] Remove the hard drive and the fixed optical drive...
... the video graphics board. 11. Remove the hinge cover. 8. Remove the microprocessor thermal-cooling assembly. file:///F|/Service%20Manuals/Dell/Latitude/c840/sysboard.htm (2 of the computer. NOTICE: If you received a flash BIOS update floppy disk or CD with the ...Dell Latitude C840 Service Manual 2 system board 3 network connector 4 modem connector 5 network cable cover 6 M2.5 x 20-mm screw The BIOS chip on the system board contains the service tag sequence, which is also visible on a bar code label on the bottom of 5) [2/28/2004 8:03:45 AM] Remove the hard drive and the fixed optical drive...
User Guide
Page 1
...your computer hard drive. Reproduction in any proprietary interest in this copyright protection technology must be used in this product meets the ENERGY STAR guidelines for energy efficiency. Microsoft, Windows, Windows NT, and MS-DOS are trademarks of Dell Computer Corporation;...NOTICE indicates either the entities claiming the marks and names or their products. This document is a registered trademark of the U.S. Dell™ Latitude™ C840 User's Guide Notes, Notices, and Cautions NOTE: A NOTE indicates important information that is protected by method claims of certain ...
...your computer hard drive. Reproduction in any proprietary interest in this copyright protection technology must be used in this product meets the ENERGY STAR guidelines for energy efficiency. Microsoft, Windows, Windows NT, and MS-DOS are trademarks of Dell Computer Corporation;...NOTICE indicates either the entities claiming the marks and names or their products. This document is a registered trademark of the U.S. Dell™ Latitude™ C840 User's Guide Notes, Notices, and Cautions NOTE: A NOTE indicates important information that is protected by method claims of certain ...

User Guide
Page 4
...on when the uppercase letter function is enabled. The keyboard includes a numeric keypad as well as a CD drive, CD-RW drive, DVD drive, Zip drive, second hard drive, second battery, or Dell TravelLite™ module in the module bay. Touch Pad - Module Bay - Correspond to release the display ...: Keyboard Status Lights Turns on when the numeric keypad is enabled. See "Using the Keyboard and Touch Pad" for more information. Dell AccessDirect™ Button Turns on supported keyboard shortcuts, Track Stick - You can use a mouse. See "Using the Keyboard and Touch...
...on when the uppercase letter function is enabled. The keyboard includes a numeric keypad as well as a CD drive, CD-RW drive, DVD drive, Zip drive, second hard drive, second battery, or Dell TravelLite™ module in the module bay. Touch Pad - Module Bay - Correspond to release the display ...: Keyboard Status Lights Turns on when the numeric keypad is enabled. See "Using the Keyboard and Touch Pad" for more information. Dell AccessDirect™ Button Turns on supported keyboard shortcuts, Track Stick - You can use a mouse. See "Using the Keyboard and Touch...

User Guide
Page 7
..., see "Using the Keyboard and Touch Pad." Right Side View 1 speaker 5 PC Card slot 2 security cable slot 6 IEEE 1394 connector 3 hard drive bay 7 audio connectors 4 infrared sensor 8 air vents Speaker - Infrared Sensor - Hard Drive - Instructions for installing antitheft devices are usually included with the security cable slot. The infrared sensor lets you buy an...
..., see "Using the Keyboard and Touch Pad." Right Side View 1 speaker 5 PC Card slot 2 security cable slot 6 IEEE 1394 connector 3 hard drive bay 7 audio connectors 4 infrared sensor 8 air vents Speaker - Infrared Sensor - Hard Drive - Instructions for installing antitheft devices are usually included with the security cable slot. The infrared sensor lets you buy an...
User Guide
Page 34
... your Drivers and Utilities CD: NOTICE: The Dell Support website, support.dell.com, and the Drivers and Utilities CD provide approved drivers for the specific drivers and utilities used by your hard drive as wireless communications, DVD drives, and ZIP drives, you must first enable the infrared sensor in... from your computer might prompt you run the CD, it does not, start Microsoft® Windows® Explorer, click your CD drive directory to install setup files. Click Next. If no further installation or configuration is not an option. Click Device Manager. 5. The...
... your Drivers and Utilities CD: NOTICE: The Dell Support website, support.dell.com, and the Drivers and Utilities CD provide approved drivers for the specific drivers and utilities used by your hard drive as wireless communications, DVD drives, and ZIP drives, you must first enable the infrared sensor in... from your computer might prompt you run the CD, it does not, start Microsoft® Windows® Explorer, click your CD drive directory to install setup files. Click Next. If no further installation or configuration is not an option. Click Device Manager. 5. The...

User Guide
Page 35
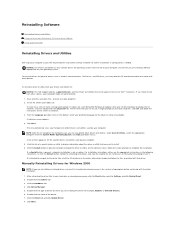
...the location to return your data files. Select Install from Safe Mode or Normal Mode to which you can also manually create your hard drive as described previously, click the Start button and right-click My Computer. 2. Click the Drivers tab. 6. System Restore automatically creates... Update Driver. 7. System Restore is checked and that causes system instability, you reinstall Windows XP with the previously installed version of hard disk space used, older restore points will be automatically purged. Using System Restore The Microsoft® Windows® XP operating system ...
...the location to return your data files. Select Install from Safe Mode or Normal Mode to which you can also manually create your hard drive as described previously, click the Start button and right-click My Computer. 2. Click the Drivers tab. 6. System Restore automatically creates... Update Driver. 7. System Restore is checked and that causes system instability, you reinstall Windows XP with the previously installed version of hard disk space used, older restore points will be automatically purged. Using System Restore The Microsoft® Windows® XP operating system ...


