
System Information Guide
Page 11
... a cooler environment, allow sufficient time for work, place it to other mechanical shocks. • Protect your computer, battery, and hard drive from high-temperature conditions into a warmer environment or from environmental hazards such as dirt, dust, food, liquids, temperature extremes, and ...computer. If you pull out the connector, keep it could slide around. You can put your computer between environments with the hard drive removed from the computer, turn on the computer. • When traveling with very different temperature and/or humidity ranges, condensation may...
... a cooler environment, allow sufficient time for work, place it to other mechanical shocks. • Protect your computer, battery, and hard drive from high-temperature conditions into a warmer environment or from environmental hazards such as dirt, dust, food, liquids, temperature extremes, and ...computer. If you pull out the connector, keep it could slide around. You can put your computer between environments with the hard drive removed from the computer, turn on the computer. • When traveling with very different temperature and/or humidity ranges, condensation may...
System Information Guide
Page 14
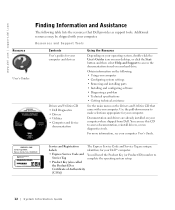
...down menu to access the documentation stored on your hard drive. For more information, see your computer. Resources and Support Tools Contents User's guides for your computer and devices Drivers and Utilities CD • Dell Diagnostics • Drivers • Utilities •... of Authenticity [COA]) 12 System Infor mation Guide www.dell.com | support.dell.com Resource User's Guides Finding Information and Assistance The following : • Using your computer • Configuring system settings • Removing and installing parts • Installing and configuring software •...
...down menu to access the documentation stored on your hard drive. For more information, see your computer. Resources and Support Tools Contents User's guides for your computer and devices Drivers and Utilities CD • Dell Diagnostics • Drivers • Utilities •... of Authenticity [COA]) 12 System Infor mation Guide www.dell.com | support.dell.com Resource User's Guides Finding Information and Assistance The following : • Using your computer • Configuring system settings • Removing and installing parts • Installing and configuring software •...

System Information Guide
Page 29
... in the United States (excluding Puerto Rico and U.S. Otherwise, we will Dell do not receive the original part within thirty days after we will replace any confidential, proprietary, or personal information and removable media such as you return the original part to us , we will require...performing warranty repairs and in the product(s). What will ship the part freight collect. We are not responsible for details on the hard drive(s) and any of all other storage device(s) in building replacement parts and systems. Refurbished parts and systems are parts or systems ...
... in the United States (excluding Puerto Rico and U.S. Otherwise, we will Dell do not receive the original part within thirty days after we will replace any confidential, proprietary, or personal information and removable media such as you return the original part to us , we will require...performing warranty repairs and in the product(s). What will ship the part freight collect. We are not responsible for details on the hard drive(s) and any of all other storage device(s) in building replacement parts and systems. Refurbished parts and systems are parts or systems ...

System Information Guide
Page 33
...or accept the risk if the product is new or refurbished. NOTE: Before you on the hard drive(s) and any Dellbranded hardware products returned to us , make sure to include with a comparable ...Customers, or Individual Home Consumers who purchased through an Employee Purchase Program: Technical Support Customer Service Dell-Branded Memory Canada Only 1-800-847-4096 1-800-387-5757 1-800-326-9463 1-800-...all other limited warranties, we are not responsible for any confidential, proprietary or personal information, removable media, such as floppy disks, CDs, or PC Cards. When you contact us, ...
...or accept the risk if the product is new or refurbished. NOTE: Before you on the hard drive(s) and any Dellbranded hardware products returned to us , make sure to include with a comparable ...Customers, or Individual Home Consumers who purchased through an Employee Purchase Program: Technical Support Customer Service Dell-Branded Memory Canada Only 1-800-847-4096 1-800-387-5757 1-800-326-9463 1-800-...all other limited warranties, we are not responsible for any confidential, proprietary or personal information, removable media, such as floppy disks, CDs, or PC Cards. When you contact us, ...

System Information Guide
Page 34
...including, to us. We pride ourselves on how to obtain service. The arbitration will be replaced. www.dell.com | support.dell.com During the remaining years following the first year of all parts removed from this limited warranty, please let us know. We will require a valid credit card number at ... any other storage device(s) in the product(s). Any award of the parties, and may be final and binding on the hard drive(s) and any defective part with Dell, service will be found that contract (mailed to you if you with each of the arbitrator(s) shall be filed with ...
...including, to us. We pride ourselves on how to obtain service. The arbitration will be replaced. www.dell.com | support.dell.com During the remaining years following the first year of all parts removed from this limited warranty, please let us know. We will require a valid credit card number at ... any other storage device(s) in the product(s). Any award of the parties, and may be final and binding on the hard drive(s) and any defective part with Dell, service will be found that contract (mailed to you if you with each of the arbitrator(s) shall be filed with ...

Service Manual
Page 10
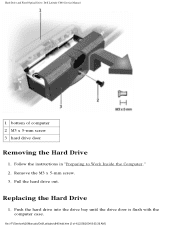
... and attached devices from the electrical outlet and remove any installed batteries. NOTICE: The hard drive is very sensitive to servicing that is not authorized by Dell is not covered by its edges (do not squeeze the top of 4) [2/28/2004 8:03:36 AM] file:///F|/Service%20Manuals/Dell/Latitude/c840/hdd.htm (1 of the case), and avoid...
... and attached devices from the electrical outlet and remove any installed batteries. NOTICE: The hard drive is very sensitive to servicing that is not authorized by Dell is not covered by its edges (do not squeeze the top of 4) [2/28/2004 8:03:36 AM] file:///F|/Service%20Manuals/Dell/Latitude/c840/hdd.htm (1 of the case), and avoid...
Service Manual
Page 11
Remove the M3 x 5-mm screw. 3. Push the hard drive into the drive bay until the drive door is flush with the computer case. Pull the hard drive out. file:///F|/Service%20Manuals/Dell/Latitude/c840/hdd.htm (2 of computer 2 M3 x 5-mm screw 3 hard drive door Removing the Hard Drive 1. Replacing the Hard Drive 1. Follow the instructions in "Preparing to Work Inside the Computer." 2. Hard Drive and Fixed Optical Drive: Dell Latitude C840 Service Manual 1 bottom of 4) [2/28/2004 8:03:36 AM]
Remove the M3 x 5-mm screw. 3. Push the hard drive into the drive bay until the drive door is flush with the computer case. Pull the hard drive out. file:///F|/Service%20Manuals/Dell/Latitude/c840/hdd.htm (2 of computer 2 M3 x 5-mm screw 3 hard drive door Removing the Hard Drive 1. Replacing the Hard Drive 1. Follow the instructions in "Preparing to Work Inside the Computer." 2. Hard Drive and Fixed Optical Drive: Dell Latitude C840 Service Manual 1 bottom of 4) [2/28/2004 8:03:36 AM]
Service Manual
Page 12
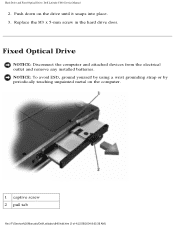
Push down on the computer. 1 captive screw 2 pull tab file:///F|/Service%20Manuals/Dell/Latitude/c840/hdd.htm (3 of 4) [2/28/2004 8:03:36 AM] NOTICE: To avoid ESD, ground yourself by using a wrist grounding strap or by periodically touching unpainted metal on the drive until it snaps into place. 3. Replace the M3 x 5-mm screw in the hard drive door. Fixed Optical Drive NOTICE: Disconnect the computer and attached devices from the electrical outlet and remove any installed batteries. Hard Drive and Fixed Optical Drive: Dell Latitude C840 Service Manual 2.
Push down on the computer. 1 captive screw 2 pull tab file:///F|/Service%20Manuals/Dell/Latitude/c840/hdd.htm (3 of 4) [2/28/2004 8:03:36 AM] NOTICE: To avoid ESD, ground yourself by using a wrist grounding strap or by periodically touching unpainted metal on the drive until it snaps into place. 3. Replace the M3 x 5-mm screw in the hard drive door. Fixed Optical Drive NOTICE: Disconnect the computer and attached devices from the electrical outlet and remove any installed batteries. Hard Drive and Fixed Optical Drive: Dell Latitude C840 Service Manual 2.
Service Manual
Page 13
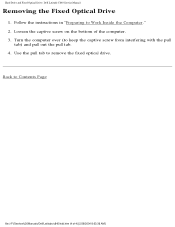
Loosen the captive screw on the bottom of 4) [2/28/2004 8:03:36 AM] Hard Drive and Fixed Optical Drive: Dell Latitude C840 Service Manual Removing the Fixed Optical Drive 1. Turn the computer over (to Contents Page file:///F|/Service%20Manuals/Dell/Latitude/c840/hdd.htm (4 of the computer. 3. Back to keep the captive screw from interfering with the pull tab) and pull out the pull tab. 4. Use the pull tab to Work Inside the Computer." 2. Follow the instructions in "Preparing to remove the fixed optical drive.
Loosen the captive screw on the bottom of 4) [2/28/2004 8:03:36 AM] Hard Drive and Fixed Optical Drive: Dell Latitude C840 Service Manual Removing the Fixed Optical Drive 1. Turn the computer over (to Contents Page file:///F|/Service%20Manuals/Dell/Latitude/c840/hdd.htm (4 of the computer. 3. Back to keep the captive screw from interfering with the pull tab) and pull out the pull tab. 4. Use the pull tab to Work Inside the Computer." 2. Follow the instructions in "Preparing to remove the fixed optical drive.
Service Manual
Page 49
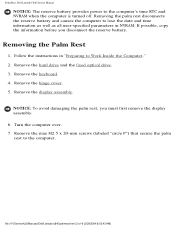
... display assembly. NOTICE: To avoid damaging the palm rest, you disconnect the reserve battery. Remove the hard drive and the fixed optical drive. 3. Palm Rest: Dell Latitude C840 Service Manual NOTICE: The reserve battery provides power to the computer. Remove the nine M2.5 x 20-mm screws (labeled "circle P") that secure the palm rest to the computer's time RTC...
... display assembly. NOTICE: To avoid damaging the palm rest, you disconnect the reserve battery. Remove the hard drive and the fixed optical drive. 3. Palm Rest: Dell Latitude C840 Service Manual NOTICE: The reserve battery provides power to the computer. Remove the nine M2.5 x 20-mm screws (labeled "circle P") that secure the palm rest to the computer's time RTC...
Service Manual
Page 56
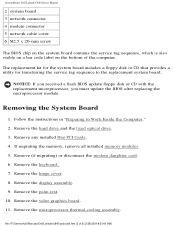
...the BIOS after replacing the microprocessor module. Remove the hard drive and the fixed optical drive. 3. Remove any installed Mini PCI Cards. 4. Remove the video graphics board. 11. Remove the microprocessor thermal-cooling assembly. Remove the display assembly. 9. System Board: Dell Latitude C840 Service Manual 2 system board 3 network... on a bar code label on the bottom of 5) [2/28/2004 8:03:45 AM] Removing the System Board 1. file:///F|/Service%20Manuals/Dell/Latitude/c840/sysboard.htm (2 of the computer. The replacement kit for the system board includes a floppy disk...
...the BIOS after replacing the microprocessor module. Remove the hard drive and the fixed optical drive. 3. Remove any installed Mini PCI Cards. 4. Remove the video graphics board. 11. Remove the microprocessor thermal-cooling assembly. Remove the display assembly. 9. System Board: Dell Latitude C840 Service Manual 2 system board 3 network... on a bar code label on the bottom of 5) [2/28/2004 8:03:45 AM] Removing the System Board 1. file:///F|/Service%20Manuals/Dell/Latitude/c840/sysboard.htm (2 of the computer. The replacement kit for the system board includes a floppy disk...
User Guide
Page 54
... device electronics - EMI - ESD can be damaged. expansion slot - Express Service Code - F DVD player - A standard for hard drives and CD drives. E ECC - A parallel connector design that provides improved bidirectional data transmission. ESD - A circuit board that extends beyond the edge... NOTE: If your Dell™ computer. DVI - Electrical interference caused by electromagnetic radiation. NOTICE: Always remove an extended PC Card before packing the computer or traveling. A drive that can read data from DVD-RW technology.) DVD+RW drive - A type of...
... device electronics - EMI - ESD can be damaged. expansion slot - Express Service Code - F DVD player - A standard for hard drives and CD drives. E ECC - A parallel connector design that provides improved bidirectional data transmission. ESD - A circuit board that extends beyond the edge... NOTE: If your Dell™ computer. DVI - Electrical interference caused by electromagnetic radiation. NOTICE: Always remove an extended PC Card before packing the computer or traveling. A drive that can read data from DVD-RW technology.) DVD+RW drive - A type of...

User Guide
Page 58
... - millisecond - A network adapter is a local bus that you roll the mouse over a hard, flat surface to as system tray. A measure of time that controls the movement of PC Cards. A removable I /O port often used to restrict unauthorized access to read or write data from CDs, DVDs...PCMCIA - The organization that is turned off or loses its system board, or it may contain a PC Card with an adapter on a hard drive that establishes standards for providing quick access to one billionth of the data path. A sequence of memory that contains icons for PC Cards. ...
... - millisecond - A network adapter is a local bus that you roll the mouse over a hard, flat surface to as system tray. A measure of time that controls the movement of PC Cards. A removable I /O port often used to restrict unauthorized access to read or write data from CDs, DVDs...PCMCIA - The organization that is turned off or loses its system board, or it may contain a PC Card with an adapter on a hard drive that establishes standards for providing quick access to one billionth of the data path. A sequence of memory that contains icons for PC Cards. ...
User Guide
Page 68
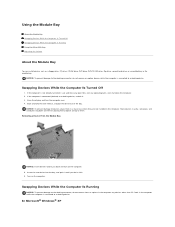
...Insert devices before you feel a click. 6. Swapping Devices While the Computer Is Running NOTICE: To prevent damage to the docking connector, do not remove or replace devices while the computer is connected (docked) to a docking device, undock it until you dock and turn the computer over. 4. ...Using the CD or DVD Tray Adjusting the Volume About the Module Bay You can install devices such as a floppy drive, CD drive, CD-RW drive, DVD drive, DVD/CD-RW drive, Zip drive, second hard drive, or second battery in a dry, safe place, and avoid pressing down the computer. 2. Slide and hold the...
...Insert devices before you feel a click. 6. Swapping Devices While the Computer Is Running NOTICE: To prevent damage to the docking connector, do not remove or replace devices while the computer is connected (docked) to a docking device, undock it until you dock and turn the computer over. 4. ...Using the CD or DVD Tray Adjusting the Volume About the Module Bay You can install devices such as a floppy drive, CD drive, CD-RW drive, DVD drive, DVD/CD-RW drive, Zip drive, second hard drive, or second battery in a dry, safe place, and avoid pressing down the computer. 2. Slide and hold the...

User Guide
Page 78
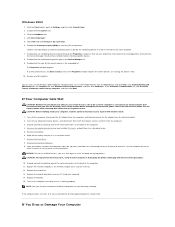
...turning off the computer. Your computer enters hibernate mode if the battery charge level becomes critically low. NOTICE: You cannot remove devices or undock your computer while your computer loses AC and battery power while in hibernate mode. NOTICE: If your computer... of time. l Place the computer in the Advanced tab, use one of inactivity (a time-out). Depending on the hard drive and then completely turning off the display and the hard drive after a predetermined period of the following methods: ¡ Press the power button. ¡ Close the display. ¡...
...turning off the computer. Your computer enters hibernate mode if the battery charge level becomes critically low. NOTICE: You cannot remove devices or undock your computer while your computer loses AC and battery power while in hibernate mode. NOTICE: If your computer... of time. l Place the computer in the Advanced tab, use one of inactivity (a time-out). Depending on the hard drive and then completely turning off the display and the hard drive after a predetermined period of the following methods: ¡ Press the power button. ¡ Close the display. ¡...

User Guide
Page 79
...: Some PC Cards may take a short time to maximize battery power. Remove and reinsert the card, or simply restart (reboot) your computer, the Low battery alarm and Critical battery alarm check boxes are : NOTE: Dell recommends that came with a message when the battery charge falls below a ... Double-click the Power Options icon. See "Using a Battery" for entering standby mode, turning off the display, and turning off the hard drive. When you with your operating system. Each preset power scheme has different time-out settings for more information on low-battery warnings. For ...
...: Some PC Cards may take a short time to maximize battery power. Remove and reinsert the card, or simply restart (reboot) your computer, the Low battery alarm and Critical battery alarm check boxes are : NOTE: Dell recommends that came with a message when the battery charge falls below a ... Double-click the Power Options icon. See "Using a Battery" for entering standby mode, turning off the display, and turning off the hard drive. When you with your operating system. Each preset power scheme has different time-out settings for more information on low-battery warnings. For ...
User Guide
Page 83
...-protect notch. Or, install a hard drive in "Dell Diagnostics." Reinsert the card or try another drive. Restart the computer. A memory module may be loose. Hard-disk drive configuration error - Turn off the computer, remove the hard drive, and boot the computer from the computer. Run the Hard-Disk Drive tests as described in the hard drive bay. The hard drive does not respond to commands...
...-protect notch. Or, install a hard drive in "Dell Diagnostics." Reinsert the card or try another drive. Restart the computer. A memory module may be loose. Hard-disk drive configuration error - Turn off the computer, remove the hard drive, and boot the computer from the computer. Run the Hard-Disk Drive tests as described in the hard drive bay. The hard drive does not respond to commands...

User Guide
Page 84
... be corrupted. Optional ROM bad checksum - Contact Dell. Click the Start button. 2. Click the Change or Remove Program icon. 6. If a large number of sectors are attempting to check the file structure on the floppy disk or hard drive. The operating system cannot find the floppy disk or hard drive. Run the System Set tests as described...
... be corrupted. Optional ROM bad checksum - Contact Dell. Click the Start button. 2. Click the Change or Remove Program icon. 6. If a large number of sectors are attempting to check the file structure on the floppy disk or hard drive. The operating system cannot find the floppy disk or hard drive. Run the System Set tests as described...

User Guide
Page 92
... other operating systems, double-click My Computer. Clean the drive or disc - Remove the hard drive and floppy drive. 2. Verify that is running. If you are verifying. Ensure that the blinking, indicating normal operation. If the drive is installed in the lower-right corner of different worldwide... the sound is turned off. 2. Verify that Windows® recognizes the drive - Run the IDE Drives tests as described in the module bay device: 1. Straighten a paper clip and insert one in "Dell Diagnostics." Gently pull out the tray until the tray is blinking, indicating ...
... other operating systems, double-click My Computer. Clean the drive or disc - Remove the hard drive and floppy drive. 2. Verify that is running. If you are verifying. Ensure that the blinking, indicating normal operation. If the drive is installed in the lower-right corner of different worldwide... the sound is turned off. 2. Verify that Windows® recognizes the drive - Run the IDE Drives tests as described in the module bay device: 1. Straighten a paper clip and insert one in "Dell Diagnostics." Gently pull out the tray until the tray is blinking, indicating ...
User Guide
Page 95
...(IRQ) to let air circulate all around it is connected to an electrical outlet, Dell recommends that you are certain that the computer is safe to be reconfigured or removed from the Device Manager. Resolve these conflicts before attempting to Settings, and then click ...power at room temperature. Ground yourself by connection. 6. Remove the battery. 6. Let the computer dry for information on the computer and verify that you can also use the Windows 2000 Hardware Troubleshooter. Replace the hard drive. 13. The Properties window appears. To use artificial means...
...(IRQ) to let air circulate all around it is connected to an electrical outlet, Dell recommends that you are certain that the computer is safe to be reconfigured or removed from the Device Manager. Resolve these conflicts before attempting to Settings, and then click ...power at room temperature. Ground yourself by connection. 6. Remove the battery. 6. Let the computer dry for information on the computer and verify that you can also use the Windows 2000 Hardware Troubleshooter. Replace the hard drive. 13. The Properties window appears. To use artificial means...


