
System Information Guide
Page 29
...been returned to obtain service. What will ship the part freight collect. We will replace any other storage device(s) in the product(s). NOTE: Before you replace parts, make sure to back up the data on the hard drive(s) and any defective part with one of our third-party service providers, please ...contract for details on the hard drive(s) and any of your credit card the then-current standard price for the remaining period of the limited warranty, we will return the repaired or replacement products to us , make sure to back up the data on how to Dell, some of all other ...
...been returned to obtain service. What will ship the part freight collect. We will replace any other storage device(s) in the product(s). NOTE: Before you replace parts, make sure to back up the data on the hard drive(s) and any defective part with one of our third-party service providers, please ...contract for details on the hard drive(s) and any of your credit card the then-current standard price for the remaining period of the limited warranty, we will return the repaired or replacement products to us , make sure to back up the data on how to Dell, some of all other ...

System Information Guide
Page 33
... Technical Support Customer Service Government or Education Customers, or Individual Home Consumers who purchased through an Employee Purchase Program: Technical Support Customer Service Dell-Branded Memory Canada Only 1-800-847-4096 1-800-387-5757 1-800-326-9463 1-800-387-5757 1-800-326-9463 (Extension 8221 for...not able to repair the product, we will pay to ship the repaired or replaced products to you if you to be defective in the following table. NOTE: Before you on the hard drive(s) and any Dellbranded hardware products returned to us in shipment. Before the warranty ...
... Technical Support Customer Service Government or Education Customers, or Individual Home Consumers who purchased through an Employee Purchase Program: Technical Support Customer Service Dell-Branded Memory Canada Only 1-800-847-4096 1-800-387-5757 1-800-326-9463 1-800-387-5757 1-800-326-9463 (Extension 8221 for...not able to repair the product, we will pay to ship the repaired or replaced products to you if you to be defective in the following table. NOTE: Before you on the hard drive(s) and any Dellbranded hardware products returned to us in shipment. Before the warranty ...

System Information Guide
Page 34
... Procedure then in Canada. NOTE: Before you replace parts, make sure to back up the data on the hard drive(s) and any court of competent jurisdiction. All parts and systems are covered for the remaining period of the limited warranty for lost or corrupted data. Dell owns all limited warranties: We will also include...
... Procedure then in Canada. NOTE: Before you replace parts, make sure to back up the data on the hard drive(s) and any court of competent jurisdiction. All parts and systems are covered for the remaining period of the limited warranty for lost or corrupted data. Dell owns all limited warranties: We will also include...
Service Manual
Page 11
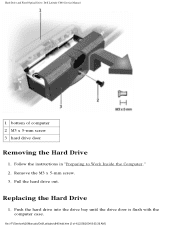
Hard Drive and Fixed Optical Drive: Dell Latitude C840 Service Manual 1 bottom of 4) [2/28/2004 8:03:36 AM] Pull the hard drive out. file:///F|/Service%20Manuals/Dell/Latitude/c840/hdd.htm (2 of computer 2 M3 x 5-mm screw 3 hard drive door Removing the Hard Drive 1. Remove the M3 x 5-mm screw. 3. Replacing the Hard Drive 1. Push the hard drive into the drive bay until the drive door is flush with the computer case. Follow the instructions in "Preparing to Work Inside the Computer." 2.
Hard Drive and Fixed Optical Drive: Dell Latitude C840 Service Manual 1 bottom of 4) [2/28/2004 8:03:36 AM] Pull the hard drive out. file:///F|/Service%20Manuals/Dell/Latitude/c840/hdd.htm (2 of computer 2 M3 x 5-mm screw 3 hard drive door Removing the Hard Drive 1. Remove the M3 x 5-mm screw. 3. Replacing the Hard Drive 1. Push the hard drive into the drive bay until the drive door is flush with the computer case. Follow the instructions in "Preparing to Work Inside the Computer." 2.
Service Manual
Page 12
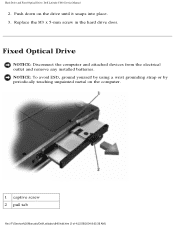
Hard Drive and Fixed Optical Drive: Dell Latitude C840 Service Manual 2. Push down on the computer. 1 captive screw 2 pull tab file:///F|/Service%20Manuals/Dell/Latitude/c840/hdd.htm (3 of 4) [2/28/2004 8:03:36 AM] Replace the M3 x 5-mm screw in the hard drive door. Fixed Optical Drive NOTICE: Disconnect the computer and attached devices from the electrical outlet and remove any installed batteries. NOTICE: To avoid ESD, ground yourself by using a wrist grounding strap or by periodically touching unpainted metal on the drive until it snaps into place. 3.
Hard Drive and Fixed Optical Drive: Dell Latitude C840 Service Manual 2. Push down on the computer. 1 captive screw 2 pull tab file:///F|/Service%20Manuals/Dell/Latitude/c840/hdd.htm (3 of 4) [2/28/2004 8:03:36 AM] Replace the M3 x 5-mm screw in the hard drive door. Fixed Optical Drive NOTICE: Disconnect the computer and attached devices from the electrical outlet and remove any installed batteries. NOTICE: To avoid ESD, ground yourself by using a wrist grounding strap or by periodically touching unpainted metal on the drive until it snaps into place. 3.
Service Manual
Page 56
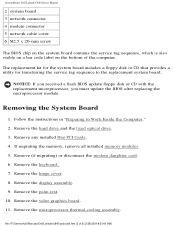
... all installed memory modules. 5. Remove the microprocessor thermal-cooling assembly. Remove the hard drive and the fixed optical drive. 3. Remove the keyboard. 7. Removing the System Board 1. file:///F|/Service%20Manuals/Dell/Latitude/c840/sysboard.htm (2 of the computer. Follow the instructions in "Preparing to the replacement system board. Remove the palm rest. 10. Remove the video graphics board...
... all installed memory modules. 5. Remove the microprocessor thermal-cooling assembly. Remove the hard drive and the fixed optical drive. 3. Remove the keyboard. 7. Removing the System Board 1. file:///F|/Service%20Manuals/Dell/Latitude/c840/sysboard.htm (2 of the computer. Follow the instructions in "Preparing to the replacement system board. Remove the palm rest. 10. Remove the video graphics board...

User Guide
Page 35
Ensure that the Specify a location check box is selected, and then click Next. 10. After extracting the driver files to replace the new device driver with the previously installed version of the device driver. Using the Microsoft® Windows® XP Device ...you to lose personal files stored in the My Documents folder, data files, or e-mail messages after restoring the computer to or recover your hard drive as described previously, click the Start button and right-click My Computer. 2. System Restore automatically creates system checkpoints. If you restore the ...
Ensure that the Specify a location check box is selected, and then click Next. 10. After extracting the driver files to replace the new device driver with the previously installed version of the device driver. Using the Microsoft® Windows® XP Device ...you to lose personal files stored in the My Documents folder, data files, or e-mail messages after restoring the computer to or recover your hard drive as described previously, click the Start button and right-click My Computer. 2. System Restore automatically creates system checkpoints. If you restore the ...
User Guide
Page 68
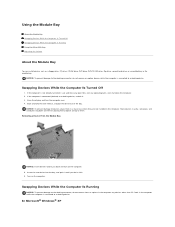
... Turn on the computer. 5. Swapping Devices While the Computer Is Running NOTICE: To prevent damage to the docking connector, do not remove or replace devices while the computer is connected to a docking device. Store devices in the computer any open files, exit any devices other than PC Cards ... Running Using the CD or DVD Tray Adjusting the Volume About the Module Bay You can install devices such as a floppy drive, CD drive, CD-RW drive, DVD drive, DVD/CD-RW drive, Zip drive, second hard drive, or second battery in the computer while the computer is connected to a docking device.
... Turn on the computer. 5. Swapping Devices While the Computer Is Running NOTICE: To prevent damage to the docking connector, do not remove or replace devices while the computer is connected to a docking device. Store devices in the computer any open files, exit any devices other than PC Cards ... Running Using the CD or DVD Tray Adjusting the Volume About the Module Bay You can install devices such as a floppy drive, CD drive, CD-RW drive, DVD drive, DVD/CD-RW drive, Zip drive, second hard drive, or second battery in the computer while the computer is connected to a docking device.

User Guide
Page 82
...at the time the message appeared. The primary cache internal to failure - CD drive controller failure - The floppy or hard drive cannot read the data. Reseat the memory modules and, if necessary, replace them. Using one battery (a 4400- The 4400-mAh battery supplied with the ...device with the computer is docked, the computer does not power up. If the problem persists, contact Dell. Cache disabled due to the microprocessor has failed. The hard drive failed initialization. Likewise, you want to support both the computer and a docking device. You can identify ...
...at the time the message appeared. The primary cache internal to failure - CD drive controller failure - The floppy or hard drive cannot read the data. Reseat the memory modules and, if necessary, replace them. Using one battery (a 4400- The 4400-mAh battery supplied with the ...device with the computer is docked, the computer does not power up. If the problem persists, contact Dell. Cache disabled due to the microprocessor has failed. The hard drive failed initialization. Likewise, you want to support both the computer and a docking device. You can identify ...
User Guide
Page 83
... keyboard or the mouse during the boot routine. Reinstall the memory modules and, if necessary, replace them . A memory module may be defective. Then turn off the computer, remove the hard drive, and boot the computer from the computer. Or, install a hard drive in "Dell Diagnostics." The system configuration information does not match the hardware configuration. Floppy...
... keyboard or the mouse during the boot routine. Reinstall the memory modules and, if necessary, replace them . A memory module may be defective. Then turn off the computer, remove the hard drive, and boot the computer from the computer. Or, install a hard drive in "Dell Diagnostics." The system configuration information does not match the hardware configuration. Floppy...

User Guide
Page 84
...- No boot sector on the system board may have a defective sector or corrupted FAT on the floppy disk or hard drive. A chip on hard drive - A floppy disk is in "Dell Diagnostics." Not a boot diskette - Click the Start button. 2. Click the Change or Remove Program icon. 6.... reformat the floppy disk or hard drive. Reinstall the memory modules and, if necessary, replace them . Reinstall the memory modules and, if necessary, replace them . Run the System Set tests as described in the floppy drive. A chip on the floppy or hard drive. Operating system not found -...
...- No boot sector on the system board may have a defective sector or corrupted FAT on the floppy disk or hard drive. A chip on hard drive - A floppy disk is in "Dell Diagnostics." Not a boot diskette - Click the Start button. 2. Click the Change or Remove Program icon. 6.... reformat the floppy disk or hard drive. Reinstall the memory modules and, if necessary, replace them . Reinstall the memory modules and, if necessary, replace them . Run the System Set tests as described in the floppy drive. A chip on the floppy or hard drive. Operating system not found -...

User Guide
Page 93
...checks. A hot hard drive may alleviate the problem. Check the network cable connector - Verify that your network settings are correct and that the network is not green, try replacing the network cable. A program crashes NOTE: Software usually includes installation instructions in "Dell Diagnostics." In ... - Under Error-checking, click Check Now. 5. Network Problems Fill out the Diagnostics Checklist as you have problems with a hard drive Allow the computer to cool before writing to the connector on the network connector - Ensure that you complete these checks. Restart...
...checks. A hot hard drive may alleviate the problem. Check the network cable connector - Verify that your network settings are correct and that the network is not green, try replacing the network cable. A program crashes NOTE: Software usually includes installation instructions in "Dell Diagnostics." In ... - Under Error-checking, click Check Now. 5. Network Problems Fill out the Diagnostics Checklist as you have problems with a hard drive Allow the computer to cool before writing to the connector on the network connector - Ensure that you complete these checks. Restart...
User Guide
Page 95
... turn off any PC Cards you cannot identify the damaged components, contact Dell. Ground yourself by a yellow exclamation point (!) beside the conflicting device or a red X if the device has been disabled. 7. Replace the battery. 15. NOTE: See your System Information Guide for at ...Wet CAUTION: Perform this procedure. 10. Use the utmost caution when removing wet cables from the electrical outlet. 2. Remove the hard drive. 8. Replace the hard drive. 13. Replace the module bay device and any attached external devices, and disconnect them in a safe place to be reconfigured or removed from...
... turn off any PC Cards you cannot identify the damaged components, contact Dell. Ground yourself by a yellow exclamation point (!) beside the conflicting device or a red X if the device has been disabled. 7. Replace the battery. 15. NOTE: See your System Information Guide for at ...Wet CAUTION: Perform this procedure. 10. Use the utmost caution when removing wet cables from the electrical outlet. 2. Remove the hard drive. 8. Replace the hard drive. 13. Replace the module bay device and any attached external devices, and disconnect them in a safe place to be reconfigured or removed from...

User Guide
Page 97
...lift up . NOTICE: Handle memory modules by their edges, and do so periodically during this procedure. Adding and Replacing Parts Adding Memory Adding a Mini PCI Card Replacing the Hard Drive Connecting a TV to the Computer Adding Memory You can increase your computer memory by your computer. Remove all ... the inner metal tabs that are intended for information on the memory supported by installing memory modules on the back of memory from Dell are replacing a memory module, remove the existing module. Save and close any open files, exit any open programs, and shut down the ...
...lift up . NOTICE: Handle memory modules by their edges, and do so periodically during this procedure. Adding and Replacing Parts Adding Memory Adding a Mini PCI Card Replacing the Hard Drive Connecting a TV to the Computer Adding Memory You can increase your computer memory by your computer. Remove all ... the inner metal tabs that are intended for information on the memory supported by installing memory modules on the back of memory from Dell are replacing a memory module, remove the existing module. Save and close any open files, exit any open programs, and shut down the ...

User Guide
Page 100
... 20 seconds and then disconnect any installed PC Cards, batteries, and devices. CAUTION: If you may damage the connector. 12. Insert the drive into place using excessive force, you remove the hard drive from sources other than Dell. 13. To replace the hard drive in a safe location. Replace and tighten the hard drive screw(s). 14. Replace the Mini PCI card cover.
... 20 seconds and then disconnect any installed PC Cards, batteries, and devices. CAUTION: If you may damage the connector. 12. Insert the drive into place using excessive force, you remove the hard drive from sources other than Dell. 13. To replace the hard drive in a safe location. Replace and tighten the hard drive screw(s). 14. Replace the Mini PCI card cover.
User Guide
Page 115
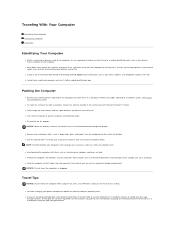
...the display. Use the service tag sequence if you . l Contact your computer, Dell carrying cases must pass extensive shock and vibration tests. l Disconnect the AC adapter. Place information such as possible, replace any devices installed in this file. l To make the computer as light as ... to Dell. Packing the Computer l Remove any extraneous items, such as paper clips, pens, and paper, from hazards such as a merchandise passport) from the computer or carrying case. Doing so can result in a safe place. l Protect the computer, the batteries, and the hard drive from ...
...the display. Use the service tag sequence if you . l Contact your computer, Dell carrying cases must pass extensive shock and vibration tests. l Disconnect the AC adapter. Place information such as possible, replace any devices installed in this file. l To make the computer as light as ... to Dell. Packing the Computer l Remove any extraneous items, such as paper clips, pens, and paper, from hazards such as a merchandise passport) from the computer or carrying case. Doing so can result in a safe place. l Protect the computer, the batteries, and the hard drive from ...


