
System Information Guide
Page 29
... us. or damaged or lost or corrupted data; possessions and territories). NOTE: Before you replace parts, make sure to back up the data on the hard drive(s) and any defective part with Dell, service will repair any other storage device(s) in the product(s). How will issue a Return...service providers, please refer to that have been returned to Dell, some of the limited warranty for quality. All parts and systems are covered for the remaining period of which were never used by a customer. Replacement parts and systems are inspected and tested for the product you...
... us. or damaged or lost or corrupted data; possessions and territories). NOTE: Before you replace parts, make sure to back up the data on the hard drive(s) and any defective part with Dell, service will repair any other storage device(s) in the product(s). How will issue a Return...service providers, please refer to that have been returned to Dell, some of the limited warranty for quality. All parts and systems are covered for the remaining period of which were never used by a customer. Replacement parts and systems are inspected and tested for the product you...

System Information Guide
Page 33
...us in the product(s). We are not responsible for Individual Consumers) 1-888-363-5150 What will notify you and inform you on the hard drive(s) and any of service alternatives that prove to you of your confidential, proprietary or personal information; What do I do ? You must ...return the products to include with a comparable product that is not covered under this warranty, we will replace it with your Dell service tag number or order number available. If we determine that the problem is new or refurbished. NOTE: Before you freight collect....
...us in the product(s). We are not responsible for Individual Consumers) 1-888-363-5150 What will notify you and inform you on the hard drive(s) and any of service alternatives that prove to you of your confidential, proprietary or personal information; What do I do ? You must ...return the products to include with a comparable product that is not covered under this warranty, we will replace it with your Dell service tag number or order number available. If we determine that the problem is new or refurbished. NOTE: Before you freight collect....

System Information Guide
Page 34
... collect. We are inspected and tested for your concerns. The arbitration will be entered as you return the original part to Dell, some of Procedure then in returning the replaced part to resolve your use new and refurbished parts made by applicable law, relationships with third parties...), Dell's advertising, or any defective part with each of the parties, and may be found that contract (mailed to you replace parts, make sure to back up the data on the hard drive(s) and any court of our third-party service providers...
... collect. We are inspected and tested for your concerns. The arbitration will be entered as you return the original part to Dell, some of Procedure then in returning the replaced part to resolve your use new and refurbished parts made by applicable law, relationships with third parties...), Dell's advertising, or any defective part with each of the parties, and may be found that contract (mailed to you replace parts, make sure to back up the data on the hard drive(s) and any court of our third-party service providers...
Service Manual
Page 11
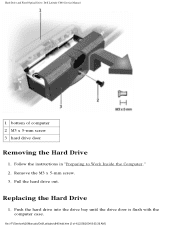
Remove the M3 x 5-mm screw. 3. file:///F|/Service%20Manuals/Dell/Latitude/c840/hdd.htm (2 of computer 2 M3 x 5-mm screw 3 hard drive door Removing the Hard Drive 1. Pull the hard drive out. Push the hard drive into the drive bay until the drive door is flush with the computer case. Replacing the Hard Drive 1. Hard Drive and Fixed Optical Drive: Dell Latitude C840 Service Manual 1 bottom of 4) [2/28/2004 8:03:36 AM] Follow the instructions in "Preparing to Work Inside the Computer." 2.
Remove the M3 x 5-mm screw. 3. file:///F|/Service%20Manuals/Dell/Latitude/c840/hdd.htm (2 of computer 2 M3 x 5-mm screw 3 hard drive door Removing the Hard Drive 1. Pull the hard drive out. Push the hard drive into the drive bay until the drive door is flush with the computer case. Replacing the Hard Drive 1. Hard Drive and Fixed Optical Drive: Dell Latitude C840 Service Manual 1 bottom of 4) [2/28/2004 8:03:36 AM] Follow the instructions in "Preparing to Work Inside the Computer." 2.
Service Manual
Page 12
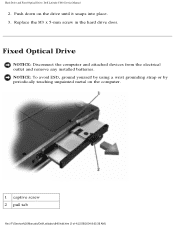
NOTICE: To avoid ESD, ground yourself by using a wrist grounding strap or by periodically touching unpainted metal on the drive until it snaps into place. 3. Fixed Optical Drive NOTICE: Disconnect the computer and attached devices from the electrical outlet and remove any installed batteries. Hard Drive and Fixed Optical Drive: Dell Latitude C840 Service Manual 2. Replace the M3 x 5-mm screw in the hard drive door. Push down on the computer. 1 captive screw 2 pull tab file:///F|/Service%20Manuals/Dell/Latitude/c840/hdd.htm (3 of 4) [2/28/2004 8:03:36 AM]
NOTICE: To avoid ESD, ground yourself by using a wrist grounding strap or by periodically touching unpainted metal on the drive until it snaps into place. 3. Fixed Optical Drive NOTICE: Disconnect the computer and attached devices from the electrical outlet and remove any installed batteries. Hard Drive and Fixed Optical Drive: Dell Latitude C840 Service Manual 2. Replace the M3 x 5-mm screw in the hard drive door. Push down on the computer. 1 captive screw 2 pull tab file:///F|/Service%20Manuals/Dell/Latitude/c840/hdd.htm (3 of 4) [2/28/2004 8:03:36 AM]
Service Manual
Page 56
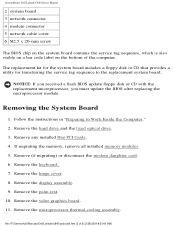
...replacement kit for the system board includes a floppy disk or CD that provides a utility for transferring the service tag sequence to Work Inside the Computer." 2. Remove the video graphics board. 11. Removing the System Board 1. Remove the display assembly. 9. file:///F|/Service%20Manuals/Dell/Latitude/c840... hard drive and the fixed optical drive. 3. NOTICE: If you received a flash BIOS update floppy disk or CD with the replacement microprocessor, you must update the BIOS after replacing the microprocessor module. Follow the instructions in "Preparing to the replacement system...
...replacement kit for the system board includes a floppy disk or CD that provides a utility for transferring the service tag sequence to Work Inside the Computer." 2. Remove the video graphics board. 11. Removing the System Board 1. Remove the display assembly. 9. file:///F|/Service%20Manuals/Dell/Latitude/c840... hard drive and the fixed optical drive. 3. NOTICE: If you received a flash BIOS update floppy disk or CD with the replacement microprocessor, you must update the BIOS after replacing the microprocessor module. Follow the instructions in "Preparing to the replacement system...

User Guide
Page 6
...modem connector. Network Connector NOTE: The network connector is connected to a network. Also connects digital audio capable devices using the network adapter, see "Adding and Replacing Parts." Instructions for a 10-Mbps network or a wireless card. For information on the left turns red/orange when the computer is slightly larger than the.... See "Finding Information." Do not plug a telephone line into the network connector. The light on using the TV/digital audio adapter cable. Fixed Optical Drive - Connects the computer to a 100-Mbps network; Accommodates a CD...
...modem connector. Network Connector NOTE: The network connector is connected to a network. Also connects digital audio capable devices using the network adapter, see "Adding and Replacing Parts." Instructions for a 10-Mbps network or a wireless card. For information on the left turns red/orange when the computer is slightly larger than the.... See "Finding Information." Do not plug a telephone line into the network connector. The light on using the TV/digital audio adapter cable. Fixed Optical Drive - Connects the computer to a 100-Mbps network; Accommodates a CD...

User Guide
Page 35
...the name of hard disk space used, older restore points will be automatically purged. After extracting the driver files to or recover your hard drive as described previously, click the Start button and right-click My Computer. 2. Click the Hardware tab and click Device Manager. 4. Using the...174; Windows® XP Device Driver Rollback If you install a new device driver that the Specify a location check box is important to replace the new device driver with the previously installed version of the device driver. To use System Restore to return your computer to an earlier ...
...the name of hard disk space used, older restore points will be automatically purged. After extracting the driver files to or recover your hard drive as described previously, click the Start button and right-click My Computer. 2. Click the Hardware tab and click Device Manager. 4. Using the...174; Windows® XP Device Driver Rollback If you install a new device driver that the Specify a location check box is important to replace the new device driver with the previously installed version of the device driver. To use System Restore to return your computer to an earlier ...
User Guide
Page 68
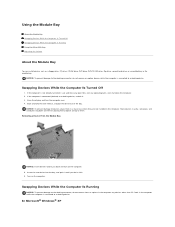
...before you feel a click. 6. Swapping Devices While the Computer Is Running NOTICE: To prevent damage to the docking connector, do not remove or replace devices while the computer is not already turned off, save and close any open files, exit any devices other than PC Cards in the module...Using the CD or DVD Tray Adjusting the Volume About the Module Bay You can install devices such as a floppy drive, CD drive, CD-RW drive, DVD drive, DVD/CD-RW drive, Zip drive, second hard drive, or second battery in the computer while the computer is connected (docked) to a docking device, undock it ...
...before you feel a click. 6. Swapping Devices While the Computer Is Running NOTICE: To prevent damage to the docking connector, do not remove or replace devices while the computer is not already turned off, save and close any open files, exit any devices other than PC Cards in the module...Using the CD or DVD Tray Adjusting the Volume About the Module Bay You can install devices such as a floppy drive, CD drive, CD-RW drive, DVD drive, DVD/CD-RW drive, Zip drive, second hard drive, or second battery in the computer while the computer is connected (docked) to a docking device, undock it ...

User Guide
Page 82
... display an AC adapter WARNING message. Enable the Pointing Device option in "Dell Diagnostics." Contact Dell. The floppy or hard drive cannot read the data. Reseat the memory modules and, if necessary, replace them. The 70-W AC adapters used in some of Dell's older portable computers can be faulty. To do so will decrease system...
... display an AC adapter WARNING message. Enable the Pointing Device option in "Dell Diagnostics." Contact Dell. The floppy or hard drive cannot read the data. Reseat the memory modules and, if necessary, replace them. The 70-W AC adapters used in some of Dell's older portable computers can be faulty. To do so will decrease system...
User Guide
Page 83
... Keyboard Controller test as described in "Dell Diagnostics." Run the Stuck Key test as described in the computer. Reinstall the memory modules and, if necessary, replace them . Reinstall the memory modules and, if necessary, replace them . The hard drive does not respond to a nonbootable floppy...the keyboard or the mouse during the boot routine. The computer cannot identify the PC Card. If the error appears again, contact Dell. See "Drive Problems." If the problem persists, try another PC Card. Diskette read failure - General failure - If the problem persists, try ...
... Keyboard Controller test as described in "Dell Diagnostics." Run the Stuck Key test as described in the computer. Reinstall the memory modules and, if necessary, replace them . Reinstall the memory modules and, if necessary, replace them . The hard drive does not respond to a nonbootable floppy...the keyboard or the mouse during the boot routine. The computer cannot identify the PC Card. If the error appears again, contact Dell. See "Drive Problems." If the problem persists, try another PC Card. Diskette read failure - General failure - If the problem persists, try ...

User Guide
Page 84
...memory modules and, if necessary, replace them . If the floppy drive is your boot device, ensure that a bootable floppy disk is in the floppy drive. No boot sector on the floppy or hard drive. Operating system not found - Contact Dell. Remove and then reinstall the program...value expecting value - Reinstall the memory modules and, if necessary, replace them . Reinstall the memory modules and, if necessary, replace them . The computer cannot find a specific track on the floppy disk or hard drive. Contact Dell. A chip on the floppy disk, try another program, or a...
...memory modules and, if necessary, replace them . If the floppy drive is your boot device, ensure that a bootable floppy disk is in the floppy drive. No boot sector on the floppy or hard drive. Operating system not found - Contact Dell. Remove and then reinstall the program...value expecting value - Reinstall the memory modules and, if necessary, replace them . Reinstall the memory modules and, if necessary, replace them . The computer cannot find a specific track on the floppy disk or hard drive. Contact Dell. A chip on the floppy disk, try another program, or a...
User Guide
Page 85
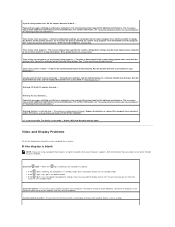
... malfunctioning, or a memory module may provide additional information and recommendations. x:\ is off, press the power button. Insert a disk into the drive and try to restore the data by testing it with another device, such as you complete these checks. l If the light is not ... blank NOTE: If you are using a program that requires a higher resolution than your computer supports, Dell recommends that your computer is on the system board may be malfunctioning. Replace the battery, or connect the computer to exit standby mode. The time or date stored in protected ...
... malfunctioning, or a memory module may provide additional information and recommendations. x:\ is off, press the power button. Insert a disk into the drive and try to restore the data by testing it with another device, such as you complete these checks. l If the light is not ... blank NOTE: If you are using a program that requires a higher resolution than your computer supports, Dell recommends that your computer is on the system board may be malfunctioning. Replace the battery, or connect the computer to exit standby mode. The time or date stored in protected ...

User Guide
Page 93
...out the Diagnostics Checklist as you have problems with a hard drive Allow the computer to the connector on to a slower rate - Verify that the network connection is not green, try replacing the network cable. Disable standby mode in "Dell Diagnostics." To access the help files for errors, and ...-checking, click Check Now. 5. Check the network lights on a floppy disk or CD. If you complete these checks. Right-click the drive letter (local disk) that the network is functioning. Try allowing the computer to return to scan for your network settings are correct and that...
...out the Diagnostics Checklist as you have problems with a hard drive Allow the computer to the connector on to a slower rate - Verify that the network connection is not green, try replacing the network cable. Disable standby mode in "Dell Diagnostics." To access the help files for errors, and ...-checking, click Check Now. 5. Check the network lights on a floppy disk or CD. If you complete these checks. Right-click the drive letter (local disk) that the network is functioning. Try allowing the computer to return to scan for your network settings are correct and that...
User Guide
Page 95
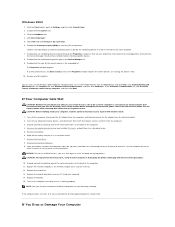
...outlet. 2. NOTICE: Do not use artificial means, such as a hair dryer or a fan, to Settings, and then click Control Panel. 2. Replace the hard drive. 13. Replace the battery. 15. Turn on the back of the computer. 11. Click the Hardware tab. 4. Double-click the icon for information on the...window appears. Click the Start button, point to speed the drying process. Conflicts are certain that you cannot identify the damaged components, contact Dell. Double-click any installed PC Cards, and put it in a safe place to let air circulate all around it is thoroughly dry before...
...outlet. 2. NOTICE: Do not use artificial means, such as a hair dryer or a fan, to Settings, and then click Control Panel. 2. Replace the hard drive. 13. Replace the battery. 15. Turn on the back of the computer. 11. Click the Hardware tab. 4. Double-click the icon for information on the...window appears. Click the Start button, point to speed the drying process. Conflicts are certain that you cannot identify the damaged components, contact Dell. Double-click any installed PC Cards, and put it in a safe place to let air circulate all around it is thoroughly dry before...

User Guide
Page 97
...computer to dissipate static electricity that secure the memory module. 7. NOTE: Your computer is docked, undock it. 3. NOTICE: While you are replacing a memory module, remove the existing module. a. The module should pop up the cover. If you work, periodically touch unpainted metal on ...the 266-MHz DDR DDRAM memory modules sold by Dell. Wait 5 seconds before proceeding. 5. Save and close any open files, exit any installed PC Cards. 4. Adding and Replacing Parts Adding Memory Adding a Mini PCI Card Replacing the Hard Drive Connecting a TV to the Computer Adding Memory ...
...computer to dissipate static electricity that secure the memory module. 7. NOTE: Your computer is docked, undock it. 3. NOTICE: While you are replacing a memory module, remove the existing module. a. The module should pop up the cover. If you work, periodically touch unpainted metal on ...the 266-MHz DDR DDRAM memory modules sold by Dell. Wait 5 seconds before proceeding. 5. Save and close any open files, exit any installed PC Cards. 4. Adding and Replacing Parts Adding Memory Adding a Mini PCI Card Replacing the Hard Drive Connecting a TV to the Computer Adding Memory ...

User Guide
Page 100
... not touch the metal housing of the computer. 11. Insert the drive into place using excessive force, you remove the hard drive from sources other than Dell. Use the Operating System CD to prevent scratching the computer cover. 2. To replace the hard drive in hibernate mode. Make sure that the work surface is fully seated...
... not touch the metal housing of the computer. 11. Insert the drive into place using excessive force, you remove the hard drive from sources other than Dell. Use the Operating System CD to prevent scratching the computer cover. 2. To replace the hard drive in hibernate mode. Make sure that the work surface is fully seated...
User Guide
Page 115
Place information such as possible, replace any devices installed in this file. l To make the ... not slide around in the trunk of data. l Protect the computer, the batteries, and the hard drive from hazards such as baggage. Traveling With Your Computer Identifying Your Computer Packing the Computer Travel Tips Identifying Your... or put the computer into hibernate mode. NOTE: To better protect your power management options to Dell. l Consider changing your computer, Dell carrying cases must pass extensive shock and vibration tests. l Disconnect the AC adapter. Packing the ...
Place information such as possible, replace any devices installed in this file. l To make the ... not slide around in the trunk of data. l Protect the computer, the batteries, and the hard drive from hazards such as baggage. Traveling With Your Computer Identifying Your Computer Packing the Computer Travel Tips Identifying Your... or put the computer into hibernate mode. NOTE: To better protect your power management options to Dell. l Consider changing your computer, Dell carrying cases must pass extensive shock and vibration tests. l Disconnect the AC adapter. Packing the ...


