Owner's Manual
Page 31
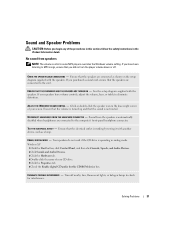
... speakers NOTE: The volume control in the Product Information Guide. ENABLE DIGITAL MODE - If you did not turn the player volume down or off nearby fans, fluorescent lights, or halogen lamps to eliminate distortion. If your speakers have been listening to the computer's front-panel headphone connector. ELIMINATE POSSIBLE INTERFERENCE - Solving...
... speakers NOTE: The volume control in the Product Information Guide. ENABLE DIGITAL MODE - If you did not turn the player volume down or off nearby fans, fluorescent lights, or halogen lamps to eliminate distortion. If your speakers have been listening to the computer's front-panel headphone connector. ELIMINATE POSSIBLE INTERFERENCE - Solving...
Owner's Manual
Page 34
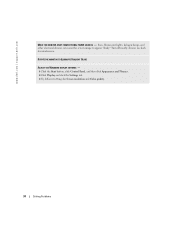
ROTATE THE MONITOR TO ELIMINATE SUNLIGHT GLARE ADJUST THE WINDOWS DISPLAY SETTINGS - 1 Click the Start button, click Control Panel, and then click Appearance and Themes. 2 Click Display and click the Settings tab. 3 Try different settings for interference. Fans, fluorescent lights, halogen lamps, and other electrical devices can cause the screen image to check for Screen resolution and Color quality. 34 Solving Problems www.dell.com | support.dell.com MOVE THE MONITOR AWAY FROM EXTERNAL POWER SOURCES - Turn off nearby devices to appear "shaky."
ROTATE THE MONITOR TO ELIMINATE SUNLIGHT GLARE ADJUST THE WINDOWS DISPLAY SETTINGS - 1 Click the Start button, click Control Panel, and then click Appearance and Themes. 2 Click Display and click the Settings tab. 3 Try different settings for interference. Fans, fluorescent lights, halogen lamps, and other electrical devices can cause the screen image to check for Screen resolution and Color quality. 34 Solving Problems www.dell.com | support.dell.com MOVE THE MONITOR AWAY FROM EXTERNAL POWER SOURCES - Turn off nearby devices to appear "shaky."
Owner's Manual
Page 51
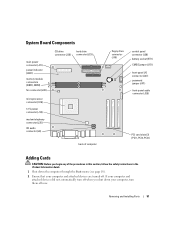
System Board Components main power connector (J21) power indicator (LED1) memory module connectors (DDR1, DDR2) fan connector (J30) CD drive connector (J20) hard drive connector (J23) microprocessor connector (U16) 12-V power connector (J10) modem telephony connector (J25) CD audio connector (J8) ...
System Board Components main power connector (J21) power indicator (LED1) memory module connectors (DDR1, DDR2) fan connector (J30) CD drive connector (J20) hard drive connector (J23) microprocessor connector (U16) 12-V power connector (J10) modem telephony connector (J25) CD audio connector (J8) ...

Owner's Manual
Page 58
www.dell.com | support.dell.com side hinges (3) front panel 13 Check all cable connections, and fold cables out of the way to Auto. NOTICE: To connect a network cable, first ... prompted to enter setup mode. 17 Highlight Drive Configuration and press . 18 Use the left and right arrows to set to provide airflow for the fan and cooling vents. 14 Replace the computer cover (see page 68).
www.dell.com | support.dell.com side hinges (3) front panel 13 Check all cable connections, and fold cables out of the way to Auto. NOTICE: To connect a network cable, first ... prompted to enter setup mode. 17 Highlight Drive Configuration and press . 18 Use the left and right arrows to set to provide airflow for the fan and cooling vents. 14 Replace the computer cover (see page 68).
Owner's Manual
Page 62
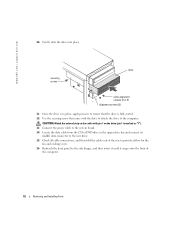
www.dell.com | support.dell.com 10 Gently slide the drive into place. securing screw drive extra alignment screws (2 or 4) alignment screws (2) 11 Once the drive is fully seated. 12 ... data connector to the new drive. 15 Check all cable connections, and then fold the cables out of the way to provide airflow for the fan and cooling vents. 16 Reattach the front panel to the computer. CAUTION: Match the colored strip on the cable with pin 1 on the drive (pin...
www.dell.com | support.dell.com 10 Gently slide the drive into place. securing screw drive extra alignment screws (2 or 4) alignment screws (2) 11 Once the drive is fully seated. 12 ... data connector to the new drive. 15 Check all cable connections, and then fold the cables out of the way to provide airflow for the fan and cooling vents. 16 Reattach the front panel to the computer. CAUTION: Match the colored strip on the cable with pin 1 on the drive (pin...


