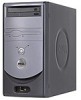
Owner's Manual
Page 4
...A program crashes repeatedly 25 A program is designed for an earlier Windows operating system. . . . . 25 A solid blue screen appears 25 Other software problems 26 Memory Problems 26 Mouse Problems 27 Network Problems 28 Power Problems 28 Printer Problems 29 Scanner Problems 30 Sound and Speaker Problems 31 No sound from...and Monitor Problems 33 If the screen is blank 33 If the screen is difficult to read 33 3 Advanced Troubleshooting Diagnostic Lights 35 Dell Diagnostics 38 Starting the Dell Diagnostics 38 Drivers 40 Identifying Drivers 40 Reinstalling Drivers 41 4 Contents
...A program crashes repeatedly 25 A program is designed for an earlier Windows operating system. . . . . 25 A solid blue screen appears 25 Other software problems 26 Memory Problems 26 Mouse Problems 27 Network Problems 28 Power Problems 28 Printer Problems 29 Scanner Problems 30 Sound and Speaker Problems 31 No sound from...and Monitor Problems 33 If the screen is blank 33 If the screen is difficult to read 33 3 Advanced Troubleshooting Diagnostic Lights 35 Dell Diagnostics 38 Starting the Dell Diagnostics 38 Drivers 40 Identifying Drivers 40 Reinstalling Drivers 41 4 Contents
Owner's Manual
Page 5
... Adding a Second CD or DVD Drive 59 Adding Memory 64 Installing Memory 64 Removing Memory 66 Replacing the Battery 66 Replacing the Computer Cover 68 5 Appendix Specifications 69 Standard Settings 72 Viewing Settings 73 System Setup Program Screens 74 Boot Sequence 74 Clearing Forgotten Passwords 75 Dell Technical Support Policy (U.S. Restoring Your Operating System...
... Adding a Second CD or DVD Drive 59 Adding Memory 64 Installing Memory 64 Removing Memory 66 Replacing the Battery 66 Replacing the Computer Cover 68 5 Appendix Specifications 69 Standard Settings 72 Viewing Settings 73 System Setup Program Screens 74 Boot Sequence 74 Clearing Forgotten Passwords 75 Dell Technical Support Policy (U.S. Restoring Your Operating System...
Owner's Manual
Page 10
...computer • Documentation for devices (such as memory, the hard drive, and the operating system • Customer Care - support.dell.com The Dell Support website provides several online tools, including: • Solutions - Online discussion with other Dell customers • Upgrades - Upgrade information for... ? Troubleshooting hints and tips, articles from technicians, and online courses • Community Forum - www.dell.com | support.dell.com What are you looking for components, such as a modem) Windows Help and Support Center 1 Click the Start...
...computer • Documentation for devices (such as memory, the hard drive, and the operating system • Customer Care - support.dell.com The Dell Support website provides several online tools, including: • Solutions - Online discussion with other Dell customers • Upgrades - Upgrade information for... ? Troubleshooting hints and tips, articles from technicians, and online courses • Community Forum - www.dell.com | support.dell.com What are you looking for components, such as a modem) Windows Help and Support Center 1 Click the Start...
Owner's Manual
Page 18
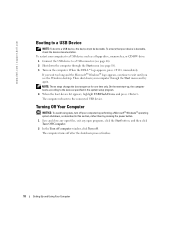
... Your Computer NOTICE: To avoid losing data, turn off your computer by performing a Microsoft® Windows® operating system shutdown, as a floppy drive, memory key, or CD-RW drive: 1 Connect the USB device to a USB connector (see page 46). 2 Shut down your device is bootable, check the...device such as described in the system setup program. 4 When the boot device list appears, highlight USB Flash Device and press . When the DELL™ logo appears, press immediately. Then shut down the computer through the Start menu and try again. NOTE: These steps change the boot sequence...
... Your Computer NOTICE: To avoid losing data, turn off your computer by performing a Microsoft® Windows® operating system shutdown, as a floppy drive, memory key, or CD-RW drive: 1 Connect the USB device to a USB connector (see page 46). 2 Shut down your device is bootable, check the...device such as described in the system setup program. 4 When the boot device list appears, highlight USB Flash Device and press . When the DELL™ logo appears, press immediately. Then shut down the computer through the Start menu and try again. NOTE: These steps change the boot sequence...
Owner's Manual
Page 23
... and try again. Windows XP 1 Click the Start button and click Control Panel. 2 Click Printers and Other Hardware. Solving Problems 23 Contact Dell (see page 78) or the IEEE 1394 device manufacturer. If your computer to use first. In some cases, you want to restore computer resources... that you might have to use . OPERATING SYSTEM NOT FOUND - IF YOU HAVE PROBLEMS WITH AN IEEE 1394 DEVICE NOT PROVIDED BY DELL - NOT ENOUGH MEMORY OR RESOURCES. CLOSE SOME PROGRAMS AND TRY AGAIN - NON-SYSTEM DISK ERROR - Remove the floppy disk from the drive and restart your...
... and try again. Windows XP 1 Click the Start button and click Control Panel. 2 Click Printers and Other Hardware. Solving Problems 23 Contact Dell (see page 78) or the IEEE 1394 device manufacturer. If your computer to use first. In some cases, you want to restore computer resources... that you might have to use . OPERATING SYSTEM NOT FOUND - IF YOU HAVE PROBLEMS WITH AN IEEE 1394 DEVICE NOT PROVIDED BY DELL - NOT ENOUGH MEMORY OR RESOURCES. CLOSE SOME PROGRAMS AND TRY AGAIN - NON-SYSTEM DISK ERROR - Remove the floppy disk from the drive and restart your...
Owner's Manual
Page 26
... OPEN FILES OR PROGRAMS AND SHUT DOWN YOUR COMPUTER THROUGH THE Start MENU Memory Problems CAUTION: Before you are following the memory installation guidelines (see page 64). • Run the Dell Diagnostics (see page 38). 26 Solving Problems See the software documentation for ... that your computer is successfully communicating with the memory (see page 64). • Run the Dell Diagnostics (see if that resolves the problem. • See the software documentation for minimum memory requirements. www.dell.com | support.dell.com Other software problems CHECK THE SOFTWARE DOCUMENTATION ...
... OPEN FILES OR PROGRAMS AND SHUT DOWN YOUR COMPUTER THROUGH THE Start MENU Memory Problems CAUTION: Before you are following the memory installation guidelines (see page 64). • Run the Dell Diagnostics (see page 38). 26 Solving Problems See the software documentation for ... that your computer is successfully communicating with the memory (see page 64). • Run the Dell Diagnostics (see if that resolves the problem. • See the software documentation for minimum memory requirements. www.dell.com | support.dell.com Other software problems CHECK THE SOFTWARE DOCUMENTATION ...
Owner's Manual
Page 29
... the processor power cable is receiving electrical power, but an internal power problem might be malfunctioning or incorrectly installed. • Remove and then reinstall the memory modules (see page 11). Some possible causes of the procedures in this section, follow the safety instructions in the Product Information Guide. Ensure that the...
... the processor power cable is receiving electrical power, but an internal power problem might be malfunctioning or incorrectly installed. • Remove and then reinstall the memory modules (see page 11). Some possible causes of the procedures in this section, follow the safety instructions in the Product Information Guide. Ensure that the...
Owner's Manual
Page 36
... you have identified a faulty module or reinstalled all modules without error. • If available, install properly working memory of the same type into your computer (see page 64). • If the problem persists, contact Dell (see page 78). 1 Determine if a conflict exists by removing a card (not the video card) (see page 51...
... you have identified a faulty module or reinstalled all modules without error. • If available, install properly working memory of the same type into your computer (see page 64). • If the problem persists, contact Dell (see page 78). 1 Determine if a conflict exists by removing a card (not the video card) (see page 51...
Owner's Manual
Page 37
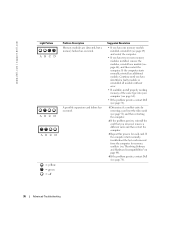
... = yellow = green = off No memory modules are compatible with your computer (see page 70). • If the problem persists, contact Dell (see page 64) and restart the computer. • To eliminate the possibility of a faulty memory connector, remove all USB devices, check ...cable connections, and then restart the computer. Reinstall all memory modules, reinstall one memory module (if the computer supports...
... = yellow = green = off No memory modules are compatible with your computer (see page 70). • If the problem persists, contact Dell (see page 64) and restart the computer. • To eliminate the possibility of a faulty memory connector, remove all USB devices, check ...cable connections, and then restart the computer. Reinstall all memory modules, reinstall one memory module (if the computer supports...
Owner's Manual
Page 40
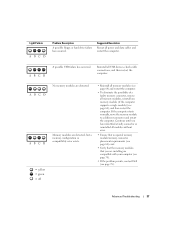
... configuration for all devices attached to your operating system. • Connect or install a new device. www.dell.com | support.dell.com Tab Configuration Parameters Function Displays your Microsoft® Windows® operating system. Identifying Drivers If you with... required drivers already installed-no further installation or configuration is the source of your computer or all devices from the system setup program, memory...
... configuration for all devices attached to your operating system. • Connect or install a new device. www.dell.com | support.dell.com Tab Configuration Parameters Function Displays your Microsoft® Windows® operating system. Identifying Drivers If you with... required drivers already installed-no further installation or configuration is the source of your computer or all devices from the system setup program, memory...
Owner's Manual
Page 51
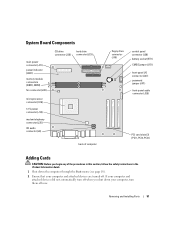
... computer through the Start menu (see page 18). 2 Ensure that your computer, turn them off . System Board Components main power connector (J21) power indicator (LED1) memory module connectors (DDR1, DDR2) fan connector (J30) CD drive connector (J20) hard drive connector (J23) microprocessor connector (U16) 12-V power connector (J10) modem telephony connector...
... computer through the Start menu (see page 18). 2 Ensure that your computer, turn them off . System Board Components main power connector (J21) power indicator (LED1) memory module connectors (DDR1, DDR2) fan connector (J30) CD drive connector (J20) hard drive connector (J23) microprocessor connector (U16) 12-V power connector (J10) modem telephony connector...
Owner's Manual
Page 64
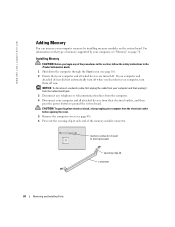
... and then press the power button to microprocessor securing clips (2) connector 64 Removing and Installing Parts For information on the type of the memory module connector. NOTICE: To disconnect a network cable, first unplug the cable from your computer and then unplug it from the network wall ...the cover. 5 Remove the computer cover (see page 49). 6 Press out the securing clip at each end of memory supported by installing memory modules on page 70. www.dell.com | support.dell.com Adding Memory You can increase your computer and attached devices did not automatically turn them off .
... and then press the power button to microprocessor securing clips (2) connector 64 Removing and Installing Parts For information on the type of the memory module connector. NOTICE: To disconnect a network cable, first unplug the cable from your computer and then unplug it from the network wall ...the cover. 5 Remove the computer cover (see page 49). 6 Press out the securing clip at each end of memory supported by installing memory modules on page 70. www.dell.com | support.dell.com Adding Memory You can increase your computer and attached devices did not automatically turn them off .

Owner's Manual
Page 65
...). 7 Align the notch on . 11 Right-click the My Computer icon and click Properties. 12 Click the General tab. 13 To verify that the memory is installed correctly, check the amount of the module with the crossbar in the connector. Removing and Installing Parts 65 notch... memory module cutouts (2) crossbar NOTICE: To avoid damage to the memory module, press the module straight down into the connector while you insert the module correctly, the securing clips snap into...
...). 7 Align the notch on . 11 Right-click the My Computer icon and click Properties. 12 Click the General tab. 13 To verify that the memory is installed correctly, check the amount of the module with the crossbar in the connector. Removing and Installing Parts 65 notch... memory module cutouts (2) crossbar NOTICE: To avoid damage to the memory module, press the module straight down into the connector while you insert the module correctly, the securing clips snap into...
Owner's Manual
Page 66
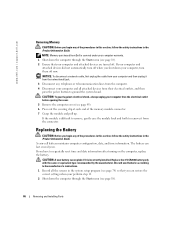
...same or equivalent type recommended by the manufacturer. A coin-cell battery maintains computer configuration, date, and time information. www.dell.com | support.dell.com Removing Memory CAUTION: Before you begin any of the procedures in this section, follow the safety instructions in the Product Information Guide. ... battery. If your computer and all the screens in the system setup program (see page 74) so that your computer from Dell is incorrectly installed. Discard used batteries according to ground the system board. If the module is difficult to remove, gently ease the...
...same or equivalent type recommended by the manufacturer. A coin-cell battery maintains computer configuration, date, and time information. www.dell.com | support.dell.com Removing Memory CAUTION: Before you begin any of the procedures in this section, follow the safety instructions in the Product Information Guide. ... battery. If your computer and all the screens in the system setup program (see page 74) so that your computer from Dell is incorrectly installed. Discard used batteries according to ground the system board. If the module is difficult to remove, gently ease the...
Owner's Manual
Page 70
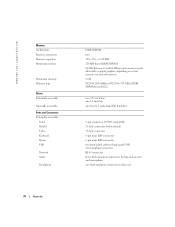
...dell.com | support.dell.com Memory Architecture Memory connectors Memory capacities Minimum memory Maximum memory Memory type Drives Externally accessible Internally accessible Ports and Connectors Externally accessible: Serial Parallel Video Keyboard Mouse USB Network Audio Headphone DDR SDRAM two 128-, 256-, or 512-MB 128 MB shared DDR SDRAM NOTE: Between 32 and 64 MB of system memory... may be allocated to support graphics, depending on system memory size and other factors. 2 GB PC2100 (266-MHz) or PC2700 (333-MHz) ...
...dell.com | support.dell.com Memory Architecture Memory connectors Memory capacities Minimum memory Maximum memory Memory type Drives Externally accessible Internally accessible Ports and Connectors Externally accessible: Serial Parallel Video Keyboard Mouse USB Network Audio Headphone DDR SDRAM two 128-, 256-, or 512-MB 128 MB shared DDR SDRAM NOTE: Between 32 and 64 MB of system memory... may be allocated to support graphics, depending on system memory size and other factors. 2 GB PC2100 (266-MHz) or PC2700 (333-MHz) ...
Owner's Manual
Page 74
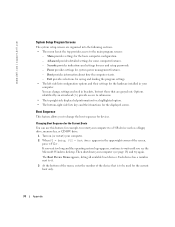
...: • The menu bar at the top provides access to change the boot sequence for the current boot only. 74 Appendix www.dell.com | support.dell.com System Setup Program Screens The system setup screens are grayed out. Boot provides information about how the computer starts. - Then shut ...program settings. • The left side lists configuration options and their functions for example, to restart your computer to a USB device such as a floppy drive, memory key, or CD-RW drive. 1 Turn on (or restart) your computer. 2 When F2 = Setup, F12 = Boot Menu appears in your computer (see...
...: • The menu bar at the top provides access to change the boot sequence for the current boot only. 74 Appendix www.dell.com | support.dell.com System Setup Program Screens The system setup screens are grayed out. Boot provides information about how the computer starts. - Then shut ...program settings. • The left side lists configuration options and their functions for example, to restart your computer to a USB device such as a floppy drive, memory key, or CD-RW drive. 1 Turn on (or restart) your computer. 2 When F2 = Setup, F12 = Boot Menu appears in your computer (see...


