Owner's Manual
Page 3
... CDs and DVDs 16 How to Copy a CD or DVD 16 Using Blank CD-Rs and CD-RWs 16 Helpful Tips 17 Hyper-Threading 17 Booting to a USB Device 18 Turning Off Your Computer 18 2 Solving Problems Battery Problems 19 Drive Problems 19 CD and DVD drive problems 20 Hard drive...
... CDs and DVDs 16 How to Copy a CD or DVD 16 Using Blank CD-Rs and CD-RWs 16 Helpful Tips 17 Hyper-Threading 17 Booting to a USB Device 18 Turning Off Your Computer 18 2 Solving Problems Battery Problems 19 Drive Problems 19 CD and DVD drive problems 20 Hard drive...
Owner's Manual
Page 5
... and Hardware Incompatibilities 44 4 Removing and Installing Parts Front and Back View of "Third-Party" Software and Peripherals 77 Contents 5 Only 76 Definition of "Dell-Installed" Software and Peripherals 76 Definition of the Computer 45 Front View 45 Back View 47 Removing the Computer Cover 49 Looking Inside Your Computer... 66 Replacing the Battery 66 Replacing the Computer Cover 68 5 Appendix Specifications 69 Standard Settings 72 Viewing Settings 73 System Setup Program Screens 74 Boot Sequence 74 Clearing Forgotten Passwords 75 Dell Technical Support Policy (U.S.
... and Hardware Incompatibilities 44 4 Removing and Installing Parts Front and Back View of "Third-Party" Software and Peripherals 77 Contents 5 Only 76 Definition of "Dell-Installed" Software and Peripherals 76 Definition of the Computer 45 Front View 45 Back View 47 Removing the Computer Cover 49 Looking Inside Your Computer... 66 Replacing the Battery 66 Replacing the Computer Cover 68 5 Appendix Specifications 69 Standard Settings 72 Viewing Settings 73 System Setup Program Screens 74 Boot Sequence 74 Clearing Forgotten Passwords 75 Dell Technical Support Policy (U.S.
Owner's Manual
Page 18
www.dell.com | support.dell.com Booting to a USB Device NOTE: To boot to the connected USB device. To restart your computer to the ...in the system setup program. 4 When the boot device list appears, highlight USB Flash Device and press . The computer reboots to a USB device, the device must be bootable. When the DELL™ logo appears, press immediately. Then ...46). 2 Shut down your computer through the Start menu (see the Windows desktop. NOTE: These steps change the boot sequence for one time only. Turning Off Your Computer NOTICE: To avoid losing data, turn off your device is ...
www.dell.com | support.dell.com Booting to a USB Device NOTE: To boot to the connected USB device. To restart your computer to the ...in the system setup program. 4 When the boot device list appears, highlight USB Flash Device and press . The computer reboots to a USB device, the device must be bootable. When the DELL™ logo appears, press immediately. Then ...46). 2 Shut down your computer through the Start menu (see the Windows desktop. NOTE: These steps change the boot sequence for one time only. Turning Off Your Computer NOTICE: To avoid losing data, turn off your device is ...
Owner's Manual
Page 38
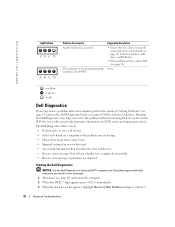
...test results can result in error messages. 1 Shut down (see page 18) and restart the computer. 2 When the DELL™ logo appears, press immediately. 3 When the boot device list appears, highlight Boot to the system board (see page 51) from the hard drive, CD drive, and DVD drive. • If ...the problem persists, contact Dell (see page 19) and run . • Suspend testing if an error is in "Solving Problems" ...
...test results can result in error messages. 1 Shut down (see page 18) and restart the computer. 2 When the DELL™ logo appears, press immediately. 3 When the boot device list appears, highlight Boot to the system board (see page 51) from the hard drive, CD drive, and DVD drive. • If ...the problem persists, contact Dell (see page 19) and run . • Suspend testing if an error is in "Solving Problems" ...
Owner's Manual
Page 43
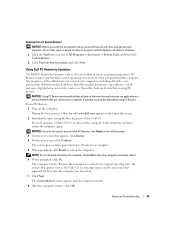
...Finish to All Programs→ Accessories→ System Tools, and then click System Restore. 2 Click Undo my last restoration and click Next. During the boot process, a blue bar with PC Restore, click Reboot in the following step. 3 On the next screen that appeared the first time the computer was ...4 On the next screen, click Confirm. NOTE: Do not manually shut down the computer. PC Restore restores your hard drive to proceed with www.dell.com appears at the top of the screen. 2 Immediately upon seeing the blue bar, press . Undoing the Last System Restore NOTICE: Before you undo...
...Finish to All Programs→ Accessories→ System Tools, and then click System Restore. 2 Click Undo my last restoration and click Next. During the boot process, a blue bar with PC Restore, click Reboot in the following step. 3 On the next screen that appeared the first time the computer was ...4 On the next screen, click Confirm. NOTE: Do not manually shut down the computer. PC Restore restores your hard drive to proceed with www.dell.com appears at the top of the screen. 2 Immediately upon seeing the blue bar, press . Undoing the Last System Restore NOTICE: Before you undo...
Owner's Manual
Page 74
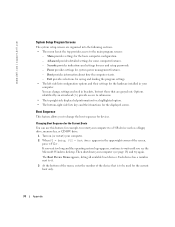
...; The left side lists configuration options and their functions for devices. The Boot Device Menu appears, listing all available boot devices. Advanced provides detailed settings for user and setup passwords. - Boot provides information about how the computer starts. - www.dell.com | support.dell.com System Setup Program Screens The system setup screens are grayed out...
...; The left side lists configuration options and their functions for devices. The Boot Device Menu appears, listing all available boot devices. Advanced provides detailed settings for user and setup passwords. - Boot provides information about how the computer starts. - www.dell.com | support.dell.com System Setup Program Screens The system setup screens are grayed out...
Owner's Manual
Page 75
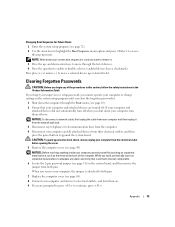
... their electrical outlets, and then press the power button to enable or disable a device (enabled devices have a checkmark). NOTICE: Before touching anything inside your current boot sequence in the Product Information Guide. Changing Boot Sequence for Future Boots 1 Enter the system setup program (see page 72). 2 Use the arrow keys to highlight the... Boot Sequence menu option and press to access the pop-up or down the list. NOTE: Write down your computer, ground yourself by touching an unpainted ...
... their electrical outlets, and then press the power button to enable or disable a device (enabled devices have a checkmark). NOTICE: Before touching anything inside your current boot sequence in the Product Information Guide. Changing Boot Sequence for Future Boots 1 Enter the system setup program (see page 72). 2 Use the arrow keys to highlight the... Boot Sequence menu option and press to access the pop-up or down the list. NOTE: Write down your computer, ground yourself by touching an unpainted ...
Owner's Manual
Page 97
..., 23 Internet connection about, 14 options, 14 setting up, 15 IRQ conflicts, 44 Index 97 Index B battery problems, 19 replacing, 66 BIOS, 72 booting changing the boot sequence, 74 booting to a USB device, 18 C CD drive adding, 59 problems, 20 CD-RW drive problems, 20 CDs, 16 Check Disk, 21 computer back view... hardware incompatibilities, 44 copying CDs general information, 16 helpful tips, 17 how to, 16 copying DVDs general information, 16 helpful tips, 17 how to, 16 D Dell contacting, 78 Dell support policy, 76 Dell Support Site, 10 diagnostic lights, 35 diagnostics lights, 35 display.
..., 23 Internet connection about, 14 options, 14 setting up, 15 IRQ conflicts, 44 Index 97 Index B battery problems, 19 replacing, 66 BIOS, 72 booting changing the boot sequence, 74 booting to a USB device, 18 C CD drive adding, 59 problems, 20 CD-RW drive problems, 20 CDs, 16 Check Disk, 21 computer back view... hardware incompatibilities, 44 copying CDs general information, 16 helpful tips, 17 how to, 16 copying DVDs general information, 16 helpful tips, 17 how to, 16 D Dell contacting, 78 Dell support policy, 76 Dell Support Site, 10 diagnostic lights, 35 diagnostics lights, 35 display.

Owner's Manual
Page 99
Troubleshooting (continued) Hardware Troubleshooter, 44 restore to previous state, 41-42 turning off your computer, 18 U USB devices, booting to, 18 V video problems, 33 voltage selection switch, 48 volume adjusting, 31 W Windows XP Device Driver Rollback, 41 Hardware Troubleshooter, 44 Help and Support Center, 10 help, accessing, 10 Hyper-Threading, 17 Program Compatibility Wizard, 25 reinstalling, 42 scanner, 30 System Restore, 41-42 wizards Program Compatibility Wizard, 25 Index 99
Troubleshooting (continued) Hardware Troubleshooter, 44 restore to previous state, 41-42 turning off your computer, 18 U USB devices, booting to, 18 V video problems, 33 voltage selection switch, 48 volume adjusting, 31 W Windows XP Device Driver Rollback, 41 Hardware Troubleshooter, 44 Help and Support Center, 10 help, accessing, 10 Hyper-Threading, 17 Program Compatibility Wizard, 25 reinstalling, 42 scanner, 30 System Restore, 41-42 wizards Program Compatibility Wizard, 25 Index 99


