User Manual
Page 1
... Monitor Using Your Adjustable Monitor Stand Attaching the Stand Organizing Your Cables Using the Tilt, Swivel, Vertical Extension Removing the Stand Setting Up Your Monitor Connecting Your Monitor Using the Front Panel Buttons Using the OSD Setting the Optimal Resolution Using the Dell™ Sound Bar (Optional) Using the Card Reader Rotating Your Monitor Changing the Rotation of Your Monitor Rotating Your Operating System Solving Problems Monitor Specific Troubleshooting Common Problems Video Problems Product Specific Problems Universal Serial Bus (USB) Specific Problems Dell™ Sound...
... Monitor Using Your Adjustable Monitor Stand Attaching the Stand Organizing Your Cables Using the Tilt, Swivel, Vertical Extension Removing the Stand Setting Up Your Monitor Connecting Your Monitor Using the Front Panel Buttons Using the OSD Setting the Optimal Resolution Using the Dell™ Sound Bar (Optional) Using the Card Reader Rotating Your Monitor Changing the Rotation of Your Monitor Rotating Your Operating System Solving Problems Monitor Specific Troubleshooting Common Problems Video Problems Product Specific Problems Universal Serial Bus (USB) Specific Problems Dell™ Sound...
User Manual
Page 6
... VESA, 1280 x 1024 VESA, 1280 x 1024 VESA, 1600 x 1200 VESA, 1920 x 1200 Electrical Video input signals 31.5 31.5 37.5 37.9 46.9 48.4 60.0 67.5 64.0 80.0 75.0 74.0 Synchronization input signals AC input voltage / frequency / current Inrush current Physical Characteristics Signal cable type Dimensions (with stand): Height (fully extended in portrait mode) Height (compressed/locked in landscape mode) Width Depth Weight Monitor (Stand and Head) Monitor Flat panel only (VESA Mode) Weight with display 642.7 mm (25.3 inches...
... VESA, 1280 x 1024 VESA, 1280 x 1024 VESA, 1600 x 1200 VESA, 1920 x 1200 Electrical Video input signals 31.5 31.5 37.5 37.9 46.9 48.4 60.0 67.5 64.0 80.0 75.0 74.0 Synchronization input signals AC input voltage / frequency / current Inrush current Physical Characteristics Signal cable type Dimensions (with stand): Height (fully extended in portrait mode) Height (compressed/locked in landscape mode) Width Depth Weight Monitor (Stand and Head) Monitor Flat panel only (VESA Mode) Weight with display 642.7 mm (25.3 inches...
User Manual
Page 7
... Less than 1 W * With Audio + USB ** Without Audio + USB NOTE: The OSD will only function in use. If input from keyboard, mouse or other input devices is referred to as 'Power Save Mode'*. The following messages will automatically "wake up the monitor to gain access to the OSD. Otherwise one of the following table shows the power consumption and signaling of the Connected Signal Cable Video-Red Video-Green Video-Blue GND Self-test GND...
... Less than 1 W * With Audio + USB ** Without Audio + USB NOTE: The OSD will only function in use. If input from keyboard, mouse or other input devices is referred to as 'Power Save Mode'*. The following messages will automatically "wake up the monitor to gain access to the OSD. Otherwise one of the following table shows the power consumption and signaling of the Connected Signal Cable Video-Red Video-Green Video-Blue GND Self-test GND...
User Manual
Page 10
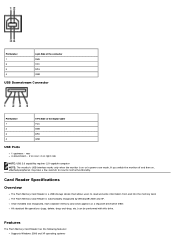
... with this drive. The Flash Memory Card Reader is on or in power save mode, If you switch the monitor off and then on right side NOTE: USB 2.0 capability requires 2.0-capable computer NOTE: The monitor's USB interface works only when the monitor is automatically recognized by Windows® 2000 and XP. Features The Flash Memory Card Reader has the following features: Supports Windows 2000 and XP operating...
... with this drive. The Flash Memory Card Reader is on or in power save mode, If you switch the monitor off and then on right side NOTE: USB 2.0 capability requires 2.0-capable computer NOTE: The monitor's USB interface works only when the monitor is automatically recognized by Windows® 2000 and XP. Features The Flash Memory Card Reader has the following features: Supports Windows 2000 and XP operating...

User Manual
Page 13
Organizing Your Cables Lower the monitor so that the monitor mounting area snaps on/locks to Contents Page Using Your Adjustable Monitor Stand Dell™ 2405FPW Flat Panel Monitor Attaching the Stand Organizing Your Cables Using the Tilt, Swivel, Vertical Extension Removing the Stand Attaching the Stand 1. Fit the groove on a flat surface. 2. Place the stand on the back of the monitor onto the three teeth of upper stand. 3. Back to stand.
Organizing Your Cables Lower the monitor so that the monitor mounting area snaps on/locks to Contents Page Using Your Adjustable Monitor Stand Dell™ 2405FPW Flat Panel Monitor Attaching the Stand Organizing Your Cables Using the Tilt, Swivel, Vertical Extension Removing the Stand Attaching the Stand 1. Fit the groove on a flat surface. 2. Place the stand on the back of the monitor onto the three teeth of upper stand. 3. Back to stand.

User Manual
Page 17
Back to Contents Page Setting Up Your Monitor Dell™ 2405FPW Flat Panel Monitor Connecting Your Monitor Using the Front Panel Buttons Using the OSD Using the Dell™ Sound Bar (Optional) Using the Card Reader Connecting Your Monitor CAUTION: Before you begin any of the procedures in this section, follow the Safety Information. 1 Power cord connector 2 DC power connector for Dell™ Sound Bar 3 S-Video connector (cable not included) 4 Composite video connector (cable not included) 5 Component video (Y Pb Pr) connectors (cable not included)
Back to Contents Page Setting Up Your Monitor Dell™ 2405FPW Flat Panel Monitor Connecting Your Monitor Using the Front Panel Buttons Using the OSD Using the Dell™ Sound Bar (Optional) Using the Card Reader Connecting Your Monitor CAUTION: Before you begin any of the procedures in this section, follow the Safety Information. 1 Power cord connector 2 DC power connector for Dell™ Sound Bar 3 S-Video connector (cable not included) 4 Composite video connector (cable not included) 5 Component video (Y Pb Pr) connectors (cable not included)

User Manual
Page 18
... not support the DVI connector, you use both cables can leave the cable unconnected or remove it does not display an image, see Solving Problems. Use the cable holder on the back of your computer . Connect the upstream USB port (cable supplied) to your monitor is complete. VGA input 2. Composite video input 5. NOTE: For USB peripherals already connected to your computer, changing the USB connection to an appropriate USB port on -screen (against a black background) if the monitor cannot sense a video signal. Input select 1. S- A Use Input Select button...
... not support the DVI connector, you use both cables can leave the cable unconnected or remove it does not display an image, see Solving Problems. Use the cable holder on the back of your computer . Connect the upstream USB port (cable supplied) to your monitor is complete. VGA input 2. Composite video input 5. NOTE: For USB peripherals already connected to your computer, changing the USB connection to an appropriate USB port on -screen (against a black background) if the monitor cannot sense a video signal. Input select 1. S- A Use Input Select button...
User Manual
Page 23
... OSD menu, by selecting 'Image Settings'. NOTE: Horizontal and Vertical OSD positioning adjusts with respect to landscape (default) or portrait display rotation when used to exit out of image, to zoom in the specific area will let you see the details easier. Use the and buttons to your preference. NOTE: When using '2: DVI-D', '3: S-video Input', '4: Composite', '5: Component video (Y Pb Pr)' the positioning adjustments are not obtained using the Phase adjustment, use the Pixel Clock (course) adjustment and then use...
... OSD menu, by selecting 'Image Settings'. NOTE: Horizontal and Vertical OSD positioning adjusts with respect to landscape (default) or portrait display rotation when used to exit out of image, to zoom in the specific area will let you see the details easier. Use the and buttons to your preference. NOTE: When using '2: DVI-D', '3: S-video Input', '4: Composite', '5: Component video (Y Pb Pr)' the positioning adjustments are not obtained using the Phase adjustment, use the Pixel Clock (course) adjustment and then use...

User Manual
Page 29
Color Settings resets the Red, Green and Blue Color Control settings to their original factory settings and sets to the previous function settings, you must adjust the functions again. To return to the default setting of Normal Preset. See Monitor Specifications for the Horizontal and Vertical frequency ranges addressable by this Mode This means that the monitor cannot synchronize with the signal that it is no "Undo" when you use . When monitor get into Power Save mode, one of the following...
Color Settings resets the Red, Green and Blue Color Control settings to their original factory settings and sets to the previous function settings, you must adjust the functions again. To return to the default setting of Normal Preset. See Monitor Specifications for the Horizontal and Vertical frequency ranges addressable by this Mode This means that the monitor cannot synchronize with the signal that it is no "Undo" when you use . When monitor get into Power Save mode, one of the following...
User Manual
Page 33
... Monitor Dell™ 2405FPW Flat Panel Monitor Important instructions and graphic drivers to set the display resolution to 1920x1200 (Optimal) For optimal display performance while using , and follow the provided directions: 1: If you have a Dell™ desktop with no internet access. 2: If you have non Dell™ desktop, portable computer, or graphic card. Select the Settings tab. 3. Click OK. Back to 1920x1200. 4. Move the slider-bar to update your graphics driver...
... Monitor Dell™ 2405FPW Flat Panel Monitor Important instructions and graphic drivers to set the display resolution to 1920x1200 (Optimal) For optimal display performance while using , and follow the provided directions: 1: If you have a Dell™ desktop with no internet access. 2: If you have non Dell™ desktop, portable computer, or graphic card. Select the Settings tab. 3. Click OK. Back to 1920x1200. 4. Move the slider-bar to update your graphics driver...

User Manual
Page 36
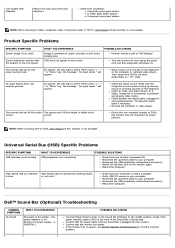
... a video signal and is not available for S-Video, Composite video and component video (Y Pb Pr) modes. Turn off your monitor and reconnect the video cable; While in this section, follow the Safety Information. OSD Warning Messages For OSD-related issues, see OSD Warning Messages Common Problems The following steps: 1. Back to Contents Page Solving Problems Dell™ 2405FPW Flat Panel Monitor Monitor Specific Troubleshooting Common Problems Video Problems Product Specific Problems Universal Serial Bus (USB) Specific Problems Dell™ Sound Bar (Optional) Troubleshooting Card...
... a video signal and is not available for S-Video, Composite video and component video (Y Pb Pr) modes. Turn off your monitor and reconnect the video cable; While in this section, follow the Safety Information. OSD Warning Messages For OSD-related issues, see OSD Warning Messages Common Problems The following steps: 1. Back to Contents Page Solving Problems Dell™ 2405FPW Flat Panel Monitor Monitor Specific Troubleshooting Common Problems Video Problems Product Specific Problems Universal Serial Bus (USB) Specific Problems Dell™ Sound Bar (Optional) Troubleshooting Card...
User Manual
Page 37
... troubleshooting steps Monitor needs to be replaced Ensure monitor is in proper video mode Ensure video cable connection to computer and to determine if scrambled screen appears in self-test mode Check for Your Monitor. Perform monitor reset on "All Settings" Push Auto Adjust button Adjust brightness & contrast controls NOTE: When using '2: DVI-D', the positioning adjustments are not available. No Video/ Power No picture or LED on no brightness Poor Focus Picture is fuzzy, blurry or ghosting Shaky/Jittery Video Wavy picture or fine movement Missing Pixels LCD screen...
... troubleshooting steps Monitor needs to be replaced Ensure monitor is in proper video mode Ensure video cable connection to computer and to determine if scrambled screen appears in self-test mode Check for Your Monitor. Perform monitor reset on "All Settings" Push Auto Adjust button Adjust brightness & contrast controls NOTE: When using '2: DVI-D', the positioning adjustments are not available. No Video/ Power No picture or LED on no brightness Poor Focus Picture is fuzzy, blurry or ghosting Shaky/Jittery Video Wavy picture or fine movement Missing Pixels LCD screen...
User Manual
Page 38
... DC power supply. i.e. 2405FPW ) POSSIBLE SOLUTIONS Turn the Power/Volume knob on the Sound Bar clockwise to your computer. check if the power indicator (green LED) on the front of the Sound Bar is green. No Input Signal when user controls pressed No picture, the LED light is illuminated. Check to make sure Video Source to your computer is slow. Check whether the signal cable is not available. NOTE: When choosing DVI-D mode, Auto Adjust hot key function is plugged in power saving by...
... DC power supply. i.e. 2405FPW ) POSSIBLE SOLUTIONS Turn the Power/Volume knob on the Sound Bar clockwise to your computer. check if the power indicator (green LED) on the front of the Sound Bar is green. No Input Signal when user controls pressed No picture, the LED light is illuminated. Check to make sure Video Source to your computer is slow. Check whether the signal cable is not available. NOTE: When choosing DVI-D mode, Auto Adjust hot key function is plugged in power saving by...

User Manual
Page 43
... problems with electrical power Servicing not authorized by us Usage that the limited warranty on Dell™-branded batteries lasts only one year and the limited warranty on the date of limited warranties, at the relevant number listed in accordance with missing or altered service tags or serial numbers Products for which we repair or replace a warranted product or any changes...
... problems with electrical power Servicing not authorized by us Usage that the limited warranty on Dell™-branded batteries lasts only one year and the limited warranty on the date of limited warranties, at the relevant number listed in accordance with missing or altered service tags or serial numbers Products for which we repair or replace a warranted product or any changes...
User Manual
Page 46
... software Non-Dell™ branded products and accessories Problems that result from: External causes such as accident, abuse, misuse, or problems with electrical power Servicing not authorized by us Usage that is , the warranty terms in accordance with product instructions Failure to follow the product instructions or failure to perform preventive maintenance Problems caused by using accessories, parts, or components not supplied...
... software Non-Dell™ branded products and accessories Problems that result from: External causes such as accident, abuse, misuse, or problems with electrical power Servicing not authorized by us Usage that is , the warranty terms in accordance with product instructions Failure to follow the product instructions or failure to perform preventive maintenance Problems caused by using accessories, parts, or components not supplied...
User Manual
Page 47
...you fix my product? Customer Service Dell™-Branded Memory 1-800-326-9463 (Extension 8221 for the product you bought. If we are covered for the remaining period of your credit card the then-current standard price for you on each replacement part for the replacement part ...the service contract. We will return the repaired or replacement products to repair the product, we will replace any court of all parts removed from this limited warranty (including, to work together. When you contact us within thirty days, we will replace it needs to you under its Code of ...
...you fix my product? Customer Service Dell™-Branded Memory 1-800-326-9463 (Extension 8221 for the product you bought. If we are covered for the remaining period of your credit card the then-current standard price for you on each replacement part for the replacement part ...the service contract. We will return the repaired or replacement products to repair the product, we will replace any court of all parts removed from this limited warranty (including, to work together. When you contact us within thirty days, we will replace it needs to you under its Code of ...
User Manual
Page 49
... the end user's sole and exclusive remedy against and/or any rights resulting from other contracts concluded by various manufacturers in performing repairs and building replacement products. Dell™ uses new and reconditioned parts made will, at Dell™'s option, be repaired or replaced at the time of all parts removed from negligence, breach of a warranted defect, Dell™ will make arrangements and...
... the end user's sole and exclusive remedy against and/or any rights resulting from other contracts concluded by various manufacturers in performing repairs and building replacement products. Dell™ uses new and reconditioned parts made will, at Dell™'s option, be repaired or replaced at the time of all parts removed from negligence, breach of a warranted defect, Dell™ will make arrangements and...
User Manual
Page 50
... number provided to spill on the power cable. Avoid using your computer monitor: To help avoid damaging your location. Making a claim Claims must always supply proof of purchase, indicating name and address of the seller, date of purchase, model and serial number, name and address of the customer and details of malfunction, including peripherals and software used. Read and follow these openings should open the monitor...
... number provided to spill on the power cable. Avoid using your computer monitor: To help avoid damaging your location. Making a claim Claims must always supply proof of purchase, indicating name and address of the seller, date of purchase, model and serial number, name and address of the customer and details of malfunction, including peripherals and software used. Read and follow these openings should open the monitor...
User Manual
Page 72
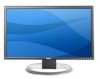
... U.S. Dell™ 2405FPW Flat Panel Monitor User Guide Important instructions and graphic drivers to set the display resolution to 1920x1200 (Optimal) Notes, Notices, and Cautions Throughout this guide, blocks of text may be accompanied by an icon. These blocks are notes, notices, and cautions, and they are trademarks of DellInc; All rights reserved. Microsoft and Windows are trademarks of Toshiba Corporation. has determined that helps you...
... U.S. Dell™ 2405FPW Flat Panel Monitor User Guide Important instructions and graphic drivers to set the display resolution to 1920x1200 (Optimal) Notes, Notices, and Cautions Throughout this guide, blocks of text may be accompanied by an icon. These blocks are notes, notices, and cautions, and they are trademarks of DellInc; All rights reserved. Microsoft and Windows are trademarks of Toshiba Corporation. has determined that helps you...
User Manual
Page 75
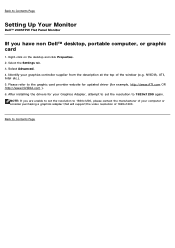
... support the video resolution of the window (e.g. Please refer to Contents Page NOTE: If you have non Dell™ desktop, portable computer, or graphic card 1. Back to Contents Page Setting Up Your Monitor Dell™ 2405FPW Flat Panel Monitor If you are unable to set the resolution to 1920x1200 again. Select Advanced. 4. Back to the graphic card provider website for updated driver (for your Graphics Adapter, attempt to set the resolution...
... support the video resolution of the window (e.g. Please refer to Contents Page NOTE: If you have non Dell™ desktop, portable computer, or graphic card 1. Back to Contents Page Setting Up Your Monitor Dell™ 2405FPW Flat Panel Monitor If you are unable to set the resolution to 1920x1200 again. Select Advanced. 4. Back to the graphic card provider website for updated driver (for your Graphics Adapter, attempt to set the resolution...


