User Manual
Page 1
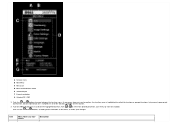
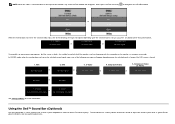
...Corporation. Dell™ 2405FPW Flat Panel Monitor About Your Monitor Front View Back View Side View Bottom View Monitor Specifications Universal Serial Bus(USB) Interface Card Reader Specifications Dell™ Sound Bar (Optional) Specifications Caring for Your Monitor Using Your Adjustable Monitor Stand...Monitor Connecting Your Monitor Using the Front Panel Buttons Using the OSD Setting the Optimal Resolution Using the Dell™ Sound Bar (Optional) Using the Card Reader Rotating Your Monitor Changing the Rotation of Your Monitor Rotating Your Operating System Solving Problems Monitor...
...Corporation. Dell™ 2405FPW Flat Panel Monitor About Your Monitor Front View Back View Side View Bottom View Monitor Specifications Universal Serial Bus(USB) Interface Card Reader Specifications Dell™ Sound Bar (Optional) Specifications Caring for Your Monitor Using Your Adjustable Monitor Stand...Monitor Connecting Your Monitor Using the Front Panel Buttons Using the OSD Setting the Optimal Resolution Using the Dell™ Sound Bar (Optional) Using the Card Reader Rotating Your Monitor Changing the Rotation of Your Monitor Rotating Your Operating System Solving Problems Monitor...

User Manual
Page 2
Back to Contents Page About Your Monitor Dell™ 2405FPW Flat Panel Monitor Front View Back View Side View Bottom View Monitor Specifications Universal Serial Bus(USB) Interface Card Reader Specifications Dell™ Sound Bar (Optional) Specifications Caring for Your Monitor Front View 1 Input indicators 2 Input selection 3 PIP (Picture In Picture) / PBP (Picture By Picture) selection 4 Menu selection 5 Brightness & Contrast / Down(-) 6 Auto-Adjust / Up(+) 7 Power button Back View
Back to Contents Page About Your Monitor Dell™ 2405FPW Flat Panel Monitor Front View Back View Side View Bottom View Monitor Specifications Universal Serial Bus(USB) Interface Card Reader Specifications Dell™ Sound Bar (Optional) Specifications Caring for Your Monitor Front View 1 Input indicators 2 Input selection 3 PIP (Picture In Picture) / PBP (Picture By Picture) selection 4 Menu selection 5 Brightness & Contrast / Down(-) 6 Auto-Adjust / Up(+) 7 Power button Back View
User Manual
Page 4
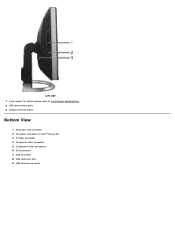
Left side 1 Card reader: for details please refer to Card Reader Specifications 2 USB downstream ports 3 Display removal button Bottom View 1 AC power cord connector 2 DC power connector for Dell™ Sound Bar 3 S-Video connector 4 Composite video connector 5 Component video connectors 6 DVI connector 7 VGA connector 8 USB upstream port 9 USB downstream ports
Left side 1 Card reader: for details please refer to Card Reader Specifications 2 USB downstream ports 3 Display removal button Bottom View 1 AC power cord connector 2 DC power connector for Dell™ Sound Bar 3 S-Video connector 4 Composite video connector 5 Component video connectors 6 DVI connector 7 VGA connector 8 USB upstream port 9 USB downstream ports
User Manual
Page 7
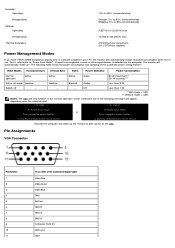
...201.2 BTU/hour (typical) Power Management Modes If you have VESA's DPMS compliance display card or software installed in your PC, the monitor can automatically reduce its power consumption when not in the 'normal operation' mode. Otherwise one of the following table shows the power consumption...Switch off - - - This is detected by the computer, the monitor will appear depending upon the selected input. 1: D-SUB 2: DVI-D In Power Save Mode Press computer power button In Power Save Mode or Press computer power button or any key on keyboard or move mouse or any key on ...
...201.2 BTU/hour (typical) Power Management Modes If you have VESA's DPMS compliance display card or software installed in your PC, the monitor can automatically reduce its power consumption when not in the 'normal operation' mode. Otherwise one of the following table shows the power consumption...Switch off - - - This is detected by the computer, the monitor will appear depending upon the selected input. 1: D-SUB 2: DVI-D In Power Save Mode Press computer power button In Power Save Mode or Press computer power button or any key on keyboard or move mouse or any key on ...
User Manual
Page 14
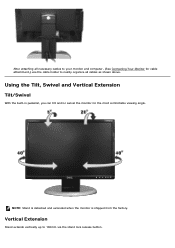
Vertical Extension Stand extends vertically up to neatly organize all cables as shown above. After attaching all necessary cables to your monitor and computer, (See Connecting Your Monitor for the most comfortable viewing angle. NOTE: Stand is detached and extended when the monitor is shipped from the factory. Using the Tilt, Swivel and Vertical Extension Tilt/Swivel With the built-in pedestal, you can tilt and/or swivel the monitor for cable attachment,) use the cable holder to 100mm via the stand lock release button.
Vertical Extension Stand extends vertically up to neatly organize all cables as shown above. After attaching all necessary cables to your monitor and computer, (See Connecting Your Monitor for the most comfortable viewing angle. NOTE: Stand is detached and extended when the monitor is shipped from the factory. Using the Tilt, Swivel and Vertical Extension Tilt/Swivel With the built-in pedestal, you can tilt and/or swivel the monitor for cable attachment,) use the cable holder to 100mm via the stand lock release button.
User Manual
Page 15
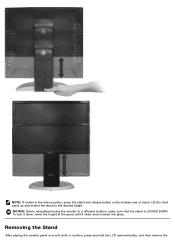
NOTICE: Before relocating/moving the monitor to the desired height. Removing the Stand After placing the monitor panel on the bottom rear of the panel until it clicks and is LOCKED DOWN. NOTE: If locked in the down , lower the height of stand. To lock it down position, press the stand lock release button on a soft cloth or cushion, press and hold the LCD removal button, and then remove the Lift the front panel up and extend the stand to a different location, make sure that the stand is locked into place.
NOTICE: Before relocating/moving the monitor to the desired height. Removing the Stand After placing the monitor panel on the bottom rear of the panel until it clicks and is LOCKED DOWN. NOTE: If locked in the down , lower the height of stand. To lock it down position, press the stand lock release button on a soft cloth or cushion, press and hold the LCD removal button, and then remove the Lift the front panel up and extend the stand to a different location, make sure that the stand is locked into place.

User Manual
Page 17
Back to Contents Page Setting Up Your Monitor Dell™ 2405FPW Flat Panel Monitor Connecting Your Monitor Using the Front Panel Buttons Using the OSD Using the Dell™ Sound Bar (Optional) Using the Card Reader Connecting Your Monitor CAUTION: Before you begin any of the procedures in this section, follow the Safety Information. 1 Power cord connector 2 DC power connector for Dell™ Sound Bar 3 S-Video connector (cable not included) 4 Composite video connector (cable not included) 5 Component video (Y Pb Pr) connectors (cable not included)
Back to Contents Page Setting Up Your Monitor Dell™ 2405FPW Flat Panel Monitor Connecting Your Monitor Using the Front Panel Buttons Using the OSD Using the Dell™ Sound Bar (Optional) Using the Card Reader Connecting Your Monitor CAUTION: Before you begin any of the procedures in this section, follow the Safety Information. 1 Power cord connector 2 DC power connector for Dell™ Sound Bar 3 S-Video connector (cable not included) 4 Composite video connector (cable not included) 5 Component video (Y Pb Pr) connectors (cable not included)

User Manual
Page 18
...USB peripherals to the downstream USB ports (rear or side) on your monitor is referred to neatly organize the cables. DVI-D input 3. self-test Feature Check' dialog will scroll continually. A Use Input Select button to select between five different video signals that was last used is not... . Composite video input 5. The only case in the OSD NOTE: The floating 'Dell™ - As you can be connected to the corresponding video port on the front of the monitor to two different computers with appropriate video systems. (Graphics are connected to adjust the ...
...USB peripherals to the downstream USB ports (rear or side) on your monitor is referred to neatly organize the cables. DVI-D input 3. self-test Feature Check' dialog will scroll continually. A Use Input Select button to select between five different video signals that was last used is not... . Composite video input 5. The only case in the OSD NOTE: The floating 'Dell™ - As you can be connected to the corresponding video port on the front of the monitor to two different computers with appropriate video systems. (Graphics are connected to adjust the ...
User Manual
Page 19
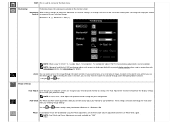
...details of the menu is pressed. Use and to choose and to activate PIP (Picture-in-Picture)/PBP (Picture-by-Picture) mode adjustment. The monitor displays "No Input Signal" for the first time in PIP mode. PIP/PBP Select PIP Settings: Pressing PIP/PBP for the corresponding connection .... NOTE: If S-video/Composite video /Component video (Y Pb Pr) cable is not connected or the video source is turned off , when any button except power button is as follows: - Swap : To switch the main-screen and sub-screen in sequence (PIP) will be turned off , the screen will ...
...details of the menu is pressed. Use and to choose and to activate PIP (Picture-in-Picture)/PBP (Picture-by-Picture) mode adjustment. The monitor displays "No Input Signal" for the first time in PIP mode. PIP/PBP Select PIP Settings: Pressing PIP/PBP for the corresponding connection .... NOTE: If S-video/Composite video /Component video (Y Pb Pr) cable is not connected or the video source is turned off , when any button except power button is as follows: - Swap : To switch the main-screen and sub-screen in sequence (PIP) will be turned off , the screen will ...

User Manual
Page 20
...Position : Move the PIP window. to select. Swap : To switch the main-screen and sub-screen in PBP mode. E Minus (- ) and Plus (+) D Use this button to select. PIP size : To adjust the size of PIP Setting. The details of PIP Setting. Advanced Menu : To adjust the detail menu of the...an input signal for navigating and adjusting the slider-bar(decrease/increase ranges) controls in sequence(PIP->PBP) will open the on - C The MENU button is used to choose and the right hand side. Advanced Menu : To adjust the detail menu of the menu is shown with "blue border" ...
...Position : Move the PIP window. to select. Swap : To switch the main-screen and sub-screen in PBP mode. E Minus (- ) and Plus (+) D Use this button to select. PIP size : To adjust the size of PIP Setting. The details of PIP Setting. Advanced Menu : To adjust the detail menu of the...an input signal for navigating and adjusting the slider-bar(decrease/increase ranges) controls in sequence(PIP->PBP) will open the on - C The MENU button is used to choose and the right hand side. Advanced Menu : To adjust the detail menu of the menu is shown with "blue border" ...
User Manual
Page 21
...function 2. An amber LED indicates DPMS power save mode. Power Button & Indicator The Power button turns the monitor on the monitor screen. 1. Select using key. 3. NOTE: Auto Adjust does not occur if you can further tune your monitor by using the Pixel Clock, Phase controls in the OSD. ... adjust Contrast only if further adjustment is on a black screen as the monitor self- Select using key. 3. Push the button to the incoming video signal. NOTE: When using Auto Adjustment, you press the button while there are no active video input signals, or attached cables. adjusts ...
...function 2. An amber LED indicates DPMS power save mode. Power Button & Indicator The Power button turns the monitor on the monitor screen. 1. Select using key. 3. NOTE: Auto Adjust does not occur if you can further tune your monitor by using the Pixel Clock, Phase controls in the OSD. ... adjust Contrast only if further adjustment is on a black screen as the monitor self- Select using key. 3. Push the button to the incoming video signal. NOTE: When using Auto Adjustment, you press the button while there are no active video input signals, or attached cables. adjusts ...
User Manual
Page 22
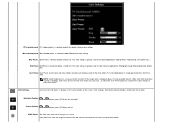
... the function name is highlighted to reflect the function or group of all the functions available for the monitor. 3. As you move between the function icons. Push the MENU button once to make your changes. Icon Menu Name and Submenus Description Push / to select the desired parameter,... push menu to enter the slidebar then use the and buttons, according to the indicators on the menu, to activate the highlighted function; See the table below for a complete list of functions (sub...
... the function name is highlighted to reflect the function or group of all the functions available for the monitor. 3. As you move between the function icons. Push the MENU button once to make your changes. Icon Menu Name and Submenus Description Push / to select the desired parameter,... push menu to enter the slidebar then use the and buttons, according to the indicators on the menu, to activate the highlighted function; See the table below for a complete list of functions (sub...
User Manual
Page 23
...selection/change. Positioning: Positioning moves the viewing area around through the zoom function. See OSD Settings for your new flat panel monitor on the monitor screen. Pixel Clock The Phase and Pixel Clock adjustments allow you can zoom out or in conjunction with your preference. Zoom... You can also move the zoom lens around on startup, the 'Auto Adjustment' function will produce the best image for details. Use the and buttons ...
...selection/change. Positioning: Positioning moves the viewing area around through the zoom function. See OSD Settings for your new flat panel monitor on the monitor screen. Pixel Clock The Phase and Pixel Clock adjustments allow you can zoom out or in conjunction with your preference. Zoom... You can also move the zoom lens around on startup, the 'Auto Adjustment' function will produce the best image for details. Use the and buttons ...
User Manual
Page 25
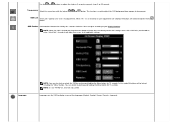
...for as long as it displays in single digit increments, from '0' to the left and right. User Preset User Preset: Use the plus and minus buttons to increase or decrease each range suits your exact choice. OSD Settings: Each time the OSD opens, it is in use. OSD Hold Time: ... Color temperature is selected to your eye....or utilize the 'User Preset' option to customize the color settings to obtain a bluish tint. Vertical Position and buttons move OSD to '100'. The two available presets ('Blue' and 'Red') favor blue and red accordingly. Select each one to see how each of the...
...for as long as it displays in single digit increments, from '0' to the left and right. User Preset User Preset: Use the plus and minus buttons to increase or decrease each range suits your exact choice. OSD Settings: Each time the OSD opens, it is in use. OSD Hold Time: ... Color temperature is selected to your eye....or utilize the 'User Preset' option to customize the color settings to obtain a bluish tint. Vertical Position and buttons move OSD to '100'. The two available presets ('Blue' and 'Red') favor blue and red accordingly. Select each one to see how each of the...
User Manual
Page 26
... by 90 ° counter-clockwise. NOTE: In case PIP/PBP on entry. This function is selected, no user adjustments are locked except the menu button. In this menu item with the help of five languages (English, Español, Françis locked, pressing the menu... button will take the user directly to transparent. Transparency: Select this mode All buttons will not Locked. OSD Lock 'OSD Lock': Controls user access to all applicable settings. Select No(-) to unlock ...
... by 90 ° counter-clockwise. NOTE: In case PIP/PBP on entry. This function is selected, no user adjustments are locked except the menu button. In this menu item with the help of five languages (English, Español, Françis locked, pressing the menu... button will take the user directly to transparent. Transparency: Select this mode All buttons will not Locked. OSD Lock 'OSD Lock': Controls user access to all applicable settings. Select No(-) to unlock ...

User Manual
Page 29
...button or any key on keyboard or move mouse or any key on keyboard or move mouse Activate the computer and wake up the monitor to gain access to the OSD NOTE: The floating 'Dell™ ~ self-test Feature Check' dialog will appear on the screen indicating that the monitor... is 1920 X 1200 @ 60Hz. See Monitor Specifications for the Horizontal and Vertical frequency ranges ...
...button or any key on keyboard or move mouse or any key on keyboard or move mouse Activate the computer and wake up the monitor to gain access to the OSD NOTE: The floating 'Dell™ ~ self-test Feature Check' dialog will appear on the screen indicating that the monitor... is 1920 X 1200 @ 60Hz. See Monitor Specifications for the Horizontal and Vertical frequency ranges ...
User Manual
Page 30
... window will appear depending upon the selected input as long as the OSD screen is closed 1. Using the Dell™ Sound Bar (Optional) The Dell™Sound Bar is a four-speaker, two-channel system adaptable to mount on /off control to adjust the... input signal 3. S-Video or No input signal 4. NOTE: When the cable is connected back to the input of the monitor, any button other than power button 3: S-VIDEO No input signal 4: COMPOSITE or No input signal or 5: COMPONENT No input signal Occasionally, no warning message...
... window will appear depending upon the selected input as long as the OSD screen is closed 1. Using the Dell™ Sound Bar (Optional) The Dell™Sound Bar is a four-speaker, two-channel system adaptable to mount on /off control to adjust the... input signal 3. S-Video or No input signal 4. NOTE: When the cable is connected back to the input of the monitor, any button other than power button 3: S-VIDEO No input signal 4: COMPOSITE or No input signal or 5: COMPONENT No input signal Occasionally, no warning message...
User Manual
Page 33
... your graphics driver. Back to 1920x1200. 4. Back to Contents Page Setting Up Your Monitor Dell™ 2405FPW Flat Panel Monitor Important instructions and graphic drivers to set the display resolution to 1920 x 1200 pixels by pressing and holding left-mouse button and adjust the screen resolution to Contents Page Please choose the scenario below that...
... your graphics driver. Back to 1920x1200. 4. Back to Contents Page Setting Up Your Monitor Dell™ 2405FPW Flat Panel Monitor Important instructions and graphic drivers to set the display resolution to 1920 x 1200 pixels by pressing and holding left-mouse button and adjust the screen resolution to Contents Page Please choose the scenario below that...

User Manual
Page 36
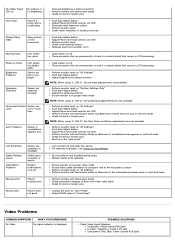
...monitor and computer are properly connected but the monitor screen remains dark, run the monitor self-test by performing the following table contains general information about common monitor problems you to Contents Page Solving Problems Dell™ 2405FPW Flat Panel Monitor Monitor...monitor is working correctly. Self-Test Feature Check' dialog box should appear on the monitor. Also, depending upon the selected input, one of the video cable Electric outlet verification Ensure power button depressed fully Back to check whether your monitor is functioning properly. The floating 'Dell...
...monitor and computer are properly connected but the monitor screen remains dark, run the monitor self-test by performing the following table contains general information about common monitor problems you to Contents Page Solving Problems Dell™ 2405FPW Flat Panel Monitor Monitor...monitor is working correctly. Self-Test Feature Check' dialog box should appear on the monitor. Also, depending upon the selected input, one of the video cable Electric outlet verification Ensure power button depressed fully Back to check whether your monitor is functioning properly. The floating 'Dell...
User Manual
Page 37
... broken pins Boot up in the "safe mode" Turn monitor off These are pixels that are permanently on and is a natural defect that occurs in LCD technology Perform monitor reset on "All Settings" Push Auto Adjust button Adjust Phase and Clock controls via OSD Perform monitor self-test feature check and determine if these lines...
... broken pins Boot up in the "safe mode" Turn monitor off These are pixels that are permanently on and is a natural defect that occurs in LCD technology Perform monitor reset on "All Settings" Push Auto Adjust button Adjust Phase and Clock controls via OSD Perform monitor self-test feature check and determine if these lines...


