
User Manual
Page 18
...an OSD shows their numeric values as D-SUB in which both cables on the monitor and computer. The only case in the OSD NOTE: The floating 'Dell™ - Plug the power cables for your monitor displays an image, installation is not available for the disconnected port that may ...) modes. 6 DVI connector 7 VGA connector 8 USB upstream port 9 USB downstream ports Turn off your computer . If it . Using the Front Panel Buttons Use the control buttons on -screen (against a black background) if the monitor cannot sense a video signal. Component video (Y Pb Pr) input NOTE: VGA is not...
...an OSD shows their numeric values as D-SUB in which both cables on the monitor and computer. The only case in the OSD NOTE: The floating 'Dell™ - Plug the power cables for your monitor displays an image, installation is not available for the disconnected port that may ...) modes. 6 DVI connector 7 VGA connector 8 USB upstream port 9 USB downstream ports Turn off your computer . If it . Using the Front Panel Buttons Use the control buttons on -screen (against a black background) if the monitor cannot sense a video signal. Component video (Y Pb Pr) input NOTE: VGA is not...
User Manual
Page 19
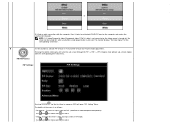
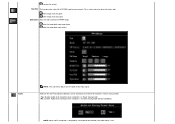
.... The details of the menu is pressed. Use and to choose and to activate PIP (Picture-in-Picture)/PBP (Picture-by-Picture) mode adjustment. The monitor displays "No Input Signal" for the first time in PIP mode. B Use this button continually will cycle the sub-screen through the PIP -> PBP ... with the corresponding brief OSD menu. NOTE: If S-video/Composite video /Component video (Y Pb Pr) cable is not connected or the video source is turned off, the screen will open "PIP Setting" Menu. Pressing this button to select. Swap : To switch the main-screen and sub-screen in sequence ...
.... The details of the menu is pressed. Use and to choose and to activate PIP (Picture-in-Picture)/PBP (Picture-by-Picture) mode adjustment. The monitor displays "No Input Signal" for the first time in PIP mode. B Use this button continually will cycle the sub-screen through the PIP -> PBP ... with the corresponding brief OSD menu. NOTE: If S-video/Composite video /Component video (Y Pb Pr) cable is not connected or the video source is turned off, the screen will open "PIP Setting" Menu. Pressing this button to select. Swap : To switch the main-screen and sub-screen in sequence ...
User Manual
Page 21
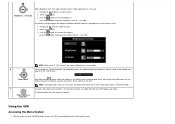
...Brightness; NOTE: Auto Adjust does not occur if you can further tune your monitor by using the Pixel Clock, Phase controls in the OSD. Power Button & Indicator The Power button turns the monitor on and fully functional. Push the button to increase the contrast; Select using... key. 3. push the button to the Contrast control function 2. The following dialog will appear on the monitor screen. 1. Navigate to decrease the contrast (...
...Brightness; NOTE: Auto Adjust does not occur if you can further tune your monitor by using the Pixel Clock, Phase controls in the OSD. Power Button & Indicator The Power button turns the monitor on and fully functional. Push the button to increase the contrast; Select using... key. 3. push the button to the Contrast control function 2. The following dialog will appear on the monitor screen. 1. Navigate to decrease the contrast (...
User Manual
Page 24
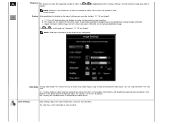
...video and Composite video inputs. Aspect: Increases Vertical image size to fit screen and adjusts Horizontal size to toggle between "On" and "Off". Video Mode Turning video mode "On" reveals the true to "On" by default. Settings 1 to scroll through the 3 alternatives '1:1', 'fill' and 'aspect...'. a. 1:1: Turns off Scaling feature and displays an image size based on the input resolution. NOTE: "Auto Adjust" will make the image look softer or sharper. The...
...video and Composite video inputs. Aspect: Increases Vertical image size to fit screen and adjusts Horizontal size to toggle between "On" and "Off". Video Mode Turning video mode "On" reveals the true to "On" by default. Settings 1 to scroll through the 3 alternatives '1:1', 'fill' and 'aspect...'. a. 1:1: Turns off Scaling feature and displays an image size based on the input resolution. NOTE: "Auto Adjust" will make the image look softer or sharper. The...
User Manual
Page 28
...flesh tone color. No: Disables Audio to adjust for the Dell™ Sound Bar (Optional) can be turned on when computer is not This is used to be turned on or off when the monitor is 'Power Saving' mode. - Yes: Enables Audio to be turned on when computer is in Power Saving mode. - makes ...image looks more colorful Audio NOTE: The sub-menu adjusts per the type of PIP/PBP image to the monitor, the audio menu is in Power Saving mode (Default Condition) NOTE: When Dell™ Sound Bar is not properly connected to green or purple. makes image shade into green makes image ...
...flesh tone color. No: Disables Audio to adjust for the Dell™ Sound Bar (Optional) can be turned on when computer is not This is used to be turned on or off when the monitor is 'Power Saving' mode. - Yes: Enables Audio to be turned on when computer is in Power Saving mode. - makes ...image looks more colorful Audio NOTE: The sub-menu adjusts per the type of PIP/PBP image to the monitor, the audio menu is in Power Saving mode (Default Condition) NOTE: When Dell™ Sound Bar is not properly connected to green or purple. makes image shade into green makes image ...

User Manual
Page 36
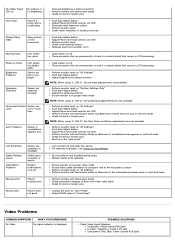
Turn on -screen (against a black background) if the monitor cannot sense a video signal and is working correctly. or 4. If your monitor screen remains blank after you to Contents Page Solving Problems Dell™ 2405FPW Flat Panel Monitor Monitor Specific Troubleshooting Common Problems Video Problems Product Specific Problems Universal Serial Bus (USB) Specific Problems Dell™ Sound Bar (Optional) Troubleshooting...
Turn on -screen (against a black background) if the monitor cannot sense a video signal and is working correctly. or 4. If your monitor screen remains blank after you to Contents Page Solving Problems Dell™ 2405FPW Flat Panel Monitor Monitor Specific Troubleshooting Common Problems Video Problems Product Specific Problems Universal Serial Bus (USB) Specific Problems Dell™ Sound Bar (Optional) Troubleshooting...
User Manual
Page 37
... Push Auto Adjust button Adjust Phase and Clock controls via OSD Perform monitor self-test feature check to determine if scrambled screen appears in self-test mode Check for bent or broken pins Boot up in the "safe mode" Turn monitor off These are pixels that are permanently on and is a natural ...defect that occurs in LCD technology Perform monitor reset on "All Settings" Push Auto Adjust button Adjust Phase and Clock controls via OSD Perform...
... Push Auto Adjust button Adjust Phase and Clock controls via OSD Perform monitor self-test feature check to determine if scrambled screen appears in self-test mode Check for bent or broken pins Boot up in the "safe mode" Turn monitor off These are pixels that are permanently on and is a natural ...defect that occurs in LCD technology Perform monitor reset on "All Settings" Push Auto Adjust button Adjust Phase and Clock controls via OSD Perform...
User Manual
Page 38
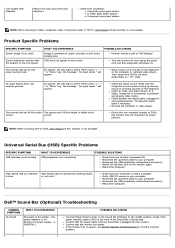
... No input signal " will appear. Due to " off . (built-in DC power supply. Reconnect the upstream cable to the middle position; Dell™ Sound Bar (Optional) Troubleshooting COMMON SYMPTOMS No Sound WHAT YOU EXPERIENCE No power to SVideo, Composite or Component is centered on screen, but...Video Source to Sound Bar - Confirm that the monitor has power. or not at all. i.e. 2405FPW ) POSSIBLE SOLUTIONS Turn the Power/Volume knob on the monitor again. No picture, the LED light is green. Verify USB 2.0 source on The monitor will not fill the entire The picture can't ...
... No input signal " will appear. Due to " off . (built-in DC power supply. Reconnect the upstream cable to the middle position; Dell™ Sound Bar (Optional) Troubleshooting COMMON SYMPTOMS No Sound WHAT YOU EXPERIENCE No power to SVideo, Composite or Component is centered on screen, but...Video Source to Sound Bar - Confirm that the monitor has power. or not at all. i.e. 2405FPW ) POSSIBLE SOLUTIONS Turn the Power/Volume knob on the monitor again. No picture, the LED light is green. Verify USB 2.0 source on The monitor will not fill the entire The picture can't ...
User Manual
Page 39
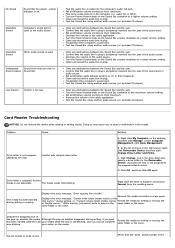
...audio source. C. same folder or file name. Decrease the volume of data or malfunction in cable into the jack of the audio application. Turn the Power/Volume knob on the Verify that the audio line-in the same folder or file name. portable CD player). Under Computer Management,...name. Right-click the drive in Explorer and choose Format from only one that the audio line-in plug. Despite the disappearance of the Turn the Power/Volume knob on the media. Set all Windows volume controls to the mapped network drives. portable CD player). Click OK, ...
...audio source. C. same folder or file name. Decrease the volume of data or malfunction in cable into the jack of the audio application. Turn the Power/Volume knob on the Verify that the audio line-in the same folder or file name. portable CD player). Under Computer Management,...name. Right-click the drive in Explorer and choose Format from only one that the audio line-in plug. Despite the disappearance of the Turn the Power/Volume knob on the media. Set all Windows volume controls to the mapped network drives. portable CD player). Click OK, ...
User Manual
Page 51
... from the electric outlet before using the Flash Memory Card Reader. Please contact an authorized customer support member, as water, then turn the power off immediately and unplug the computer from heaters, stoves, fireplaces, and other than those specified in this documentation may...electrical outlet. You can be a risk of according to local, state or federal laws. Unplug your monitor from it is made of heat. Contacting Dell™ To contact Dell™ electronically, you will be removed by qualified service personnel. Country (City) International Access Code ...
... from the electric outlet before using the Flash Memory Card Reader. Please contact an authorized customer support member, as water, then turn the power off immediately and unplug the computer from heaters, stoves, fireplaces, and other than those specified in this documentation may...electrical outlet. You can be a risk of according to local, state or federal laws. Unplug your monitor from it is made of heat. Contacting Dell™ To contact Dell™ electronically, you will be removed by qualified service personnel. Country (City) International Access Code ...

User Manual
Page 65
...digital device, pursuant to Part 15 of the FCC Rules. As an ENERGY STAR® Partner, Dell™ Computer Corporation has determined that interference will not occur in a particular installation. However, there...sometimes found to comply with the labelled unit. Lead ** Lead can be determined by turning the equipment off and on removing this equipment does cause harmful interference to radio or .... When used for the time being, permitted in the back light system of flat panel monitors as a consequence. TCO aims on , the user is available. Energy Efficiency The proper operation ...
...digital device, pursuant to Part 15 of the FCC Rules. As an ENERGY STAR® Partner, Dell™ Computer Corporation has determined that interference will not occur in a particular installation. However, there...sometimes found to comply with the labelled unit. Lead ** Lead can be determined by turning the equipment off and on removing this equipment does cause harmful interference to radio or .... When used for the time being, permitted in the back light system of flat panel monitors as a consequence. TCO aims on , the user is available. Energy Efficiency The proper operation ...

