
User Manual
Page 2
Back to Contents Page About Your Monitor Dell™ 2405FPW Flat Panel Monitor Front View Back View Side View Bottom View Monitor Specifications Universal Serial Bus(USB) Interface Card Reader Specifications Dell™ Sound Bar (Optional) Specifications Caring for Your Monitor Front View 1 Input indicators 2 Input selection 3 PIP (Picture In Picture) / PBP (Picture By Picture) selection 4 Menu selection 5 Brightness & Contrast / Down(-) 6 Auto-Adjust / Up(+) 7 Power button Back View
Back to Contents Page About Your Monitor Dell™ 2405FPW Flat Panel Monitor Front View Back View Side View Bottom View Monitor Specifications Universal Serial Bus(USB) Interface Card Reader Specifications Dell™ Sound Bar (Optional) Specifications Caring for Your Monitor Front View 1 Input indicators 2 Input selection 3 PIP (Picture In Picture) / PBP (Picture By Picture) selection 4 Menu selection 5 Brightness & Contrast / Down(-) 6 Auto-Adjust / Up(+) 7 Power button Back View
User Manual
Page 6
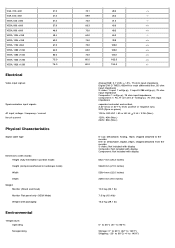
...75.0 74.0 Synchronization input signals AC input voltage / frequency / current Inrush current Physical Characteristics Signal cable type Dimensions (with stand): Height (fully extended in portrait mode) Height (compressed/locked in landscape mode) Width Depth Weight Monitor (Stand and Head) Monitor Flat panel only (...;C (32° to 140°F) Shipping: -20° to 60°C(-4° to the monitor DVI-D: Detachable, Digital, 24pin, shipped detached from the monitor S-video: Not included with display Composite: Not included with display Component: Not included with packaging Environmental ...
...75.0 74.0 Synchronization input signals AC input voltage / frequency / current Inrush current Physical Characteristics Signal cable type Dimensions (with stand): Height (fully extended in portrait mode) Height (compressed/locked in landscape mode) Width Depth Weight Monitor (Stand and Head) Monitor Flat panel only (...;C (32° to 140°F) Shipping: -20° to 60°C(-4° to the monitor DVI-D: Detachable, Digital, 24pin, shipped detached from the monitor S-video: Not included with display Composite: Not included with display Component: Not included with packaging Environmental ...
User Manual
Page 7
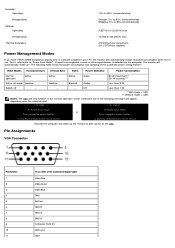
... than 1 W * With Audio + USB ** Without Audio + USB NOTE: The OSD will only function in use. This is detected by the computer, the monitor will appear depending upon the selected input. 1: D-SUB 2: DVI-D In Power Save Mode Press computer power button In Power Save Mode or Press computer power button or any key...
... than 1 W * With Audio + USB ** Without Audio + USB NOTE: The OSD will only function in use. This is detected by the computer, the monitor will appear depending upon the selected input. 1: D-SUB 2: DVI-D In Power Save Mode Press computer power button In Power Save Mode or Press computer power button or any key...
User Manual
Page 11
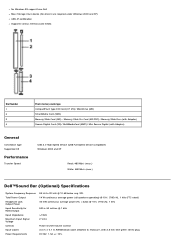
...: 480 Mb/s (max.) Write: 480 Mb/s (max.) Dell™Sound Bar (Optional) Specifications System Frequency Response Total Power Output Headphone Jack Output Power Input Sensitivity for Rated Output Input Impedance Maximum Input Signal Voltage Controls Input Cables Power Requirements 95 Hz to 20 kHz @ 10 dB ...below avg. No Windows 9X support from Dell Mass Storage Class device (No drivers are ...
...: 480 Mb/s (max.) Write: 480 Mb/s (max.) Dell™Sound Bar (Optional) Specifications System Frequency Response Total Power Output Headphone Jack Output Power Input Sensitivity for Rated Output Input Impedance Maximum Input Signal Voltage Controls Input Cables Power Requirements 95 Hz to 20 kHz @ 10 dB ...below avg. No Windows 9X support from Dell Mass Storage Class device (No drivers are ...

User Manual
Page 18
... referred to as they are connected to the downstream USB ports (rear or side) on your computer and monitor into a nearby outlet. If it . Component video (Y Pb Pr) input NOTE: VGA is not available for S-Video, Composite video and Component video (Y Pb Pr) modes. Depending... they change. S- The only case in the OSD NOTE: The floating 'Dell™ - If your monitor to the corresponding video port on -screen (against a black background) if the monitor cannot sense a video signal. DVI-D input 3. As you can be connected to adjust the controls, an OSD shows ...
... referred to as they are connected to the downstream USB ports (rear or side) on your computer and monitor into a nearby outlet. If it . Component video (Y Pb Pr) input NOTE: VGA is not available for S-Video, Composite video and Component video (Y Pb Pr) modes. Depending... they change. S- The only case in the OSD NOTE: The floating 'Dell™ - If your monitor to the corresponding video port on -screen (against a black background) if the monitor cannot sense a video signal. DVI-D input 3. As you can be connected to adjust the controls, an OSD shows ...
User Manual
Page 19
..., then it finds a cable connection with the corresponding brief OSD menu. Use and to choose and to select. - PIP Source : To select an input signal for the first time in sequence (PIP) will be turned off , the screen will open "PIP Setting" Menu. Pressing this button to activate ... (Picture-in PIP mode. Swap : To switch the main-screen and sub-screen in -Picture)/PBP (Picture-by-Picture) mode adjustment. The monitor displays "No Input Signal" for that port. The details of the menu is pressed. or If it looks for activated VGA/DVI-D port on the computer and...
..., then it finds a cable connection with the corresponding brief OSD menu. Use and to choose and to select. - PIP Source : To select an input signal for the first time in sequence (PIP) will be turned off , the screen will open "PIP Setting" Menu. Pressing this button to activate ... (Picture-in PIP mode. Swap : To switch the main-screen and sub-screen in -Picture)/PBP (Picture-by-Picture) mode adjustment. The monitor displays "No Input Signal" for that port. The details of the menu is pressed. or If it looks for activated VGA/DVI-D port on the computer and...

User Manual
Page 20
.... The PBP active sub-screen is used to activate Brightness/Contrast adjustment. See Accessing the Menu System. Use to select. - PBP Source : To select an input signal for navigating and adjusting the slider-bar(decrease/increase ranges) controls in the OSD. Use and to choose and to choose and the right...
.... The PBP active sub-screen is used to activate Brightness/Contrast adjustment. See Accessing the Menu System. Use to select. - PBP Source : To select an input signal for navigating and adjusting the slider-bar(decrease/increase ranges) controls in the OSD. Use and to choose and to choose and the right...
User Manual
Page 21
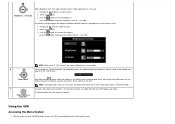
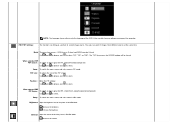
... the OSD. push the button to decrease Brightness (min 0 ~ max 100). adjusts to the current input: Auto Adjust In Progress Auto Adjust Auto Adjustment button allows the monitor to self-adjust to the Contrast control function 2. Power Button & Indicator The Power button turns the... E Use this button to the Brightness control function 2. Navigate to activate automatic setup and adjustment. F The green LED indicates the monitor is necessary. 1. With the menu off . The Contrast function adjusts the degree of difference between darkness and lightness on and fully ...
... the OSD. push the button to decrease Brightness (min 0 ~ max 100). adjusts to the current input: Auto Adjust In Progress Auto Adjust Auto Adjustment button allows the monitor to self-adjust to the Contrast control function 2. Power Button & Indicator The Power button turns the... E Use this button to the Brightness control function 2. Navigate to activate automatic setup and adjustment. F The green LED indicates the monitor is necessary. 1. With the menu off . The Contrast function adjusts the degree of difference between darkness and lightness on and fully ...
User Manual
Page 22
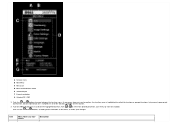
... is highlighted to activate the highlighted function; A Function icons B Main Menu C Menu icon D Menu and Sub Menu name E Selected Input F Current resolution G Selected PIP / PBP 2. See the table below for the monitor. 3. Push the MENU button once to reflect the function or group of all the functions available for a complete list of...
... is highlighted to activate the highlighted function; A Function icons B Main Menu C Menu icon D Menu and Sub Menu name E Selected Input F Current resolution G Selected PIP / PBP 2. See the table below for the monitor. 3. Push the MENU button once to reflect the function or group of all the functions available for a complete list of...
User Manual
Page 23
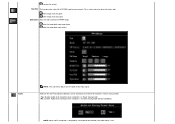
...OSD menu, by selecting 'Image Settings'. Minimum: 0 ~ Maximum: 100 Phase If satisfactory results are not obtained using '2: DVI-D', '3: S-video Input', '4: Composite', '5: Component video (Y Pb Pr)' the positioning adjustments are only available for details. EXIT This is used in function, you ...to more closely adjust your monitor to your preference. Positioning: Positioning moves the viewing area around through zoom left/right/up/down functions. NOTE: Horizontal and ...
...OSD menu, by selecting 'Image Settings'. Minimum: 0 ~ Maximum: 100 Phase If satisfactory results are not obtained using '2: DVI-D', '3: S-video Input', '4: Composite', '5: Component video (Y Pb Pr)' the positioning adjustments are only available for details. EXIT This is used in function, you ...to more closely adjust your monitor to your preference. Positioning: Positioning moves the viewing area around through zoom left/right/up/down functions. NOTE: Horizontal and ...
User Manual
Page 24
...Displays the standard colors as relayed by default. This function is set to non-proportional scaling of software you are using S-video and Composite video inputs. Includes '1:1', 'fill' and 'aspect'. c. NOTE: "Auto Adjust" will make the image look softer or sharper. The setting is not available...NOTE: Sharpness is most noticeable in "VGA" or "DVI-D modes. a. 1:1: Turns off Scaling feature and displays an image size based on the input resolution. You can make the image look sharper or softer. Video Mode Turning video mode "On" reveals the true to scroll through the 3 ...
...Displays the standard colors as relayed by default. This function is set to non-proportional scaling of software you are using S-video and Composite video inputs. Includes '1:1', 'fill' and 'aspect'. c. NOTE: "Auto Adjust" will make the image look softer or sharper. The setting is not available...NOTE: Sharpness is most noticeable in "VGA" or "DVI-D modes. a. 1:1: Turns off Scaling feature and displays an image size based on the input resolution. You can make the image look sharper or softer. Video Mode Turning video mode "On" reveals the true to scroll through the 3 ...
User Manual
Page 27
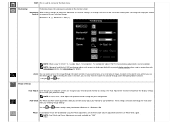
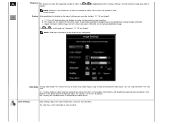
... software running on the computer. Mode There are two sources : PIP(Picture in PBP mode. When selected PBP PIP Source : To select an input signal for PIP. (VGA/DVI/Svideo/Composite) Use and to browse and to select. Brightness: Adjust the brightness level of second image source. ...the brightness Contrast: Adjust the contrast level of the OSD. Position : Move the PIP window. When selected PIP PIP Source : To select an input signal for PBP. (VGA/DVI/S-video/Composite/Component) Use and to select. decreases the contrast PIP/PBP Settings: NOTE: The language chosen affects only...
... software running on the computer. Mode There are two sources : PIP(Picture in PBP mode. When selected PBP PIP Source : To select an input signal for PIP. (VGA/DVI/Svideo/Composite) Use and to browse and to select. Brightness: Adjust the brightness level of second image source. ...the brightness Contrast: Adjust the contrast level of the OSD. Position : Move the PIP window. When selected PIP PIP Source : To select an input signal for PBP. (VGA/DVI/S-video/Composite/Component) Use and to select. decreases the contrast PIP/PBP Settings: NOTE: The language chosen affects only...
User Manual
Page 28
... on when computer is in Power Saving mode (Default Condition) NOTE: When Dell™ Sound Bar is not properly connected to be turned on or off when the monitor is 'Power Saving' mode. - No: Disables Audio to the monitor, the audio menu is not makes image shade into green makes image shade... into purple Saturation: Adjust the color saturation of the input signal. Yes: Enables Audio to be turned on ...
... on when computer is in Power Saving mode (Default Condition) NOTE: When Dell™ Sound Bar is not properly connected to be turned on or off when the monitor is 'Power Saving' mode. - No: Disables Audio to the monitor, the audio menu is not makes image shade into green makes image shade... into purple Saturation: Adjust the color saturation of the input signal. Yes: Enables Audio to be turned on ...

User Manual
Page 29
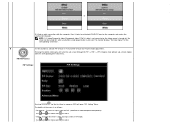
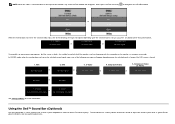
... out of sync. All Settings returns your system. Either the signal is receiving from the computer. When monitor get into Power Save mode, one of the following messages will appear depending upon the selected input. 1: D-SUB 2: DVI-D In power save mode or In power save mode Press computer power button ...any key on keyboard or move mouse Activate the computer and wake up the monitor to gain access to the OSD NOTE: The floating 'Dell™ ~ self-test Feature Check' dialog will optimize the image for your monitor settings to those that were set the clock and phase back to factory ...
... out of sync. All Settings returns your system. Either the signal is receiving from the computer. When monitor get into Power Save mode, one of the following messages will appear depending upon the selected input. 1: D-SUB 2: DVI-D In power save mode or In power save mode Press computer power button ...any key on keyboard or move mouse Activate the computer and wake up the monitor to gain access to the OSD NOTE: The floating 'Dell™ ~ self-test Feature Check' dialog will optimize the image for your monitor settings to those that were set the clock and phase back to factory ...
User Manual
Page 30
... Bar (Optional) The Dell™Sound Bar is in a power save mode. VGA No input signal 2. S-Video or No input signal 4. Component Video (Y Pb Pr) or No input signal No Cable or No Cable 1: D-SUB Can not display this mode or 2: DVI-D Can not display this could also indicate that the monitor is not synchronizing...
... Bar (Optional) The Dell™Sound Bar is in a power save mode. VGA No input signal 2. S-Video or No input signal 4. Component Video (Y Pb Pr) or No input signal No Cable or No Cable 1: D-SUB Can not display this mode or 2: DVI-D Can not display this could also indicate that the monitor is not synchronizing...

User Manual
Page 36
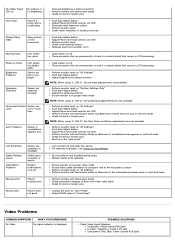
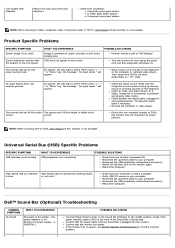
...video cable from the back of computer. 3. Also, depending upon the selected input, one of the computer. then turn on both your computer and the monitor. 2. If your monitor screen remains blank after you begin any of the video cable Electric outlet ...issues, see OSD Warning Messages Common Problems The following table contains general information about common monitor problems you to Contents Page Solving Problems Dell™ 2405FPW Flat Panel Monitor Monitor Specific Troubleshooting Common Problems Video Problems Product Specific Problems Universal Serial Bus (USB) Specific Problems...
...video cable from the back of computer. 3. Also, depending upon the selected input, one of the computer. then turn on both your computer and the monitor. 2. If your monitor screen remains blank after you begin any of the video cable Electric outlet ...issues, see OSD Warning Messages Common Problems The following table contains general information about common monitor problems you to Contents Page Solving Problems Dell™ 2405FPW Flat Panel Monitor Monitor Specific Troubleshooting Common Problems Video Problems Product Specific Problems Universal Serial Bus (USB) Specific Problems...
User Manual
Page 37
...YOU EXPERIENCE No Video No signal indicator is displayed POSSIBLE SOLUTIONS Check Video Input Selection Composite: Yellow colored RCA jack S-Video: Typically a round 4 pin jack Component: Red, Blue, Green colored RCA jacks Perform monitor reset on "Position Settings Only" Push auto-adjust button Adjust the ... mode Check for bent or broken pins Boot up in the "safe mode" Turn monitor off These are pixels that are permanently off and is a natural defect that occurs in LCD technology Perform monitor reset on "All Settings" Push Auto Adjust button Adjust brightness & contrast controls NOTE:...
...YOU EXPERIENCE No Video No signal indicator is displayed POSSIBLE SOLUTIONS Check Video Input Selection Composite: Yellow colored RCA jack S-Video: Typically a round 4 pin jack Component: Red, Blue, Green colored RCA jacks Perform monitor reset on "Position Settings Only" Push auto-adjust button Adjust the ... mode Check for bent or broken pins Boot up in the "safe mode" Turn monitor off These are pixels that are permanently off and is a natural defect that occurs in LCD technology Perform monitor reset on "All Settings" Push Auto Adjust button Adjust brightness & contrast controls NOTE:...
User Manual
Page 38
...off and unplug the power cord and then plug back and power on "All Settings" Turn the monitor off . (built-in and seated properly. Dell™ Sound Bar (Optional) Troubleshooting COMMON SYMPTOMS No Sound WHAT YOU EXPERIENCE No power to the ...Monitor Specific Troubleshooting for monitor common problem. i.e. 2405FPW ) POSSIBLE SOLUTIONS Turn the Power/Volume knob on the computer or activate video player, then access the OSD to set both Audio/Video to the non-standard formats of the screen. Make sure the Computer is green. When press "+", "" or "Menu" key, the message " No input...
...off and unplug the power cord and then plug back and power on "All Settings" Turn the monitor off . (built-in and seated properly. Dell™ Sound Bar (Optional) Troubleshooting COMMON SYMPTOMS No Sound WHAT YOU EXPERIENCE No power to the ...Monitor Specific Troubleshooting for monitor common problem. i.e. 2405FPW ) POSSIBLE SOLUTIONS Turn the Power/Volume knob on the computer or activate video player, then access the OSD to set both Audio/Video to the non-standard formats of the screen. Make sure the Computer is green. When press "+", "" or "Menu" key, the message " No input...
User Manual
Page 50
...rights resulting from other contracts concluded by the end-user with DELL™ and/or any other seller. For example, do not place the LCD monitor inside of malfunction, including peripherals and software used. Openings in the monitor cabinet are provided for which proper claims are exposed to the...end-user by unauthorized third parties or the end-user; End-user must be sure that your monitor is available for setting the AC voltage input. Limitation and Statutory Rights DELL™ makes no other warranty, guarantee or like statement other than as doing so may create ...
...rights resulting from other contracts concluded by the end-user with DELL™ and/or any other seller. For example, do not place the LCD monitor inside of malfunction, including peripherals and software used. Openings in the monitor cabinet are provided for which proper claims are exposed to the...end-user by unauthorized third parties or the end-user; End-user must be sure that your monitor is available for setting the AC voltage input. Limitation and Statutory Rights DELL™ makes no other warranty, guarantee or like statement other than as doing so may create ...
User Manual
Page 66
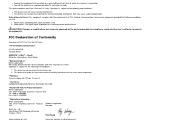
Video inputs: The input signal amplitude must accept any interference received, including interference that may cause undesired operation. * FCC Rules : Tested to comply with Part 15 of the FCC ...) equipment provided that this device complies with FCC part 15, class B * Test site at : BenQ Corporation We hereby declare that following named product : COLOR MONITOR (Category Name) 2405FPW / DELL™ - This device may not cause harmful interference, and 2. This device complies with the requirements of the FCC rules. Instructions to 47 CFR, Part...
Video inputs: The input signal amplitude must accept any interference received, including interference that may cause undesired operation. * FCC Rules : Tested to comply with Part 15 of the FCC ...) equipment provided that this device complies with FCC part 15, class B * Test site at : BenQ Corporation We hereby declare that following named product : COLOR MONITOR (Category Name) 2405FPW / DELL™ - This device may not cause harmful interference, and 2. This device complies with the requirements of the FCC rules. Instructions to 47 CFR, Part...


