
User Manual
Page 2
Back to Contents Page About Your Monitor Dell™ 2405FPW Flat Panel Monitor Front View Back View Side View Bottom View Monitor Specifications Universal Serial Bus(USB) Interface Card Reader Specifications Dell™ Sound Bar (Optional) Specifications Caring for Your Monitor Front View 1 Input indicators 2 Input selection 3 PIP (Picture In Picture) / PBP (Picture By Picture) selection 4 Menu selection 5 Brightness & Contrast / Down(-) 6 Auto-Adjust / Up(+) 7 Power button Back View
Back to Contents Page About Your Monitor Dell™ 2405FPW Flat Panel Monitor Front View Back View Side View Bottom View Monitor Specifications Universal Serial Bus(USB) Interface Card Reader Specifications Dell™ Sound Bar (Optional) Specifications Caring for Your Monitor Front View 1 Input indicators 2 Input selection 3 PIP (Picture In Picture) / PBP (Picture By Picture) selection 4 Menu selection 5 Brightness & Contrast / Down(-) 6 Auto-Adjust / Up(+) 7 Power button Back View

User Manual
Page 20
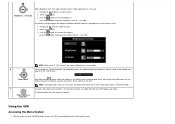
... - PIP size : To adjust the size of PIP Setting. Use and to choose and to select. Position : Move the PIP window. Use and to choose and to select. to select. - See PIP/PBP Settings. E Minus (- ) and Plus (+) D Use this button to display the Brightness/Contrast adjustment menu. With the Menu off..., push the button to activate Brightness/Contrast adjustment.
... - PIP size : To adjust the size of PIP Setting. Use and to choose and to select. Position : Move the PIP window. Use and to choose and to select. to select. - See PIP/PBP Settings. E Minus (- ) and Plus (+) D Use this button to display the Brightness/Contrast adjustment menu. With the Menu off..., push the button to activate Brightness/Contrast adjustment.
User Manual
Page 21
... Adjust Auto Adjustment button allows the monitor to self-adjust to activate automatic setup and adjustment. Navigate to decrease Brightness (min 0 ~ max 100). push the button to the Brightness control function 2. NOTE: Auto Adjust does not occur if you can further tune your monitor by using key. 3. Navigate to increase Brightness; The following dialog will appear on the monitor screen. 1. Brightness / Contrast Adjust Brightness...
... Adjust Auto Adjustment button allows the monitor to self-adjust to activate automatic setup and adjustment. Navigate to decrease Brightness (min 0 ~ max 100). push the button to the Brightness control function 2. NOTE: Auto Adjust does not occur if you can further tune your monitor by using key. 3. Navigate to increase Brightness; The following dialog will appear on the monitor screen. 1. Brightness / Contrast Adjust Brightness...
User Manual
Page 27
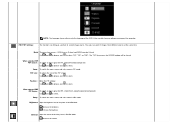
... PBP PIP Source : To select an input signal for PIP. (VGA/DVI/Svideo/Composite) Use and to browse and to select. decreases the brightness increases the brightness Contrast: Adjust the contrast level of the PIP screen. Mode There are two sources : PIP(Picture in PIP/PBP Mode. When selected PIP PIP Source : To... at the same time. Thus you can bring up a picture of the OSD. Use and to browse and to select. Position : Move the PIP window. Brightness: Adjust the brightness level of the picture in Picture) and PBP(Picture by Picture) Use and to browse and to select.
... PBP PIP Source : To select an input signal for PIP. (VGA/DVI/Svideo/Composite) Use and to browse and to select. decreases the brightness increases the brightness Contrast: Adjust the contrast level of the PIP screen. Mode There are two sources : PIP(Picture in PIP/PBP Mode. When selected PIP PIP Source : To... at the same time. Thus you can bring up a picture of the OSD. Use and to browse and to select. Position : Move the PIP window. Brightness: Adjust the brightness level of the picture in Picture) and PBP(Picture by Picture) Use and to browse and to select.

User Manual
Page 29
..., clock frequency, phase, brightness, contrast and OSD hold time. OSD Warning Messages A warning message may appear on the screen indicating that were set the clock and phase back to factory settings, activating "auto adjust" may be saved. Cannot Display this monitor. When monitor get into Power Save mode...move mouse Activate the computer and wake up the monitor to gain access to the OSD NOTE: The floating 'Dell™ ~ self-test Feature Check' dialog will also be required and this submenu without resetting any adjustments you have made. Reset Functions Factory Preset Restoration ...
..., clock frequency, phase, brightness, contrast and OSD hold time. OSD Warning Messages A warning message may appear on the screen indicating that were set the clock and phase back to factory settings, activating "auto adjust" may be saved. Cannot Display this monitor. When monitor get into Power Save mode...move mouse Activate the computer and wake up the monitor to gain access to the OSD NOTE: The floating 'Dell™ ~ self-test Feature Check' dialog will also be required and this submenu without resetting any adjustments you have made. Reset Functions Factory Preset Restoration ...
User Manual
Page 37
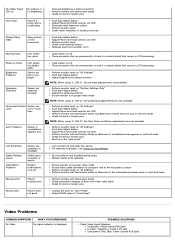
... another room Cycle power on and is not available. Perform monitor reset on "Position Settings Only" Push auto-adjust button Adjust the centering controls Ensure monitor is in LCD technology Perform monitor reset on "All Settings" Push Auto Adjust button Adjust brightness & contrast controls NOTE: When using '2: DVI-D', the contrast adjustment is a natural defect that occurs in proper video mode...
... another room Cycle power on and is not available. Perform monitor reset on "Position Settings Only" Push auto-adjust button Adjust the centering controls Ensure monitor is in LCD technology Perform monitor reset on "All Settings" Push Auto Adjust button Adjust brightness & contrast controls NOTE: When using '2: DVI-D', the contrast adjustment is a natural defect that occurs in proper video mode...


