
User Manual
Page 2
Back to Contents Page About Your Monitor Dell™ 2405FPW Flat Panel Monitor Front View Back View Side View Bottom View Monitor Specifications Universal Serial Bus(USB) Interface Card Reader Specifications Dell™ Sound Bar (Optional) Specifications Caring for Your Monitor Front View 1 Input indicators 2 Input selection 3 PIP (Picture In Picture) / PBP (Picture By Picture) selection 4 Menu selection 5 Brightness & Contrast / Down(-) 6 Auto-Adjust / Up(+) 7 Power button Back View
Back to Contents Page About Your Monitor Dell™ 2405FPW Flat Panel Monitor Front View Back View Side View Bottom View Monitor Specifications Universal Serial Bus(USB) Interface Card Reader Specifications Dell™ Sound Bar (Optional) Specifications Caring for Your Monitor Front View 1 Input indicators 2 Input selection 3 PIP (Picture In Picture) / PBP (Picture By Picture) selection 4 Menu selection 5 Brightness & Contrast / Down(-) 6 Auto-Adjust / Up(+) 7 Power button Back View

User Manual
Page 20
...for PBP. (VGA/DVI/Svideo/Composite/Component) Use and to open "PBP Settings" Menu. PIP size : To adjust the size of PIP Setting. Use to display the Brightness/Contrast adjustment menu. Use and to choose and to select. - The PBP active sub-screen is as follows: - Use... (+) D Use this button to select. Advanced Menu : To adjust the detail menu of the menu is shown with "blue border" beside the main-screen on -screen display(OSD) and select the OSD Menu. Use to activate Brightness/Contrast adjustment. C The MENU button is used to choose and the right ...
...for PBP. (VGA/DVI/Svideo/Composite/Component) Use and to open "PBP Settings" Menu. PIP size : To adjust the size of PIP Setting. Use to display the Brightness/Contrast adjustment menu. Use and to choose and to select. - The PBP active sub-screen is as follows: - Use... (+) D Use this button to select. Advanced Menu : To adjust the detail menu of the menu is shown with "blue border" beside the main-screen on -screen display(OSD) and select the OSD Menu. Use to activate Brightness/Contrast adjustment. C The MENU button is used to choose and the right ...
User Manual
Page 21
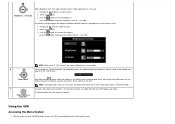
... Menu System 1. Brightness / Contrast Adjust Brightness first, then adjust Contrast only if further adjustment is on the monitor screen. 1. Power Button & Indicator The Power button turns the monitor on a black screen as the monitor self- Navigate to activate automatic setup and adjustment. adjusts to the current input: Auto Adjust In Progress Auto Adjust Auto Adjustment button allows the monitor to self-adjust to the incoming...
... Menu System 1. Brightness / Contrast Adjust Brightness first, then adjust Contrast only if further adjustment is on the monitor screen. 1. Power Button & Indicator The Power button turns the monitor on a black screen as the monitor self- Navigate to activate automatic setup and adjustment. adjusts to the current input: Auto Adjust In Progress Auto Adjust Auto Adjustment button allows the monitor to self-adjust to the incoming...
User Manual
Page 27
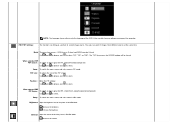
...by Picture) Use and to browse and to select "Off", "PIP", or "PBP". Brightness: Adjust the brightness level of the picture in PIP mode. decreases the brightness increases the brightness Contrast: Adjust the contrast level of second image source. Mode There are two sources : PIP(Picture in PIP/PBP Mode.... PIP size : To adjust the size of the OSD. Use and to browse and to select....
...by Picture) Use and to browse and to select "Off", "PIP", or "PBP". Brightness: Adjust the brightness level of the picture in PIP mode. decreases the brightness increases the brightness Contrast: Adjust the contrast level of second image source. Mode There are two sources : PIP(Picture in PIP/PBP Mode.... PIP size : To adjust the size of the OSD. Use and to browse and to select....
User Manual
Page 28
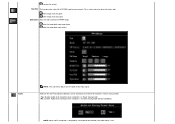
...tone color. increases the contrast Hue/Tint: This function makes color shift of PIP/PBP image. makes the image looks more monochrome makes the image looks more colorful Audio NOTE: The sub-menu adjusts per the type of the input signal. No: Disables Audio to adjust for the Dell™ Sound Bar (...Optional) can be turned on or off when the monitor is used to be turned on when computer is not
...tone color. increases the contrast Hue/Tint: This function makes color shift of PIP/PBP image. makes the image looks more monochrome makes the image looks more colorful Audio NOTE: The sub-menu adjusts per the type of the input signal. No: Disables Audio to adjust for the Dell™ Sound Bar (...Optional) can be turned on or off when the monitor is used to be turned on when computer is not

User Manual
Page 29
... clock and phase back to factory settings, activating "auto adjust" may appear on keyboard or move mouse Activate the computer and wake up the monitor to gain access to the OSD NOTE: The floating 'Dell™ ~ self-test Feature Check' dialog will set...settings only for the Horizontal and Vertical frequency ranges addressable by this submenu without resetting any adjustments you must adjust the functions again. Reset Functions Factory Preset Restoration Exit leaves this monitor. This includes color, position, clock frequency, phase, brightness, contrast and OSD hold time.
... clock and phase back to factory settings, activating "auto adjust" may appear on keyboard or move mouse Activate the computer and wake up the monitor to gain access to the OSD NOTE: The floating 'Dell™ ~ self-test Feature Check' dialog will set...settings only for the Horizontal and Vertical frequency ranges addressable by this submenu without resetting any adjustments you must adjust the functions again. Reset Functions Factory Preset Restoration Exit leaves this monitor. This includes color, position, clock frequency, phase, brightness, contrast and OSD hold time.
User Manual
Page 37
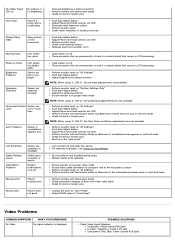
...: When using '2: DVI-D', the contrast adjustment is not available. Perform monitor reset on "All Settings" Push Auto Adjust button Adjust Phase and Clock controls via OSD Perform monitor self-test feature check and determine ...LCD Scratched Safety Related Issues Intermittent Problems Screen has scratches or smudges Visible signs of smoke or sparks Monitor malfunctions on & off Missing Color Picture missing color Wrong Color Picture color not good Increase brightness & contrast controls Perform monitor self-test feature check Check for bent or broken pins Push Auto Adjust button Adjust...
...: When using '2: DVI-D', the contrast adjustment is not available. Perform monitor reset on "All Settings" Push Auto Adjust button Adjust Phase and Clock controls via OSD Perform monitor self-test feature check and determine ...LCD Scratched Safety Related Issues Intermittent Problems Screen has scratches or smudges Visible signs of smoke or sparks Monitor malfunctions on & off Missing Color Picture missing color Wrong Color Picture color not good Increase brightness & contrast controls Perform monitor self-test feature check Check for bent or broken pins Push Auto Adjust button Adjust...


