User Manual
Page 1
.... Microdrive is a trademark of International Business Machines Corporation. Dell™ 2405FPW Flat Panel Monitor About Your Monitor Front View Back View Side View Bottom View Monitor Specifications Universal Serial Bus(USB) Interface Card Reader Specifications Dell™ Sound Bar (Optional) Specifications Caring for Your Monitor Using Your Adjustable Monitor Stand Attaching the Stand Organizing Your Cables Using the...
.... Microdrive is a trademark of International Business Machines Corporation. Dell™ 2405FPW Flat Panel Monitor About Your Monitor Front View Back View Side View Bottom View Monitor Specifications Universal Serial Bus(USB) Interface Card Reader Specifications Dell™ Sound Bar (Optional) Specifications Caring for Your Monitor Using Your Adjustable Monitor Stand Attaching the Stand Organizing Your Cables Using the...

User Manual
Page 2
Back to Contents Page About Your Monitor Dell™ 2405FPW Flat Panel Monitor Front View Back View Side View Bottom View Monitor Specifications Universal Serial Bus(USB) Interface Card Reader Specifications Dell™ Sound Bar (Optional) Specifications Caring for Your Monitor Front View 1 Input indicators 2 Input selection 3 PIP (Picture In Picture) / PBP (Picture By Picture) selection 4 Menu selection 5 Brightness & Contrast / Down(-) 6 Auto-Adjust / Up(+) 7 Power button Back View
Back to Contents Page About Your Monitor Dell™ 2405FPW Flat Panel Monitor Front View Back View Side View Bottom View Monitor Specifications Universal Serial Bus(USB) Interface Card Reader Specifications Dell™ Sound Bar (Optional) Specifications Caring for Your Monitor Front View 1 Input indicators 2 Input selection 3 PIP (Picture In Picture) / PBP (Picture By Picture) selection 4 Menu selection 5 Brightness & Contrast / Down(-) 6 Auto-Adjust / Up(+) 7 Power button Back View
User Manual
Page 5
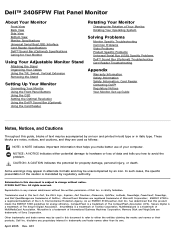
Monitor Specifications General Model number 2405FPW Flat Panel Screen type Screen dimensions Preset display area: Horizontal Vertical Pixel pitch Viewing angle Luminance output Contrast ratio Faceplate coating Backlight Response Time Active matrix - Preset Display Modes Display Mode Horizontal Frequency (kHz) Vertical Frequency (Hz) Pixel Clock (MHz) Sync Polarity (Horizontal/Vertical) TFT LCD 24 inches (24... at 60 Hz(VESA CVT-R Mode) Digital : 1920 x 1200 at 60 Hz(VESA CVT-R Mode) Dell™ guarantees image size and centering for all preset modes listed in the following table.
Monitor Specifications General Model number 2405FPW Flat Panel Screen type Screen dimensions Preset display area: Horizontal Vertical Pixel pitch Viewing angle Luminance output Contrast ratio Faceplate coating Backlight Response Time Active matrix - Preset Display Modes Display Mode Horizontal Frequency (kHz) Vertical Frequency (Hz) Pixel Clock (MHz) Sync Polarity (Horizontal/Vertical) TFT LCD 24 inches (24... at 60 Hz(VESA CVT-R Mode) Digital : 1920 x 1200 at 60 Hz(VESA CVT-R Mode) Dell™ guarantees image size and centering for all preset modes listed in the following table.
User Manual
Page 6
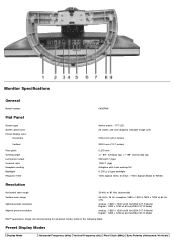
... Signal cable type Dimensions (with stand): Height (fully extended in portrait mode) Height (compressed/locked in landscape mode) Width Depth Weight Monitor (Stand and Head) Monitor Flat panel only (VESA Mode) Weight with display 642.7 mm (25.3 inches) 546.8 mm (21.5 inches) 559.4 mm (...to 60°C (32° to 140°F) Shipping: -20° to 60°C(-4° to the monitor DVI-D: Detachable, Digital, 24pin, shipped detached from the monitor S-video: Not included with display Composite: Not included with display Component: Not included with packaging Environmental Temperature: Operating...
... Signal cable type Dimensions (with stand): Height (fully extended in portrait mode) Height (compressed/locked in landscape mode) Width Depth Weight Monitor (Stand and Head) Monitor Flat panel only (VESA Mode) Weight with display 642.7 mm (25.3 inches) 546.8 mm (21.5 inches) 559.4 mm (...to 60°C (32° to 140°F) Shipping: -20° to 60°C(-4° to the monitor DVI-D: Detachable, Digital, 24pin, shipped detached from the monitor S-video: Not included with display Composite: Not included with display Component: Not included with packaging Environmental Temperature: Operating...
User Manual
Page 7
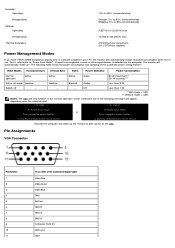
... Consumption Normal operation Active Active Active Green 80 W (maximum)* 59 W (normal)** Active-off - - - The following messages will automatically "wake up the monitor to gain access to 90%(noncondensing) 3,657.6 m (12,000 ft) max 12,192 m (40,000 ft) max 272.8 BTU/hour (maximum) 201....2 BTU/hour (typical) Power Management Modes If you have VESA's DPMS compliance display card or software installed in your PC, the monitor can automatically reduce its power consumption when not in the 'normal operation' mode. Off Less than 2 W Switch off mode Inactive Inactive ...
... Consumption Normal operation Active Active Active Green 80 W (maximum)* 59 W (normal)** Active-off - - - The following messages will automatically "wake up the monitor to gain access to 90%(noncondensing) 3,657.6 m (12,000 ft) max 12,192 m (40,000 ft) max 272.8 BTU/hour (maximum) 201....2 BTU/hour (typical) Power Management Modes If you have VESA's DPMS compliance display card or software installed in your PC, the monitor can automatically reduce its power consumption when not in the 'normal operation' mode. Off Less than 2 W Switch off mode Inactive Inactive ...
User Manual
Page 9
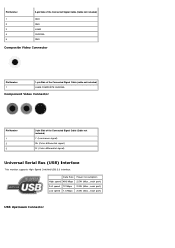
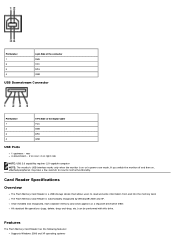
... Side of the Connected Signal Cable (Cable not included) Y (Luminance signal) Pb (Color differential signal) Pr (Color differential signal) Universal Serial Bus (USB) Interface This monitor supports High-Speed Certified USB 2.0 interface.
... Side of the Connected Signal Cable (Cable not included) Y (Luminance signal) Pb (Color differential signal) Pr (Color differential signal) Universal Serial Bus (USB) Interface This monitor supports High-Speed Certified USB 2.0 interface.
User Manual
Page 10
... Flash Memory Card Reader is on or in power save mode, If you switch the monitor off and then on right side NOTE: USB 2.0 capability requires 2.0-capable computer NOTE: The monitor's USB interface works only when the monitor is automatically recognized by Windows® 2000 and XP. Card Reader Specifications Overview The Flash...
... Flash Memory Card Reader is on or in power save mode, If you switch the monitor off and then on right side NOTE: USB 2.0 capability requires 2.0-capable computer NOTE: The monitor's USB interface works only when the monitor is automatically recognized by Windows® 2000 and XP. Card Reader Specifications Overview The Flash...
User Manual
Page 12
..., abrasive cleaners, or compressed air. Use a lightly-dampened, warm cloth to Contents Page If you notice a white powder when you unpack your monitor, wipe it off with care as some detergents leave a milky film on the plastics. This white powder occurs during the shipping of any Plug ... to 40°C Humidity, Non-condensing 95% RH @ 40 °C Plug and Play Capability You can install the monitor in most cases monitor installation is automatic. To clean your monitor with a cloth. Power Cord Length 305 mm ± 15 mm AWG22 black cable attached to enclosure, with water. Avoid...
..., abrasive cleaners, or compressed air. Use a lightly-dampened, warm cloth to Contents Page If you notice a white powder when you unpack your monitor, wipe it off with care as some detergents leave a milky film on the plastics. This white powder occurs during the shipping of any Plug ... to 40°C Humidity, Non-condensing 95% RH @ 40 °C Plug and Play Capability You can install the monitor in most cases monitor installation is automatic. To clean your monitor with a cloth. Power Cord Length 305 mm ± 15 mm AWG22 black cable attached to enclosure, with water. Avoid...

User Manual
Page 13
Organizing Your Cables Back to stand. Lower the monitor so that the monitor mounting area snaps on/locks to Contents Page Using Your Adjustable Monitor Stand Dell™ 2405FPW Flat Panel Monitor Attaching the Stand Organizing Your Cables Using the Tilt, Swivel, Vertical Extension Removing the Stand Attaching the Stand 1. Fit the groove on a flat surface. 2. Place the stand on the back of the monitor onto the three teeth of upper stand. 3.
Organizing Your Cables Back to stand. Lower the monitor so that the monitor mounting area snaps on/locks to Contents Page Using Your Adjustable Monitor Stand Dell™ 2405FPW Flat Panel Monitor Attaching the Stand Organizing Your Cables Using the Tilt, Swivel, Vertical Extension Removing the Stand Attaching the Stand 1. Fit the groove on a flat surface. 2. Place the stand on the back of the monitor onto the three teeth of upper stand. 3.
User Manual
Page 14
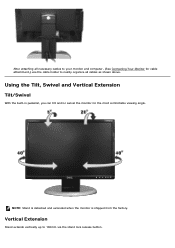
Vertical Extension Stand extends vertically up to neatly organize all necessary cables to your monitor and computer, (See Connecting Your Monitor for the most comfortable viewing angle. Using the Tilt, Swivel and Vertical Extension Tilt/Swivel With the built-in pedestal, you can tilt and/or swivel the monitor for cable attachment,) use the cable holder to 100mm via the stand lock release button. After attaching all cables as shown above. NOTE: Stand is detached and extended when the monitor is shipped from the factory.
Vertical Extension Stand extends vertically up to neatly organize all necessary cables to your monitor and computer, (See Connecting Your Monitor for the most comfortable viewing angle. Using the Tilt, Swivel and Vertical Extension Tilt/Swivel With the built-in pedestal, you can tilt and/or swivel the monitor for cable attachment,) use the cable holder to 100mm via the stand lock release button. After attaching all cables as shown above. NOTE: Stand is detached and extended when the monitor is shipped from the factory.
User Manual
Page 15
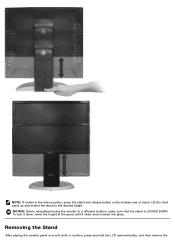
NOTE: If locked in the down , lower the height of stand. To lock it clicks and is LOCKED DOWN. NOTICE: Before relocating/moving the monitor to the desired height. Removing the Stand After placing the monitor panel on the bottom rear of the panel until it down position, press the stand lock release button on a soft cloth or cushion, press and hold the LCD removal button, and then remove the Lift the front panel up and extend the stand to a different location, make sure that the stand is locked into place.
NOTE: If locked in the down , lower the height of stand. To lock it clicks and is LOCKED DOWN. NOTICE: Before relocating/moving the monitor to the desired height. Removing the Stand After placing the monitor panel on the bottom rear of the panel until it down position, press the stand lock release button on a soft cloth or cushion, press and hold the LCD removal button, and then remove the Lift the front panel up and extend the stand to a different location, make sure that the stand is locked into place.
User Manual
Page 16
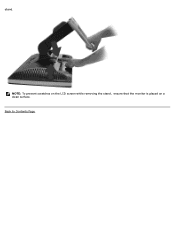
NOTE: To prevent scratches on the LCD screen while removing the stand, ensure that the monitor is placed on a clean surface. stand. Back to Contents Page
NOTE: To prevent scratches on the LCD screen while removing the stand, ensure that the monitor is placed on a clean surface. stand. Back to Contents Page

User Manual
Page 17
Back to Contents Page Setting Up Your Monitor Dell™ 2405FPW Flat Panel Monitor Connecting Your Monitor Using the Front Panel Buttons Using the OSD Using the Dell™ Sound Bar (Optional) Using the Card Reader Connecting Your Monitor CAUTION: Before you begin any of the procedures in this section, follow the Safety Information. 1 Power cord connector 2 DC power connector for Dell™ Sound Bar 3 S-Video connector (cable not included) 4 Composite video connector (cable not included) 5 Component video (Y Pb Pr) connectors (cable not included)
Back to Contents Page Setting Up Your Monitor Dell™ 2405FPW Flat Panel Monitor Connecting Your Monitor Using the Front Panel Buttons Using the OSD Using the Dell™ Sound Bar (Optional) Using the Card Reader Connecting Your Monitor CAUTION: Before you begin any of the procedures in this section, follow the Safety Information. 1 Power cord connector 2 DC power connector for Dell™ Sound Bar 3 S-Video connector (cable not included) 4 Composite video connector (cable not included) 5 Component video (Y Pb Pr) connectors (cable not included)

User Manual
Page 18
...complete. Connect either the white (digital DVI-D) or the blue (analog D-sub) display connector cable to adjust the characteristics of your monitor to two different computers with appropriate video systems. (Graphics are connected to the power port on the back of the dialogs shown ...The only case in the OSD NOTE: The floating 'Dell™ - 6 DVI connector 7 VGA connector 8 USB upstream port 9 USB downstream ports Turn off your computer and monitor into a nearby outlet. Turn on -screen (against a black background) if the monitor cannot sense a video signal. Connect USB peripherals to ...
...complete. Connect either the white (digital DVI-D) or the blue (analog D-sub) display connector cable to adjust the characteristics of your monitor to two different computers with appropriate video systems. (Graphics are connected to the power port on the back of the dialogs shown ...The only case in the OSD NOTE: The floating 'Dell™ - 6 DVI connector 7 VGA connector 8 USB upstream port 9 USB downstream ports Turn off your computer and monitor into a nearby outlet. Turn on -screen (against a black background) if the monitor cannot sense a video signal. Connect USB peripherals to ...
User Manual
Page 19
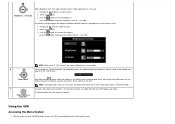
... is not connected or the video source is turned off, the screen will open "PIP Setting" Menu. The details of the menu is pressed. The monitor displays "No Input Signal" for the first time in sequence (PIP) will be turned off, when any button except power button is as follows: - Pressing...
... is not connected or the video source is turned off, the screen will open "PIP Setting" Menu. The details of the menu is pressed. The monitor displays "No Input Signal" for the first time in sequence (PIP) will be turned off, when any button except power button is as follows: - Pressing...
User Manual
Page 21
... Brightness (min 0 ~ max 100). An amber LED indicates DPMS power save mode. Power Button & Indicator The Power button turns the monitor on the monitor screen. 1. Push the button to the incoming video signal. adjusts to the current input: Auto Adjust In Progress Auto Adjust Auto Adjustment... With the menu off . Navigate to the Brightness control function 2. NOTE: Auto Adjust does not occur if you can further tune your monitor by using key. 3. Select using the Pixel Clock, Phase controls in the OSD. The Contrast function adjusts the degree of difference between ...
... Brightness (min 0 ~ max 100). An amber LED indicates DPMS power save mode. Power Button & Indicator The Power button turns the monitor on the monitor screen. 1. Push the button to the incoming video signal. adjusts to the current input: Auto Adjust In Progress Auto Adjust Auto Adjustment... With the menu off . Navigate to the Brightness control function 2. NOTE: Auto Adjust does not occur if you can further tune your monitor by using key. 3. Select using the Pixel Clock, Phase controls in the OSD. The Contrast function adjusts the degree of difference between ...
User Manual
Page 22
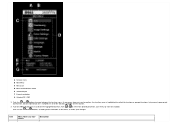
See the table below for the monitor. 3. Push the MENU button once to move from one icon to another, the function name is highlighted to make your changes. Push the and buttons ...
See the table below for the monitor. 3. Push the MENU button once to move from one icon to another, the function name is highlighted to make your changes. Push the and buttons ...
User Manual
Page 23
...lens around on a small area of image, to zoom in conjunction with your new flat panel monitor on startup, the 'Auto Adjustment' function will let you to more closely adjust your monitor to your selection/change. Using the and keys. Horizontal When making changes to either the '...Phase (fine), again. NOTE: Horizontal and Vertical OSD positioning adjusts with respect to your preference. Use the and buttons to focus on the monitor screen. After activating the zoom in function, you want to adjust away interference. NOTE: In most cases, 'Auto Adjust' will simply be...
...lens around on a small area of image, to zoom in conjunction with your new flat panel monitor on startup, the 'Auto Adjustment' function will let you to more closely adjust your monitor to your selection/change. Using the and keys. Horizontal When making changes to either the '...Phase (fine), again. NOTE: Horizontal and Vertical OSD positioning adjusts with respect to your preference. Use the and buttons to focus on the monitor screen. After activating the zoom in function, you want to adjust away interference. NOTE: In most cases, 'Auto Adjust' will simply be...
User Manual
Page 28
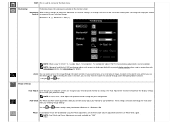
... colorful Audio NOTE: The sub-menu adjusts per the type of PIP/PBP image. Yes: Enables Audio to the monitor, the audio menu is in Power Saving mode (Default Condition) NOTE: When Dell™ Sound Bar is not properly connected to be turned on when computer is not No: Disables Audio to... the color saturation of the input signal. increases the contrast Hue/Tint: This function makes color shift of PIP/PBP image to adjust for the Dell™ Sound Bar (Optional) can be turned on or off when the monitor is used to green or purple.
... colorful Audio NOTE: The sub-menu adjusts per the type of PIP/PBP image. Yes: Enables Audio to the monitor, the audio menu is in Power Saving mode (Default Condition) NOTE: When Dell™ Sound Bar is not properly connected to be turned on when computer is not No: Disables Audio to... the color saturation of the input signal. increases the contrast Hue/Tint: This function makes color shift of PIP/PBP image to adjust for the Dell™ Sound Bar (Optional) can be turned on or off when the monitor is used to green or purple.

User Manual
Page 29
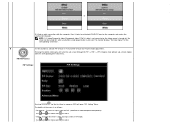
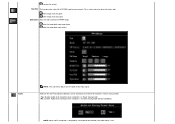
.... NOTE: There is out of Normal Preset. OSD Warning Messages A warning message may be saved. Recommended mode is receiving from the computer. When monitor get into Power Save mode, one of the dialogs shown below appear. Color Settings resets the Red, Green and Blue Color Control settings to their...any key on keyboard or move mouse Activate the computer and wake up the monitor to gain access to the OSD NOTE: The floating 'Dell™ ~ self-test Feature Check' dialog will appear on-screen if the monitor cannot sense a video signal Depending upon the selected input, one of the ...
.... NOTE: There is out of Normal Preset. OSD Warning Messages A warning message may be saved. Recommended mode is receiving from the computer. When monitor get into Power Save mode, one of the dialogs shown below appear. Color Settings resets the Red, Green and Blue Color Control settings to their...any key on keyboard or move mouse Activate the computer and wake up the monitor to gain access to the OSD NOTE: The floating 'Dell™ ~ self-test Feature Check' dialog will appear on-screen if the monitor cannot sense a video signal Depending upon the selected input, one of the ...


