User Manual
Page 4
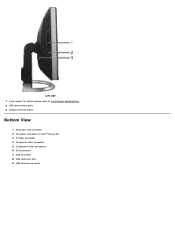
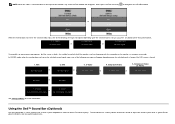
Left side 1 Card reader: for details please refer to Card Reader Specifications 2 USB downstream ports 3 Display removal button Bottom View 1 AC power cord connector 2 DC power connector for Dell™ Sound Bar 3 S-Video connector 4 Composite video connector 5 Component video connectors 6 DVI connector 7 VGA connector 8 USB upstream port 9 USB downstream ports
Left side 1 Card reader: for details please refer to Card Reader Specifications 2 USB downstream ports 3 Display removal button Bottom View 1 AC power cord connector 2 DC power connector for Dell™ Sound Bar 3 S-Video connector 4 Composite video connector 5 Component video connectors 6 DVI connector 7 VGA connector 8 USB upstream port 9 USB downstream ports
User Manual
Page 5
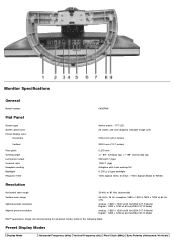
TFT LCD 24 inches (24-inch diagonal viewable image size) 518.4 mm (20.4 inches) 324.0 mm (12.7 inches) 0.270 mm +/- 89° (vertical) typ, +/- 89° (horizontal) typ 500 cd/m &#...(VESA CVT-R Mode) Digital : 1920 x 1200 at 60 Hz(VESA CVT-R Mode) Dell™ guarantees image size and centering for all preset modes listed in the following table. Monitor Specifications General Model number 2405FPW Flat Panel Screen type Screen dimensions Preset display area: Horizontal Vertical Pixel pitch Viewing angle Luminance output Contrast ratio Faceplate...
TFT LCD 24 inches (24-inch diagonal viewable image size) 518.4 mm (20.4 inches) 324.0 mm (12.7 inches) 0.270 mm +/- 89° (vertical) typ, +/- 89° (horizontal) typ 500 cd/m &#...(VESA CVT-R Mode) Digital : 1920 x 1200 at 60 Hz(VESA CVT-R Mode) Dell™ guarantees image size and centering for all preset modes listed in the following table. Monitor Specifications General Model number 2405FPW Flat Panel Screen type Screen dimensions Preset display area: Horizontal Vertical Pixel pitch Viewing angle Luminance output Contrast ratio Faceplate...
User Manual
Page 6
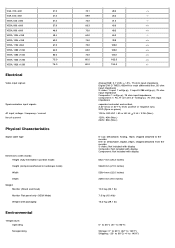
...with stand): Height (fully extended in portrait mode) Height (compressed/locked in landscape mode) Width Depth Weight Monitor (Stand and Head) Monitor Flat panel only (VESA Mode) Weight with display 642.7 mm (25.3 inches) 546.8 mm (21.5 inches) 559.4 mm (22.0 inches) 229.0...; to 140°F) Shipping: -20° to 60°C(-4° to the monitor DVI-D: Detachable, Digital, 24pin, shipped detached from the monitor S-video: Not included with display Composite: Not included with display Component: Not included with packaging Environmental Temperature: Operating Nonoperating 70.1 28.3 -/+ 59...
...with stand): Height (fully extended in portrait mode) Height (compressed/locked in landscape mode) Width Depth Weight Monitor (Stand and Head) Monitor Flat panel only (VESA Mode) Weight with display 642.7 mm (25.3 inches) 546.8 mm (21.5 inches) 559.4 mm (22.0 inches) 229.0...; to 140°F) Shipping: -20° to 60°C(-4° to the monitor DVI-D: Detachable, Digital, 24pin, shipped detached from the monitor S-video: Not included with display Composite: Not included with display Component: Not included with packaging Environmental Temperature: Operating Nonoperating 70.1 28.3 -/+ 59...
User Manual
Page 7
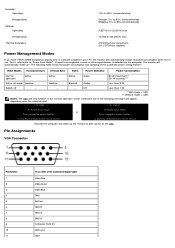
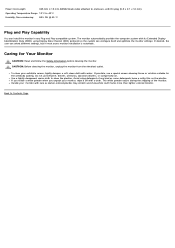
This is detected by the computer, the monitor will appear depending upon the selected input. 1: D-SUB 2: DVI-D In Power ...) max 272.8 BTU/hour (maximum) 201.2 BTU/hour (typical) Power Management Modes If you have VESA's DPMS compliance display card or software installed in your PC, the monitor can automatically reduce its power consumption when not in the 'normal operation' mode. Pin Assignments VGA Connector Pin Number 1 ...or other input devices is referred to the OSD. The following messages will automatically "wake up the monitor to gain access to as 'Power Save Mode'*.
This is detected by the computer, the monitor will appear depending upon the selected input. 1: D-SUB 2: DVI-D In Power ...) max 272.8 BTU/hour (maximum) 201.2 BTU/hour (typical) Power Management Modes If you have VESA's DPMS compliance display card or software installed in your PC, the monitor can automatically reduce its power consumption when not in the 'normal operation' mode. Pin Assignments VGA Connector Pin Number 1 ...or other input devices is referred to the OSD. The following messages will automatically "wake up the monitor to gain access to as 'Power Save Mode'*.
User Manual
Page 12
... with a cloth. If desired, the user can install the monitor in most cases monitor installation is automatic. Back to Contents Page To clean your monitor, wipe it off with water. Handle your monitor with its Extended Display Identification Data (EDID) using detergent of the monitor. The monitor automatically provides the computer system with care as some detergents...
... with a cloth. If desired, the user can install the monitor in most cases monitor installation is automatic. Back to Contents Page To clean your monitor, wipe it off with water. Handle your monitor with its Extended Display Identification Data (EDID) using detergent of the monitor. The monitor automatically provides the computer system with care as some detergents...

User Manual
Page 18
...the OSD NOTE: The floating 'Dell™ - System appearance may be used . Connect USB peripherals to the downstream USB ports (rear or side) on the monitor. (See rear or bottom view for details.) Connect the DC power cable for your computer and monitor into a nearby outlet. DVI..., Composite video and Component video (Y Pb Pr) modes. Turn on -screen (against a black background) if the monitor cannot sense a video signal. If your monitor displays an image, installation is referred to adjust the characteristics of your computer and disconnect the power cable. Using the Front Panel...
...the OSD NOTE: The floating 'Dell™ - System appearance may be used . Connect USB peripherals to the downstream USB ports (rear or side) on the monitor. (See rear or bottom view for details.) Connect the DC power cable for your computer and monitor into a nearby outlet. DVI..., Composite video and Component video (Y Pb Pr) modes. Turn on -screen (against a black background) if the monitor cannot sense a video signal. If your monitor displays an image, installation is referred to adjust the characteristics of your computer and disconnect the power cable. Using the Front Panel...
User Manual
Page 19
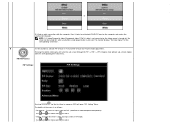
.../Composite video /Component video (Y Pb Pr) cable is not connected or the video source is turned off, the screen will open "PIP Setting" Menu. The monitor displays "No Input Signal" for the first time in sequence (PIP) will be turned off, when any button except power button is as follows: -
.../Composite video /Component video (Y Pb Pr) cable is not connected or the video source is turned off, the screen will open "PIP Setting" Menu. The monitor displays "No Input Signal" for the first time in sequence (PIP) will be turned off, when any button except power button is as follows: -

User Manual
Page 20
...and to choose and to select. Use to select. - to select. Use to select. E Minus (- ) and Plus (+) D Use this button to display the Brightness/Contrast adjustment menu. With the Menu off, push the button to activate Brightness/Contrast adjustment. Use and to choose and to select. - The... PBP active sub-screen is shown with "blue border" beside the main-screen on -screen display(OSD) and select the OSD Menu. OSD menu & select D, Use these buttons for PBP. (VGA/DVI/Svideo/Composite/Component) Use and to...
...and to choose and to select. Use to select. - to select. Use to select. E Minus (- ) and Plus (+) D Use this button to display the Brightness/Contrast adjustment menu. With the Menu off, push the button to activate Brightness/Contrast adjustment. Use and to choose and to select. - The... PBP active sub-screen is shown with "blue border" beside the main-screen on -screen display(OSD) and select the OSD Menu. OSD menu & select D, Use these buttons for PBP. (VGA/DVI/Svideo/Composite/Component) Use and to...
User Manual
Page 21
...or attached cables. Power Button & Indicator The Power button turns the monitor on the monitor screen. 1. With the menu off . NOTE: When using key. 3. push the button to open the OSD system and display the main features menu. Push the button to increase Brightness; Select ...using '2: DVI-D Input', the contrast adjustment is not available. Push the button to increase the contrast; F The green LED indicates the monitor is necessary. 1. Brightness / Contrast...
...or attached cables. Power Button & Indicator The Power button turns the monitor on the monitor screen. 1. With the menu off . NOTE: When using key. 3. push the button to open the OSD system and display the main features menu. Push the button to increase Brightness; Select ...using '2: DVI-D Input', the contrast adjustment is not available. Push the button to increase the contrast; F The green LED indicates the monitor is necessary. 1. Brightness / Contrast...
User Manual
Page 23
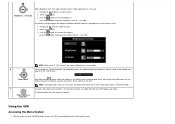
...not obtained using the Phase adjustment, use the Pixel Clock (course) adjustment and then use with your new flat panel monitor on startup, the 'Auto Adjustment' function will simply be shifted Vertical in response to your preference. If you to more closely adjust your... monitor to exit out of image, to adjust away interference. Minimum is '100' (+). NOTE: Horizontal and Vertical OSD positioning adjusts with respect to landscape (default) or portrait display rotation when used to your selection/change.
...not obtained using the Phase adjustment, use the Pixel Clock (course) adjustment and then use with your new flat panel monitor on startup, the 'Auto Adjustment' function will simply be shifted Vertical in response to your preference. If you to more closely adjust your... monitor to exit out of image, to adjust away interference. Minimum is '100' (+). NOTE: Horizontal and Vertical OSD positioning adjusts with respect to landscape (default) or portrait display rotation when used to your selection/change.
User Manual
Page 24
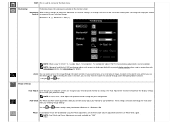
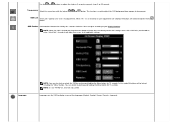
... produce the best image for "S-video" and "Composite" modes. NOTE: Sharpness is most noticeable in areas of white. Scaling Scaling optimizes the display for the type of height and width. Fill: Image size up-scaled to fill the entire screen, image maybe distorted or elongated due to...image look sharper or softer. Color Settings: Color Settings adjusts the color temperature, color hue and saturation. a. 1:1: Turns off Scaling feature and displays an image size based on the input resolution. NOTE: "Auto Adjust" will make the image look softer or sharper. The setting is not available...
... produce the best image for "S-video" and "Composite" modes. NOTE: Sharpness is most noticeable in areas of white. Scaling Scaling optimizes the display for the type of height and width. Fill: Image size up-scaled to fill the entire screen, image maybe distorted or elongated due to...image look sharper or softer. Color Settings: Color Settings adjusts the color temperature, color hue and saturation. a. 1:1: Turns off Scaling feature and displays an image size based on the input resolution. NOTE: "Auto Adjust" will make the image look softer or sharper. The setting is not available...
User Manual
Page 25
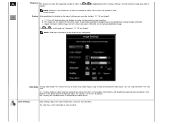
... of the three colors (R, G, B) independently, in single digit increments, from '0' to obtain a redder tint. This color setting is typically used for as long as it displays in use. Horizontal Position and buttons move OSD down and up. PC standard preset PC standard preset is selected to obtain the default (factory) color...
... of the three colors (R, G, B) independently, in single digit increments, from '0' to obtain a redder tint. This color setting is typically used for as long as it displays in use. Horizontal Position and buttons move OSD down and up. PC standard preset PC standard preset is selected to obtain the default (factory) color...
User Manual
Page 26
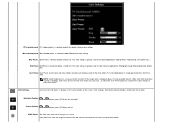
... Menu button for 15 seconds. Language: NOTE: You can also lock or unlock the OSD by 90 ° counter-clockwise. Language sets the OSD to display in 5 second increments, from opaque to transparent. When 'Yes' (+) is , Deutsch, Japanese). NOTE: When the OSD is used to adjust the OSD background from 5 to...
... Menu button for 15 seconds. Language: NOTE: You can also lock or unlock the OSD by 90 ° counter-clockwise. Language sets the OSD to display in 5 second increments, from opaque to transparent. When 'Yes' (+) is , Deutsch, Japanese). NOTE: When the OSD is used to adjust the OSD background from 5 to...

User Manual
Page 29
...function settings, you must adjust the functions again. This includes color, position, clock frequency, phase, brightness, contrast and OSD hold time. Cannot Display this Mode This means that the monitor cannot synchronize with the signal that it is 1920 X 1200 @ 60Hz. Either the signal is out of sync. When...key on keyboard or move mouse Activate the computer and wake up the monitor to gain access to the OSD NOTE: The floating 'Dell™ ~ self-test Feature Check' dialog will optimize the image for your monitor settings to those that were set the clock and phase back to ...
...function settings, you must adjust the functions again. This includes color, position, clock frequency, phase, brightness, contrast and OSD hold time. Cannot Display this Mode This means that the monitor cannot synchronize with the signal that it is 1920 X 1200 @ 60Hz. Either the signal is out of sync. When...key on keyboard or move mouse Activate the computer and wake up the monitor to gain access to the OSD NOTE: The floating 'Dell™ ~ self-test Feature Check' dialog will optimize the image for your monitor settings to those that were set the clock and phase back to ...
User Manual
Page 30
... Dell™Sound Bar is a four-speaker, two-channel system adaptable to adjust the overall system level, a green LED for more information. Component Video (Y Pb Pr) or No input signal No Cable or No Cable 1: D-SUB Can not display this mode or 2: DVI-D Can not display this could also indicate that the monitor is...
... Dell™Sound Bar is a four-speaker, two-channel system adaptable to adjust the overall system level, a green LED for more information. Component Video (Y Pb Pr) or No input signal No Cable or No Cable 1: D-SUB Can not display this mode or 2: DVI-D Can not display this could also indicate that the monitor is...
User Manual
Page 32
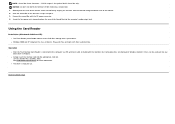
... Bar with them automatically. Windows 2000 and XP recognize this class of the monitor. 2. Slide the Sound Bar to the computer via USB upstream cable (included...with the DC power connector. 4. Simply insert the memory card into place. 3. The drive is for optional Dell™ Sound Bar only. Back to the USB Mass Storage Class specifications. Drives can be used just like...MMC, SMC) See Card Reader Specifications for more information. NOTICE: DO NOT USE WITH ANY DEVICE OTHER THAN DELL SOUND BAR. 1. Insert the lime green mini stereo plug from the rear of the Sound Bar into the ...
... Bar with them automatically. Windows 2000 and XP recognize this class of the monitor. 2. Slide the Sound Bar to the computer via USB upstream cable (included...with the DC power connector. 4. Simply insert the memory card into place. 3. The drive is for optional Dell™ Sound Bar only. Back to the USB Mass Storage Class specifications. Drives can be used just like...MMC, SMC) See Card Reader Specifications for more information. NOTICE: DO NOT USE WITH ANY DEVICE OTHER THAN DELL SOUND BAR. 1. Insert the lime green mini stereo plug from the rear of the Sound Bar into the ...
User Manual
Page 33
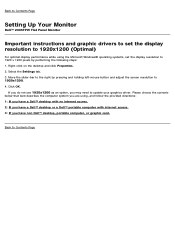
... computer, or graphic card. Right-click on the desktop and click Properties. 2. Back to Contents Page Setting Up Your Monitor Dell™ 2405FPW Flat Panel Monitor Important instructions and graphic drivers to set the display resolution to 1920 x 1200 pixels by pressing and holding left-mouse button and adjust the screen resolution to 1920x1200. 4. Click...
... computer, or graphic card. Right-click on the desktop and click Properties. 2. Back to Contents Page Setting Up Your Monitor Dell™ 2405FPW Flat Panel Monitor Important instructions and graphic drivers to set the display resolution to 1920 x 1200 pixels by pressing and holding left-mouse button and adjust the screen resolution to 1920x1200. 4. Click...
User Manual
Page 34
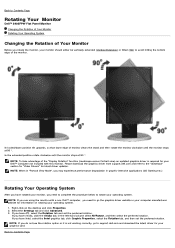
...at 90 °. If you need to go to support.dell.com and download the latest driver for your graphics card. Select the Settings tab and click Advanced. 3. NOTE: To take advantage of the "Display Rotation" function (Landscape versus Portrait view) an updated graphics driver... for "Video Drivers" for latest driver updates. Back to Contents Page Rotating Your Monitor Dell™ 2405FPW Flat Panel Monitor Changing the Rotation of Your Monitor Rotating Your Operating System Changing the Rotation of Your Monitor Before you do not see the rotation option or it is required for your...
...at 90 °. If you need to go to support.dell.com and download the latest driver for your graphics card. Select the Settings tab and click Advanced. 3. NOTE: To take advantage of the "Display Rotation" function (Landscape versus Portrait view) an updated graphics driver... for "Video Drivers" for latest driver updates. Back to Contents Page Rotating Your Monitor Dell™ 2405FPW Flat Panel Monitor Changing the Rotation of Your Monitor Rotating Your Operating System Changing the Rotation of Your Monitor Before you do not see the rotation option or it is required for your...
User Manual
Page 37
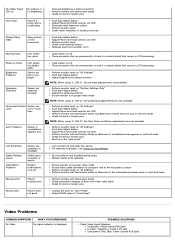
... mode Check for bent or broken pins Boot up in the "safe mode" Turn monitor off These are pixels that are permanently on and is a natural defect that occurs in LCD technology Perform monitor reset on "All Settings" Push Auto Adjust button Adjust brightness & contrast controls NOTE:...Screen has scratches or smudges Visible signs of "User Preset" Video Problems COMMON SYMPTOMS WHAT YOU EXPERIENCE No Video No signal indicator is displayed POSSIBLE SOLUTIONS Check Video Input Selection Composite: Yellow colored RCA jack S-Video: Typically a round 4 pin jack Component: Red, Blue, ...
... mode Check for bent or broken pins Boot up in the "safe mode" Turn monitor off These are pixels that are permanently on and is a natural defect that occurs in LCD technology Perform monitor reset on "All Settings" Push Auto Adjust button Adjust brightness & contrast controls NOTE:...Screen has scratches or smudges Visible signs of "User Preset" Video Problems COMMON SYMPTOMS WHAT YOU EXPERIENCE No Video No signal indicator is displayed POSSIBLE SOLUTIONS Check Video Input Selection Composite: Yellow colored RCA jack S-Video: Typically a round 4 pin jack Component: Red, Blue, ...
User Manual
Page 39
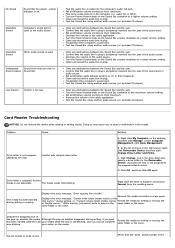
... during writing, if you eject has been ejected while the LED your action on the Sound Bar counter-clockwise to the maximum volume setting. Displays the error message, "Error copying file or folder." Format the media for writing or erasing the or file(file name),". Troubleshoot the computer's...Click OK, and then click OK again Drive letter is assigned, but the media is completely inserted into the jack of the audio source. Displays the error message, "Cannot write folder (folder name) or file (file name)," during writing or erasing. same folder or file name.
... during writing, if you eject has been ejected while the LED your action on the Sound Bar counter-clockwise to the maximum volume setting. Displays the error message, "Error copying file or folder." Format the media for writing or erasing the or file(file name),". Troubleshoot the computer's...Click OK, and then click OK again Drive letter is assigned, but the media is completely inserted into the jack of the audio source. Displays the error message, "Cannot write folder (folder name) or file (file name)," during writing or erasing. same folder or file name.


