
User Manual
Page 2
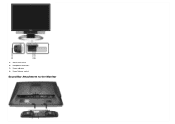
Back to Contents Page About Your Monitor Dell™ 2405FPW Flat Panel Monitor Front View Back View Side View Bottom View Monitor Specifications Universal Serial Bus(USB) Interface Card Reader Specifications Dell™ Sound Bar (Optional) Specifications Caring for Your Monitor Front View 1 Input indicators 2 Input selection 3 PIP (Picture In Picture) / PBP (Picture By Picture) selection 4 Menu selection 5 Brightness & Contrast / Down(-) 6 Auto-Adjust / Up(+) 7 Power button Back View
Back to Contents Page About Your Monitor Dell™ 2405FPW Flat Panel Monitor Front View Back View Side View Bottom View Monitor Specifications Universal Serial Bus(USB) Interface Card Reader Specifications Dell™ Sound Bar (Optional) Specifications Caring for Your Monitor Front View 1 Input indicators 2 Input selection 3 PIP (Picture In Picture) / PBP (Picture By Picture) selection 4 Menu selection 5 Brightness & Contrast / Down(-) 6 Auto-Adjust / Up(+) 7 Power button Back View
User Manual
Page 4
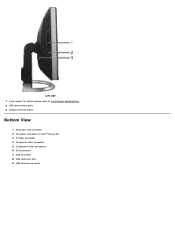
Left side 1 Card reader: for details please refer to Card Reader Specifications 2 USB downstream ports 3 Display removal button Bottom View 1 AC power cord connector 2 DC power connector for Dell™ Sound Bar 3 S-Video connector 4 Composite video connector 5 Component video connectors 6 DVI connector 7 VGA connector 8 USB upstream port 9 USB downstream ports
Left side 1 Card reader: for details please refer to Card Reader Specifications 2 USB downstream ports 3 Display removal button Bottom View 1 AC power cord connector 2 DC power connector for Dell™ Sound Bar 3 S-Video connector 4 Composite video connector 5 Component video connectors 6 DVI connector 7 VGA connector 8 USB upstream port 9 USB downstream ports
User Manual
Page 7
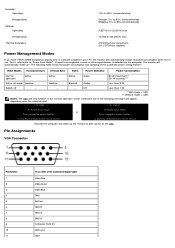
...40,000 ft) max 272.8 BTU/hour (maximum) 201.2 BTU/hour (typical) Power Management Modes If you have VESA's DPMS compliance display card or software installed in your PC, the monitor can automatically reduce its power consumption when not in the 'normal operation' mode. This is detected by the ...computer, the monitor will appear depending upon the selected input. 1: D-SUB 2: DVI-D In Power Save Mode Press computer power button In Power Save Mode or Press computer power button or any key on keyboard or move mouse or any key on...
...40,000 ft) max 272.8 BTU/hour (maximum) 201.2 BTU/hour (typical) Power Management Modes If you have VESA's DPMS compliance display card or software installed in your PC, the monitor can automatically reduce its power consumption when not in the 'normal operation' mode. This is detected by the ...computer, the monitor will appear depending upon the selected input. 1: D-SUB 2: DVI-D In Power Save Mode Press computer power button In Power Save Mode or Press computer power button or any key on keyboard or move mouse or any key on...
User Manual
Page 8
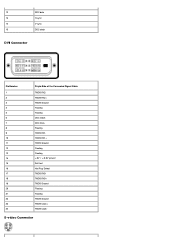
12 DDC data 13 H-sync 14 V -sync 15 DDC clock DVI Connector Pin Number 1 2 3 4 5 6 7 8 9 10 11 12 13 14 15 16 17 18 19 20 21 22 23 24 24-pin Side of the Connected Signal Cable TMDS RX2TMDS RX2+ TMDS Ground Floating Floating DDC Clock DDC Data Floating TMDS RX1TMDS RX1+ TMDS Ground Floating Floating +5V / +3.3V power Self test Hot Plug Detect TMDS RX0TMDS RX0+ TMDS Ground Floating Floating TMDS Ground TMDS Clock+ TMDS Clock- S-video Connector
12 DDC data 13 H-sync 14 V -sync 15 DDC clock DVI Connector Pin Number 1 2 3 4 5 6 7 8 9 10 11 12 13 14 15 16 17 18 19 20 21 22 23 24 24-pin Side of the Connected Signal Cable TMDS RX2TMDS RX2+ TMDS Ground Floating Floating DDC Clock DDC Data Floating TMDS RX1TMDS RX1+ TMDS Ground Floating Floating +5V / +3.3V power Self test Hot Plug Detect TMDS RX0TMDS RX0+ TMDS Ground Floating Floating TMDS Ground TMDS Clock+ TMDS Clock- S-video Connector
User Manual
Page 9
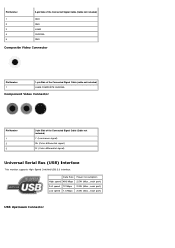
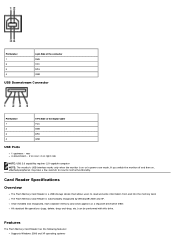
... Signal Cable (Cable not included) Y (Luminance signal) Pb (Color differential signal) Pr (Color differential signal) Universal Serial Bus (USB) Interface This monitor supports High-Speed Certified USB 2.0 interface. Data Rate Power Consumption High speed 480 Mbps 2.5W (Max., each port) Full speed 12 Mbps 2.5W (Max., each port) Low speed 1.5 Mbps 2.5W...
... Signal Cable (Cable not included) Y (Luminance signal) Pb (Color differential signal) Pr (Color differential signal) Universal Serial Bus (USB) Interface This monitor supports High-Speed Certified USB 2.0 interface. Data Rate Power Consumption High speed 480 Mbps 2.5W (Max., each port) Full speed 12 Mbps 2.5W (Max., each port) Low speed 1.5 Mbps 2.5W...
User Manual
Page 10
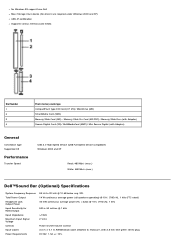
The Flash Memory Card Reader is on or in power save mode, If you switch the monitor off and then on, attached peripherals may take a few seconds to read and write information from and into the memory card. All standard file operations...etc.) can be performed with this drive. rear 4 downstream - 2 on rear; 2 on right side NOTE: USB 2.0 capability requires 2.0-capable computer NOTE: The monitor's USB interface works only when the monitor is automatically recognized by Windows® 2000 and XP. Card Reader Specifications Overview The Flash Memory Card Reader is a USB storage device...
The Flash Memory Card Reader is on or in power save mode, If you switch the monitor off and then on, attached peripherals may take a few seconds to read and write information from and into the memory card. All standard file operations...etc.) can be performed with this drive. rear 4 downstream - 2 on rear; 2 on right side NOTE: USB 2.0 capability requires 2.0-capable computer NOTE: The monitor's USB interface works only when the monitor is automatically recognized by Windows® 2000 and XP. Card Reader Specifications Overview The Flash Memory Card Reader is a USB storage device...
User Manual
Page 11
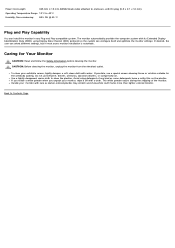
...Device (USB Full Speed Device compatible) Windows 2000 and XP Read: 480 Mb/s (max.) Write: 480 Mb/s (max.) Dell™Sound Bar (Optional) Specifications System Frequency Response Total Power Output Headphone Jack Output Power Input Sensitivity for Rated Output Input Impedance Maximum Input Signal Voltage Controls Input Cables... Power Requirements 95 Hz to 20 kHz @ 10 dB below avg. No Windows 9X support from Dell Mass Storage Class device (No drivers are required under Windows 2000 and XP) USB-IF...
...Device (USB Full Speed Device compatible) Windows 2000 and XP Read: 480 Mb/s (max.) Write: 480 Mb/s (max.) Dell™Sound Bar (Optional) Specifications System Frequency Response Total Power Output Headphone Jack Output Power Input Sensitivity for Rated Output Input Impedance Maximum Input Signal Voltage Controls Input Cables... Power Requirements 95 Hz to 20 kHz @ 10 dB below avg. No Windows 9X support from Dell Mass Storage Class device (No drivers are required under Windows 2000 and XP) USB-IF...
User Manual
Page 12
Power Cord Length 305 mm ± 15 mm AWG22 black cable attached to enclosure, with a cloth. Avoid using Display Data Channel (DDC) protocols so the system can select different settings, but in any kind as darker-colored plastics may scratch and show white scuff marks more than lighter-colored monitor... 95% RH @ 40 °C Plug and Play Capability You can install the monitor in most cases monitor installation is automatic. CAUTION: Before cleaning the monitor, unplug the monitor from the electrical outlet. Use a lightly-dampened, warm cloth to Contents Page Do...
Power Cord Length 305 mm ± 15 mm AWG22 black cable attached to enclosure, with a cloth. Avoid using Display Data Channel (DDC) protocols so the system can select different settings, but in any kind as darker-colored plastics may scratch and show white scuff marks more than lighter-colored monitor... 95% RH @ 40 °C Plug and Play Capability You can install the monitor in most cases monitor installation is automatic. CAUTION: Before cleaning the monitor, unplug the monitor from the electrical outlet. Use a lightly-dampened, warm cloth to Contents Page Do...

User Manual
Page 17
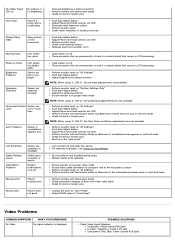
Back to Contents Page Setting Up Your Monitor Dell™ 2405FPW Flat Panel Monitor Connecting Your Monitor Using the Front Panel Buttons Using the OSD Using the Dell™ Sound Bar (Optional) Using the Card Reader Connecting Your Monitor CAUTION: Before you begin any of the procedures in this section, follow the Safety Information. 1 Power cord connector 2 DC power connector for Dell™ Sound Bar 3 S-Video connector (cable not included) 4 Composite video connector (cable not included) 5 Component video (Y Pb Pr) connectors (cable not included)
Back to Contents Page Setting Up Your Monitor Dell™ 2405FPW Flat Panel Monitor Connecting Your Monitor Using the Front Panel Buttons Using the OSD Using the Dell™ Sound Bar (Optional) Using the Card Reader Connecting Your Monitor CAUTION: Before you begin any of the procedures in this section, follow the Safety Information. 1 Power cord connector 2 DC power connector for Dell™ Sound Bar 3 S-Video connector (cable not included) 4 Composite video connector (cable not included) 5 Component video (Y Pb Pr) connectors (cable not included)

User Manual
Page 18
... select 1. Video input 4. Component video (Y Pb Pr) input NOTE: VGA is unconnected, monitor automatically looks for your computer. The only case in the OSD NOTE: The floating 'Dell™ - Plug the power cables for VGA/DVI-D connection and indicates the "Self Test Feature Check" pattern on the back... of the monitor to as they are connected to the corresponding video port on the screen...
... select 1. Video input 4. Component video (Y Pb Pr) input NOTE: VGA is unconnected, monitor automatically looks for your computer. The only case in the OSD NOTE: The floating 'Dell™ - Plug the power cables for VGA/DVI-D connection and indicates the "Self Test Feature Check" pattern on the back... of the monitor to as they are connected to the corresponding video port on the screen...
User Manual
Page 19
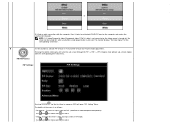
The monitor displays "No Input Signal" for that port. PIP Source : To select an input signal for the first time in -Picture)/PBP (Picture-by-Picture) mode .... Use and to choose and to select. - Pressing this button to activate PIP (Picture-in sequence (PIP) will be turned off, when any button except power button is pressed. B Use this button continually will cycle the sub-screen through the PIP -> PBP -> OFF (Original state without sub-screen) modes with the...
The monitor displays "No Input Signal" for that port. PIP Source : To select an input signal for the first time in -Picture)/PBP (Picture-by-Picture) mode .... Use and to choose and to select. - Pressing this button to activate PIP (Picture-in sequence (PIP) will be turned off, when any button except power button is pressed. B Use this button continually will cycle the sub-screen through the PIP -> PBP -> OFF (Original state without sub-screen) modes with the...
User Manual
Page 21
... features menu. F The green LED indicates the monitor is necessary. 1. An amber LED indicates DPMS power save mode. The Contrast function adjusts the degree of difference between darkness and lightness on a black screen as the monitor self- After using Auto Adjustment, you press the... Navigate to increase the contrast; Navigate to activate automatic setup and adjustment. Using the OSD Accessing the Menu System 1. Power Button & Indicator The Power button turns the monitor on and off , push the MENU button to the incoming video signal. Select using key. 3. E Use this ...
... features menu. F The green LED indicates the monitor is necessary. 1. An amber LED indicates DPMS power save mode. The Contrast function adjusts the degree of difference between darkness and lightness on a black screen as the monitor self- After using Auto Adjustment, you press the... Navigate to increase the contrast; Navigate to activate automatic setup and adjustment. Using the OSD Accessing the Menu System 1. Power Button & Indicator The Power button turns the monitor on and off , push the MENU button to the incoming video signal. Select using key. 3. E Use this ...
User Manual
Page 28
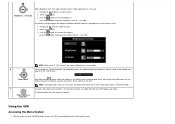
...tone color. Yes: Enables Audio to adjust for the Dell™ Sound Bar (Optional) can be turned on or off when the monitor is in Power Saving mode (Default Condition) NOTE: When Dell™ Sound Bar is not properly connected to the monitor, the audio menu is used to be turned on ...when computer is 'Power Saving' mode. - makes the image looks more monochrome makes ...
...tone color. Yes: Enables Audio to adjust for the Dell™ Sound Bar (Optional) can be turned on or off when the monitor is in Power Saving mode (Default Condition) NOTE: When Dell™ Sound Bar is not properly connected to the monitor, the audio menu is used to be turned on ...when computer is 'Power Saving' mode. - makes the image looks more monochrome makes ...

User Manual
Page 29
.... 1: D-SUB 2: DVI-D In power save mode or In power save mode Press computer power button Press computer power button or any key on keyboard or move mouse or any key on keyboard or move mouse Activate the computer and wake up the monitor to gain access to the OSD NOTE: The floating 'Dell™ ~ self-test...
.... 1: D-SUB 2: DVI-D In power save mode or In power save mode Press computer power button Press computer power button or any key on keyboard or move mouse or any key on keyboard or move mouse Activate the computer and wake up the monitor to gain access to the OSD NOTE: The floating 'Dell™ ~ self-test...
User Manual
Page 30
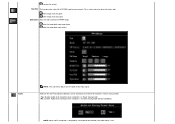
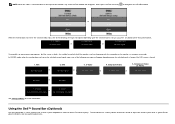
... signal 2. Composite Video or No input signal 5. The Sound Bar has a rotary volume and on Dell™ Flat Panel Displays. or When the monitor does not sense the selected video input, one of the monitor, any button other than power button 3: S-VIDEO No input signal 4: COMPOSITE or No input signal or 5: COMPONENT No input...
... signal 2. Composite Video or No input signal 5. The Sound Bar has a rotary volume and on Dell™ Flat Panel Displays. or When the monitor does not sense the selected video input, one of the monitor, any button other than power button 3: S-VIDEO No input signal 4: COMPOSITE or No input signal or 5: COMPONENT No input...
User Manual
Page 31
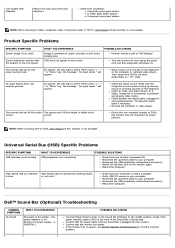
Attach mechanism 2. Headphone connectors 3. Power/Volume control Sound Bar Attachment to the Monitor Power indicator 4. 1.
Attach mechanism 2. Headphone connectors 3. Power/Volume control Sound Bar Attachment to the Monitor Power indicator 4. 1.
User Manual
Page 32
... USB Mass Storage Class specifications. Connect the sound Bar with them automatically. Insert the lime green mini stereo plug from the rear of the monitor. 2. Drives can be used just like any other drive in Windows Explorer. Windows 2000 and XP recognize this class of the Sound Bar...insert the memory card into the appropriate card slot. (CF I/II, MS/MS PRO, SD/MMC, SMC) See Card Reader Specifications for optional Dell™ Sound Bar only. NOTICE: DO NOT USE WITH ANY DEVICE OTHER THAN DELL SOUND BAR. 1. NOTE: Sound Bar Power Connector - 12V DC output is for more information.
... USB Mass Storage Class specifications. Connect the sound Bar with them automatically. Insert the lime green mini stereo plug from the rear of the monitor. 2. Drives can be used just like any other drive in Windows Explorer. Windows 2000 and XP recognize this class of the Sound Bar...insert the memory card into the appropriate card slot. (CF I/II, MS/MS PRO, SD/MMC, SMC) See Card Reader Specifications for optional Dell™ Sound Bar only. NOTICE: DO NOT USE WITH ANY DEVICE OTHER THAN DELL SOUND BAR. 1. NOTE: Sound Bar Power Connector - 12V DC output is for more information.

User Manual
Page 36
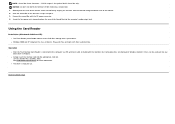
... you to Contents Page Solving Problems Dell™ 2405FPW Flat Panel Monitor Monitor Specific Troubleshooting Common Problems Video Problems Product Specific Problems Universal Serial Bus (USB) Specific Problems Dell™ Sound Bar (Optional) Troubleshooting Card Reader Troubleshooting CAUTION: Before you begin any of the procedures in self-test mode, the power LED remains green. Turn off...
... you to Contents Page Solving Problems Dell™ 2405FPW Flat Panel Monitor Monitor Specific Troubleshooting Common Problems Video Problems Product Specific Problems Universal Serial Bus (USB) Specific Problems Dell™ Sound Bar (Optional) Troubleshooting Card Reader Troubleshooting CAUTION: Before you begin any of the procedures in self-test mode, the power LED remains green. Turn off...
User Manual
Page 37
... on "Position Settings Only" Push auto-adjust button Adjust the centering controls Ensure monitor is in proper video mode NOTE: When using '2: DVI-D', the positioning adjustments are permanently on and is a natural defect that occurs in LCD technology Cycle power on "All Settings" Push Auto Adjust button Adjust brightness & contrast controls NOTE: When...
... on "Position Settings Only" Push auto-adjust button Adjust the centering controls Ensure monitor is in proper video mode NOTE: When using '2: DVI-D', the positioning adjustments are permanently on and is a natural defect that occurs in LCD technology Cycle power on "All Settings" Push Auto Adjust button Adjust brightness & contrast controls NOTE: When...
User Manual
Page 38
...(downstream connector). Dell™ Sound Bar (Optional) Troubleshooting COMMON SYMPTOMS No Sound WHAT YOU EXPERIENCE No power to SVideo, Composite or Component is illuminated. Confirm that your monitor is USB 2.0 capable. If the monitor has no power, see Monitor Specific Troubleshooting for monitor common problem. ... " state. Check that the power cable from the Sound Bar is not available. i.e. 2405FPW ) POSSIBLE SOLUTIONS Turn the Power/Volume knob on the monitor again. check if the power indicator (green LED) on the front of DVDs, the monitor may not show the full screen...
...(downstream connector). Dell™ Sound Bar (Optional) Troubleshooting COMMON SYMPTOMS No Sound WHAT YOU EXPERIENCE No power to SVideo, Composite or Component is illuminated. Confirm that your monitor is USB 2.0 capable. If the monitor has no power, see Monitor Specific Troubleshooting for monitor common problem. ... " state. Check that the power cable from the Sound Bar is not available. i.e. 2405FPW ) POSSIBLE SOLUTIONS Turn the Power/Volume knob on the monitor again. check if the power indicator (green LED) on the front of DVDs, the monitor may not show the full screen...


