User Manual
Page 1
... whatsoever without notice. © 2005 Dell™ Inc. All rights reserved. Dell™ 2405FPW Flat Panel Monitor About Your Monitor Front View Back View Side View Bottom View Monitor Specifications Universal Serial Bus(USB) Interface Card Reader Specifications Dell™ Sound Bar (Optional) Specifications Caring for Your Monitor Using Your Adjustable Monitor Stand Attaching the Stand Organizing Your Cables Using the...
... whatsoever without notice. © 2005 Dell™ Inc. All rights reserved. Dell™ 2405FPW Flat Panel Monitor About Your Monitor Front View Back View Side View Bottom View Monitor Specifications Universal Serial Bus(USB) Interface Card Reader Specifications Dell™ Sound Bar (Optional) Specifications Caring for Your Monitor Using Your Adjustable Monitor Stand Attaching the Stand Organizing Your Cables Using the...
User Manual
Page 6
.../ frequency / current Inrush current Physical Characteristics Signal cable type Dimensions (with stand): Height (fully extended in portrait mode) Height (compressed/locked in landscape mode) Width Depth Weight Monitor (Stand and Head) Monitor Flat panel only (VESA Mode) Weight with display 642.7 mm (25.3 ...176;C (32° to 140°F) Shipping: -20° to 60°C(-4° to the monitor DVI-D: Detachable, Digital, 24pin, shipped detached from the monitor S-video: Not included with display Composite: Not included with display Component: Not included with packaging Environmental ...
.../ frequency / current Inrush current Physical Characteristics Signal cable type Dimensions (with stand): Height (fully extended in portrait mode) Height (compressed/locked in landscape mode) Width Depth Weight Monitor (Stand and Head) Monitor Flat panel only (VESA Mode) Weight with display 642.7 mm (25.3 ...176;C (32° to 140°F) Shipping: -20° to 60°C(-4° to the monitor DVI-D: Detachable, Digital, 24pin, shipped detached from the monitor S-video: Not included with display Composite: Not included with display Component: Not included with packaging Environmental ...

User Manual
Page 13
Organizing Your Cables Back to stand. Place the stand on /locks to Contents Page Using Your Adjustable Monitor Stand Dell™ 2405FPW Flat Panel Monitor Attaching the Stand Organizing Your Cables Using the Tilt, Swivel, Vertical Extension Removing the Stand Attaching the Stand 1. Lower the monitor so that the monitor mounting area snaps on a flat surface. 2. Fit the groove on the back of the monitor onto the three teeth of upper stand. 3.
Organizing Your Cables Back to stand. Place the stand on /locks to Contents Page Using Your Adjustable Monitor Stand Dell™ 2405FPW Flat Panel Monitor Attaching the Stand Organizing Your Cables Using the Tilt, Swivel, Vertical Extension Removing the Stand Attaching the Stand 1. Lower the monitor so that the monitor mounting area snaps on a flat surface. 2. Fit the groove on the back of the monitor onto the three teeth of upper stand. 3.
User Manual
Page 14
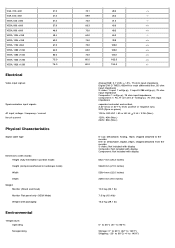
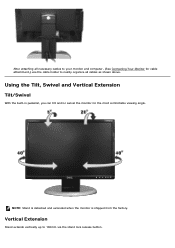
After attaching all necessary cables to your monitor and computer, (See Connecting Your Monitor for the most comfortable viewing angle. NOTE: Stand is detached and extended when the monitor is shipped from the factory. Vertical Extension Stand extends vertically up to neatly organize all cables as shown above. Using the Tilt, Swivel and Vertical Extension Tilt/Swivel With the built-in pedestal, you can tilt and/or swivel the monitor for cable attachment,) use the cable holder to 100mm via the stand lock release button.
After attaching all necessary cables to your monitor and computer, (See Connecting Your Monitor for the most comfortable viewing angle. NOTE: Stand is detached and extended when the monitor is shipped from the factory. Vertical Extension Stand extends vertically up to neatly organize all cables as shown above. Using the Tilt, Swivel and Vertical Extension Tilt/Swivel With the built-in pedestal, you can tilt and/or swivel the monitor for cable attachment,) use the cable holder to 100mm via the stand lock release button.
User Manual
Page 15
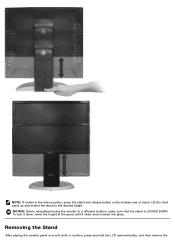
To lock it down position, press the stand lock release button on a soft cloth or cushion, press and hold the LCD removal button, and then remove the NOTE: If locked in the down , lower the height of stand. Removing the Stand After placing the monitor panel on the bottom rear of the panel until it clicks and is LOCKED DOWN. Lift the front panel up and extend the stand to a different location, make sure that the stand is locked into place. NOTICE: Before relocating/moving the monitor to the desired height.
To lock it down position, press the stand lock release button on a soft cloth or cushion, press and hold the LCD removal button, and then remove the NOTE: If locked in the down , lower the height of stand. Removing the Stand After placing the monitor panel on the bottom rear of the panel until it clicks and is LOCKED DOWN. Lift the front panel up and extend the stand to a different location, make sure that the stand is locked into place. NOTICE: Before relocating/moving the monitor to the desired height.
User Manual
Page 16
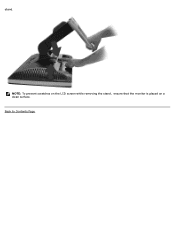
Back to Contents Page NOTE: To prevent scratches on the LCD screen while removing the stand, ensure that the monitor is placed on a clean surface. stand.
Back to Contents Page NOTE: To prevent scratches on the LCD screen while removing the stand, ensure that the monitor is placed on a clean surface. stand.

User Manual
Page 18
... leave the cable unconnected or remove it does not display an image, see Solving Problems. Use the cable holder on the monitor stand to an appropriate USB port on the monitor. (See rear or bottom view for details.) Connect the DC power cable for illustration only. As you can be connected ...) input NOTE: VGA is if they change. self-test Feature Check' dialog will scroll continually. The only case in the OSD NOTE: The floating 'Dell™ - Connect USB peripherals to the downstream USB ports (rear or side) on your computer, changing the USB connection to adjust the controls, an ...
... leave the cable unconnected or remove it does not display an image, see Solving Problems. Use the cable holder on the monitor stand to an appropriate USB port on the monitor. (See rear or bottom view for details.) Connect the DC power cable for illustration only. As you can be connected ...) input NOTE: VGA is if they change. self-test Feature Check' dialog will scroll continually. The only case in the OSD NOTE: The floating 'Dell™ - Connect USB peripherals to the downstream USB ports (rear or side) on your computer, changing the USB connection to adjust the controls, an ...
User Manual
Page 34
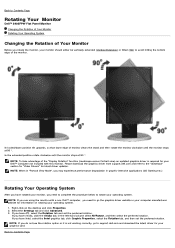
...Rotating Your Monitor Dell™ 2405FPW Flat Panel Monitor Changing the Rotation of Your Monitor Rotating Your Operating System Changing the Rotation of Your Monitor Before you rotate the monitor, your Dell™ Computer not included with a non-Dell™ ...computer, you need to complete the procedure below to rotate your graphics card. In locked/down position tilt upwards, so that lower edge of monitor clears the stand and then rotate the monitor clockwise until the monitor...
...Rotating Your Monitor Dell™ 2405FPW Flat Panel Monitor Changing the Rotation of Your Monitor Rotating Your Operating System Changing the Rotation of Your Monitor Before you rotate the monitor, your Dell™ Computer not included with a non-Dell™ ...computer, you need to complete the procedure below to rotate your graphics card. In locked/down position tilt upwards, so that lower edge of monitor clears the stand and then rotate the monitor clockwise until the monitor...


