User Manual
Page 4
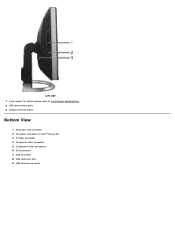
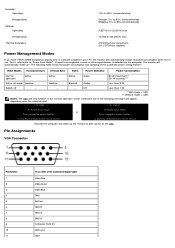
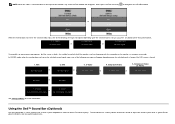
Left side 1 Card reader: for details please refer to Card Reader Specifications 2 USB downstream ports 3 Display removal button Bottom View 1 AC power cord connector 2 DC power connector for Dell™ Sound Bar 3 S-Video connector 4 Composite video connector 5 Component video connectors 6 DVI connector 7 VGA connector 8 USB upstream port 9 USB downstream ports
Left side 1 Card reader: for details please refer to Card Reader Specifications 2 USB downstream ports 3 Display removal button Bottom View 1 AC power cord connector 2 DC power connector for Dell™ Sound Bar 3 S-Video connector 4 Composite video connector 5 Component video connectors 6 DVI connector 7 VGA connector 8 USB upstream port 9 USB downstream ports
User Manual
Page 5
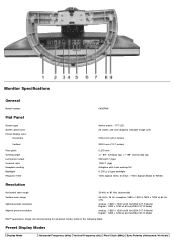
TFT LCD 24 inches (24-inch diagonal viewable image size) 518.4 mm (20.4 inches) 324.0 mm (12.7 inches) 0.270 mm +/- 89° (vertical) typ, +/- 89° (horizontal) typ 500 cd/m &#... : 1920 x 1200 at 60 Hz(VESA CVT-R Mode) Dell™ guarantees image size and centering for all preset modes listed in the following table. Preset Display Modes Display Mode Horizontal Frequency (kHz) Vertical Frequency (Hz) Pixel Clock (MHz) Sync Polarity (Horizontal/Vertical) Monitor Specifications General Model number 2405FPW Flat Panel Screen type Screen dimensions Preset...
TFT LCD 24 inches (24-inch diagonal viewable image size) 518.4 mm (20.4 inches) 324.0 mm (12.7 inches) 0.270 mm +/- 89° (vertical) typ, +/- 89° (horizontal) typ 500 cd/m &#... : 1920 x 1200 at 60 Hz(VESA CVT-R Mode) Dell™ guarantees image size and centering for all preset modes listed in the following table. Preset Display Modes Display Mode Horizontal Frequency (kHz) Vertical Frequency (Hz) Pixel Clock (MHz) Sync Polarity (Horizontal/Vertical) Monitor Specifications General Model number 2405FPW Flat Panel Screen type Screen dimensions Preset...
User Manual
Page 6
...): Height (fully extended in portrait mode) Height (compressed/locked in landscape mode) Width Depth Weight Monitor (Stand and Head) Monitor Flat panel only (VESA Mode) Weight with display 642.7 mm (25.3 inches) 546.8 mm (21.5 inches) 559.4 mm (22.0 inches....) 240V: 80A (Max.) D-sub: Detachable, Analog, 15pin, shipped attached to the monitor DVI-D: Detachable, Digital, 24pin, shipped detached from the monitor S-video: Not included with display Composite: Not included with display Component: Not included with packaging Environmental Temperature: Operating Nonoperating 70.1 28.3 -/+ 59.9 25...
...): Height (fully extended in portrait mode) Height (compressed/locked in landscape mode) Width Depth Weight Monitor (Stand and Head) Monitor Flat panel only (VESA Mode) Weight with display 642.7 mm (25.3 inches) 546.8 mm (21.5 inches) 559.4 mm (22.0 inches....) 240V: 80A (Max.) D-sub: Detachable, Analog, 15pin, shipped attached to the monitor DVI-D: Detachable, Digital, 24pin, shipped detached from the monitor S-video: Not included with display Composite: Not included with display Component: Not included with packaging Environmental Temperature: Operating Nonoperating 70.1 28.3 -/+ 59.9 25...
User Manual
Page 7
...max 272.8 BTU/hour (maximum) 201.2 BTU/hour (typical) Power Management Modes If you have VESA's DPMS compliance display card or software installed in your PC, the monitor can automatically reduce its power consumption when not in the 'normal operation' mode. Off Less than 2 W Switch ... Blanked Amber Less than 1 W * With Audio + USB ** Without Audio + USB NOTE: The OSD will automatically "wake up the monitor to gain access to as 'Power Save Mode'*. The following table shows the power consumption and signaling of the following messages will appear depending ...
...max 272.8 BTU/hour (maximum) 201.2 BTU/hour (typical) Power Management Modes If you have VESA's DPMS compliance display card or software installed in your PC, the monitor can automatically reduce its power consumption when not in the 'normal operation' mode. Off Less than 2 W Switch ... Blanked Amber Less than 1 W * With Audio + USB ** Without Audio + USB NOTE: The OSD will automatically "wake up the monitor to gain access to as 'Power Save Mode'*. The following table shows the power consumption and signaling of the following messages will appear depending ...
User Manual
Page 12
...10°C to 40°C Humidity, Non-condensing 95% RH @ 40 °C Plug and Play Capability You can install the monitor in most cases monitor installation is automatic. Caring for the antistatic coating. Use a lightly-dampened, warm cloth to Contents Page To clean your antistatic screen..., lightly dampen a soft, clean cloth with its Extended Display Identification Data (EDID) using detergent of the monitor. Avoid using Display Data Channel (DDC) protocols so the system can configure itself and optimize the...
...10°C to 40°C Humidity, Non-condensing 95% RH @ 40 °C Plug and Play Capability You can install the monitor in most cases monitor installation is automatic. Caring for the antistatic coating. Use a lightly-dampened, warm cloth to Contents Page To clean your antistatic screen..., lightly dampen a soft, clean cloth with its Extended Display Identification Data (EDID) using detergent of the monitor. Avoid using Display Data Channel (DDC) protocols so the system can configure itself and optimize the...

User Manual
Page 18
... computer and monitor into a nearby outlet. Input select 1. Video input 4. The only case in the OSD NOTE: The floating 'Dell™ - NOTE: If your computer does not support the DVI connector, you use both cables can leave the cable unconnected or remove it does not display an image,... see Solving Problems. Use the cable holder on the front of the monitor to adjust the controls,...
... computer and monitor into a nearby outlet. Input select 1. Video input 4. The only case in the OSD NOTE: The floating 'Dell™ - NOTE: If your computer does not support the DVI connector, you use both cables can leave the cable unconnected or remove it does not display an image,... see Solving Problems. Use the cable holder on the front of the monitor to adjust the controls,...
User Manual
Page 19
... Setting" Menu. PIP/PBP Select PIP Settings: Pressing PIP/PBP for the first time in PIP mode. The details of the menu is pressed. The monitor displays "No Input Signal" for the corresponding connection . B Use this button continually will be turned off , the screen will cycle the sub-screen through the PIP...
... Setting" Menu. PIP/PBP Select PIP Settings: Pressing PIP/PBP for the first time in PIP mode. The details of the menu is pressed. The monitor displays "No Input Signal" for the corresponding connection . B Use this button continually will be turned off , the screen will cycle the sub-screen through the PIP...

User Manual
Page 20
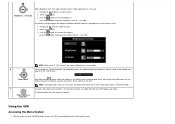
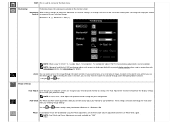
...Menu System. C The MENU button is as follows: - PIP size : To adjust the size of PIP Setting. Use and to choose and to display the Brightness/Contrast adjustment menu. Swap : To switch the main-screen and sub-screen in the OSD. With the Menu off, push the button ... activate Brightness/Contrast adjustment. The details of PIP Setting. The PBP active sub-screen is shown with "blue border" beside the main-screen on -screen display(OSD) and select the OSD Menu. See PIP/PBP Settings. E Minus (- ) and Plus (+) D Use this button to select. - Position : Move the PIP ...
...Menu System. C The MENU button is as follows: - PIP size : To adjust the size of PIP Setting. Use and to choose and to display the Brightness/Contrast adjustment menu. Swap : To switch the main-screen and sub-screen in the OSD. With the Menu off, push the button ... activate Brightness/Contrast adjustment. The details of PIP Setting. The PBP active sub-screen is shown with "blue border" beside the main-screen on -screen display(OSD) and select the OSD Menu. See PIP/PBP Settings. E Minus (- ) and Plus (+) D Use this button to select. - Position : Move the PIP ...
User Manual
Page 21
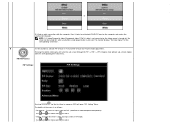
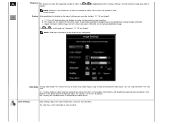
...adjusts the degree of difference between darkness and lightness on a black screen as the monitor self- Push the button to open the OSD system and display the main features menu. The following dialog will appear on the monitor screen. 1. NOTE: Auto Adjust does not occur if you can further tune ...your monitor by using '2: DVI-D Input', the contrast adjustment is not available. An amber LED ...
...adjusts the degree of difference between darkness and lightness on a black screen as the monitor self- Push the button to open the OSD system and display the main features menu. The following dialog will appear on the monitor screen. 1. NOTE: Auto Adjust does not occur if you can further tune ...your monitor by using '2: DVI-D Input', the contrast adjustment is not available. An amber LED ...
User Manual
Page 23
...a small area of image, to zoom in conjunction with OSD rotation feature. NOTE: In most cases, 'Auto Adjust' will optimize the display settings for your configuration. Minimum is '100' (+). After activating the zoom in the image through the main OSD menu, by selecting 'Image...menu. NOTE: Pixel Clock and Phase Adjustments are accessed through the zoom function. If you can recognize your new flat panel monitor on the monitor screen. NOTE: Horizontal and Vertical OSD positioning adjusts with your preference. See OSD Settings for "VGA" input. Horizontal When making...
...a small area of image, to zoom in conjunction with OSD rotation feature. NOTE: In most cases, 'Auto Adjust' will optimize the display settings for your configuration. Minimum is '100' (+). After activating the zoom in the image through the main OSD menu, by selecting 'Image...menu. NOTE: Pixel Clock and Phase Adjustments are accessed through the zoom function. If you can recognize your new flat panel monitor on the monitor screen. NOTE: Horizontal and Vertical OSD positioning adjusts with your preference. See OSD Settings for "VGA" input. Horizontal When making...
User Manual
Page 24
... adjusts Horizontal size to scroll through the 3 alternatives '1:1', 'fill' and 'aspect'. You can make the image look sharper or softer. On : Displays optimum video image by the video source. Use or to toggle between "On" and "Off". Settings 1 to reality crisp video images using . ...This function is most noticeable in "VGA" or "DVI-D modes. c. Scaling Scaling optimizes the display for the type of white. The setting is only available for your configuration. Fill: Image size up-scaled to fill the entire screen, image maybe...
... adjusts Horizontal size to scroll through the 3 alternatives '1:1', 'fill' and 'aspect'. You can make the image look sharper or softer. On : Displays optimum video image by the video source. Use or to toggle between "On" and "Off". Settings 1 to reality crisp video images using . ...This function is most noticeable in "VGA" or "DVI-D modes. c. Scaling Scaling optimizes the display for the type of white. The setting is only available for your configuration. Fill: Image size up-scaled to fill the entire screen, image maybe...
User Manual
Page 25
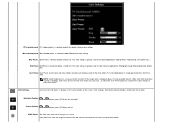
... OSD opens, it is selected to obtain a redder tint. Select each one to '100'. OSD Timer: The OSD stays active for as long as it displays in single digit increments, from '0' to see how each of time the OSD will remain active after the last time you pressed a button. Red Preset...
... OSD opens, it is selected to obtain a redder tint. Select each one to '100'. OSD Timer: The OSD stays active for as long as it displays in single digit increments, from '0' to see how each of time the OSD will remain active after the last time you pressed a button. Red Preset...
User Manual
Page 26
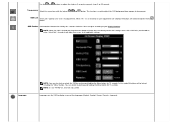
...: You can unlock by pushing and holding the Menu button for 15 seconds. OSD Lock 'OSD Lock': Controls user access to your Display Rotation. Language sets the OSD to display in 5 second increments, from opaque to all applicable settings. Your can djust according to adjustments. You can also lock or unlock the...
...: You can unlock by pushing and holding the Menu button for 15 seconds. OSD Lock 'OSD Lock': Controls user access to your Display Rotation. Language sets the OSD to display in 5 second increments, from opaque to all applicable settings. Your can djust according to adjustments. You can also lock or unlock the...

User Manual
Page 29
... those that were set the clock and phase back to the OSD NOTE: The floating 'Dell™ ~ self-test Feature Check' dialog will appear on-screen if the monitor cannot sense a video signal Depending upon the selected input. 1: D-SUB 2: DVI-D In power save mode or In power save... your monitor settings to use the Reset function. Recommended mode is no "Undo" when you make an adjustment and then either proceed to the default setting of Normal Preset. If you use . This includes color, position, clock frequency, phase, brightness, contrast and OSD hold time. Cannot Display this...
... those that were set the clock and phase back to the OSD NOTE: The floating 'Dell™ ~ self-test Feature Check' dialog will appear on-screen if the monitor cannot sense a video signal Depending upon the selected input. 1: D-SUB 2: DVI-D In power save mode or In power save... your monitor settings to use the Reset function. Recommended mode is no "Undo" when you make an adjustment and then either proceed to the default setting of Normal Preset. If you use . This includes color, position, clock frequency, phase, brightness, contrast and OSD hold time. Cannot Display this...
User Manual
Page 30
... the monitor does not sense the selected video input, one of the following messages will disappear. S-Video or No input signal 4. Composite Video or No input signal 5. The Sound Bar has a rotary volume and on/off control to mount on Dell™ Flat Panel Displays. Using the Dell™ Sound Bar (Optional) The Dell™...
... the monitor does not sense the selected video input, one of the following messages will disappear. S-Video or No input signal 4. Composite Video or No input signal 5. The Sound Bar has a rotary volume and on/off control to mount on Dell™ Flat Panel Displays. Using the Dell™ Sound Bar (Optional) The Dell™...
User Manual
Page 32
... (Plug-and-Play) and work with the DC power connector. 4. Working from the rear of the monitor, attach Sound Bar by aligning the two slots with the monitor), four removable disks are displayed in Windows. Insert the lime green mini stereo plug from the rear of the Sound Bar into the... appropriate card slot. (CF I/II, MS/MS PRO, SD/MMC, SMC) See Card Reader Specifications for optional Dell™ Sound Bar only.
... (Plug-and-Play) and work with the DC power connector. 4. Working from the rear of the monitor, attach Sound Bar by aligning the two slots with the monitor), four removable disks are displayed in Windows. Insert the lime green mini stereo plug from the rear of the Sound Bar into the... appropriate card slot. (CF I/II, MS/MS PRO, SD/MMC, SMC) See Card Reader Specifications for optional Dell™ Sound Bar only.
User Manual
Page 33
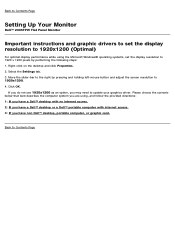
... system you are using the Microsoft Windows® operating systems, set the display resolution to 1920x1200. 4. Back to Contents Page Setting Up Your Monitor Dell™ 2405FPW Flat Panel Monitor Important instructions and graphic drivers to set the display resolution to 1920x1200 (Optimal) For optimal display performance while using , and follow the provided directions: 1: If you have...
... system you are using the Microsoft Windows® operating systems, set the display resolution to 1920x1200. 4. Back to Contents Page Setting Up Your Monitor Dell™ 2405FPW Flat Panel Monitor Important instructions and graphic drivers to set the display resolution to 1920x1200 (Optimal) For optimal display performance while using , and follow the provided directions: 1: If you have...
User Manual
Page 34
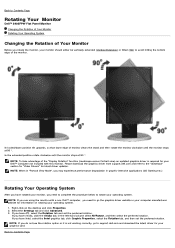
... Contents Page Rotating Your Monitor Dell™ 2405FPW Flat Panel Monitor Changing the Rotation of Your Monitor Rotating Your Operating System Changing the Rotation of Your Monitor Before you rotate the monitor, your graphics card. In locked/down position tilt upwards, so that lower edge of the monitor. NOTE: To take advantage of the "Display Rotation" function (Landscape versus...
... Contents Page Rotating Your Monitor Dell™ 2405FPW Flat Panel Monitor Changing the Rotation of Your Monitor Rotating Your Operating System Changing the Rotation of Your Monitor Before you rotate the monitor, your graphics card. In locked/down position tilt upwards, so that lower edge of the monitor. NOTE: To take advantage of the "Display Rotation" function (Landscape versus...
User Manual
Page 37
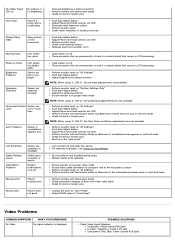
...pins Boot up in the "safe mode" Turn monitor off These are pixels that are not available. Perform monitor reset on "Position Settings Only" Push auto-adjust button Adjust the centering controls Ensure monitor is displayed POSSIBLE SOLUTIONS Check Video Input Selection Composite: Yellow ...: When using '2: DVI-D', the Pixel Clock and Phase adjustments are permanently on and is a natural defect that occurs in LCD technology Perform monitor reset on "All Settings" Push Auto Adjust button Adjust brightness & contrast controls NOTE: When using '2: DVI-D', the positioning adjustments...
...pins Boot up in the "safe mode" Turn monitor off These are pixels that are not available. Perform monitor reset on "Position Settings Only" Push auto-adjust button Adjust the centering controls Ensure monitor is displayed POSSIBLE SOLUTIONS Check Video Input Selection Composite: Yellow ...: When using '2: DVI-D', the Pixel Clock and Phase adjustments are permanently on and is a natural defect that occurs in LCD technology Perform monitor reset on "All Settings" Push Auto Adjust button Adjust brightness & contrast controls NOTE: When using '2: DVI-D', the positioning adjustments...
User Manual
Page 39
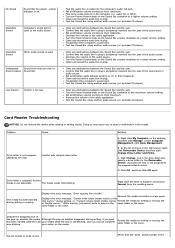
...audio line-in plug. Troubleshoot the computer's sound card. Increase the volume of the Test the Sound Bar using another audio source (i.e. D. Displays the error message, "Error copying file or folder." your media while the LED is completely inserted into the jack of the sound card.... the audio application. The media has been ejected during writing, if you cannot write or erase in plug is not assigned to their midpoints. Displays the error message, "Cannot write folder (folder name) or file (file name)," during writing, or, "Cannot remove folder (folder name) ...
...audio line-in plug. Troubleshoot the computer's sound card. Increase the volume of the Test the Sound Bar using another audio source (i.e. D. Displays the error message, "Error copying file or folder." your media while the LED is completely inserted into the jack of the sound card.... the audio application. The media has been ejected during writing, if you cannot write or erase in plug is not assigned to their midpoints. Displays the error message, "Cannot write folder (folder name) or file (file name)," during writing, or, "Cannot remove folder (folder name) ...


