Product Manual
Page 2
... 2 Features 3 Hardware Overview 4 Front Panel 4 Rear Panel (Connections 5 Getting Started 6 ShareCenter Software CD 6 Installation 7 Setup Wizard 7 Install the Hard Drives 8 Power and Device Selection 10 Admin password 11 Network Setup 12 Dynamic DNS 13 DDNS Account and System Time 14 E-mail Settings and Volume Information 15 RAID Configuration...Shares Wizard 48 Adding New ISO Mount Shares Wizard 54 Admin Password 58 Network Management 59 LAN Setup 59 Dynamic DNS 61 Application Management 62 FTP Server 62 UPnP AV Server 63 D-Link ShareCenter DNS-320 User Manual i
... 2 Features 3 Hardware Overview 4 Front Panel 4 Rear Panel (Connections 5 Getting Started 6 ShareCenter Software CD 6 Installation 7 Setup Wizard 7 Install the Hard Drives 8 Power and Device Selection 10 Admin password 11 Network Setup 12 Dynamic DNS 13 DDNS Account and System Time 14 E-mail Settings and Volume Information 15 RAID Configuration...Shares Wizard 48 Adding New ISO Mount Shares Wizard 54 Admin Password 58 Network Management 59 LAN Setup 59 Dynamic DNS 61 Application Management 62 FTP Server 62 UPnP AV Server 63 D-Link ShareCenter DNS-320 User Manual i
Product Manual
Page 3
... Mapping the Recycle Bin 102 USB Print Server 103 Yahoo! Widget Display 107 USB Copy Function 108 Contacting Technical Support 109 Warranty 110 Registration 115 D-Link ShareCenter DNS-320 User Manual ii Time Machine 90 P2P Downloads -
... Mapping the Recycle Bin 102 USB Print Server 103 Yahoo! Widget Display 107 USB Copy Function 108 Contacting Technical Support 109 Warranty 110 Registration 115 D-Link ShareCenter DNS-320 User Manual ii Time Machine 90 P2P Downloads -
Product Manual
Page 4
...safekeeping. Product Overview Product Overview Introduction The D-Link ShareCenter® DNS-320 2-Bay Network Storage, when used with all codecs. The ShareCenter® will only have access to its full protection. 1 Hard Drive(s) not included. 2 D-Link cannot guarantee full compatibility or proper playback with...or groups. This feature is ideal for an office environment with employee-specific sensitive data or for maximum space efficiency. D-Link ShareCenter DNS-320 User Manual 1 Section 1 - The availability of the UPnP™ AV media player. Whether you can create users and...
...safekeeping. Product Overview Product Overview Introduction The D-Link ShareCenter® DNS-320 2-Bay Network Storage, when used with all codecs. The ShareCenter® will only have access to its full protection. 1 Hard Drive(s) not included. 2 D-Link cannot guarantee full compatibility or proper playback with...or groups. This feature is ideal for an office environment with employee-specific sensitive data or for maximum space efficiency. D-Link ShareCenter DNS-320 User Manual 1 Section 1 - The availability of the UPnP™ AV media player. Whether you can create users and...
Product Manual
Page 5
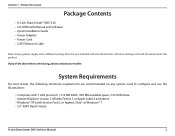
... Note: Using a power supply with a different voltage than the one included with Service Pack 2 or higher), Vista® or Windows® 7 • 3.5" SATA Hard Drive(s) D-Link ShareCenter DNS-320 User Manual 2 If any of the above items are recommended on any system used to configure and use the... ShareCenter: • Computer with: 1GHz processor / 512 MB RAM / 200 MB available space / CD-ROM drive • Internet Explorer version 7, Mozilla Firefox 3 or Apple Safari 4 and ...
... Note: Using a power supply with a different voltage than the one included with Service Pack 2 or higher), Vista® or Windows® 7 • 3.5" SATA Hard Drive(s) D-Link ShareCenter DNS-320 User Manual 2 If any of the above items are recommended on any system used to configure and use the... ShareCenter: • Computer with: 1GHz processor / 512 MB RAM / 200 MB available space / CD-ROM drive • Internet Explorer version 7, Mozilla Firefox 3 or Apple Safari 4 and ...
Product Manual
Page 6
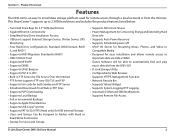
... Music, Photos, and Video to automatically find and play music directly from the Internet. Product Overview Features The DNS-320 is an easy to install data storage platform used for easy installation and allows remote access to important data via... the DNS-320 • D-Link Storage Utility • Configurable by Web Browser • Supports HTTPS Management Function • Network Recycle Bin • Supports Yahoo! Widget • Supports System Logging/FTP Logging • Automatic E-Mail and SMS Notifications • Supports Remote File Access D-Link ShareCenter DNS-320 User ...
... Music, Photos, and Video to automatically find and play music directly from the Internet. Product Overview Features The DNS-320 is an easy to install data storage platform used for easy installation and allows remote access to important data via... the DNS-320 • D-Link Storage Utility • Configurable by Web Browser • Supports HTTPS Management Function • Network Recycle Bin • Supports Yahoo! Widget • Supports System Logging/FTP Logging • Automatic E-Mail and SMS Notifications • Supports Remote File Access D-Link ShareCenter DNS-320 User ...
Product Manual
Page 7
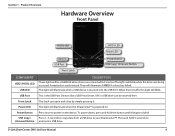
...Front Latch Power LED Power Button USB Copy / Unmount Button DESCRIPTION These lights will be inserted here. When there's traffic this ShareCenter® is powered on the device. This latch can be solid BLUE when drives are being accessed, formatted or synchronized. This...illuminate when this light will blink when the drives are connected but inactive The lights will blink. Press once to your ShareCenter®F. Section 1 - D-Link ShareCenter DNS-320 User Manual 4 This light will illuminate when a USB device is the USB Port. They will illuminate AMBER if a drive ...
...Front Latch Power LED Power Button USB Copy / Unmount Button DESCRIPTION These lights will be inserted here. When there's traffic this ShareCenter® is powered on the device. This latch can be solid BLUE when drives are being accessed, formatted or synchronized. This...illuminate when this light will blink when the drives are connected but inactive The lights will blink. Press once to your ShareCenter®F. Section 1 - D-Link ShareCenter DNS-320 User Manual 4 This light will illuminate when a USB device is the USB Port. They will illuminate AMBER if a drive ...
Product Manual
Page 8
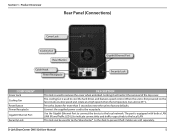
Section 1 - The cooling fan is equipped with both a LAN LINK (R) and Traffic LED (L) to indicate connectivity and traffic respectively to the local LAN This lock can be used to the ...cool the hard drives and features speed control. The port is used to factory defaults. When the unit is used to tie the ShareCenter® to the desk to the local network. Locking it will restrict the removal of the top cover. Use the Gigabit Ethernet ... powered on the fans rotate at a low speed and rotate at a high speed when the temperature rises above 49 °C. D-Link ShareCenter DNS-320 User Manual 5
Section 1 - The cooling fan is equipped with both a LAN LINK (R) and Traffic LED (L) to indicate connectivity and traffic respectively to the local LAN This lock can be used to the ...cool the hard drives and features speed control. The port is used to factory defaults. When the unit is used to tie the ShareCenter® to the desk to the local network. Locking it will restrict the removal of the top cover. Use the Gigabit Ethernet ... powered on the fans rotate at a low speed and rotate at a high speed when the temperature rises above 49 °C. D-Link ShareCenter DNS-320 User Manual 5
Product Manual
Page 9
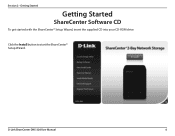
Section 2 - D-Link ShareCenter DNS-320 User Manual 6 Getting Started Getting Started ShareCenter Software CD To get started with the ShareCenter® Setup Wizard, insert the supplied CD into your CD-ROM drive: Click the Install button to start the ShareCenter® Setup Wizard.
Section 2 - D-Link ShareCenter DNS-320 User Manual 6 Getting Started Getting Started ShareCenter Software CD To get started with the ShareCenter® Setup Wizard, insert the supplied CD into your CD-ROM drive: Click the Install button to start the ShareCenter® Setup Wizard.
Product Manual
Page 10
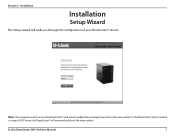
Section 3 - Note: The computer used to access the ShareCenter® web-based configuration manager must be in the same subnet. D-Link ShareCenter DNS-320 User Manual 7 Installation Installation Setup Wizard The Setup wizard will automatically be on the same subnet as the ShareCenter. If your network is using a DHCP server, the ShareCenter® will walk you through the configuration of your ShareCenter® device.
Section 3 - Note: The computer used to access the ShareCenter® web-based configuration manager must be in the same subnet. D-Link ShareCenter DNS-320 User Manual 7 Installation Installation Setup Wizard The Setup wizard will automatically be on the same subnet as the ShareCenter. If your network is using a DHCP server, the ShareCenter® will walk you through the configuration of your ShareCenter® device.
Product Manual
Page 11
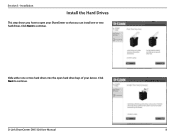
Slide either one or two hard drives. D-Link ShareCenter DNS-320 User Manual 8 Click Next to continue. Click Next to continue. Section 3 - Installation Install the Hard Drives This step shows you how to open your ShareCenter so that you can install one or two hard drives into the open hard drive bays of your device.
Slide either one or two hard drives. D-Link ShareCenter DNS-320 User Manual 8 Click Next to continue. Click Next to continue. Section 3 - Installation Install the Hard Drives This step shows you how to open your ShareCenter so that you can install one or two hard drives into the open hard drive bays of your device.
Product Manual
Page 12
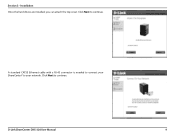
Section 3 - D-Link ShareCenter DNS-320 User Manual 9 A standard CAT5E Ethernet cable with a RJ-45 connector is needed to connect your ShareCenter® to continue. Click Next to your network. Installation Once the hard drives are installed, you can attach the top cover. Click Next to continue.
Section 3 - D-Link ShareCenter DNS-320 User Manual 9 A standard CAT5E Ethernet cable with a RJ-45 connector is needed to connect your ShareCenter® to continue. Click Next to your network. Installation Once the hard drives are installed, you can attach the top cover. Click Next to continue.
Product Manual
Page 13
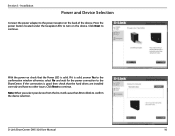
... window otherwise select No and wait for the power connection to continue. Section 3 - Click Next to the ShareCenter. If the connection is solid. If it will cause the LEDs to blink to continue. D-Link ShareCenter DNS-320 User Manual 10 Installation Power and Device Selection Connect the power adapter to turn on check that the...
... window otherwise select No and wait for the power connection to continue. Section 3 - Click Next to the ShareCenter. If the connection is solid. If it will cause the LEDs to blink to continue. D-Link ShareCenter DNS-320 User Manual 10 Installation Power and Device Selection Connect the power adapter to turn on check that the...
Product Manual
Page 14
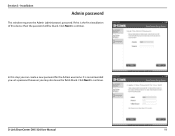
If this is recommended you set a password however you can create a new password for the Admin username. Click Next to continue. D-Link ShareCenter DNS-320 User Manual 11 Section 3 - Click Next to continue. Installation Admin password This window requests the Admin (administrator) password. In this device then the password will be blank. It is the first installation of this step you may also leave the fields blank.
If this is recommended you set a password however you can create a new password for the Admin username. Click Next to continue. D-Link ShareCenter DNS-320 User Manual 11 Section 3 - Click Next to continue. Installation Admin password This window requests the Admin (administrator) password. In this device then the password will be blank. It is the first installation of this step you may also leave the fields blank.
Product Manual
Page 15
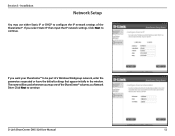
If you want your ShareCenter® to continue. If you map one of the ShareCenter® volumes as a Network Drive. D-Link ShareCenter DNS-320 User Manual 12 Installation Network Setup You may use either Static IP or DHCP to continue. The name will be part of the ShareCenter®. Click Next to configure the IP network settings of a Windows Workgroup network, enter the parameters requested or leave the default settings that appear initially in the window. Section 3 - Click Next to be used whenever you select Static IP then input the IP network settings.
If you want your ShareCenter® to continue. If you map one of the ShareCenter® volumes as a Network Drive. D-Link ShareCenter DNS-320 User Manual 12 Installation Network Setup You may use either Static IP or DHCP to continue. The name will be part of the ShareCenter®. Click Next to configure the IP network settings of a Windows Workgroup network, enter the parameters requested or leave the default settings that appear initially in the window. Section 3 - Click Next to be used whenever you select Static IP then input the IP network settings.
Product Manual
Page 16
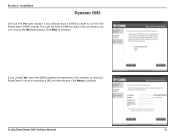
If you do not have a DDNS account or do not want to use for the ShareCenter® DDNS settings. If you already have a DDNS account to use one, click on the Yes radio button if you clicked Yes, enter the DDNS parameters requested in this window so that your ShareCenter® can be accessed by a URL over the Internet. Installation Dynamic DNS Click on the No Radio button. Click Next to continue. Click Next to continue. Section 3 - D-Link ShareCenter DNS-320 User Manual 13
If you do not have a DDNS account or do not want to use for the ShareCenter® DDNS settings. If you already have a DDNS account to use one, click on the Yes radio button if you clicked Yes, enter the DDNS parameters requested in this window so that your ShareCenter® can be accessed by a URL over the Internet. Installation Dynamic DNS Click on the No Radio button. Click Next to continue. Click Next to continue. Section 3 - D-Link ShareCenter DNS-320 User Manual 13

Product Manual
Page 17
... here in order to create a DDNS account and configure your LAN equipment and ShareCenter® to work with your ShareCenter®, D-Link provides a free DDNS account by clicking on the web link shown. Select the time zone from the computer's settings. D-Link ShareCenter DNS-320 User Manual 14 Installation DDNS Account and System Time If you want a DDNS...
... here in order to create a DDNS account and configure your LAN equipment and ShareCenter® to work with your ShareCenter®, D-Link provides a free DDNS account by clicking on the web link shown. Select the time zone from the computer's settings. D-Link ShareCenter DNS-320 User Manual 14 Installation DDNS Account and System Time If you want a DDNS...
Product Manual
Page 18
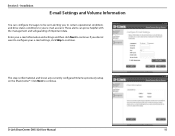
... conditions and drive status conditions to continue. Click Next to continue. D-Link ShareCenter DNS-320 User Manual 15 Enter your e-mail settings, click Skip to your e-mail account. This step is informational and shows any currently configured Volumes previously setup on the ShareCenter®. Installation E-mail Settings and Volume Information You can prove helpful with...
... conditions and drive status conditions to continue. Click Next to continue. D-Link ShareCenter DNS-320 User Manual 15 Enter your e-mail settings, click Skip to your e-mail account. This step is informational and shows any currently configured Volumes previously setup on the ShareCenter®. Installation E-mail Settings and Volume Information You can prove helpful with...
Product Manual
Page 19
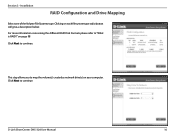
on each file system type radio button will give a description below. Click Next to map the volume(s) created as network drive(s) on your computer. Clicking on page 98 Click Next to "What is RAID?" This step allows you to continue. For more information concerning the different RAID Disk Formats please refer to continue. Installation RAID Configuration and Drive Mapping Select one of the Volume File Systems type. Section 3 - D-Link ShareCenter DNS-320 User Manual 16
on each file system type radio button will give a description below. Click Next to map the volume(s) created as network drive(s) on your computer. Clicking on page 98 Click Next to "What is RAID?" This step allows you to continue. For more information concerning the different RAID Disk Formats please refer to continue. Installation RAID Configuration and Drive Mapping Select one of the Volume File Systems type. Section 3 - D-Link ShareCenter DNS-320 User Manual 16
Product Manual
Page 20
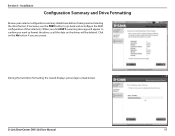
Installation Configuration Summary and Drive Formatting Review your volume configuration summary details here before clicking next and starting the drive format. During the hard drive formatting the wizard displays percentage complete bars. Click on the No button if you want to format the drives as all the data on the drives will appear to go back and reconfigure the RAID configuration of the volume(s). If necessary use the PREV button to confirm you are unsure. D-Link ShareCenter DNS-320 User Manual 17 When you click NEXT a warning message will be deleted. Section 3 -
Installation Configuration Summary and Drive Formatting Review your volume configuration summary details here before clicking next and starting the drive format. During the hard drive formatting the wizard displays percentage complete bars. Click on the No button if you want to format the drives as all the data on the drives will appear to go back and reconfigure the RAID configuration of the volume(s). If necessary use the PREV button to confirm you are unsure. D-Link ShareCenter DNS-320 User Manual 17 When you click NEXT a warning message will be deleted. Section 3 -
Product Manual
Page 21
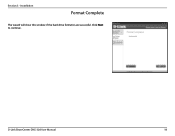
Installation Format Complete The wizard will show this window if the hard drive format(s) are successful. Click Next to continue. D-Link ShareCenter DNS-320 User Manual 18 Section 3 -
Installation Format Complete The wizard will show this window if the hard drive format(s) are successful. Click Next to continue. D-Link ShareCenter DNS-320 User Manual 18 Section 3 -


