Product Manual
Page 5
...: • Computer with the ShareCenter will cause damage and void the warranty for this product. Product Overview Package Contents • D-Link ShareCenter® DNS-320 • CD-ROM with Manual and Software • Quick Installation Guide • Power Adapter • Power Cord • CAT5... version 7, Mozilla Firefox 3 or Apple Safari 4 and above items are recommended on any of the above • Windows® XP (with Service Pack 2 or higher), Vista® or Windows® 7 • 3.5" SATA Hard Drive(s) D-Link ShareCenter DNS-320 User Manual 2 Section 1 -
...: • Computer with the ShareCenter will cause damage and void the warranty for this product. Product Overview Package Contents • D-Link ShareCenter® DNS-320 • CD-ROM with Manual and Software • Quick Installation Guide • Power Adapter • Power Cord • CAT5... version 7, Mozilla Firefox 3 or Apple Safari 4 and above items are recommended on any of the above • Windows® XP (with Service Pack 2 or higher), Vista® or Windows® 7 • 3.5" SATA Hard Drive(s) D-Link ShareCenter DNS-320 User Manual 2 Section 1 -
Product Manual
Page 13
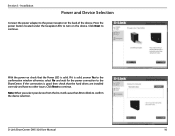
... confirmation window otherwise select No and wait for the power connection to confirm the device selection. With the power on the device. Click Next to continue. Click Next to continue. Press the power button located under the faceplate LEDs to the power receptor on the back of the device. D-Link ShareCenter DNS-320 User...
... confirmation window otherwise select No and wait for the power connection to confirm the device selection. With the power on the device. Click Next to continue. Click Next to continue. Press the power button located under the faceplate LEDs to the power receptor on the back of the device. D-Link ShareCenter DNS-320 User...
Product Manual
Page 14
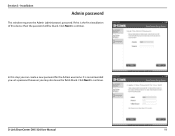
Installation Admin password This window requests the Admin (administrator) password. In this device then the password will be blank. Click Next to continue. Click Next to continue. If this is recommended you set a password however you can create a new password for the Admin username. It is the first installation of this step you may also leave the fields blank. Section 3 - D-Link ShareCenter DNS-320 User Manual 11
Installation Admin password This window requests the Admin (administrator) password. In this device then the password will be blank. Click Next to continue. Click Next to continue. If this is recommended you set a password however you can create a new password for the Admin username. It is the first installation of this step you may also leave the fields blank. Section 3 - D-Link ShareCenter DNS-320 User Manual 11
Product Manual
Page 15
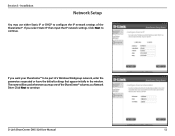
The name will be part of a Windows Workgroup network, enter the parameters requested or leave the default settings that appear initially in the window. Section 3 - D-Link ShareCenter DNS-320 User Manual 12 If you want your ShareCenter® to continue. If you map one of the ShareCenter®. Click Next to be used whenever you select Static IP then input the IP network settings. Click Next to configure the IP network settings of the ShareCenter® volumes as a Network Drive. Installation Network Setup You may use either Static IP or DHCP to continue.
The name will be part of a Windows Workgroup network, enter the parameters requested or leave the default settings that appear initially in the window. Section 3 - D-Link ShareCenter DNS-320 User Manual 12 If you want your ShareCenter® to continue. If you map one of the ShareCenter®. Click Next to be used whenever you select Static IP then input the IP network settings. Click Next to configure the IP network settings of the ShareCenter® volumes as a Network Drive. Installation Network Setup You may use either Static IP or DHCP to continue.
Product Manual
Page 16
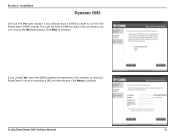
Click Next to continue. Section 3 - Click Next to continue. If you do not want to use one, click on the No Radio button. Installation Dynamic DNS Click on the Yes radio button if you already have a DDNS account or do not have a DDNS account to use for the ShareCenter® DDNS settings. If you clicked Yes, enter the DDNS parameters requested in this window so that your ShareCenter® can be accessed by a URL over the Internet. D-Link ShareCenter DNS-320 User Manual 13
Click Next to continue. Section 3 - Click Next to continue. If you do not want to use one, click on the No Radio button. Installation Dynamic DNS Click on the Yes radio button if you already have a DDNS account or do not have a DDNS account to use for the ShareCenter® DDNS settings. If you clicked Yes, enter the DDNS parameters requested in this window so that your ShareCenter® can be accessed by a URL over the Internet. D-Link ShareCenter DNS-320 User Manual 13
Product Manual
Page 21
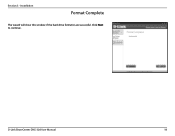
Installation Format Complete The wizard will show this window if the hard drive format(s) are successful. Click Next to continue. D-Link ShareCenter DNS-320 User Manual 18 Section 3 -
Installation Format Complete The wizard will show this window if the hard drive format(s) are successful. Click Next to continue. D-Link ShareCenter DNS-320 User Manual 18 Section 3 -
Product Manual
Page 22
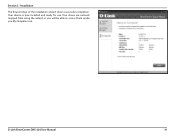
Your drives are network mapped from using the wizard so you will be able to access them under you My Computer icon. Your device is now installed and ready for use. D-Link ShareCenter DNS-320 User Manual 19 Installation The final window of the installation wizard shows successful completion. Section 3 -
Your drives are network mapped from using the wizard so you will be able to access them under you My Computer icon. Your device is now installed and ready for use. D-Link ShareCenter DNS-320 User Manual 19 Installation The final window of the installation wizard shows successful completion. Section 3 -
Product Manual
Page 32
...-Rebuild: If you do not want to select the RAID configuration and format the drives. D-Link ShareCenter DNS-320 User Manual 29 Section 4 - Configuration Disk Management Hard Drive Configuration To setup the Hard Drive RAID configuration of the window. Manual Rebuild Now: If you have disabled Auto-Rebuild then you set the Auto-Rebuild...
...-Rebuild: If you do not want to select the RAID configuration and format the drives. D-Link ShareCenter DNS-320 User Manual 29 Section 4 - Configuration Disk Management Hard Drive Configuration To setup the Hard Drive RAID configuration of the window. Manual Rebuild Now: If you have disabled Auto-Rebuild then you set the Auto-Rebuild...
Product Manual
Page 38
Click on the Create button to add a schedule. Schedule List: In the window all the created schedule lists will be available over the network until it has completed testing. Configuration Schedule: By clicking the Create Schedule button the user can create a S.M.A.R.T. Select the frequency (Daily, Weekly, Monthly) and the Time here. D-Link ShareCenter DNS-320 User Manual 35 test, your hard drives will run automatically at the configured time. test schedule where this test will not be displayed. Section 4 - Note: When performing a S.M.A.R.T.
Click on the Create button to add a schedule. Schedule List: In the window all the created schedule lists will be available over the network until it has completed testing. Configuration Schedule: By clicking the Create Schedule button the user can create a S.M.A.R.T. Select the frequency (Daily, Weekly, Monthly) and the Time here. D-Link ShareCenter DNS-320 User Manual 35 test, your hard drives will run automatically at the configured time. test schedule where this test will not be displayed. Section 4 - Note: When performing a S.M.A.R.T.

Product Manual
Page 39
... Disk test then a window Window: with a progress bar will scan your ShareCenter. Section 4 - Click on . Volume: Use the drop-down menu to select the disk volume that you can try reformatting the drive and test again. After completion, the test results will need 3rd party disk troubleshooting tools. D-Link ShareCenter DNS-320 User Manual 36...
... Disk test then a window Window: with a progress bar will scan your ShareCenter. Section 4 - Click on . Volume: Use the drop-down menu to select the disk volume that you can try reformatting the drive and test again. After completion, the test results will need 3rd party disk troubleshooting tools. D-Link ShareCenter DNS-320 User Manual 36...
Product Manual
Page 41
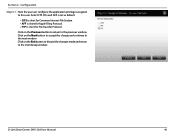
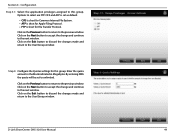
... on the Exit button to discard the changes made and return to the User/Group window. Click on the Previous button to return to be confirmed by re-entering the password in the Confirm Password field. In this device. Section 4 - To ... to configure wizard will be able to the User/Group window. Click on this wizard the user will be launched and look like the following section will guide the user through the steps of the configuration before completing the addition. D-Link ShareCenter DNS-320 User Manual 38 Step 1: Here you can enter the User...
... on the Exit button to discard the changes made and return to the User/Group window. Click on the Previous button to return to be confirmed by re-entering the password in the Confirm Password field. In this device. Section 4 - To ... to configure wizard will be able to the User/Group window. Click on this wizard the user will be launched and look like the following section will guide the user through the steps of the configuration before completing the addition. D-Link ShareCenter DNS-320 User Manual 38 Step 1: Here you can enter the User...
Product Manual
Page 42
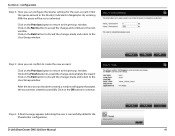
Click on the Previous button to return to the previous window. Click on the Previous button to return to the next window. Click on the Next button to accept the change and continue to the previous window. Configuration Step 2: Here you can configure the appropriate Network Access ... on the Exit button to discard the changes made and return to the next window. Step 3: Here the user can add this user account to the User/Group window. D-Link ShareCenter DNS-320 User Manual 39 Click on the Exit button to discard the changes made and return to a group. Section...
Click on the Previous button to return to the previous window. Click on the Previous button to return to the next window. Click on the Next button to accept the change and continue to the previous window. Configuration Step 2: Here you can configure the appropriate Network Access ... on the Exit button to discard the changes made and return to the next window. Step 3: Here the user can add this user account to the User/Group window. D-Link ShareCenter DNS-320 User Manual 39 Click on the Exit button to discard the changes made and return to a group. Section...
Product Manual
Page 43
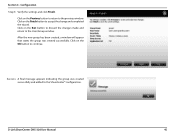
Click on the Exit button to discard the changes made and return to the previous window. D-Link ShareCenter DNS-320 User Manual 40 Click on the Previous button to return to the User/Group window. Select FTP. CIFs and AFP is set as default. • CIFS is short for Common Internet File System. • AFP is... Apple Filing Protocol. • FTP is short for File Transfer Protocol. Configuration Step 3-1: Here the user can configure the application privileges assigned to the next window. Click on the Next button to accept the change and continue to this user. Section 4 -
Click on the Exit button to discard the changes made and return to the previous window. D-Link ShareCenter DNS-320 User Manual 40 Click on the Previous button to return to the User/Group window. Select FTP. CIFs and AFP is set as default. • CIFS is short for Common Internet File System. • AFP is... Apple Filing Protocol. • FTP is short for File Transfer Protocol. Configuration Step 3-1: Here the user can configure the application privileges assigned to the next window. Click on the Next button to accept the change and continue to this user. Section 4 -
Product Manual
Page 44
... the Previous button to return to create the new account. After the new account has been created, a window will be set to the ShareCenter configuration.. Section 4 - Step 5: Here you can confirm to the previous window. Configuration Step 4: Here you can configure the Quotas settings for the user account. By entering 0Mb the... the Exit button to discard the changes made and return to continue. Click on the Next button to accept the change and complete the wizard. D-Link ShareCenter DNS-320 User Manual 41
... the Previous button to return to create the new account. After the new account has been created, a window will be set to the ShareCenter configuration.. Section 4 - Step 5: Here you can confirm to the previous window. Configuration Step 4: Here you can configure the Quotas settings for the user account. By entering 0Mb the... the Exit button to discard the changes made and return to continue. Click on the Next button to accept the change and complete the wizard. D-Link ShareCenter DNS-320 User Manual 41
Product Manual
Page 45
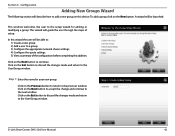
... to add a new group on the Exit button to discard the changes made and return to continue. D-Link ShareCenter DNS-320 User Manual 42 Section 4 - To add a group click on the Next button to the User/Group window. Click on the Previous button to return to a group. 3) Configure the appropriate network shares settings. 4) Configure...
... to add a new group on the Exit button to discard the changes made and return to continue. D-Link ShareCenter DNS-320 User Manual 42 Section 4 - To add a group click on the Next button to the User/Group window. Click on the Previous button to return to a group. 3) Configure the appropriate network shares settings. 4) Configure...
Product Manual
Page 46
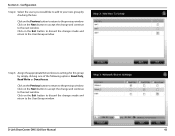
... Network Access settings for this group by checking the box. Click on the Previous button to return to the next window. Configuration Step 2: Select the users you would like to add to the previous window. Click on the Next button to accept the change and continue to the User/Group...to the previous window. Click on the Exit button to discard the changes made and return to the User/Group window. Click on the Previous button to return to your new group by simply clicking one of the following options: Read Only, Read Write or Deny Access. D-Link ShareCenter DNS-320 User Manual 43...
... Network Access settings for this group by checking the box. Click on the Previous button to return to the next window. Configuration Step 2: Select the users you would like to add to the previous window. Click on the Next button to accept the change and continue to the User/Group...to the previous window. Click on the Exit button to discard the changes made and return to the User/Group window. Click on the Previous button to return to your new group by simply clicking one of the following options: Read Only, Read Write or Deny Access. D-Link ShareCenter DNS-320 User Manual 43...
Product Manual
Page 47
... in Megabytes. Click on the Previous button to return to the previous window. CIFS and AFP is set to the next window. Click on the Next button to accept the change and continue to unlimited. D-Link ShareCenter DNS-320 User Manual 44 Options to this group. Click on the Next button ...to accept the change and continue to the User/Group window. Click on the Exit button to discard the changes made and return...
... in Megabytes. Click on the Previous button to return to the previous window. CIFS and AFP is set to the next window. Click on the Next button to accept the change and continue to unlimited. D-Link ShareCenter DNS-320 User Manual 44 Options to this group. Click on the Next button ...to accept the change and continue to the User/Group window. Click on the Exit button to discard the changes made and return...
Product Manual
Page 48
... to discard the changes made and return to the previous window. Click on the Previous button to return to the User/Group window. Click on the Finish button to the ShareCenter® configuration. D-Link ShareCenter DNS-320 User Manual 45 Configuration Step 5: Verify the settings and click... Finish. After the new group has been created, a window will appear that states the group ...
... to discard the changes made and return to the previous window. Click on the Previous button to return to the User/Group window. Click on the Finish button to the ShareCenter® configuration. D-Link ShareCenter DNS-320 User Manual 45 Configuration Step 5: Verify the settings and click... Finish. After the new group has been created, a window will appear that states the group ...
Product Manual
Page 50
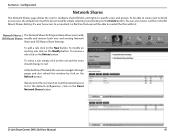
... folders and rights to read all the files within it and clicking on the Refresh button. You can navigate through pages and also refresh the window by simply selecting it . Section 4 - If a user has access to a mounted .iso file then that user will be able to add, ISO Mount ...remove both new and existing Network Share and ISO Mount Share Settings. To modify an existing rule click on the Reset Network Shares button. D-Link ShareCenter DNS-320 User Manual 47 To select a rule, simply click on the rule and the entry should change to the default configuration, click on the Modify...
... folders and rights to read all the files within it and clicking on the Refresh button. You can navigate through pages and also refresh the window by simply selecting it . Section 4 - If a user has access to a mounted .iso file then that user will be able to add, ISO Mount ...remove both new and existing Network Share and ISO Mount Share Settings. To modify an existing rule click on the Reset Network Shares button. D-Link ShareCenter DNS-320 User Manual 47 To select a rule, simply click on the rule and the entry should change to the default configuration, click on the Modify...
Product Manual
Page 51
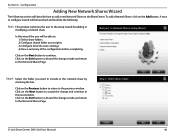
... to include in this wizard the user will be launched and look like the following section will be able to the previous window. Click on the Add button. D-Link ShareCenter DNS-320 User Manual 48 In this network share by checking the box. Click on the Next button to the Network Shares Page. A easy... accept the change and continue to the setup wizard for adding or modifying a network share. Configuration Adding New Network Shares Wizard The following : Start: This window welcomes the user to the next...
... to include in this wizard the user will be launched and look like the following section will be able to the previous window. Click on the Add button. D-Link ShareCenter DNS-320 User Manual 48 In this network share by checking the box. Click on the Next button to the Network Shares Page. A easy... accept the change and continue to the setup wizard for adding or modifying a network share. Configuration Adding New Network Shares Wizard The following : Start: This window welcomes the user to the next...


