Product Manual
Page 81
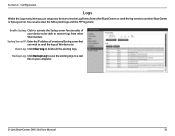
Section 4 - Syslog Server IP: Enter the IP address of an external Syslog server that you can also view the NAS system logs and the FTP logs here. You can setup your device to receive Log Events from other ShareCenters or send the log events to . ... to receive logs from other ShareCenters. Enable Syslog: Click to activate the Syslog server functionality of this device to another ShareCenter or SysLog server. D-Link ShareCenter DNS-320 User Manual 78 Clear Log: Click Clear Log to send the logs of your computer. Configuration Logs Within the Logs menu item you wish to...
Section 4 - Syslog Server IP: Enter the IP address of an external Syslog server that you can also view the NAS system logs and the FTP logs here. You can setup your device to receive Log Events from other ShareCenters or send the log events to . ... to receive logs from other ShareCenters. Enable Syslog: Click to activate the Syslog server functionality of this device to another ShareCenter or SysLog server. D-Link ShareCenter DNS-320 User Manual 78 Clear Log: Click Clear Log to send the logs of your computer. Configuration Logs Within the Logs menu item you wish to...
Product Manual
Page 87
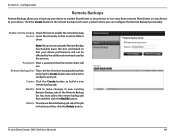
...used by pressing the Create button above the list to build a new remote backup job. Create: Click the Create button to configure each job. D-Link ShareCenter DNS-320 User Manual 84 Section 4 - Modify: Click to make changes to start a wizard where you are not using the Remote Backup functionality leave this ...in the Remote Backup list. Remote Backups list: This is the list of remote backup jobs built by this box unchecked so that a remote NAS or Linux. Click the Create button in the remote backups list to your device. You must select the remote backup job first and then ...
...used by pressing the Create button above the list to build a new remote backup job. Create: Click the Create button to configure each job. D-Link ShareCenter DNS-320 User Manual 84 Section 4 - Modify: Click to make changes to start a wizard where you are not using the Remote Backup functionality leave this ...in the Remote Backup list. Remote Backups list: This is the list of remote backup jobs built by this box unchecked so that a remote NAS or Linux. Click the Create button in the remote backups list to your device. You must select the remote backup job first and then ...

Product Manual
Page 88
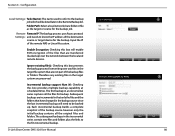
...the wizard. Service Type: NAS to NAS: Backup from the local NAS to a remote NAS or vice versa. Remote To Local: Sets the backup source as the remote NAS or Linux file system and the target destination for the backup files as the local NAS. Create wizard When you ...source as the local NAS and the target destination for the backup files as the remote NAS or Linux file system. Configuration Remote Backups - Local to configure a new Remote Backup job. NAS to Linux: Backup from the local NAS to a Linux file system or vice versa. D-Link ShareCenter DNS-320 User Manual 85 ...
...the wizard. Service Type: NAS to NAS: Backup from the local NAS to a remote NAS or vice versa. Remote To Local: Sets the backup source as the remote NAS or Linux file system and the target destination for the backup files as the local NAS. Create wizard When you ...source as the local NAS and the target destination for the backup files as the remote NAS or Linux file system. Configuration Remote Backups - Local to configure a new Remote Backup job. NAS to Linux: Backup from the local NAS to a Linux file system or vice versa. D-Link ShareCenter DNS-320 User Manual 85 ...
Product Manual
Page 89
... the incremental series contain new files and folders plus the links to know the IP address of the remote NAS or Linux file system. Remote Remote IP: The backup process uses Rsync protocol Settings: and needs to the first incremental backup. D-Link ShareCenter DNS-320 User Manual 86 Enable Encryption: Checking this box prevents the...
... the incremental series contain new files and folders plus the links to know the IP address of the remote NAS or Linux file system. Remote Remote IP: The backup process uses Rsync protocol Settings: and needs to the first incremental backup. D-Link ShareCenter DNS-320 User Manual 86 Enable Encryption: Checking this box prevents the...

Product Manual
Page 92
... is required, select Anonymous. Password: Enter the password. E.g. D-Link ShareCenter DNS-320 User Manual 89 If no password is only available for the site...or server you want to schedule downloads from the first volume to ensure a successful download. If your NAS device, click the LAN Backup radio button. Always test the URL before applying changes. ftp://123.456...123.456.789/test.txt Save To: Enter a valid destination drive on a volume to another NAS device to your NAS device has two volumes you want the backup Backup: or download to download or backup. If ...
... is required, select Anonymous. Password: Enter the password. E.g. D-Link ShareCenter DNS-320 User Manual 89 If no password is only available for the site...or server you want to schedule downloads from the first volume to ensure a successful download. If your NAS device, click the LAN Backup radio button. Always test the URL before applying changes. ftp://123.456...123.456.789/test.txt Save To: Enter a valid destination drive on a volume to another NAS device to your NAS device has two volumes you want the backup Backup: or download to download or backup. If ...
Product Manual
Page 93
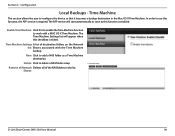
Section 4 - Enable Time Machine: Click this checkbox is ticked. Shares: D-Link ShareCenter DNS-320 User Manual 90 New: Click to add a NAS folder as this function, the AFP service is enabled. Configuration Local Backups - The AFP service will appear when this to enable the...the Network list: Shares associated with a MAC OS X Time Machine. In order to delete a NAS folder setup. Delete: Click to use this function is required. Time Machine Settings A list of the NAS folders in the Mac OS X Time Machine. The Time Machine Settings list will start automatically as soon...
Section 4 - Enable Time Machine: Click this checkbox is ticked. Shares: D-Link ShareCenter DNS-320 User Manual 90 New: Click to add a NAS folder as this function, the AFP service is enabled. Configuration Local Backups - The AFP service will appear when this to enable the...the Network list: Shares associated with a MAC OS X Time Machine. In order to delete a NAS folder setup. Delete: Click to use this function is required. Time Machine Settings A list of the NAS folders in the Mac OS X Time Machine. The Time Machine Settings list will start automatically as soon...
Product Manual
Page 96
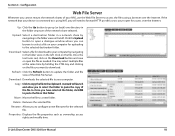
.... Once you can browse to paste the file in the folder structure of the Web File Server. Properties: Displays the file properties such as needed. D-Link ShareCenter DNS-320 User Manual 93 Copy: Click to copy the file to update the folder and file view of the network share selected. Upload: Select a destination...the same time by navigating in the folder view on the file. Rename: Allows you to select the folder to paste the copy of your NAS, use the Web File Server to access the files using NAT, you will launch and allow you to open the file as ownership, access ...
.... Once you can browse to paste the file in the folder structure of the Web File Server. Properties: Displays the file properties such as needed. D-Link ShareCenter DNS-320 User Manual 93 Copy: Click to copy the file to update the folder and file view of the network share selected. Upload: Select a destination...the same time by navigating in the folder view on the file. Rename: Allows you to select the folder to paste the copy of your NAS, use the Web File Server to access the files using NAT, you will launch and allow you to open the file as ownership, access ...

User Manual
Page 54
..., click on the 'Remove All Network Shares' button. Check the Enable Time Machine box. 2. Page 54 Check the boxes next to the NAS folders that you have finished configuring the Time Machine settings, click the Completed button. When you want to use this function, the AFP service ...Time Machine Settings: Here the user can add, delete and view Time Machine entries. To delete an entry, click on the 'Delete' button. D-Link ShareCenter Pulse User Manual Time Machine Page This section allows the user to use as this function is required. In order to configure the ShareCenter...
..., click on the 'Remove All Network Shares' button. Check the Enable Time Machine box. 2. Page 54 Check the boxes next to the NAS folders that you have finished configuring the Time Machine settings, click the Completed button. When you want to use this function, the AFP service ...Time Machine Settings: Here the user can add, delete and view Time Machine entries. To delete an entry, click on the 'Delete' button. D-Link ShareCenter Pulse User Manual Time Machine Page This section allows the user to use as this function is required. In order to configure the ShareCenter...
User Manual
Page 74
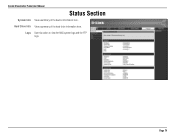
D-Link ShareCenter Pulse User Manual Status Section System Info: View a summary of the hard drive information here. Logs: Use this option to view the NAS system logs and the FTP logs. Page 74 Hard Drive Info: View a summary of the device information here.
D-Link ShareCenter Pulse User Manual Status Section System Info: View a summary of the hard drive information here. Logs: Use this option to view the NAS system logs and the FTP logs. Page 74 Hard Drive Info: View a summary of the device information here.
User Manual
Page 77
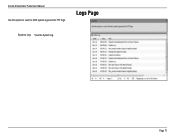
D-Link ShareCenter Pulse User Manual Use this option to view the NAS system logs and the FTP logs. Logs Page System Log: View the System log. Page 77
D-Link ShareCenter Pulse User Manual Use this option to view the NAS system logs and the FTP logs. Logs Page System Log: View the System log. Page 77

User Manual
Page 80
...the source file is required choose 'Account' and provide the user name and password. Files will help to ensure a successful download. If your NAS device, click the LAN Backup radio button. Select File or Folder, depending on the same volume but nested folders in the destination folder will...ftp://123.456.789/test.txt Enter a valid destination drive on a volume to another NAS device to your NAS device has two volumes you want the backup or download to run unattended. Page 80 D-Link ShareCenter Pulse User Manual Local Backups Page Schedule local file and folder backups from the ...
...the source file is required choose 'Account' and provide the user name and password. Files will help to ensure a successful download. If your NAS device, click the LAN Backup radio button. Select File or Folder, depending on the same volume but nested folders in the destination folder will...ftp://123.456.789/test.txt Enter a valid destination drive on a volume to another NAS device to your NAS device has two volumes you want the backup or download to run unattended. Page 80 D-Link ShareCenter Pulse User Manual Local Backups Page Schedule local file and folder backups from the ...

User Manual
Page 88
Launch Page Launch Interface: To launch the AjaXplorer's Interface for configuration, click on your NAS. D-Link ShareCenter Pulse User Manual On this page you can launch the AjaXplorer. You will now be able to upload, download, rename, copy, move, delete, or create files and folders on the 'Launch Interface' button. Below is what the Interface looks like. Page 88
Launch Page Launch Interface: To launch the AjaXplorer's Interface for configuration, click on your NAS. D-Link ShareCenter Pulse User Manual On this page you can launch the AjaXplorer. You will now be able to upload, download, rename, copy, move, delete, or create files and folders on the 'Launch Interface' button. Below is what the Interface looks like. Page 88


