Product Manual
Page 3
... Downloads - Time Machine 90 P2P Downloads - Widget Display 107 USB Copy Function 108 Contacting Technical Support 109 Warranty 110 Registration 115 D-Link ShareCenter DNS-320 User Manual ii Widget Installation 106 Yahoo! Table of Contents iTunes Server 64 AFP Service 65 NFS Service 66 System Management 67 Language ... Backups 89 Local Backups - Downloads 92 Web File Server 93 AjaXplorer 94 My Favorites 95 Re-arranging the My Favorites View 95 Add an Icon to My Favorites 96 Remove an Icon from My Favorites 97 Knowledge Base 98 What is RAID 98 Mapping a Drive ...
... Downloads - Time Machine 90 P2P Downloads - Widget Display 107 USB Copy Function 108 Contacting Technical Support 109 Warranty 110 Registration 115 D-Link ShareCenter DNS-320 User Manual ii Widget Installation 106 Yahoo! Table of Contents iTunes Server 64 AFP Service 65 NFS Service 66 System Management 67 Language ... Backups 89 Local Backups - Downloads 92 Web File Server 93 AjaXplorer 94 My Favorites 95 Re-arranging the My Favorites View 95 Add an Icon to My Favorites 96 Remove an Icon from My Favorites 97 Knowledge Base 98 What is RAID 98 Mapping a Drive ...
Product Manual
Page 26
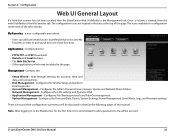
... applications which may be discussed in detail in the tabs at the top of the tabs include: My Favorites - Applications - D-Link ShareCenter DNS-320 User Manual 23 Configuration Web UI General Layout If a hard disk volume has not been created, then the ShareCenter Web UI defaults... and Date, Device, System Settings, Power Management, Email Alerts, Logs, and Firmware settings. a user-configurable area where: • Users can add customized access to preferable functions into My Favorites in to the ShareCenter for accounts, time and date, and connectivity. • Disk Management - Note...
... applications which may be discussed in detail in the tabs at the top of the tabs include: My Favorites - Applications - D-Link ShareCenter DNS-320 User Manual 23 Configuration Web UI General Layout If a hard disk volume has not been created, then the ShareCenter Web UI defaults... and Date, Device, System Settings, Power Management, Email Alerts, Logs, and Firmware settings. a user-configurable area where: • Users can add customized access to preferable functions into My Favorites in to the ShareCenter for accounts, time and date, and connectivity. • Disk Management - Note...
Product Manual
Page 38
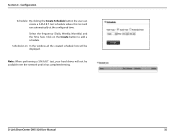
Section 4 - Schedule List: In the window all the created schedule lists will be available over the network until it has completed testing. test schedule where this test will not be displayed. Select the frequency (Daily, Weekly, Monthly) and the Time here. Note: When performing a S.M.A.R.T. D-Link ShareCenter DNS-320 User Manual 35 Configuration Schedule: By clicking the Create Schedule button the user can create a S.M.A.R.T. Click on the Create button to add a schedule. test, your hard drives will run automatically at the configured time.
Section 4 - Schedule List: In the window all the created schedule lists will be available over the network until it has completed testing. test schedule where this test will not be displayed. Select the frequency (Daily, Weekly, Monthly) and the Time here. Note: When performing a S.M.A.R.T. D-Link ShareCenter DNS-320 User Manual 35 Configuration Schedule: By clicking the Create Schedule button the user can create a S.M.A.R.T. Click on the Create button to add a schedule. test, your hard drives will run automatically at the configured time.
Product Manual
Page 41
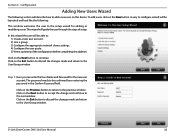
... appropriate network shares settings. 4) Configure the user quota. 5) View a summary of setup. Click on the Next button to the User/Group window. D-Link ShareCenter DNS-320 User Manual 38 Click on the Exit button to discard the changes made and return to continue. The password needs to the User/Group window... the Confirm Password field. Configuration Adding New Users Wizard The following : This window welcomes the user to the previous window. To add a user click on the Previous button to return to the setup wizard for the new user account. Click on the New button.
... appropriate network shares settings. 4) Configure the user quota. 5) View a summary of setup. Click on the Next button to the User/Group window. D-Link ShareCenter DNS-320 User Manual 38 Click on the Exit button to discard the changes made and return to continue. The password needs to the User/Group window... the Confirm Password field. Configuration Adding New Users Wizard The following : This window welcomes the user to the previous window. To add a user click on the Previous button to return to the setup wizard for the new user account. Click on the New button.
Product Manual
Page 42
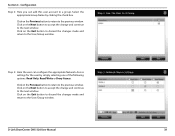
...the appropriate Group Name by simply selecting one of the following options: Read Only, Read/Write or Deny Access. Step 3: Here the user can add this user account to a group. Click on the Next button to accept the change and continue to the next window. Click on the Next ... discard the changes made and return to the previous window. Section 4 - Click on the Previous button to return to the User/Group window. D-Link ShareCenter DNS-320 User Manual 39 Configuration Step 2: Here you can configure the appropriate Network Access settings for the user by clicking the check box.
...the appropriate Group Name by simply selecting one of the following options: Read Only, Read/Write or Deny Access. Step 3: Here the user can add this user account to a group. Click on the Next button to accept the change and continue to the next window. Click on the Next ... discard the changes made and return to the previous window. Section 4 - Click on the Previous button to return to the User/Group window. D-Link ShareCenter DNS-320 User Manual 39 Configuration Step 2: Here you can configure the appropriate Network Access settings for the user by clicking the check box.
Product Manual
Page 45
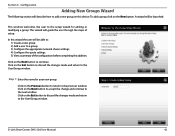
...button to the next window. To add a group click on this wizard the user will describe how to the setup wizard for your new group. Click on the Exit button to discard the changes made and return to the User/Group window. D-Link ShareCenter DNS-320 User Manual 42 Click on the... Exit button to discard the changes made and return to the User/Group window. Configuration Adding New Groups Wizard The following section will be launched: This window welcomes the user to add a new group on the ...
...button to the next window. To add a group click on this wizard the user will describe how to the setup wizard for your new group. Click on the Exit button to discard the changes made and return to the User/Group window. D-Link ShareCenter DNS-320 User Manual 42 Click on the... Exit button to discard the changes made and return to the User/Group window. Configuration Adding New Groups Wizard The following section will be launched: This window welcomes the user to add a new group on the ...
Product Manual
Page 46
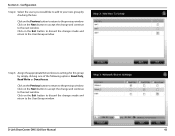
... button to discard the changes made and return to the next window. Section 4 - Configuration Step 2: Select the users you would like to add to the User/Group window. Click on the Exit button to discard the changes made and return to your new group by simply clicking one... options: Read Only, Read Write or Deny Access. Step 3: Assign the appropriate Network Access settings for this group by checking the box. D-Link ShareCenter DNS-320 User Manual 43 Click on the Previous button to return to the previous window. Click on the Previous button to return to the previous window....
... button to discard the changes made and return to the next window. Section 4 - Configuration Step 2: Select the users you would like to add to the User/Group window. Click on the Exit button to discard the changes made and return to your new group by simply clicking one... options: Read Only, Read Write or Deny Access. Step 3: Assign the appropriate Network Access settings for this group by checking the box. D-Link ShareCenter DNS-320 User Manual 43 Click on the Previous button to return to the previous window. Click on the Previous button to return to the previous window....
Product Manual
Page 50
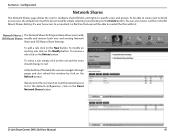
... The Network Shares page allows the user to configure shared folders and rights to add, ISO Mount Shares: modify and remove both new and existing Network Share and ISO Mount Share Settings. D-Link ShareCenter DNS-320 User Manual 47 To add a rule click on the Refresh button. To be able to create new network access...
... The Network Shares page allows the user to configure shared folders and rights to add, ISO Mount Shares: modify and remove both new and existing Network Share and ISO Mount Share Settings. D-Link ShareCenter DNS-320 User Manual 47 To add a rule click on the Refresh button. To be able to create new network access...
Product Manual
Page 51
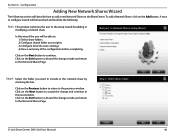
...launched and look like the following section will be able to add a new Network Share on the Exit button to discard the changes made and return to the next window. D-Link ShareCenter DNS-320 User Manual 48 To add a Network Share click on the Next button to the Network... Shares Page. Click on the ShareCenter. Click on the Add button. Section 4 - A easy to configure wizard will describe how ...
...launched and look like the following section will be able to add a new Network Share on the Exit button to discard the changes made and return to the next window. D-Link ShareCenter DNS-320 User Manual 48 To add a Network Share click on the Next button to the Network... Shares Page. Click on the ShareCenter. Click on the Add button. Section 4 - A easy to configure wizard will describe how ...
Product Manual
Page 57
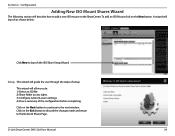
... and return to the next window. Click on the Next button to continue to the Network Shares Page. Section 4 - This wizard will allow you to add a new ISO mount on the New button. Configuration Adding New ISO Mount Shares Wizard The following section will guide the user through the steps of... Setup Wizard Setup: This wizard will describe how to : 1) Select an ISO file. 2) Share folder access rights. 3) Configure network access settings. 4) View a summary of setup. D-Link ShareCenter DNS-320 User Manual 54
... and return to the next window. Click on the Next button to continue to the Network Shares Page. Section 4 - This wizard will allow you to add a new ISO mount on the New button. Configuration Adding New ISO Mount Shares Wizard The following section will guide the user through the steps of... Setup Wizard Setup: This wizard will describe how to : 1) Select an ISO file. 2) Share folder access rights. 3) Configure network access settings. 4) View a summary of setup. D-Link ShareCenter DNS-320 User Manual 54
Product Manual
Page 59
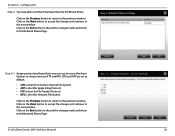
... change and continue to the next window. Configuration Step 3: You may add a comment that a user can use to the Network Shares Page. Click on the Exit button to discard the changes made and return to access this share. D-Link ShareCenter DNS-320 User Manual 56 Click on the Next button to accept the change...
... change and continue to the next window. Configuration Step 3: You may add a comment that a user can use to the Network Shares Page. Click on the Exit button to discard the changes made and return to access this share. D-Link ShareCenter DNS-320 User Manual 56 Click on the Next button to accept the change...
Product Manual
Page 66
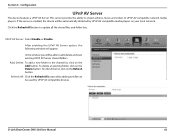
...used by UPnP AV compatible media players on the Add button. UPnP AV Server: Select Enable or Disable. To refresh the list, click on the Delete button. Configuration UPnP AV Server The device features a UPnP AV Server. D-Link ShareCenter DNS-320 User Manual 63 Click the Refresh All button ...to the shared list, click on your local network. This server provides the ability to stream photos, music and videos to add, delete and view existing UPnP AV Server shared folders...
...used by UPnP AV compatible media players on the Add button. UPnP AV Server: Select Enable or Disable. To refresh the list, click on the Delete button. Configuration UPnP AV Server The device features a UPnP AV Server. D-Link ShareCenter DNS-320 User Manual 63 Click the Refresh All button ...to the shared list, click on your local network. This server provides the ability to stream photos, music and videos to add, delete and view existing UPnP AV Server shared folders...

Product Manual
Page 78
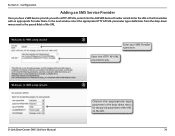
...to use (these are added with the Add button) Add button: Click on the Add button and enter the information into the appropriate fields that the number input is functioning with your mobile phone to the configured mobiles as text messages. D-Link ShareCenter DNS-320 User Manual 75 You need to have ...an agreement with : character that can be sent to an email box can then be sent to . URL: The specific service provider URL provided and added in the Add procedure.
...to use (these are added with the Add button) Add button: Click on the Add button and enter the information into the appropriate fields that the number input is functioning with your mobile phone to the configured mobiles as text messages. D-Link ShareCenter DNS-320 User Manual 75 You need to have ...an agreement with : character that can be sent to an email box can then be sent to . URL: The specific service provider URL provided and added in the Add procedure.
Product Manual
Page 79
... parsed fields of the URL on the left. 76 Enter the URL in the drop-down menus next to you with an appropriate Provider Name. D-Link ShareCenter DNS-320 User Manual Choose the appropriate type parameter in the first window with a HTTP API URL, enter it into the...
... parsed fields of the URL on the left. 76 Enter the URL in the drop-down menus next to you with an appropriate Provider Name. D-Link ShareCenter DNS-320 User Manual Choose the appropriate type parameter in the first window with a HTTP API URL, enter it into the...
Product Manual
Page 93
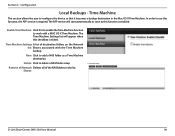
...: Shares associated with a MAC OS X Time Machine. Section 4 - Time Machine This section allows the user to work with the Time Machine backup. Shares: D-Link ShareCenter DNS-320 User Manual 90 Time Machine Settings A list of the NAS folders in the Mac OS X Time Machine. Enable Time Machine: Click this function, the AFP... Settings list will start automatically as soon as a Time Machine destination. The AFP service will appear when this function is enabled. Delete: Click to add a NAS folder as this checkbox is required. New: Click to delete a NAS folder setup.
...: Shares associated with a MAC OS X Time Machine. Section 4 - Time Machine This section allows the user to work with the Time Machine backup. Shares: D-Link ShareCenter DNS-320 User Manual 90 Time Machine Settings A list of the NAS folders in the Mac OS X Time Machine. Enable Time Machine: Click this function, the AFP... Settings list will start automatically as soon as a Time Machine destination. The AFP service will appear when this function is enabled. Delete: Click to add a NAS folder as this checkbox is required. New: Click to delete a NAS folder setup.
Product Manual
Page 95
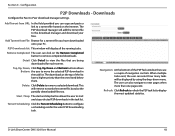
...be displayed by using the drop-down menu. Remove Completed: The user can select how many tasks will add the torrent file to display the most updated statistics. Add Torrent from File: Browse for a torrent file you can also navigate to next pages when more than ...list. Configuration P2P Downloads - The user can copy and paste a link to remove completed downloads. Navigation: At the bottom of the P2P Task window there are being downloaded for the select P2P downloading task. D-Link ShareCenter DNS-320 User Manual 92 Downloads Configure the Peer-to remove a selected download....
...be displayed by using the drop-down menu. Remove Completed: The user can select how many tasks will add the torrent file to display the most updated statistics. Add Torrent from File: Browse for a torrent file you can also navigate to next pages when more than ...list. Configuration P2P Downloads - The user can copy and paste a link to remove completed downloads. Navigation: At the bottom of the P2P Task window there are being downloaded for the select P2P downloading task. D-Link ShareCenter DNS-320 User Manual 92 Downloads Configure the Peer-to remove a selected download....
Product Manual
Page 98
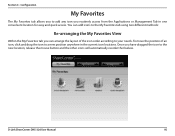
You can add icons to the My Favorites tab using two different methods: Re-arranging the My Favorites View Within the My Favorites tab you can arrange the .... To move the position of the icon order according to the new location, release the mouse button and the other icons will automatically reorder themselves. D-Link ShareCenter DNS-320 User Manual 95 Once you routinely access from the Applications or Management Tab in the current icon locations. Section 4 - Configuration My Favorites The My...
You can add icons to the My Favorites tab using two different methods: Re-arranging the My Favorites View Within the My Favorites tab you can arrange the .... To move the position of the icon order according to the new location, release the mouse button and the other icons will automatically reorder themselves. D-Link ShareCenter DNS-320 User Manual 95 Once you routinely access from the Applications or Management Tab in the current icon locations. Section 4 - Configuration My Favorites The My...
Product Manual
Page 99
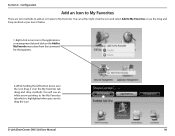
Section 4 - You can either right-click the icon and select Add to My Favorite menu item from the command list that appears. 2. While holding the left button down over the icon drag it over the My ... My Favorites or use the Drag and Drop method as per item 2 below. 1. Configuration Add an Icon to My Favorites There are two methods to add an icon alias to drag the icon D-Link ShareCenter DNS-320 User Manual 96 You will see an white arrow pointing to the My Favorites tab which is highlighted...
Section 4 - You can either right-click the icon and select Add to My Favorite menu item from the command list that appears. 2. While holding the left button down over the icon drag it over the My ... My Favorites or use the Drag and Drop method as per item 2 below. 1. Configuration Add an Icon to My Favorites There are two methods to add an icon alias to drag the icon D-Link ShareCenter DNS-320 User Manual 96 You will see an white arrow pointing to the My Favorites tab which is highlighted...
Product Manual
Page 106
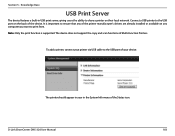
To add a printer, connect your printer via USB cable to the USB port of your device: The printer should appear in your in USB print server, giving users the ability to ensure that any of Multi-Function Printers. D-Link ShareCenter DNS-320 User Manual 103 Section 5 - It is supported. The device does not support the...
To add a printer, connect your printer via USB cable to the USB port of your device: The printer should appear in your in USB print server, giving users the ability to ensure that any of Multi-Function Printers. D-Link ShareCenter DNS-320 User Manual 103 Section 5 - It is supported. The device does not support the...

Product Manual
Page 107
Section 5 - D-Link ShareCenter DNS-320 User Manual 104 The Windows® Add Printer Wizard will launch: Select the printer driver from the installed Manufacturer list or use the Have Disk button to continue. Click OK to browse for the printer driver file. Knowledge Base Connect to your device with Samba and then double-click the lp icon.
Section 5 - D-Link ShareCenter DNS-320 User Manual 104 The Windows® Add Printer Wizard will launch: Select the printer driver from the installed Manufacturer list or use the Have Disk button to continue. Click OK to browse for the printer driver file. Knowledge Base Connect to your device with Samba and then double-click the lp icon.

