Product Manual
Page 2
... Started 6 ShareCenter Software CD 6 Installation 7 Setup Wizard 7 Install the Hard Drives 8 Power and Device Selection 10 Admin password 11 Network Setup 12 Dynamic DNS 13 DDNS Account and System Time 14 E-mail Settings and Volume Information 15 RAID Configuration and Drive Mapping 16 Configuration Summary and... Network Shares 47 Adding New Network Shares Wizard 48 Adding New ISO Mount Shares Wizard 54 Admin Password 58 Network Management 59 LAN Setup 59 Dynamic DNS 61 Application Management 62 FTP Server 62 UPnP AV Server 63 D-Link ShareCenter DNS-320 User Manual i
... Started 6 ShareCenter Software CD 6 Installation 7 Setup Wizard 7 Install the Hard Drives 8 Power and Device Selection 10 Admin password 11 Network Setup 12 Dynamic DNS 13 DDNS Account and System Time 14 E-mail Settings and Volume Information 15 RAID Configuration and Drive Mapping 16 Configuration Summary and... Network Shares 47 Adding New Network Shares Wizard 48 Adding New ISO Mount Shares Wizard 54 Admin Password 58 Network Management 59 LAN Setup 59 Dynamic DNS 61 Application Management 62 FTP Server 62 UPnP AV Server 63 D-Link ShareCenter DNS-320 User Manual i
Product Manual
Page 14
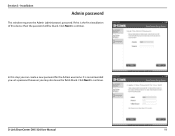
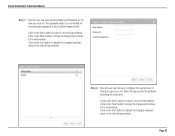
If this is recommended you set a password however you can create a new password for the Admin username. In this device then the password will be blank. D-Link ShareCenter DNS-320 User Manual 11 It is the first installation of this step you may also leave the fields blank. Click Next to continue. Click Next to continue. Section 3 - Installation Admin password This window requests the Admin (administrator) password.
If this is recommended you set a password however you can create a new password for the Admin username. In this device then the password will be blank. D-Link ShareCenter DNS-320 User Manual 11 It is the first installation of this step you may also leave the fields blank. Click Next to continue. Click Next to continue. Section 3 - Installation Admin password This window requests the Admin (administrator) password.

Product Manual
Page 17
... and time zone settings here. D-Link ShareCenter DNS-320 User Manual 14 You will need to do the following: • Create an account with a username and password. • Create a hostname that the DDNS service will use with the hostname and DDNS service provider details. • Configure your ShareCenter®, D-Link provides a free DDNS account by...
... and time zone settings here. D-Link ShareCenter DNS-320 User Manual 14 You will need to do the following: • Create an account with a username and password. • Create a hostname that the DDNS service will use with the hostname and DDNS service provider details. • Configure your ShareCenter®, D-Link provides a free DDNS account by...
Product Manual
Page 25
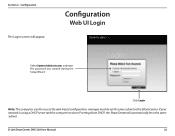
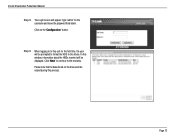
If your network is using a DHCP server and the computer receives IP settings from DHCP, the ShareCenter will appear: Configuration Web UI Login Select System Administrator and enter the password you created during the Setup Wizard. D-Link ShareCenter DNS-320 User Manual 22 Click Login Note: The computer, used to access the web-based configuration, manager must be in the same subnet. Configuration The Login screen will automatically be on the same subnet as the ShareCenter. Section 4 -
If your network is using a DHCP server and the computer receives IP settings from DHCP, the ShareCenter will appear: Configuration Web UI Login Select System Administrator and enter the password you created during the Setup Wizard. D-Link ShareCenter DNS-320 User Manual 22 Click Login Note: The computer, used to access the web-based configuration, manager must be in the same subnet. Configuration The Login screen will automatically be on the same subnet as the ShareCenter. Section 4 -
Product Manual
Page 26
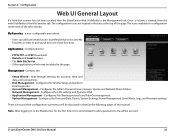
... Step-through settings for the first time it is created, then the web UI defaults to the Management tab. Configures the Admin Password, Users, Groups, Quotas and Network Share Folders. • Network Management - Configuration Web UI General Layout If a hard disk...Web UI defaults to the My Favorites tab. Once a volume is recommended to add a password to these functions. Applications - Configures the LAN settings and Dynamic DNS. • Application Management - D-Link ShareCenter DNS-320 User Manual 23 Section 4 - a user-configurable area where: • Users can add ...
... Step-through settings for the first time it is created, then the web UI defaults to the Management tab. Configures the Admin Password, Users, Groups, Quotas and Network Share Folders. • Network Management - Configuration Web UI General Layout If a hard disk...Web UI defaults to the My Favorites tab. Once a volume is recommended to add a password to these functions. Applications - Configures the LAN settings and Dynamic DNS. • Application Management - D-Link ShareCenter DNS-320 User Manual 23 Section 4 - a user-configurable area where: • Users can add ...
Product Manual
Page 29
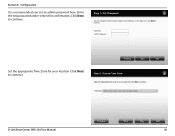
Click Next to continue. Set the appropriate Time Zone for confirmation. Configuration It is recommended you set an admin password here. D-Link ShareCenter DNS-320 User Manual 26 Section 4 - Enter the new password and re-enter it for your location. Click Next to continue.
Click Next to continue. Set the appropriate Time Zone for confirmation. Configuration It is recommended you set an admin password here. D-Link ShareCenter DNS-320 User Manual 26 Section 4 - Enter the new password and re-enter it for your location. Click Next to continue.
Product Manual
Page 41
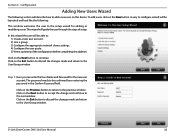
Section 4 - D-Link ShareCenter DNS-320 User Manual 38 Click on the Next button to accept the change ... through the steps of the configuration before completing the addition. Step 1: Here you can enter the User Name and Password for adding or modifying a user. Click on the Previous button to return to the next window. Configuration Adding New...2) Join a group. 3) Configure the appropriate network shares settings. 4) Configure the user quota. 5) View a summary of setup. The password needs to be launched and look like the following section will be confirmed by re-entering the...
Section 4 - D-Link ShareCenter DNS-320 User Manual 38 Click on the Next button to accept the change ... through the steps of the configuration before completing the addition. Step 1: Here you can enter the User Name and Password for adding or modifying a user. Click on the Previous button to return to the next window. Configuration Adding New...2) Join a group. 3) Configure the appropriate network shares settings. 4) Configure the user quota. 5) View a summary of setup. The password needs to be launched and look like the following section will be confirmed by re-entering the...
Product Manual
Page 61
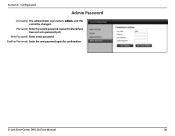
Confirm Password: Enter the new password again for confirmation. Password: Enter the current password. (Leave this cannot be changed. D-Link ShareCenter DNS-320 User Manual 58 Configuration Admin Password Username: The administrator user name is admin, and this blank if you have not set a password yet.) New Password: Enter a new password. Section 4 -
Confirm Password: Enter the new password again for confirmation. Password: Enter the current password. (Leave this cannot be changed. D-Link ShareCenter DNS-320 User Manual 58 Configuration Admin Password Username: The administrator user name is admin, and this blank if you have not set a password yet.) New Password: Enter a new password. Section 4 -

Product Manual
Page 64
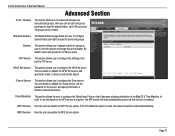
Using a DDNS service provider, your IP address. DDNS Settings DDNS: Select Enable or Disable. Host Name: Enter your password or key. Verify Password or Re-enter your DDNS host name. When the user clicks on the right hand-side, or type in this configuration. Username ...domain name to connect to your server regardless of your friends can create or modify a D-Link DDNS account to use in the server address manually. Key: Status: Displays your DDNS username or key. D-Link ShareCenter DNS-320 User Manual 61 Server Address: Select a DDNS Server from the combo box on the "...
Using a DDNS service provider, your IP address. DDNS Settings DDNS: Select Enable or Disable. Host Name: Enter your password or key. Verify Password or Re-enter your DDNS host name. When the user clicks on the right hand-side, or type in this configuration. Username ...domain name to connect to your server regardless of your friends can create or modify a D-Link DDNS account to use in the server address manually. Key: Status: Displays your DDNS username or key. D-Link ShareCenter DNS-320 User Manual 61 Server Address: Select a DDNS Server from the combo box on the "...
Product Manual
Page 67
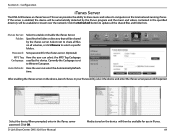
... disable the iTunes Server. In your iTunes utility, select the device and enter the iTunes server password if required. D-Link ShareCenter DNS-320 User Manual Media stored on the local network running iTunes. Configuration iTunes Server The DNS-320 features an iTunes Server. This server provides the ability to share music and videos to Western European...
... disable the iTunes Server. In your iTunes utility, select the device and enter the iTunes server password if required. D-Link ShareCenter DNS-320 User Manual Media stored on the local network running iTunes. Configuration iTunes Server The DNS-320 features an iTunes Server. This server provides the ability to share music and videos to Western European...
Product Manual
Page 77
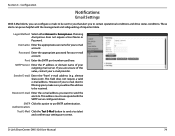
...E-Mail button to . If you to certain operational conditions and drive status conditions. This field does not require a valid e-mail address. D-Link ShareCenter DNS-320 User Manual 74 Configuration Notifications Email Settings With E-Mail Alerts, you want to send the alerts to send a test alert and confirm your...the e-mail address you can prove helpful with the SMTP server configured above. Choosing Anonymous does not require a User Name or Password. Sender E-mail: Enter the "from" e-mail address (e.g. alerts@ share.com). SMTP Click this value, contact your e-mail account.
...E-Mail button to . If you to certain operational conditions and drive status conditions. This field does not require a valid e-mail address. D-Link ShareCenter DNS-320 User Manual 74 Configuration Notifications Email Settings With E-Mail Alerts, you want to send the alerts to send a test alert and confirm your...the e-mail address you can prove helpful with the SMTP server configured above. Choosing Anonymous does not require a User Name or Password. Sender E-mail: Enter the "from" e-mail address (e.g. alerts@ share.com). SMTP Click this value, contact your e-mail account.
Product Manual
Page 85
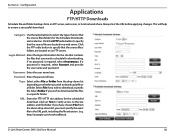
... that the source files/ folders are located on Test to verify access to specify that the source files/folders for downloading. D-Link ShareCenter DNS-320 User Manual 82 Always test the URL before applying changes. Select File if you must specify the exact file in a specific folder...drop-down list depending on an FTP server. Category: Use the radio buttons to download a specific file. If a password is required, select Anonymous. Password: Enter the password here. URL: Enter the FTP/ HTTP site address for the scheduled download. If you have chosen File from an FTP...
... that the source files/ folders are located on Test to verify access to specify that the source files/folders for downloading. D-Link ShareCenter DNS-320 User Manual 82 Always test the URL before applying changes. Select File if you must specify the exact file in a specific folder...drop-down list depending on an FTP server. Category: Use the radio buttons to download a specific file. If a password is required, select Anonymous. Password: Enter the password here. URL: Enter the FTP/ HTTP site address for the scheduled download. If you have chosen File from an FTP...
Product Manual
Page 87
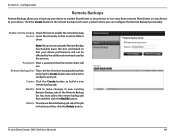
... the list and then click the Delete button. Password: Enter a password that a remote NAS or Linux. Click the Create button in the remote backups list to configure each job. You must select the remote backup job first and then click the Modify button. D-Link ShareCenter DNS-320 User Manual 84 Create: Click the Create button...
... the list and then click the Delete button. Password: Enter a password that a remote NAS or Linux. Click the Create button in the remote backups list to configure each job. You must select the remote backup job first and then click the Modify button. D-Link ShareCenter DNS-320 User Manual 84 Create: Click the Create button...

Product Manual
Page 92
... folder will only be overwritten by the source files. Checking Incremental Backup will help to the second volume and vice-versa. If a password is required, select Anonymous. This will have the device compare identical file names at the source and destination. Category: Use the radio ... backup. This option is more recent. Type: Select File or Folder, depending on the device, or click Browse to run unattended. D-Link ShareCenter DNS-320 User Manual 89 E.g. Rename: Enter the renamed file name here. Always test the URL before applying changes. ftp://123.456.789/Test ...
... folder will only be overwritten by the source files. Checking Incremental Backup will help to the second volume and vice-versa. If a password is required, select Anonymous. This will have the device compare identical file names at the source and destination. Category: Use the radio ... backup. This option is more recent. Type: Select File or Folder, depending on the device, or click Browse to run unattended. D-Link ShareCenter DNS-320 User Manual 89 E.g. Rename: Enter the renamed file name here. Always test the URL before applying changes. ftp://123.456.789/Test ...
User Manual
Page 2
... - RAID 0 68 RAID Configuration - Standard 66 RAID Configuration - RAID 1 69 Dynamic DNS Page 71 Disk Diagnostic Page 72 Status Section 74 System Info Page 75 Hard Drive Info Page 76 Logs Page 77 Page 2 D-Link ShareCenter Pulse User Manual Table of Contents Table of Contents 2 Product Overview 4 Package Contents... UPnP AV Server Page 51 iTunes Server Page 53 Time Machine Page 54 NFS Service Page 56 Maintenance Section 57 Admin Password Page 58 System Page 59 Firmware Upgrade Page 61 E-mail Alerts Page 62 Power Management Page 64 RAID Page 65 RAID Configuration -
... - RAID 0 68 RAID Configuration - Standard 66 RAID Configuration - RAID 1 69 Dynamic DNS Page 71 Disk Diagnostic Page 72 Status Section 74 System Info Page 75 Hard Drive Info Page 76 Logs Page 77 Page 2 D-Link ShareCenter Pulse User Manual Table of Contents Table of Contents 2 Product Overview 4 Package Contents... UPnP AV Server Page 51 iTunes Server Page 53 Time Machine Page 54 NFS Service Page 56 Maintenance Section 57 Admin Password Page 58 System Page 59 Firmware Upgrade Page 61 E-mail Alerts Page 62 Power Management Page 64 RAID Page 65 RAID Configuration -
User Manual
Page 13
Click on the drives will be erased during this window, information about the HDDs inserted will be displayed. Page 13 D-Link ShareCenter Pulse User Manual Step 3: The Login screen will appear: Type 'admin' for the first time, the user will be prompted to format the HDD in the device. Click 'Next' to continue to this unit for the username and leave the password field blank. Please note that the data stored on the 'Configuration' button. In this process. Step 4: When logging in to the next step.
Click on the drives will be erased during this window, information about the HDDs inserted will be displayed. Page 13 D-Link ShareCenter Pulse User Manual Step 3: The Login screen will appear: Type 'admin' for the first time, the user will be prompted to format the HDD in the device. Click 'Next' to continue to this unit for the username and leave the password field blank. Please note that the data stored on the 'Configuration' button. In this process. Step 4: When logging in to the next step.
User Manual
Page 18
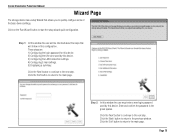
...the setup wizard quick configuration. Click the 'Back' button to return to the main page. Step 2: In this window the user must enter a new login password used by this configuration. Page 18 Click the 'Next' button to continue to the main page. These steps are: 1) Configuring the login...Click the 'Exit' button to return to the next step. Click on the 'Run Wizard' button to quickly configure some of the basic device settings. D-Link ShareCenter Pulse User Manual Wizard Page The storage device has a setup Wizard that will follow in the given spaces. Click the 'Next' button to continue...
...the setup wizard quick configuration. Click the 'Back' button to return to the main page. Step 2: In this window the user must enter a new login password used by this configuration. Page 18 Click the 'Next' button to continue to the main page. These steps are: 1) Configuring the login...Click the 'Exit' button to return to the next step. Click on the 'Run Wizard' button to quickly configure some of the basic device settings. D-Link ShareCenter Pulse User Manual Wizard Page The storage device has a setup Wizard that will follow in the given spaces. Click the 'Next' button to continue...
User Manual
Page 27
...section allows you to create and manage user accounts and groups. The AFP service will start automatically as soon as this function is required. D-Link ShareCenter Pulse User Manual Advanced Section User / Groups: The section allows you to configure the iTunes server. Up to 64 users and 10...built-in the Mac OS X Time Machine. Quotas: This section allows you to use this option should be created. You can set the password for specific shared folders. In order to configure the settings of storage they are allocated. Network Shares: The Network Shares page allows the ...
...section allows you to create and manage user accounts and groups. The AFP service will start automatically as soon as this function is required. D-Link ShareCenter Pulse User Manual Advanced Section User / Groups: The section allows you to configure the iTunes server. Up to 64 users and 10...built-in the Mac OS X Time Machine. Quotas: This section allows you to use this option should be created. You can set the password for specific shared folders. In order to configure the settings of storage they are allocated. Network Shares: The Network Shares page allows the ...
User Manual
Page 30
... the Confirm Password field. Click on the 'Exit' button to discard the changes made and return to the previous window. Click on the 'Back' button to return to the User/Group window. Select the appropriate Group Name by ticking the check box. D-Link ShareCenter Pulse User Manual Step 1: Here ...the user can choose to configure this user account to belong to a group or not. The password needs to the next window. Click on the 'Next' button to accept the...
... the Confirm Password field. Click on the 'Exit' button to discard the changes made and return to the previous window. Click on the 'Back' button to return to the User/Group window. Select the appropriate Group Name by ticking the check box. D-Link ShareCenter Pulse User Manual Step 1: Here ...the user can choose to configure this user account to belong to a group or not. The password needs to the next window. Click on the 'Next' button to accept the...

User Manual
Page 48
Then press OK to 'Auth TLS (Best)'. Host: Enter the IP of the ShareCenter Pulse in here. Step 4: Go to the Connection Tab and set the Security function to finish the setup. Login: Enter the user's username in here. Page 48 Password: Enter the user's password in here. D-Link ShareCenter Pulse User Manual Step 3: Account Name: Enter a name for this FTP connection here.
Then press OK to 'Auth TLS (Best)'. Host: Enter the IP of the ShareCenter Pulse in here. Step 4: Go to the Connection Tab and set the Security function to finish the setup. Login: Enter the user's username in here. Page 48 Password: Enter the user's password in here. D-Link ShareCenter Pulse User Manual Step 3: Account Name: Enter a name for this FTP connection here.


