Product Manual
Page 2
... Power and Device Selection 10 Admin password 11 Network Setup 12 Dynamic DNS 13 DDNS Account and System Time 14 E-mail Settings and Volume Information 15 RAID Configuration and Drive Mapping 16 Configuration Summary and Drive Formatting.......17 Format Complete 18 D-Link Storage Utility 20 Configuration 22 Web UI Login 22... Shares 47 Adding New Network Shares Wizard 48 Adding New ISO Mount Shares Wizard 54 Admin Password 58 Network Management 59 LAN Setup 59 Dynamic DNS 61 Application Management 62 FTP Server 62 UPnP AV Server 63 D-Link ShareCenter DNS-320 User Manual i
... Power and Device Selection 10 Admin password 11 Network Setup 12 Dynamic DNS 13 DDNS Account and System Time 14 E-mail Settings and Volume Information 15 RAID Configuration and Drive Mapping 16 Configuration Summary and Drive Formatting.......17 Format Complete 18 D-Link Storage Utility 20 Configuration 22 Web UI Login 22... Shares 47 Adding New Network Shares Wizard 48 Adding New ISO Mount Shares Wizard 54 Admin Password 58 Network Management 59 LAN Setup 59 Dynamic DNS 61 Application Management 62 FTP Server 62 UPnP AV Server 63 D-Link ShareCenter DNS-320 User Manual i
Product Manual
Page 9
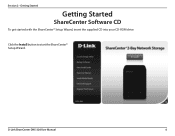
Section 2 - D-Link ShareCenter DNS-320 User Manual 6 Getting Started Getting Started ShareCenter Software CD To get started with the ShareCenter® Setup Wizard, insert the supplied CD into your CD-ROM drive: Click the Install button to start the ShareCenter® Setup Wizard.
Section 2 - D-Link ShareCenter DNS-320 User Manual 6 Getting Started Getting Started ShareCenter Software CD To get started with the ShareCenter® Setup Wizard, insert the supplied CD into your CD-ROM drive: Click the Install button to start the ShareCenter® Setup Wizard.
Product Manual
Page 10
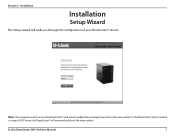
Installation Installation Setup Wizard The Setup wizard will automatically be on the same subnet as the ShareCenter. D-Link ShareCenter DNS-320 User Manual 7 Section 3 - If your network is using a DHCP server, the ShareCenter® will walk you through the configuration of your ShareCenter® device. Note: The computer used to access the ShareCenter® web-based configuration manager must be in the same subnet.
Installation Installation Setup Wizard The Setup wizard will automatically be on the same subnet as the ShareCenter. D-Link ShareCenter DNS-320 User Manual 7 Section 3 - If your network is using a DHCP server, the ShareCenter® will walk you through the configuration of your ShareCenter® device. Note: The computer used to access the ShareCenter® web-based configuration manager must be in the same subnet.
Product Manual
Page 15
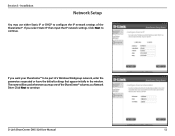
D-Link ShareCenter DNS-320 User Manual 12 Installation Network Setup You may use either Static IP or DHCP to be used whenever you select Static IP then input the IP network settings. If you map one of the ShareCenter® volumes as a Network Drive. If you want your ShareCenter® to configure the IP network settings of a Windows Workgroup network, enter the parameters requested or leave the default settings that appear initially in the window. Section 3 - The name will be part of the ShareCenter®. Click Next to continue. Click Next to continue.
D-Link ShareCenter DNS-320 User Manual 12 Installation Network Setup You may use either Static IP or DHCP to be used whenever you select Static IP then input the IP network settings. If you map one of the ShareCenter® volumes as a Network Drive. If you want your ShareCenter® to configure the IP network settings of a Windows Workgroup network, enter the parameters requested or leave the default settings that appear initially in the window. Section 3 - The name will be part of the ShareCenter®. Click Next to continue. Click Next to continue.
Product Manual
Page 18
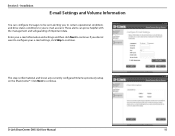
... not want to configure your e-mail settings, click Skip to your e-mail information and settings and then click Next to continue. Enter your e-mail account. D-Link ShareCenter DNS-320 User Manual 15 This step is informational and shows any currently configured Volumes previously setup on the ShareCenter®. Click Next to continue.
... not want to configure your e-mail settings, click Skip to your e-mail information and settings and then click Next to continue. Enter your e-mail account. D-Link ShareCenter DNS-320 User Manual 15 This step is informational and shows any currently configured Volumes previously setup on the ShareCenter®. Click Next to continue.
Product Manual
Page 25
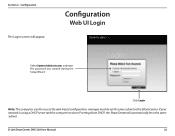
If your network is using a DHCP server and the computer receives IP settings from DHCP, the ShareCenter will appear: Configuration Web UI Login Select System Administrator and enter the password you created during the Setup Wizard. Section 4 - D-Link ShareCenter DNS-320 User Manual 22 Configuration The Login screen will automatically be on the same subnet as the ShareCenter. Click Login Note: The computer, used to access the web-based configuration, manager must be in the same subnet.
If your network is using a DHCP server and the computer receives IP settings from DHCP, the ShareCenter will appear: Configuration Web UI Login Select System Administrator and enter the password you created during the Setup Wizard. Section 4 - D-Link ShareCenter DNS-320 User Manual 22 Configuration The Login screen will automatically be on the same subnet as the ShareCenter. Click Login Note: The computer, used to access the web-based configuration, manager must be in the same subnet.
Product Manual
Page 26
... - Once a volume is recommended to add a password to these functions. Applications - Contains the: • Setup Wizard - Configures the LAN settings and Dynamic DNS. • Application Management - Configures File Sharing protocols and Add-On management. • System Management - These icons...My Favorites in the tabs at the top of the tabs include: My Favorites - D-Link ShareCenter DNS-320 User Manual 23 Configuration for configuration under each of the page. Configures the Volume Setup and perform Disk Diagnostics. • Account Management - Configures the Time and Date, ...
... - Once a volume is recommended to add a password to these functions. Applications - Contains the: • Setup Wizard - Configures the LAN settings and Dynamic DNS. • Application Management - Configures File Sharing protocols and Add-On management. • System Management - These icons...My Favorites in the tabs at the top of the tabs include: My Favorites - D-Link ShareCenter DNS-320 User Manual 23 Configuration for configuration under each of the page. Configures the Volume Setup and perform Disk Diagnostics. • Account Management - Configures the Time and Date, ...

Product Manual
Page 27
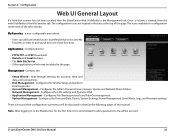
D-Link ShareCenter DNS-320 User Manual 24 Section 4 - Configuration Management This tab contains the Setup Wizard, Disk Management, Account Management, Network Management, Application Management, System Management and Status Icons. Click each of the icons to see the submenus.
D-Link ShareCenter DNS-320 User Manual 24 Section 4 - Configuration Management This tab contains the Setup Wizard, Disk Management, Account Management, Network Management, Application Management, System Management and Status Icons. Click each of the icons to see the submenus.
Product Manual
Page 28
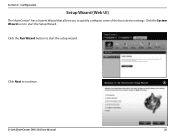
Click Next to quickly configure some of the basic device settings. D-Link ShareCenter DNS-320 User Manual 25 Section 4 - Click the System Wizard icon to start the Setup Wizard. Configuration Setup Wizard (Web UI) The ShareCenter® has a System Wizard that allows you to continue. Click the Run Wizard button to start the setup wizard.
Click Next to quickly configure some of the basic device settings. D-Link ShareCenter DNS-320 User Manual 25 Section 4 - Click the System Wizard icon to start the Setup Wizard. Configuration Setup Wizard (Web UI) The ShareCenter® has a System Wizard that allows you to continue. Click the Run Wizard button to start the setup wizard.
Product Manual
Page 32
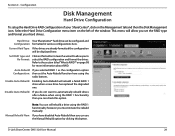
... page 98 for more information about RAID. Refer to automatically rebuild drives after a failure when using the RAID 1 functionality however you can be displayed here. D-Link ShareCenter DNS-320 User Manual 29 This menu will rebuild a failed RAID 1 drive when a new drive has replaced the degraded one. Enable Auto-Rebuild: Enabling Auto-Rebuild... want to the section titled"What is RAID?"on the Management tab and then the Disk Management icon. Configuration Disk Management Hard Drive Configuration To setup the Hard Drive RAID configuration of the window. Section 4 -
... page 98 for more information about RAID. Refer to automatically rebuild drives after a failure when using the RAID 1 functionality however you can be displayed here. D-Link ShareCenter DNS-320 User Manual 29 This menu will rebuild a failed RAID 1 drive when a new drive has replaced the degraded one. Enable Auto-Rebuild: Enabling Auto-Rebuild... want to the section titled"What is RAID?"on the Management tab and then the Disk Management icon. Configuration Disk Management Hard Drive Configuration To setup the Hard Drive RAID configuration of the window. Section 4 -
Product Manual
Page 41
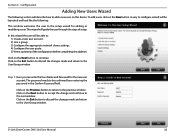
Click on the Exit button to discard the changes made and return to the setup wizard for the new user account. Section 4 - Configuration Adding New Users Wizard The following : This window welcomes the user to the User/Group window. A easy ... adding or modifying a user. Click on this wizard the user will guide the user through the steps of the configuration before completing the addition. D-Link ShareCenter DNS-320 User Manual 38 In this device. To add a user click on the Next button to accept the change and continue to continue. Click on the...
Click on the Exit button to discard the changes made and return to the setup wizard for the new user account. Section 4 - Configuration Adding New Users Wizard The following : This window welcomes the user to the User/Group window. A easy ... adding or modifying a user. Click on this wizard the user will guide the user through the steps of the configuration before completing the addition. D-Link ShareCenter DNS-320 User Manual 38 In this device. To add a user click on the Next button to accept the change and continue to continue. Click on the...
Product Manual
Page 45
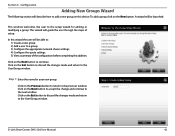
.... Click on the Next button to accept the change and continue to the User/Group window. D-Link ShareCenter DNS-320 User Manual 42 Click on the Exit button to discard the changes made and return to the setup wizard for your new group. Section 4 - Configuration Adding New Groups Wizard The following section will describe...
.... Click on the Next button to accept the change and continue to the User/Group window. D-Link ShareCenter DNS-320 User Manual 42 Click on the Exit button to discard the changes made and return to the setup wizard for your new group. Section 4 - Configuration Adding New Groups Wizard The following section will describe...
Product Manual
Page 51
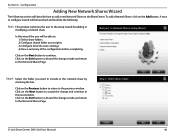
... on the Next button to the setup wizard for adding or modifying a network share. Section 4 - Step 1: Select the folder you want to include in this wizard the user will be launched and look like the following section will be able to the Network Shares Page. D-Link ShareCenter DNS-320 User Manual 48 In this...
... on the Next button to the setup wizard for adding or modifying a network share. Section 4 - Step 1: Select the folder you want to include in this wizard the user will be launched and look like the following section will be able to the Network Shares Page. D-Link ShareCenter DNS-320 User Manual 48 In this...
Product Manual
Page 57
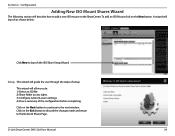
... discard the changes made and return to the next window. A wizard will launch as shown below: Click New to launch the ISO Share Setup Wizard Setup: This wizard will describe how to : 1) Select an ISO file. 2) Share folder access rights. 3) Configure network access settings. 4) View a summary of setup. Section 4 - D-Link ShareCenter DNS-320 User Manual 54
... discard the changes made and return to the next window. A wizard will launch as shown below: Click New to launch the ISO Share Setup Wizard Setup: This wizard will describe how to : 1) Select an ISO file. 2) Share folder access rights. 3) Configure network access settings. 4) View a summary of setup. Section 4 - D-Link ShareCenter DNS-320 User Manual 54

Product Manual
Page 62
Configuration Network Management LAN Setup The LAN Settings allows you to obtain an IP address from the local DHCP server. The IP address of 192.168.0.1. The Gateway IP Address Address: is 255.255.255.0. A DNS Address will cause the DNS-320 to assign the IP information for the device. The... and to resolve names into IP addresses. DNS1/ DNS2: Specify the first and second DNS Addresses for the DNS-320 manually. IP Settings DHCP Client: Selecting DHCP Client will allow the device to configure the Link Speed and the IP address as a DHCP client or Static IP. Click Save Settings...
Configuration Network Management LAN Setup The LAN Settings allows you to obtain an IP address from the local DHCP server. The IP address of 192.168.0.1. The Gateway IP Address Address: is 255.255.255.0. A DNS Address will cause the DNS-320 to assign the IP information for the device. The... and to resolve names into IP addresses. DNS1/ DNS2: Specify the first and second DNS Addresses for the DNS-320 manually. IP Settings DHCP Client: Selecting DHCP Client will allow the device to configure the Link Speed and the IP address as a DHCP client or Static IP. Click Save Settings...
Product Manual
Page 81
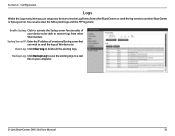
... can setup your computer. Enable Syslog: Click to activate the Syslog server functionality of this device to another ShareCenter or SysLog server. Syslog Server IP: Enter the IP address of an external Syslog server that you can also view the NAS system logs and the FTP logs here. D-Link ShareCenter DNS-320 User Manual...
... can setup your computer. Enable Syslog: Click to activate the Syslog server functionality of this device to another ShareCenter or SysLog server. Syslog Server IP: Enter the IP address of an external Syslog server that you can also view the NAS system logs and the FTP logs here. D-Link ShareCenter DNS-320 User Manual...
Product Manual
Page 93
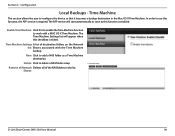
... will appear when this function is required. Time Machine Settings A list of the NAS folders in the Mac OS X Time Machine. Shares: D-Link ShareCenter DNS-320 User Manual 90 The Time Machine Settings list will start automatically as soon as a Time Machine destination. New: Click to work with the Time ...the Network list: Shares associated with a MAC OS X Time Machine. Section 4 - Time Machine This section allows the user to delete a NAS folder setup. Configuration Local Backups - Delete: Click to configure the device so that it becomes a backup destination in the list.
... will appear when this function is required. Time Machine Settings A list of the NAS folders in the Mac OS X Time Machine. Shares: D-Link ShareCenter DNS-320 User Manual 90 The Time Machine Settings list will start automatically as soon as a Time Machine destination. New: Click to work with the Time ...the Network list: Shares associated with a MAC OS X Time Machine. Section 4 - Time Machine This section allows the user to delete a NAS folder setup. Configuration Local Backups - Delete: Click to configure the device so that it becomes a backup destination in the list.
User Manual
Page 2
...- RAID 1 69 Dynamic DNS Page 71 Disk Diagnostic Page 72 Status Section 74 System Info Page 75 Hard Drive Info Page 76 Logs Page 77 Page 2 RAID 0 68 RAID Configuration - JBOD 67 RAID Configuration - D-Link ShareCenter Pulse User Manual Table... of Contents Table of Contents 2 Product Overview 4 Package Contents 4 System Requirements 4 Introduction 5 Features 5 Hardware Overview 7 Front View 7 Rear View (Connections 8 Basic Installation 9 Hardware Setup 9 Software Setup 11 Easy Search Utility 11 ...
...- RAID 1 69 Dynamic DNS Page 71 Disk Diagnostic Page 72 Status Section 74 System Info Page 75 Hard Drive Info Page 76 Logs Page 77 Page 2 RAID 0 68 RAID Configuration - JBOD 67 RAID Configuration - D-Link ShareCenter Pulse User Manual Table... of Contents Table of Contents 2 Product Overview 4 Package Contents 4 System Requirements 4 Introduction 5 Features 5 Hardware Overview 7 Front View 7 Rear View (Connections 8 Basic Installation 9 Hardware Setup 9 Software Setup 11 Easy Search Utility 11 ...
User Manual
Page 9
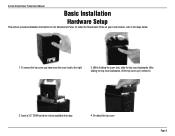
To remove the top cover you have move the cover lock to the steps below: 1. While holding the cover lock, slide the top cover backwards. Re-attach the top cover. To install the ShareCenter Pulse on your local network, refer to the right. 2. Insert a 3.5" SATA hard drive into an available drive bay. 4. After sliding the top cover backwards, lift the top cover up to remove it. 3. Page 9 D-Link ShareCenter Pulse User Manual Basic Installation Hardware Setup This section provides installation information for the ShareCenter Pulse.
To remove the top cover you have move the cover lock to the steps below: 1. While holding the cover lock, slide the top cover backwards. Re-attach the top cover. To install the ShareCenter Pulse on your local network, refer to the right. 2. Insert a 3.5" SATA hard drive into an available drive bay. 4. After sliding the top cover backwards, lift the top cover up to remove it. 3. Page 9 D-Link ShareCenter Pulse User Manual Basic Installation Hardware Setup This section provides installation information for the ShareCenter Pulse.
User Manual
Page 11
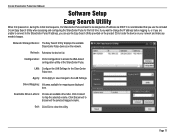
...for the first time. Click Connect to close the utility. Exit: Click Exit to map the selected volume. D-Link ShareCenter Pulse User Manual Software Setup Easy Search Utility When first powered on the network. Network Storage Device: The Easy Search Utility displays the available ShareCenter... an available drive letter. Configuration: Click Configuration to the LAN Settings. It is recommended that you can use the included D-Link Easy Search Utility when accessing and configuring the ShareCenter Pulse for the ShareCenter Pulse here. Apply: Click Apply to save changes to...
...for the first time. Click Connect to close the utility. Exit: Click Exit to map the selected volume. D-Link ShareCenter Pulse User Manual Software Setup Easy Search Utility When first powered on the network. Network Storage Device: The Easy Search Utility displays the available ShareCenter... an available drive letter. Configuration: Click Configuration to the LAN Settings. It is recommended that you can use the included D-Link Easy Search Utility when accessing and configuring the ShareCenter Pulse for the ShareCenter Pulse here. Apply: Click Apply to save changes to...


