
Owners Manual
Page 1
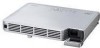
z Be sure to read the precautions in the separate User's Guide (Basic Operation). E DATA PROJECTOR XJ-SC210/XJ-SC215* XJ-S32/XJ-S37* XJ-S42/XJ-S47* XJ-S52/XJ-S57* * USB Port Equipped Models User's Guide z Be sure to keep all user documentation handy for future reference. For details about setting up the projector and lamp replacement, see the User's Guide (Basic Operation).
z Be sure to read the precautions in the separate User's Guide (Basic Operation). E DATA PROJECTOR XJ-SC210/XJ-SC215* XJ-S32/XJ-S37* XJ-S42/XJ-S47* XJ-S52/XJ-S57* * USB Port Equipped Models User's Guide z Be sure to keep all user documentation handy for future reference. For details about setting up the projector and lamp replacement, see the User's Guide (Basic Operation).
Owners Manual
Page 3
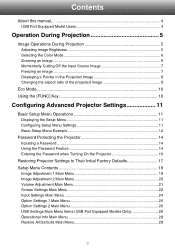
... Off the Input Source Image 7 Freezing an Image ...7 Displaying a Pointer in the Projected Image 8 Changing the aspect ratio of the projected image 9 Eco Mode ...10 Using the [FUNC] Key 10 Configuring Advanced Projector Settings 11 Basic Setup Menu Operations 11 Displaying the Setup Menu 11 Configuring Setup Menu Settings 11 Basic Setup Menu Example 12 Password Protecting the Projector 14 Inputting a Password 14 Using the Password Feature 14 Entering the Password when Turning On the Projector 16 Restoring Projector Settings to Their Initial Factory Defaults 17 Setup Menu Contents...
... Off the Input Source Image 7 Freezing an Image ...7 Displaying a Pointer in the Projected Image 8 Changing the aspect ratio of the projected image 9 Eco Mode ...10 Using the [FUNC] Key 10 Configuring Advanced Projector Settings 11 Basic Setup Menu Operations 11 Displaying the Setup Menu 11 Configuring Setup Menu Settings 11 Basic Setup Menu Example 12 Password Protecting the Projector 14 Inputting a Password 14 Using the Password Feature 14 Entering the Password when Turning On the Projector 16 Restoring Projector Settings to Their Initial Factory Defaults 17 Setup Menu Contents...
Owners Manual
Page 4
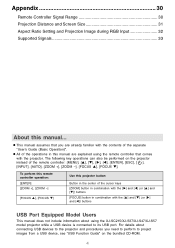
...controller operation: [ENTER] [ZOOM +], [ZOOM -] [FOCUS S], [FOCUS T] Use this manual... Appendix 30 Remote Controller Signal Range 30 Projection Distance and Screen Size 31 Aspect Ratio Setting and Projection Image during RGB Input 32 Supported Signals 33 About this projector button: Button in the center of the cursor keys [ZOOM] button in combination with the [X] and [W] (or [S] and [T]) buttons [FOCUS] button in this manual are already familiar with the contents of the remote controller: [MENU], [S], [T], [X], [W], [ENTER], [ESC], [ ], [INPUT], [AUTO], [ZOOM +], [ZOOM -], [FOCUS...
...controller operation: [ENTER] [ZOOM +], [ZOOM -] [FOCUS S], [FOCUS T] Use this manual... Appendix 30 Remote Controller Signal Range 30 Projection Distance and Screen Size 31 Aspect Ratio Setting and Projection Image during RGB Input 32 Supported Signals 33 About this projector button: Button in the center of the cursor keys [ZOOM] button in combination with the [X] and [W] (or [S] and [T]) buttons [FOCUS] button in this manual are already familiar with the contents of the remote controller: [MENU], [S], [T], [X], [W], [ENTER], [ESC], [ ], [INPUT], [AUTO], [ZOOM +], [ZOOM -], [FOCUS...
Owners Manual
Page 5
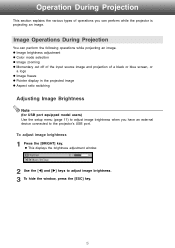
... input source image and projection of operations you have an external device connected to adjust image brightness. 3 To hide the window, press the [ESC] key. 5 To adjust image brightness 1 Press the [BRIGHT] key. z This displays the brightness adjustment window. 2 Use the [W] and [X] keys to the projector's USB port. Image Operations During Projection You can perform while the projector is projecting an image. Operation During Projection This section explains the various types of a black or blue screen, or a logo z Image...
... input source image and projection of operations you have an external device connected to adjust image brightness. 3 To hide the window, press the [ESC] key. 5 To adjust image brightness 1 Press the [BRIGHT] key. z This displays the brightness adjustment window. 2 Use the [W] and [X] keys to the projector's USB port. Image Operations During Projection You can perform while the projector is projecting an image. Operation During Projection This section explains the various types of a black or blue screen, or a logo z Image...
Owners Manual
Page 6
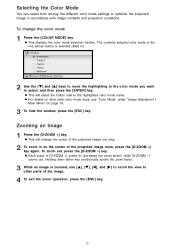
... in on page 19. 3 To hide the window, press the [ESC] key. z This displays the color mode selection window. To change the color mode 1 Press the [COLOR MODE] key. Zooming an Image 1 Press the [D-ZOOM +] key. The currently selected color mode is the one whose button is zoomed, use [S], [T], [W], and [X] to scroll the view to other parts of the projected image one step. 2 To zoom in ). 2 Use the [T] and [S] keys to move the highlighting...
... in on page 19. 3 To hide the window, press the [ESC] key. z This displays the color mode selection window. To change the color mode 1 Press the [COLOR MODE] key. Zooming an Image 1 Press the [D-ZOOM +] key. The currently selected color mode is the one whose button is zoomed, use [S], [T], [W], and [X] to scroll the view to other parts of the projected image one step. 2 To zoom in ). 2 Use the [T] and [S] keys to move the highlighting...
Owners Manual
Page 8
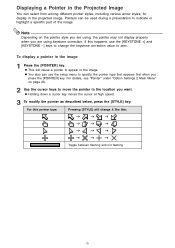
... "Pointer" under "Option Settings 2 Main Menu" on the pointer style you are using, the pointer may not display properly when you are using keystone correction. For this pointer type: Pressing [STYLE] will cause a pointer to the location you press the [POINTER] key. z This will change it like this happens, use the setup menu to indicate or highlight a specific part of the image. Pointers can be...
... "Pointer" under "Option Settings 2 Main Menu" on the pointer style you are using, the pointer may not display properly when you are using keystone correction. For this pointer type: Pressing [STYLE] will cause a pointer to the location you press the [POINTER] key. z This will change it like this happens, use the setup menu to indicate or highlight a specific part of the image. Pointers can be...
Owners Manual
Page 10
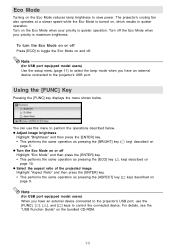
... your priority is maximum brightness. Note (for USB port equipped model users) Use the setup menu (page 11) to select the lamp mode when you have an external device connected to perform the operations described below . Eco Mode Turning on page 9. Note (for USB port equipped model users) When you have an external device connected to the projector's USB port, use this menu to the projector's USB port. z Adjust image brightness Highlight "Brightness" and then press the [ENTER...
... your priority is maximum brightness. Note (for USB port equipped model users) Use the setup menu (page 11) to select the lamp mode when you have an external device connected to perform the operations described below . Eco Mode Turning on page 9. Note (for USB port equipped model users) When you have an external device connected to the projector's USB port, use this menu to the projector's USB port. z Adjust image brightness Highlight "Brightness" and then press the [ENTER...
Owners Manual
Page 11
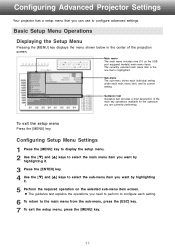
... selected sub-menu item screen. To exit the setup menu Press the [MENU] key. Guidance text Guidance text provides a brief description of the projection screen. Basic Setup Menu Operations Displaying the Setup Menu Pressing the [MENU] key displays the menu shown below in the center of the main key operations available for the operation you want by highlighting it. 5 Perform the required operation on the USB port equipped models) main menu items. The...
... selected sub-menu item screen. To exit the setup menu Press the [MENU] key. Guidance text Guidance text provides a brief description of the projection screen. Basic Setup Menu Operations Displaying the Setup Menu Pressing the [MENU] key displays the menu shown below in the center of the main key operations available for the operation you want by highlighting it. 5 Perform the required operation on the USB port equipped models) main menu items. The...
Owners Manual
Page 14
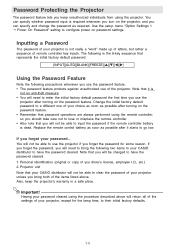
... projector's warranty in a safe place. Use the setup menu "Option Settings 1 J Power On Password" setting to go low. You will need to their initial factory defaults. 14 Also, keep unauthorized individuals from using the remote controller, so you should take care not to lose or misplace the remote controller. • Also note that it starts to configure power on the password feature. • Remember that password operations are always performed using the projector...
... projector's warranty in a safe place. Use the setup menu "Option Settings 1 J Power On Password" setting to go low. You will need to their initial factory defaults. 14 Also, keep unauthorized individuals from using the remote controller, so you should take care not to lose or misplace the remote controller. • Also note that it starts to configure power on the password feature. • Remember that password operations are always performed using the projector...
Owners Manual
Page 15
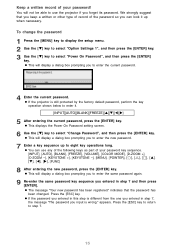
.... z You can use the projector if you can look it . [INPUT][AUTO][BLANK][FREEZE][S][T][W][X] 5 After entering the current password, press the [ENTER] key. Keep a written record of your password key sequence. [INPUT], [AUTO], [BLANK], [FREEZE], [VOLUME], [COLOR MODE], [D-ZOOM +], [D-ZOOM -], [KEYSTONE +], [KEYSTONE -], [MENU], [POINTER], [ ], [U], […], [S], [T], [W], [X], [FUNC] 8 After entering the new password, press the [ENTER] key. To change the password 1 Press the [MENU] key to display the setup menu. 2 Use the [T] key to select "Option Settings 1", and...
.... z You can use the projector if you can look it . [INPUT][AUTO][BLANK][FREEZE][S][T][W][X] 5 After entering the current password, press the [ENTER] key. Keep a written record of your password key sequence. [INPUT], [AUTO], [BLANK], [FREEZE], [VOLUME], [COLOR MODE], [D-ZOOM +], [D-ZOOM -], [KEYSTONE +], [KEYSTONE -], [MENU], [POINTER], [ ], [U], […], [S], [T], [W], [X], [FUNC] 8 After entering the new password, press the [ENTER] key. To change the password 1 Press the [MENU] key to display the setup menu. 2 Use the [T] key to select "Option Settings 1", and...
Owners Manual
Page 16
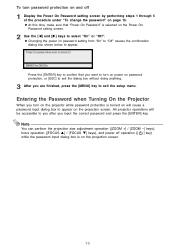
z Changing the power on the Power On Password setting screen. 2 Use the [W] and [X] keys to select "On" or "Off". Note You can perform the projection size adjustment operation ([ZOOM +] / [ZOOM -] keys), focus operation ([FOCUS S] / [FOCUS T] keys), and power off 1 Display the Power On Password setting screen by performing steps 1 through 5 of the procedure under "To change the password" on page 15. Entering the Password when Turning On the Projector When you turn on the projector while password protection is on the projection screen. 16...
z Changing the power on the Power On Password setting screen. 2 Use the [W] and [X] keys to select "On" or "Off". Note You can perform the projection size adjustment operation ([ZOOM +] / [ZOOM -] keys), focus operation ([FOCUS S] / [FOCUS T] keys), and power off 1 Display the Power On Password setting screen by performing steps 1 through 5 of the procedure under "To change the password" on page 15. Entering the Password when Turning On the Projector When you turn on the projector while password protection is on the projection screen. 16...
Owners Manual
Page 18
... input), C (component video input), V (video input), and U (USB input, USB port equipped models only). Setting Name This column shows the names of the settings to select it. Description This column provides details about the setting item and how to their initial factory defaults, except for RGB input and a setting of the tables. z This displays a confirmation message asking if you are abbreviated as they appear on the setup menu. "Source Specific" in this column indicates...
... input), C (component video input), V (video input), and U (USB input, USB port equipped models only). Setting Name This column shows the names of the settings to select it. Description This column provides details about the setting item and how to their initial factory defaults, except for RGB input and a setting of the tables. z This displays a confirmation message asking if you are abbreviated as they appear on the setup menu. "Source Specific" in this column indicates...

Owners Manual
Page 19
... the colors of your images. Color: You can be adjusted individually only when "Normal" is NTSC or NTSC4.43. This setting is supported only when the signal is selected as the "Preset" setting. 19 Graphics: Use this sub-menu to adjust the sharpness of the projected Specific image. Color Balance RCVU Source Specific This sub-menu lets you adjust the color balance of your presentation. Color settings can adjust the intensity of red, green, and blue...
... the colors of your images. Color: You can be adjusted individually only when "Normal" is NTSC or NTSC4.43. This setting is supported only when the signal is selected as the "Preset" setting. 19 Graphics: Use this sub-menu to adjust the sharpness of the projected Specific image. Color Balance RCVU Source Specific This sub-menu lets you adjust the color balance of your presentation. Color settings can adjust the intensity of red, green, and blue...
Owners Manual
Page 20
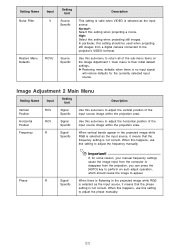
... image input from the computer to disappear from a digital camera connected to adjust the frequency manually. If, for the currently selected input source. Normal*: Select this setting when projecting still images. z Restoring menu defaults when there is not correct. In particular, this setting to the projector's VIDEO terminal. Image Adjustment 2 Main Menu Setting Name Input Setting Unit Description Vertical Position RCV Signal Specific Use this sub-menu to their initial default settings. Horizontal Position RCV Signal Specific Use this sub-menu to adjust...
... image input from the computer to disappear from a digital camera connected to adjust the frequency manually. If, for the currently selected input source. Normal*: Select this setting when projecting still images. z Restoring menu defaults when there is not correct. In particular, this setting to the projector's VIDEO terminal. Image Adjustment 2 Main Menu Setting Name Input Setting Unit Description Vertical Position RCV Signal Specific Use this sub-menu to their initial default settings. Horizontal Position RCV Signal Specific Use this sub-menu to adjust...
Owners Manual
Page 21
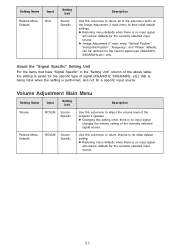
... input source. z "Image Adjustment 2" main menu "Vertical Position", "Horizontal Position", "Frequency", and "Phase" defaults can be restored for a specific input source. Restore Menu Defaults RCVUN Source Specific Use this sub-menu to their initial default settings. z Changing this sub-menu to return all of the sub-menu items on the Image Adjustment 2 main menu to adjust the volume level of the projector's speaker. Setting Name Input Restore Menu Defaults RCV Setting Unit Source Specific Description Use this setting when there is no input signal changes the volume setting...
... input source. z "Image Adjustment 2" main menu "Vertical Position", "Horizontal Position", "Frequency", and "Phase" defaults can be restored for a specific input source. Restore Menu Defaults RCVUN Source Specific Use this sub-menu to their initial default settings. z Changing this sub-menu to return all of the sub-menu items on the Image Adjustment 2 main menu to adjust the volume level of the projector's speaker. Setting Name Input Restore Menu Defaults RCV Setting Unit Source Specific Description Use this setting when there is no input signal changes the volume setting...
Owners Manual
Page 22
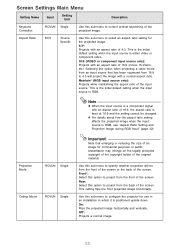
... ratio setting for the projected image. 4:3*: Projects with an aspect ratio of the input source. Use this sub-menu to correct vertical keystoning of the projected image. Aspect Ratio RCV Source Specific Use this sub-menu to 4:3 will be changed. Maintain* (RGB input source only): Projects while maintaining the aspect ratio of 16:9 (movie, Hi-Vision, etc.) Selecting this option when projecting a video movie from an input source that enlarging or reducing the size...
... ratio setting for the projected image. 4:3*: Projects with an aspect ratio of the input source. Use this sub-menu to correct vertical keystoning of the projected image. Aspect Ratio RCV Source Specific Use this sub-menu to 4:3 will be changed. Maintain* (RGB input source only): Projects while maintaining the aspect ratio of 16:9 (movie, Hi-Vision, etc.) Selecting this option when projecting a video movie from an input source that enlarging or reducing the size...
Owners Manual
Page 24
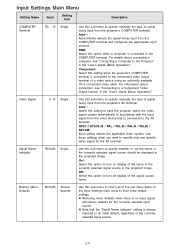
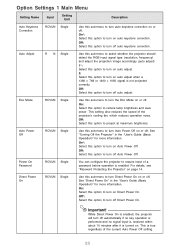
... about connection, see "Connecting a Computer to the Projector" in the "User's Guide (Basic Operation)". Auto*: Select this setting to have the projector switch the video signal system automatically in the projected image. NTSC / NTSC4.43 / PAL / PAL-M / PAL-N / PAL60 / SECAM: Each setting selects the applicable video system. Off: Select this option to their initial default settings. Use these settings when you want to specify only one specific video signal for the currently selected input source. Video Signal...
... about connection, see "Connecting a Computer to the Projector" in the "User's Guide (Basic Operation)". Auto*: Select this setting to have the projector switch the video signal system automatically in the projected image. NTSC / NTSC4.43 / PAL / PAL-M / PAL-N / PAL60 / SECAM: Each setting selects the applicable video system. Off: Select this option to their initial default settings. Use these settings when you want to specify only one specific video signal for the currently selected input source. Video Signal...
Owners Manual
Page 25
... Power On" in the "User's Guide (Basic Operation)" for more information. Auto Adjust RCVUN Single Use this sub-menu to select whether the projector should detect the RGB input signal type (resolution, frequency) and adjust the projection image accordingly (auto adjust). 1*: Select this option to turn on auto adjust. 2: Select this option to turn on or off auto keystone correction. Auto Power Off RCVUN Single Use this option to turn off . While Direct Power On is turned on Direct Power...
... Power On" in the "User's Guide (Basic Operation)" for more information. Auto Adjust RCVUN Single Use this sub-menu to select whether the projector should detect the RGB input signal type (resolution, frequency) and adjust the projection image accordingly (auto adjust). 1*: Select this option to turn on auto adjust. 2: Select this option to turn on or off auto keystone correction. Auto Power Off RCVUN Single Use this option to turn off . While Direct Power On is turned on Direct Power...
Owners Manual
Page 26
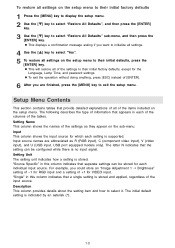
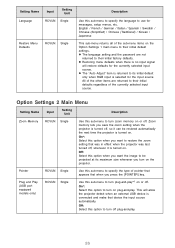
... that device the input source automatically. This will restore defaults for the currently selected input source. z Restoring menu defaults when there is selected for messages, setup menus, etc. Setting Name Language Input Setting Unit RCVUN Single Restore Menu Defaults RCVUN Single Description Use this option when you want the image to be restored automatically the next time the projector is turned on. z The language setting and the password are returned to...
... that device the input source automatically. This will restore defaults for the currently selected input source. z Restoring menu defaults when there is selected for messages, setup menus, etc. Setting Name Language Input Setting Unit RCVUN Single Restore Menu Defaults RCVUN Single Description Use this option when you want the image to be restored automatically the next time the projector is turned on. z The language setting and the password are returned to...
Owners Manual
Page 28
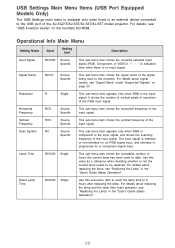
... the scanning frequency of the input signal. The input signal is an external device connected to the projector. Reset Lamp Time RCVUN Single Use this value as a reference when deciding whether or not the current lamp needs to 0 hours after replacing the lamp. Signal Name RCVU Source Specific This sub-menu item shows the signal name of the input signal. USB Settings Main Menu Items (USB Port Equipped Models Only) The USB Settings main menu is available only when there...
... the scanning frequency of the input signal. The input signal is an external device connected to the projector. Reset Lamp Time RCVUN Single Use this value as a reference when deciding whether or not the current lamp needs to 0 hours after replacing the lamp. Signal Name RCVU Source Specific This sub-menu item shows the signal name of the input signal. USB Settings Main Menu Items (USB Port Equipped Models Only) The USB Settings main menu is available only when there...

