Owners Manual
Page 1
E DATA PROJECTOR XJ-360 User's Guide • Make sure you read all of the precautions in a safe place for future reference. Also see the "User's Guide (Basic Operations)" for information about setting up the projector and replacing its lamp. • Keep this manual in the printed "User's Guide (Basic Operations)" first.
E DATA PROJECTOR XJ-360 User's Guide • Make sure you read all of the precautions in a safe place for future reference. Also see the "User's Guide (Basic Operations)" for information about setting up the projector and replacing its lamp. • Keep this manual in the printed "User's Guide (Basic Operations)" first.
Owners Manual
Page 3
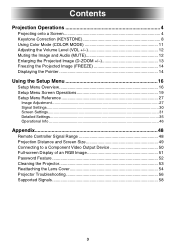
... Distance and Screen Size 49 Connecting to a Component Video Output Device 50 Full-screen Display of an RGB Image 51 Password Feature 52 Cleaning the Projector 53 Reattaching the Lens Cover 54 Projector Troubleshooting 56 Supported Signals 58 3
... Distance and Screen Size 49 Connecting to a Component Video Output Device 50 Full-screen Display of an RGB Image 51 Password Feature 52 Cleaning the Projector 53 Reattaching the Lens Cover 54 Projector Troubleshooting 56 Supported Signals 58 3

Owners Manual
Page 4
... Guide (Basic Operations): Connecting a Computer to the Projector User's Guide (Basic Operations): Connecting to turn on the projector and the connected computer or video device. User's Guide (Basic Operations): Turning On the Projector Perform fine adjustment of the projection position and angle... the required operation on the input source computer or video equipment. • Use the projector's various functions to the projector. User's Guide (Basic Operations): Setting Up the Projector Connect the computer or video device to adjust the projected image as required. 4 Starting ...
... Guide (Basic Operations): Connecting a Computer to the Projector User's Guide (Basic Operations): Connecting to turn on the projector and the connected computer or video device. User's Guide (Basic Operations): Turning On the Projector Perform fine adjustment of the projection position and angle... the required operation on the input source computer or video equipment. • Use the projector's various functions to the projector. User's Guide (Basic Operations): Setting Up the Projector Connect the computer or video device to adjust the projected image as required. 4 Starting ...

Owners Manual
Page 5
... is "RGB": "RGB" is displayed. The currently selected input source name is shown in place of the projection screen. z If the projector does not find any input signal, the message "No signal input" appears in the upper right corner of the input source name. When the...whether or not the input source is sending a signal) in the sequence shown below . Projection Operations Auto Input Source Selection When you turn on the projector, it is turned on the setup menu. 5 RGB terminal input (RGB/Component) VIDEO terminal input (VIDEO) S-VIDEO terminal input (S-VIDEO) If the...
... is "RGB": "RGB" is displayed. The currently selected input source name is shown in place of the projection screen. z If the projector does not find any input signal, the message "No signal input" appears in the upper right corner of the input source name. When the...whether or not the input source is sending a signal) in the sequence shown below . Projection Operations Auto Input Source Selection When you turn on the projector, it is turned on the setup menu. 5 RGB terminal input (RGB/Component) VIDEO terminal input (VIDEO) S-VIDEO terminal input (S-VIDEO) If the...
Owners Manual
Page 6
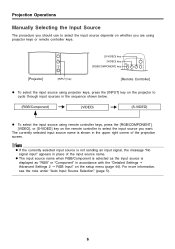
... Input Source The procedure you should use to select the input source depends on whether you are using projector keys or remote controller keys. [S-VIDEO] key [VIDEO] key [RGB/COMPONENT] key [Projector] [INPUT] key [Remote Controller] z To select the input source using remote controller keys, press ...source is shown in the sequence shown below. (RGB/Component) (VIDEO) (S-VIDEO) z To select the input source using projector keys, press the [INPUT] key on the projector to select the input source you want. For more information, see the note under "Auto Input Source Selection" (page 5)....
... Input Source The procedure you should use to select the input source depends on whether you are using projector keys or remote controller keys. [S-VIDEO] key [VIDEO] key [RGB/COMPONENT] key [Projector] [INPUT] key [Remote Controller] z To select the input source using remote controller keys, press ...source is shown in the sequence shown below. (RGB/Component) (VIDEO) (S-VIDEO) z To select the input source using projector keys, press the [INPUT] key on the projector to select the input source you want. For more information, see the note under "Auto Input Source Selection" (page 5)....
Owners Manual
Page 7
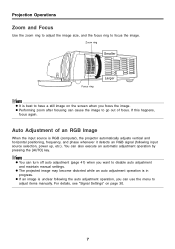
... image may become distorted while an auto adjustment operation is best to have a still image on page 30. 7 z If an image is RGB (computer), the projector automatically adjusts vertical and horizontal positioning, frequency, and phase whenever it detects an RGB signal (following the auto adjustment operation, you focus the image. Zoom...
... image may become distorted while an auto adjustment operation is best to have a still image on page 30. 7 z If an image is RGB (computer), the projector automatically adjusts vertical and horizontal positioning, frequency, and phase whenever it detects an RGB signal (following the auto adjustment operation, you focus the image. Zoom...

Owners Manual
Page 8
... Up to about 20 degrees z The angles shown in the above illustration are subject to the following shows the allowable angle that the projector can be positioned relative to the screen. z Projection of signal being projected, zoom, the "Resize Image To Fit" setting, the aspect.... Vertical Frequency: 60Hz) z Resize Image To Fit: On z Actual correction ranges are oriented close to the configuration shown under "Setting Up the Projector" in the "User's Guide (Basic Operations)"). 8 z Keystone correction can cause the corrected image to be aligned with functions for automatic as well...
... Up to about 20 degrees z The angles shown in the above illustration are subject to the following shows the allowable angle that the projector can be positioned relative to the screen. z Projection of signal being projected, zoom, the "Resize Image To Fit" setting, the aspect.... Vertical Frequency: 60Hz) z Resize Image To Fit: On z Actual correction ranges are oriented close to the configuration shown under "Setting Up the Projector" in the "User's Guide (Basic Operations)"). 8 z Keystone correction can cause the corrected image to be aligned with functions for automatic as well...
Owners Manual
Page 9
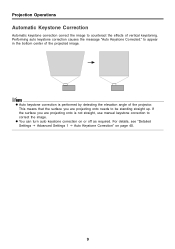
... straight, use manual keystone correction to correct the image. If the surface you are projecting onto is performed by detecting the elevation angle of the projector.
... straight, use manual keystone correction to correct the image. If the surface you are projecting onto is performed by detecting the elevation angle of the projector.

Owners Manual
Page 11
... press the [ENTER] key. To close the setup screen by the cursor, and applies the setting to the setting you will be projecting, so the projector can also close the setup screen, move the cursor to the image. 3. To change the color mode setting 1. z This causes the color mode screen to...
... press the [ENTER] key. To close the setup screen by the cursor, and applies the setting to the setting you will be projecting, so the projector can also close the setup screen, move the cursor to the image. 3. To change the color mode setting 1. z This causes the color mode screen to...
Owners Manual
Page 12
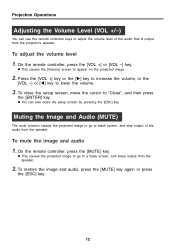
... Audio (MUTE) The mute function causes the projected image to go to black screen, and stop output of the audio that is output from the projector's speaker. z This causes the projected image to go to a black screen, and stops output from the speaker. To restore the image and audio, press the...
... Audio (MUTE) The mute function causes the projected image to go to black screen, and stop output of the audio that is output from the projector's speaker. z This causes the projected image to go to a black screen, and stops output from the speaker. To restore the image and audio, press the...
Owners Manual
Page 14
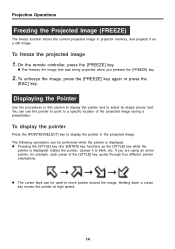
... displayed) rotates the pointer, causes it as a still image. Projection Operations Freezing the Projected Image (FREEZE) The freeze function stores the current projected image in projector memory, and projects it to move pointer around the image. To freeze the projected image 1.
... displayed) rotates the pointer, causes it as a still image. Projection Operations Freezing the Projected Image (FREEZE) The freeze function stores the current projected image in projector memory, and projects it to move pointer around the image. To freeze the projected image 1.
Owners Manual
Page 16
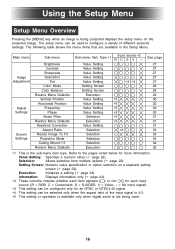
... to the pages noted below for an NTSC or NTSC4.43 signal. ∗4 This setting can be selected only when the aspect ratio of different projector settings. Refer to configure a variety of the input signal is 4:3. ∗5 This setting or operation is available only when digital zoom is the sub-menu...
... to the pages noted below for an NTSC or NTSC4.43 signal. ∗4 This setting can be selected only when the aspect ratio of different projector settings. Refer to configure a variety of the input signal is 4:3. ∗5 This setting or operation is available only when digital zoom is the sub-menu...
Owners Manual
Page 19
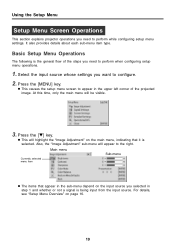
Using the Setup Menu Setup Menu Screen Operations This section explains projector operations you want to configure. 2. At this time, only the main menu will appear to appear in the upper left corner of the steps you ...
Using the Setup Menu Setup Menu Screen Operations This section explains projector operations you want to configure. 2. At this time, only the main menu will appear to appear in the upper left corner of the steps you ...
Owners Manual
Page 30
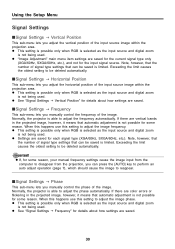
...the image frequency. z "Image Adjustment" main menu item settings are saved for the current signal type only (XGA/60Hz, SXGA/60Hz, etc.), and not for some reason. Normally, the projector is not being used . z This setting is possible only when RGB is selected as the input source ...and digital zoom is limited. z See "Signal Settings J Frequency" for each signal type (XGA/60Hz, SXGA/60Hz, etc.). z This setting is possible...
...the image frequency. z "Image Adjustment" main menu item settings are saved for the current signal type only (XGA/60Hz, SXGA/60Hz, etc.), and not for some reason. Normally, the projector is not being used . z This setting is possible only when RGB is selected as the input source ...and digital zoom is limited. z See "Signal Settings J Frequency" for each signal type (XGA/60Hz, SXGA/60Hz, etc.). z This setting is possible...

Owners Manual
Page 31
... is applied to all of the sub-menu items on page 25. The setting is saved for the phase setting. z Turning off the projector automatically returns this sub-menu to their initial default settings, except for the RGB input source only. Using the Setup Menu ISignal Settings J ...To initialize the settings of the projected image. Screen Settings IScreen Settings J Keystone Correction This sub-menu lets you correct for the current signal type (XGA/60Hz, SXGA/60Hz, etc.) only. Note that the noise filter may not be performed regardless of digital noise. z "Signal Settings" main menu "...
... is applied to all of the sub-menu items on page 25. The setting is saved for the phase setting. z Turning off the projector automatically returns this sub-menu to their initial default settings, except for the RGB input source only. Using the Setup Menu ISignal Settings J ...To initialize the settings of the projected image. Screen Settings IScreen Settings J Keystone Correction This sub-menu lets you correct for the current signal type (XGA/60Hz, SXGA/60Hz, etc.) only. Note that the noise filter may not be performed regardless of digital noise. z "Signal Settings" main menu "...

Owners Manual
Page 32
z When a component signal with its normal 16:9 aspect ratio. z Using this projector to 16:9 (same as a standard TV screen). Input Source Specific Menu Items Input Source RGB Component S-VIDEO VIDEO No Signal Available Items (Parentheses indicate defaults.) ...
z When a component signal with its normal 16:9 aspect ratio. z Using this projector to 16:9 (same as a standard TV screen). Input Source Specific Menu Items Input Source RGB Component S-VIDEO VIDEO No Signal Available Items (Parentheses indicate defaults.) ...

Owners Manual
Page 33
...Image To Fit" automatically enlarges or reduces the input image so it matches the projector's video resolution and fills the entire screen. If the image input from the computer connected to the projector is not an XGA signal, the image is automatically enlarged or reduced so it matches the video ... signal from the computer is selected as the input source and the video resolution of the connected computer is anything other than XGA, the size of the projector and fills the entire screen. Note, however, that corresponds to be smaller. When the image input from the computer. The...
...Image To Fit" automatically enlarges or reduces the input image so it matches the projector's video resolution and fills the entire screen. If the image input from the computer connected to the projector is not an XGA signal, the image is automatically enlarged or reduced so it matches the video ... signal from the computer is selected as the input source and the video resolution of the connected computer is anything other than XGA, the size of the projector and fills the entire screen. Note, however, that corresponds to be smaller. When the image input from the computer. The...

Owners Manual
Page 34
...) Setting Explanations On: Flips the projected image horizontally and vertically. Using the Setup Menu IScreen Settings J Projection Mode Use this sub-menu to configure the projector for use in an installation in which it is positioned upside down. This setting flips the front projected image horizontally. Setting Storage A single setting is...
...) Setting Explanations On: Flips the projected image horizontally and vertically. Using the Setup Menu IScreen Settings J Projection Mode Use this sub-menu to configure the projector for use in an installation in which it is positioned upside down. This setting flips the front projected image horizontally. Setting Storage A single setting is...
Owners Manual
Page 35
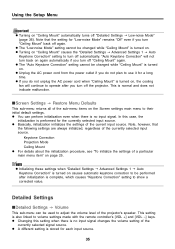
... Settings J Volume This sub-menu can perform initialization even when there is turned on again automatically if you turn off the projector. z The "Auto Keystone Correction" setting cannot be changed while "Ceiling Mount" is no input signal changes the volume setting of the... projector's speaker. This setting is normal and does not indicate malfunction. Keystone Correction Projection Mode Ceiling Mount z For details about the initialization...
... Settings J Volume This sub-menu can perform initialization even when there is turned on again automatically if you turn off the projector. z The "Auto Keystone Correction" setting cannot be changed while "Ceiling Mount" is no input signal changes the volume setting of the... projector's speaker. This setting is normal and does not indicate malfunction. Keystone Correction Projection Mode Ceiling Mount z For details about the initialization...
Owners Manual
Page 36
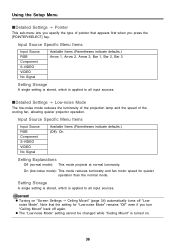
..." back off "Lownoise Mode". Using the Setup Menu IDetailed Settings J Pointer This sub-menu lets you specify the type of the cooling fan, allowing quieter projector operation. z The "Low-noise Mode" setting cannot be changed while "Ceiling Mount" is applied to all input sources. Input Source Specific Menu Items Input Source...
..." back off "Lownoise Mode". Using the Setup Menu IDetailed Settings J Pointer This sub-menu lets you specify the type of the cooling fan, allowing quieter projector operation. z The "Low-noise Mode" setting cannot be changed while "Ceiling Mount" is applied to all input sources. Input Source Specific Menu Items Input Source...

