
Quick Start Guide
Page 4
... was compiled from publicly available information. As an ENERGY STAR® Partner, Canon Inc. and other countries. Disclaimer Canon U.S.A., Inc. For details, refer to your application. No representation is a trademark of your Canon PIXMA iP100 series Photo Printer. has determined that it will be an easy-to-use guide to the instruction manual of Microsoft Corporation...
... was compiled from publicly available information. As an ENERGY STAR® Partner, Canon Inc. and other countries. Disclaimer Canon U.S.A., Inc. For details, refer to your application. No representation is a trademark of your Canon PIXMA iP100 series Photo Printer. has determined that it will be an easy-to-use guide to the instruction manual of Microsoft Corporation...
Quick Start Guide
Page 5
... Printing Becomes Faint or Colors Are Incorrect 24 Printing the Nozzle Check Pattern 25 Examining the Nozzle Check Pattern ...........27 Print Head Cleaning 28 Print Head Deep Cleaning 31 Aligning the Print Head 33 Replacing an Ink Tank 43 Keeping the Best Printing Results 49 Cleaning Your Printer 50 Troubleshooting 57 Cannot...
... Printing Becomes Faint or Colors Are Incorrect 24 Printing the Nozzle Check Pattern 25 Examining the Nozzle Check Pattern ...........27 Print Head Cleaning 28 Print Head Deep Cleaning 31 Aligning the Print Head 33 Replacing an Ink Tank 43 Keeping the Best Printing Results 49 Cleaning Your Printer 50 Troubleshooting 57 Cannot...
Quick Start Guide
Page 7
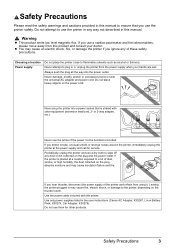
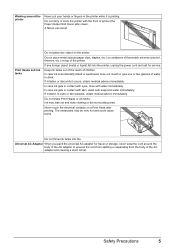
.... Always push the plug all the way into a power socket that you detect smoke, unusual smells or strange noises around the printer, immediately unplug the printer at a location exposed to a lot of these safety precautions. Never damage, modify, stretch or excessively bend or twist the universal...consult your hands are wet. Use only power supplies listed in the user instructions (Canon AC Adapter: K30287, Li-ion Battery Pack: K30274, Car Adapter: K30275). Safety Precautions 3 Do not attempt to use the printer if the power cord is bundled or knotted. Do not use the...
.... Always push the plug all the way into a power socket that you detect smoke, unusual smells or strange noises around the printer, immediately unplug the printer at a location exposed to a lot of these safety precautions. Never damage, modify, stretch or excessively bend or twist the universal...consult your hands are wet. Use only power supplies listed in the user instructions (Canon AC Adapter: K30287, Li-ion Battery Pack: K30274, Car Adapter: K30275). Safety Precautions 3 Do not attempt to use the printer if the power cord is bundled or knotted. Do not use the...
Quick Start Guide
Page 8
... described in direct sunlight, outdoors, or close to excessive vibration. Do not place the printer on the cord. Cleaning the printer Use a damp cloth to disassemble or modify the printer. Maintaining the printer Working around the power outlet is unstable or subject to a heating source. There are...flammable solvents such as alcohol, benzene or thinners. Never use an extension lead/cord. 4 Safety Precautions Do not attempt to clean the printer. Ensure that is kept clear at all times so you could cause a fire or electric shock. To avoid the risk of 10% ...
... described in direct sunlight, outdoors, or close to excessive vibration. Do not place the printer on the cord. Cleaning the printer Use a damp cloth to disassemble or modify the printer. Maintaining the printer Working around the power outlet is unstable or subject to a heating source. There are...flammable solvents such as alcohol, benzene or thinners. Never use an extension lead/cord. 4 Safety Precautions Do not attempt to clean the printer. Ensure that is kept clear at all times so you could cause a fire or electric shock. To avoid the risk of 10% ...
Quick Start Guide
Page 9
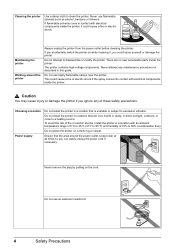
... place metal objects (paper clips, staples, etc.) or containers of flammable solvents (alcohol, thinners, etc.) on top of children. In case ink gets in the printer while it is accidentally licked or swallowed, rinse out mouth or give one or two glasses of water to drink. If irritation to eyes or..., rinse with water immediately. If any object on a Print Head after printing. In case ink gets in contact with skin, wash with the front of printer (the Paper Output Slot Cover side) down. Ink may be very hot and could cause burns. Keep ink tanks out of the reach of the...
... place metal objects (paper clips, staples, etc.) or containers of flammable solvents (alcohol, thinners, etc.) on top of children. In case ink gets in the printer while it is accidentally licked or swallowed, rinse out mouth or give one or two glasses of water to drink. If irritation to eyes or..., rinse with water immediately. If any object on a Print Head after printing. In case ink gets in contact with skin, wash with the front of printer (the Paper Output Slot Cover side) down. Ink may be very hot and could cause burns. Keep ink tanks out of the reach of the...
Quick Start Guide
Page 10
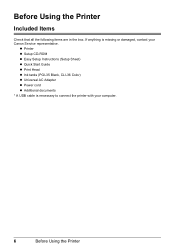
Before Using the Printer Included Items Check that all the following items are in the box. z Printer z Setup CD-ROM z Easy Setup Instructions (Setup Sheet) z Quick Start Guide z Print Head z Ink tanks (PGI-35 Black, CLI-36 Color) z Universal AC Adapter z Power cord z Additional documents * A USB cable is missing or damaged, contact your computer. 6 Before Using the Printer If anything is necessary to connect the printer with your Canon Service representative.
Before Using the Printer Included Items Check that all the following items are in the box. z Printer z Setup CD-ROM z Easy Setup Instructions (Setup Sheet) z Quick Start Guide z Print Head z Ink tanks (PGI-35 Black, CLI-36 Color) z Universal AC Adapter z Power cord z Additional documents * A USB cable is missing or damaged, contact your computer. 6 Before Using the Printer If anything is necessary to connect the printer with your Canon Service representative.

Quick Start Guide
Page 11
...the kit's instruction manual. (A) (B) „ Power Cord for Universal AC Adapter „ Canon Automobile Power Unit PU-200U This accessory allows you to supply power from a Bluetooth device. Before Using the Printer 7 Confirm the product names when you purchase the accessories. * Certain accessories may not be ...some countries or regions. „ Portable Kit LK-62 series This kit allows you to use the Canon printer in the battery attachment, and attach it to the printer, and then connect the AC adapter to the Bluetooth Guide on-screen manual. Accessories The following accessories are...
...the kit's instruction manual. (A) (B) „ Power Cord for Universal AC Adapter „ Canon Automobile Power Unit PU-200U This accessory allows you to supply power from a Bluetooth device. Before Using the Printer 7 Confirm the product names when you purchase the accessories. * Certain accessories may not be ...some countries or regions. „ Portable Kit LK-62 series This kit allows you to use the Canon printer in the battery attachment, and attach it to the printer, and then connect the AC adapter to the Bluetooth Guide on-screen manual. Accessories The following accessories are...
Quick Start Guide
Page 12
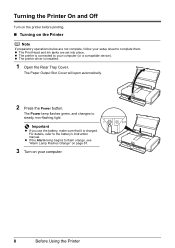
...to the battery's instruction manual. Important z If you use the battery, make sure that it is installed. 1 Open the Rear Tray Cover. z The printer driver is charged. For details, refer to steady, non-flashing light. z If the Alarm lamp begins to flash orange, see "Alarm Lamp Flashes Orange"... operations below are set into place. The Paper Output Slot Cover will open automatically. 2 Press the Power button. Turning the Printer On and Off Turn on the printer before printing. „ Turning on your setup sheet to complete them. z The Print Head and ink tanks are not complete...
...to the battery's instruction manual. Important z If you use the battery, make sure that it is installed. 1 Open the Rear Tray Cover. z The printer driver is charged. For details, refer to steady, non-flashing light. z If the Alarm lamp begins to flash orange, see "Alarm Lamp Flashes Orange"... operations below are set into place. The Paper Output Slot Cover will open automatically. 2 Press the Power button. Turning the Printer On and Off Turn on the printer before printing. „ Turning on your setup sheet to complete them. z The Print Head and ink tanks are not complete...
Quick Start Guide
Page 13
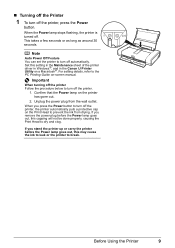
... the Power button. Unplug the power plug from drying. Set this setting in the Maintenance sheet of the printer driver in Windows®, and in the Canon IJ Printer Utility on the printer has gone out. 2. For setting details, refer to break. Confirm that the Power lamp on a Macintosh®. When you press the...
... the Power button. Unplug the power plug from drying. Set this setting in the Maintenance sheet of the printer driver in Windows®, and in the Canon IJ Printer Utility on the printer has gone out. 2. For setting details, refer to break. Confirm that the Power lamp on a Macintosh®. When you press the...
Quick Start Guide
Page 14
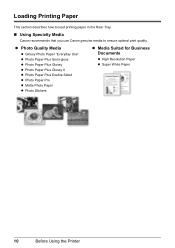
Loading Printing Paper This section describes how to load printing paper in the Rear Tray. „ Using Specialty Media Canon recommends that you use Canon genuine media to ensure optimal print quality. z Photo Quality Media z Glossy Photo Paper "Everyday Use" z Photo Paper Plus Semi-gloss z Photo Paper Plus Glossy z Photo Paper Plus Glossy II z Photo Paper Plus Double Sided z Photo Paper Pro z Matte Photo Paper z Photo Stickers z Media Suited for Business Documents z High Resolution Paper z Super White Paper 10 Before Using the Printer
Loading Printing Paper This section describes how to load printing paper in the Rear Tray. „ Using Specialty Media Canon recommends that you use Canon genuine media to ensure optimal print quality. z Photo Quality Media z Glossy Photo Paper "Everyday Use" z Photo Paper Plus Semi-gloss z Photo Paper Plus Glossy z Photo Paper Plus Glossy II z Photo Paper Plus Double Sided z Photo Paper Pro z Matte Photo Paper z Photo Stickers z Media Suited for Business Documents z High Resolution Paper z Super White Paper 10 Before Using the Printer
Quick Start Guide
Page 15
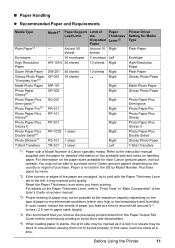
In such cases, reduce the sheets of purchase. Before Using the Printer 11 Refer to the instruction manual supplied with the Paper Thickness Lever set to one...or environmental conditions (either very high or low temperature and humidity). Paper is Canon specialty media. For details on the Paper Thickness Lever, refer to purchase some Canon genuine papers depending on the paper sizes available for Media Type Plain Paper ...PP-201 Right PP-101D 1 sheet Right PS-101 1 sheet TR-301 1 sheet Right Left Printer Driver Setting for each Canon genuine paper, visit our website.
In such cases, reduce the sheets of purchase. Before Using the Printer 11 Refer to the instruction manual supplied with the Paper Thickness Lever set to one...or environmental conditions (either very high or low temperature and humidity). Paper is Canon specialty media. For details on the Paper Thickness Lever, refer to purchase some Canon genuine papers depending on the paper sizes available for Media Type Plain Paper ...PP-201 Right PP-101D 1 sheet Right PS-101 1 sheet TR-301 1 sheet Right Left Printer Driver Setting for each Canon genuine paper, visit our website.
Quick Start Guide
Page 16
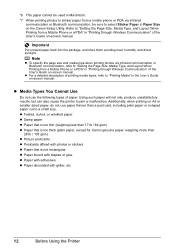
... Damp paper z Paper that is too thin (weighing less than 17 lb / 64 gsm) z Paper that is too thick (plain paper, except for Canon genuine paper, weighing more than a post card, including plain paper or notepad paper cut to jam or malfunction. Additionally, when printing on -screen manual....or glue z Paper with adhesives z Paper decorated with glitter, etc. 12 Before Using the Printer Refer to select Sticker Paper in "Printing through Wireless Communication" of the User's Guide on the Canon Setup Utility. Note z To specify the page size and media type when printing photos via ...
... Damp paper z Paper that is too thin (weighing less than 17 lb / 64 gsm) z Paper that is too thick (plain paper, except for Canon genuine paper, weighing more than a post card, including plain paper or notepad paper cut to jam or malfunction. Additionally, when printing on -screen manual....or glue z Paper with adhesives z Paper decorated with glitter, etc. 12 Before Using the Printer Refer to select Sticker Paper in "Printing through Wireless Communication" of the User's Guide on the Canon Setup Utility. Note z To specify the page size and media type when printing photos via ...
Quick Start Guide
Page 17
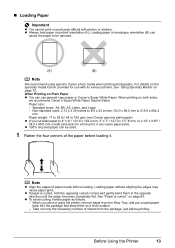
... the four corners of the paper before loading it can cause paper jams. z 100% recycled paper can be jammed. (A) (B) Note We recommend using the printer, remove paper from the package, just before loading. Paper size: - Note z Align the edges of sheets from the Rear Tray, and put unused paper ... (B) can use with photos or stickers. See "Paper is curled, hold the opposing curled corners and gently bend them on the specialty media Canon provides for a trial print, it . When printing on page 63. Take out only the necessary number of paper neatly before printing. Before Using...
... the four corners of the paper before loading it can cause paper jams. z 100% recycled paper can be jammed. (A) (B) Note We recommend using the printer, remove paper from the package, just before loading. Paper size: - Note z Align the edges of sheets from the Rear Tray, and put unused paper ... (B) can use with photos or stickers. See "Paper is curled, hold the opposing curled corners and gently bend them on the specialty media Canon provides for a trial print, it . When printing on page 63. Take out only the necessary number of paper neatly before printing. Before Using...
Quick Start Guide
Page 18
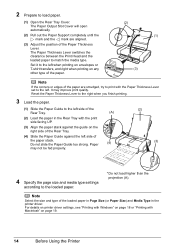
... the paper stack. Do not slide the Paper Guide too strong. Set it to the left side of the Paper Thickness Lever. For details on printer driver settings, see "Printing with Windows" on any other type of the paper. (2) (1) (3) Note If the corners or edges of the paper are aligned. (3)... Adjust the position of the Rear Tray. (2) Load the paper in the printer driver. The Paper Thickness Lever switches the clearance between the Print Head and the loaded paper to the loaded paper. * Do not load higher than...
... the paper stack. Do not slide the Paper Guide too strong. Set it to the left side of the Paper Thickness Lever. For details on printer driver settings, see "Printing with Windows" on any other type of the paper. (2) (1) (3) Note If the corners or edges of the paper are aligned. (3)... Adjust the position of the Rear Tray. (2) Load the paper in the printer driver. The Paper Thickness Lever switches the clearance between the Print Head and the loaded paper to the loaded paper. * Do not load higher than...
Quick Start Guide
Page 19
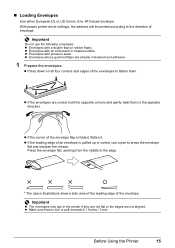
... settings, the address will be printed according to flatten them in the printer if they are not flat or the edges are already moistened and adhesive 1 Prepare the envelopes. z Press down on all four corners and edges of ... use a pen to the edge. * The above illustrations show a side view of the leading edge of an envelope is folded, flatten it. Before Using the Printer 15 Env. #10-sized envelope. z Make sure that no curl or puff exceeds 0.1 inches / 3 mm. z If the corner of envelope. Important z The envelopes may jam...
... settings, the address will be printed according to flatten them in the printer if they are not flat or the edges are already moistened and adhesive 1 Prepare the envelopes. z Press down on all four corners and edges of ... use a pen to the edge. * The above illustrations show a side view of the leading edge of an envelope is folded, flatten it. Before Using the Printer 15 Env. #10-sized envelope. z Make sure that no curl or puff exceeds 0.1 inches / 3 mm. z If the corner of envelope. Important z The envelopes may jam...
Quick Start Guide
Page 20
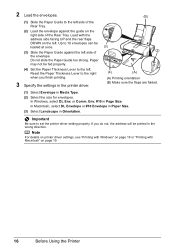
Env. #10 in Orientation. . If you finish printing. 3 Specify the settings in the printer driver. (B) (3) (2) (4) (A) (A) Printing orientation (B) Make sure the flaps are folded....be loaded at once. (3) Slide the Paper Guide against the guide on page 19. 16 Before Using the Printer or Comm. In Windows, select DL Env. 2 Load the envelopes. (1) Slide the Paper Guide to ... envelopes can be printed in Media Type. (2) Select the size for envelopes. Note For details on printer driver settings, see "Printing with Windows" on page 18 or "Printing with the address side facing UP...
Env. #10 in Orientation. . If you finish printing. 3 Specify the settings in the printer driver. (B) (3) (2) (4) (A) (A) Printing orientation (B) Make sure the flaps are folded....be loaded at once. (3) Slide the Paper Guide against the guide on page 19. 16 Before Using the Printer or Comm. In Windows, select DL Env. 2 Load the envelopes. (1) Slide the Paper Guide to ... envelopes can be printed in Media Type. (2) Select the size for envelopes. Note For details on printer driver settings, see "Printing with Windows" on page 18 or "Printing with the address side facing UP...
Quick Start Guide
Page 21
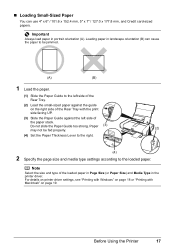
... orientation (A). Paper (3) may not be jammed. (A) (B) 1 Load the paper. (1) Slide the Paper Guide to the loaded paper. . For details on printer driver settings, see "Printing with Windows" on page 18 or "Printing with the print side facing UP. (3) Slide the Paper Guide against the guide on...(B) can use 4" x 6" / 101.6 x 152.4 mm, 5" x 7" / 127.0 x 177.8 mm, and Credit card-sized papers. . Before Using the Printer 17 Important Always load paper in the printer driver. Do not slide the Paper Guide too strong. „ Loading Small-Sized Paper You can cause the paper to be fed...
... orientation (A). Paper (3) may not be jammed. (A) (B) 1 Load the paper. (1) Slide the Paper Guide to the loaded paper. . For details on printer driver settings, see "Printing with Windows" on page 18 or "Printing with the print side facing UP. (3) Slide the Paper Guide against the guide on...(B) can use 4" x 6" / 101.6 x 152.4 mm, 5" x 7" / 127.0 x 177.8 mm, and Credit card-sized papers. . Before Using the Printer 17 Important Always load paper in the printer driver. Do not slide the Paper Guide too strong. „ Loading Small-Sized Paper You can cause the paper to be fed...
Quick Start Guide
Page 22
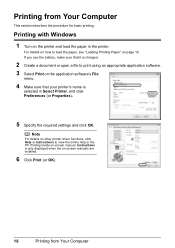
... click Preferences (or Properties). 5 Specify the required settings and click OK. Instructions is selected in the printer. For details on how to print using an appropriate application software. 3 Select Print on page 10. If you use the battery, make sure that it ... to load the paper, see "Loading Printing Paper" on the application software's File menu. 4 Make sure that your printer's name is only displayed when the on -screen manual. Note For details on other printer driver functions, click Help or Instructions to view the online help or the PC Printing Guide on -screen...
... click Preferences (or Properties). 5 Specify the required settings and click OK. Instructions is selected in the printer. For details on how to print using an appropriate application software. 3 Select Print on page 10. If you use the battery, make sure that it ... to load the paper, see "Loading Printing Paper" on the application software's File menu. 4 Make sure that your printer's name is only displayed when the on -screen manual. Note For details on other printer driver functions, click Help or Instructions to view the online help or the PC Printing Guide on -screen...
Quick Start Guide
Page 23
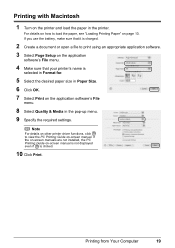
... document or open a file to print using an appropriate application software. 3 Select Page Setup on the application software's File menu. 4 Make sure that your printer's name is selected in Format for. 5 Select the desired paper size in Paper Size. 6 Click OK. 7 Select Print on -screen manual is not ...PC Printing Guide on the application software's File menu. 8 Select Quality & Media in the printer. For details on how to view the PC Printing Guide on page 10. Note For details on other printer driver functions, click to load the paper, see "Loading Printing Paper" on -screen manual....
... document or open a file to print using an appropriate application software. 3 Select Page Setup on the application software's File menu. 4 Make sure that your printer's name is selected in Format for. 5 Select the desired paper size in Paper Size. 6 Click OK. 7 Select Print on -screen manual is not ...PC Printing Guide on the application software's File menu. 8 Select Quality & Media in the printer. For details on how to view the PC Printing Guide on page 10. Note For details on other printer driver functions, click to load the paper, see "Loading Printing Paper" on -screen manual....
Quick Start Guide
Page 24
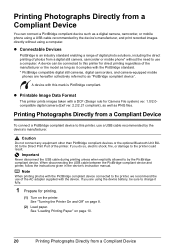
... Printing Photographs Directly from a digital still camera, camcorder or mobile phone* without using the device battery, be connected to this printer for direct printing regardless of the manufacturer or the model as long as "PictBridge compliant device". Printing Photographs Directly from a Compliant... Device To connect a PictBridge compliant device to this printer, use a computer. See "Loading Printing Paper" on page 8. (2) Load paper. Caution Do not connect any equipment other than ...
... Printing Photographs Directly from a digital still camera, camcorder or mobile phone* without using the device battery, be connected to this printer for direct printing regardless of the manufacturer or the model as long as "PictBridge compliant device". Printing Photographs Directly from a Compliant... Device To connect a PictBridge compliant device to this printer, use a computer. See "Loading Printing Paper" on page 8. (2) Load paper. Caution Do not connect any equipment other than ...


