
Quick Start Guide
Page 5
...Colors Are Incorrect 24 Printing the Nozzle Check Pattern 25 Examining the Nozzle Check Pattern ...........27 Print Head Cleaning 28 Print Head Deep Cleaning 31 Aligning the Print Head 33 Replacing an Ink Tank 43 Keeping the Best Printing Results 49 Cleaning Your Printer 50 Troubleshooting 57 Cannot Install the Printer... Driver 58 Cannot Connect to Computer Properly.........60 Print Results Not Satisfactory 61 Printer Does Not Start 64 Printer Moves But Ink Is Not Ejected 65 ...
...Colors Are Incorrect 24 Printing the Nozzle Check Pattern 25 Examining the Nozzle Check Pattern ...........27 Print Head Cleaning 28 Print Head Deep Cleaning 31 Aligning the Print Head 33 Replacing an Ink Tank 43 Keeping the Best Printing Results 49 Cleaning Your Printer 50 Troubleshooting 57 Cannot Install the Printer... Driver 58 Cannot Connect to Computer Properly.........60 Print Results Not Satisfactory 61 Printer Does Not Start 64 Printer Moves But Ink Is Not Ejected 65 ...
Quick Start Guide
Page 8
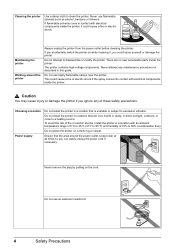
...location Power supply Do not install the printer in direct sunlight, outdoors, or close to a heating source. The printer contains high-voltage components. Do not install the printer in locations that are no user serviceable parts inside the printer. Do not place the printer on while cleaning it ... cord. This could injure yourself or damage the printer. Never attempt any maintenance procedure not described in a location with electrical components inside the printer, it , you ignore any of fire or electric shocks, install the printer in this guide. Do not use an extension...
...location Power supply Do not install the printer in direct sunlight, outdoors, or close to a heating source. The printer contains high-voltage components. Do not install the printer in locations that are no user serviceable parts inside the printer. Do not place the printer on while cleaning it ... cord. This could injure yourself or damage the printer. Never attempt any maintenance procedure not described in a location with electrical components inside the printer, it , you ignore any of fire or electric shocks, install the printer in this guide. Do not use an extension...

Quick Start Guide
Page 11
...Power Cord for Universal AC Adapter „ Canon Automobile Power Unit PU-200U This accessory allows you to supply power from a Bluetooth device. For further information on the installation or the Bluetooth settings, refer to the printer. Accessories The following accessories are available for ...operation or battery charging. „ Bluetooth Unit BU-30 This accessory allows you to use the Canon printer in location where a power...
...Power Cord for Universal AC Adapter „ Canon Automobile Power Unit PU-200U This accessory allows you to supply power from a Bluetooth device. For further information on the installation or the Bluetooth settings, refer to the printer. Accessories The following accessories are available for ...operation or battery charging. „ Bluetooth Unit BU-30 This accessory allows you to use the Canon printer in location where a power...
Quick Start Guide
Page 12
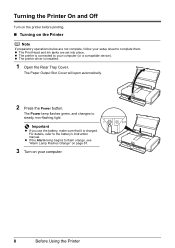
z The printer driver is charged. Important z If you use the battery, make sure that it is installed. 1 Open the Rear Tray Cover. z The Print Head and ink tanks are not complete, follow your setup sheet to complete them. The Power lamp flashes ...green, and changes to the battery's instruction manual. z If the Alarm lamp begins to your computer. 8 Before Using the Printer For details, refer...
z The printer driver is charged. Important z If you use the battery, make sure that it is installed. 1 Open the Rear Tray Cover. z The Print Head and ink tanks are not complete, follow your setup sheet to complete them. The Power lamp flashes ...green, and changes to the battery's instruction manual. z If the Alarm lamp begins to your computer. 8 Before Using the Printer For details, refer...
Quick Start Guide
Page 22
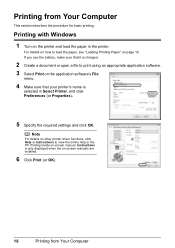
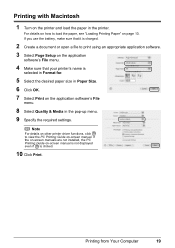
...'s File menu. 4 Make sure that it is selected in the printer. If you use the battery, make sure that your printer's name is charged. 2 Create a document or open a file to print using an appropriate application software. 3 Select Print on -screen manuals are installed. 6 Click Print (or OK). 18 Printing from Your Computer This...
...'s File menu. 4 Make sure that it is selected in the printer. If you use the battery, make sure that your printer's name is charged. 2 Create a document or open a file to print using an appropriate application software. 3 Select Print on -screen manuals are installed. 6 Click Print (or OK). 18 Printing from Your Computer This...
Quick Start Guide
Page 23
... to print using an appropriate application software. 3 Select Page Setup on the application software's File menu. 8 Select Quality & Media in the printer. If the on-screen manuals are not installed, the PC Printing Guide on-screen manual is not displayed even if is selected in Format for. 5 Select the desired paper size... open a file to view the PC Printing Guide on page 10. Printing from Your Computer 19 If you use the battery, make sure that your printer's name is clicked. 10 Click Print.
... to print using an appropriate application software. 3 Select Page Setup on the application software's File menu. 8 Select Quality & Media in the printer. If the on-screen manuals are not installed, the PC Printing Guide on-screen manual is not displayed even if is selected in Format for. 5 Select the desired paper size... open a file to view the PC Printing Guide on page 10. Printing from Your Computer 19 If you use the battery, make sure that your printer's name is clicked. 10 Click Print.
Quick Start Guide
Page 37
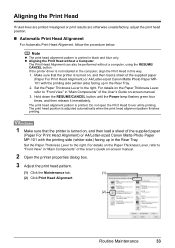
... 3. For details on the Paper Thickness Lever, refer to "Front View" in "Main Components" of the User's Guide on -screen manual. 2 Open the printer properties dialog box. 3 Adjust the print head pattern. (1) Click the Maintenance tab. (1) (2) Click Print Head Alignment. (2) Routine Maintenance 33 Note z The ...Print Head Alignment) or A4/Letter-sized Canon Matte Photo Paper MP101 with the printing side (whiter side) facing up in the Rear Tray. Make sure that the printer is printed in this way. 1. If the printer driver is not installed in the computer, align the Print Head ...
... 3. For details on the Paper Thickness Lever, refer to "Front View" in "Main Components" of the User's Guide on -screen manual. 2 Open the printer properties dialog box. 3 Adjust the print head pattern. (1) Click the Maintenance tab. (1) (2) Click Print Head Alignment. (2) Routine Maintenance 33 Note z The ...Print Head Alignment) or A4/Letter-sized Canon Matte Photo Paper MP101 with the printing side (whiter side) facing up in the Rear Tray. Make sure that the printer is printed in this way. 1. If the printer driver is not installed in the computer, align the Print Head ...
Quick Start Guide
Page 48
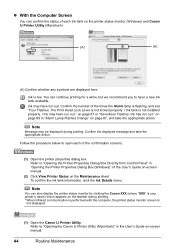
...is not locked properly. / Ink tank is not installed properly. / Ink may be displayed during printing. * When infrared communication is performed with the computer, the printer status monitor screen is not displayed. (1) Open the Canon IJ Printer Utility. To confirm the ink tank information, click ...the Ink Details menu. Note You can also display the printer status monitor by clicking the Canon XXX (where "XXX" is low. on page 69 in "Alarm Lamp Flashes Orange" on the printer status monitor (Windows) and Canon IJ Printer Utility (Macintosh). (A) (A) (A) Confirm whether any symbols are...
...is not locked properly. / Ink tank is not installed properly. / Ink may be displayed during printing. * When infrared communication is performed with the computer, the printer status monitor screen is not displayed. (1) Open the Canon IJ Printer Utility. To confirm the ink tank information, click ...the Ink Details menu. Note You can also display the printer status monitor by clicking the Canon XXX (where "XXX" is low. on page 69 in "Alarm Lamp Flashes Orange" on the printer status monitor (Windows) and Canon IJ Printer Utility (Macintosh). (A) (A) (A) Confirm whether any symbols are...
Quick Start Guide
Page 49
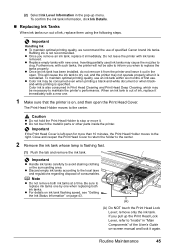
z Once an ink tank has been installed, do not remove it from the printer and leave it out in "Main Components" of the User's Guide on-screen manual and lock it again. z Color ink may be able to inform you when to replace the tanks properly. z Do not touch the metallic parts or ... Routine Maintenance 45 Refilling ink is flashing fast. (1) Push the tab and remove the ink tank. Do not leave the printer with new ones. When an ink tank is out of specified Canon brand ink tanks. If you remove an ink tank, replace it . (2) Select Ink Level Information in Print Head Cleaning...
z Once an ink tank has been installed, do not remove it from the printer and leave it out in "Main Components" of the User's Guide on-screen manual and lock it again. z Color ink may be able to inform you when to replace the tanks properly. z Do not touch the metallic parts or ... Routine Maintenance 45 Refilling ink is flashing fast. (1) Push the tab and remove the ink tank. Do not leave the printer with new ones. When an ink tank is out of specified Canon brand ink tanks. If you remove an ink tank, replace it . (2) Select Ink Level Information in Print Head Cleaning...
Quick Start Guide
Page 51
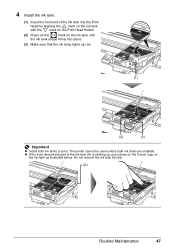
... Maintenance 47 z If the front (innermost) part of the ink tank into place. (3) Make sure that the ink lamp lights up , push down on the Canon logo on the ink tank until the ink tank snaps firmly into the Print Head by aligning the mark on the ink tank with the... mark on the Print Head Holder. (2) Press on the mark on the ink tank as illustrated below. The printer cannot be used unless both ink tanks to print. 4 Install the ink tank. (1) Insert the front end of the ink tank (A) is sticking up red. (1) (2) (3) Important...
... Maintenance 47 z If the front (innermost) part of the ink tank into place. (3) Make sure that the ink lamp lights up , push down on the Canon logo on the ink tank until the ink tank snaps firmly into the Print Head by aligning the mark on the ink tank with the... mark on the Print Head Holder. (2) Press on the mark on the ink tank as illustrated below. The printer cannot be used unless both ink tanks to print. 4 Install the ink tank. (1) Insert the front end of the ink tank (A) is sticking up red. (1) (2) (3) Important...
Quick Start Guide
Page 53
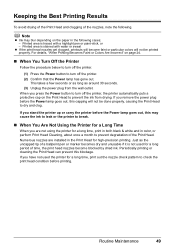
...installed in the following . Printed area is traced with water or sweat z If the print head nozzles get clogged, printouts will become blocked by dried ink. Printed area is stained with a highlight pen or paint-stick, or - If you press the Power button to turn off the printer, the printer.... Just as around 30 seconds. (3) Unplug the power plug from drying. Numerous nozzles are not using the printer for a long time, print in both black & white and in color, or perform Print Head Cleaning, about once a month to prevent degradation of time, the print head nozzles become...
...installed in the following . Printed area is traced with water or sweat z If the print head nozzles get clogged, printouts will become blocked by dried ink. Printed area is stained with a highlight pen or paint-stick, or - If you press the Power button to turn off the printer, the printer.... Just as around 30 seconds. (3) Unplug the power plug from drying. Numerous nozzles are not using the printer for a long time, print in both black & white and in color, or perform Print Head Cleaning, about once a month to prevent degradation of time, the print head nozzles become...

Quick Start Guide
Page 61
...When infrared communication is performed with the computer, the printer status monitor screen is displayed automatically. Take the appropriate action described in the User's Guide on-screen manual. To handle problems using the printer. z "Cannot Install the Printer Driver" on page 58 z "Cannot Connect to ...Computer Properly" on page 60 z "Print Results Not Satisfactory" on page 61 z "Printer Does Not Start" on page 64 z "Printer Moves But Ink Is Not Ejected" on ...
...When infrared communication is performed with the computer, the printer status monitor screen is displayed automatically. Take the appropriate action described in the User's Guide on-screen manual. To handle problems using the printer. z "Cannot Install the Printer Driver" on page 58 z "Cannot Connect to ...Computer Properly" on page 60 z "Print Results Not Satisfactory" on page 61 z "Printer Does Not Start" on page 64 z "Printer Moves But Ink Is Not Ejected" on ...
Quick Start Guide
Page 62
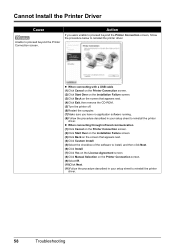
.... (11)Follow the procedure described in your setup sheet to reinstall the printer driver. Cannot Install the Printer Driver Cause Unable to reinstall the printer driver. z When connecting through infrared communication (1)Click Cancel on the Printer Connection screen. (2)Click Start Over on the Installation Failure screen. (3)Click Back on the screen that appears next. (4)Click Custom...
.... (11)Follow the procedure described in your setup sheet to reinstall the printer driver. Cannot Install the Printer Driver Cause Unable to reinstall the printer driver. z When connecting through infrared communication (1)Click Cancel on the Printer Connection screen. (2)Click Start Over on the Installation Failure screen. (3)Click Back on the screen that appears next. (4)Click Custom...
Quick Start Guide
Page 63
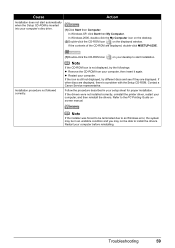
... CD-ROM icon on your setup sheet for proper installation. z Restart your computer before reinstalling. If the drivers were not installed correctly, uninstall the printer driver, restart your computer's disc drive. (1)Click Start then Computer. Refer to install the drivers. Contact a Canon Service representative. Note If the installer was forced to be terminated due to an...
... CD-ROM icon on your setup sheet for proper installation. z Restart your computer before reinstalling. If the drivers were not installed correctly, uninstall the printer driver, restart your computer's disc drive. (1)Click Start then Computer. Refer to install the drivers. Contact a Canon Service representative. Note If the installer was forced to be terminated due to an...

Quick Start Guide
Page 64
Speed connection. Obtain and install the latest update for your computer supports USB 2.0 Hi-Speed connection. z The USB 2.0 Hi-Speed driver operates properly. In this case, the printer operates properly but printing speed may slow down due to be no longer than around 10 feet / 3 meters. z ... environment supports USB 2.0 Hi-Speed connection. Be sure to ensure that your system environment is not fully compatible with your hardware and install it on page 60. 60 Troubleshooting Cannot Connect to Computer Properly „ Printing Speed Is Slow / USB 2.0 Hi-Speed Connection...
Speed connection. Obtain and install the latest update for your computer supports USB 2.0 Hi-Speed connection. z The USB 2.0 Hi-Speed driver operates properly. In this case, the printer operates properly but printing speed may slow down due to be no longer than around 10 feet / 3 meters. z ... environment supports USB 2.0 Hi-Speed connection. Be sure to ensure that your system environment is not fully compatible with your hardware and install it on page 60. 60 Troubleshooting Cannot Connect to Computer Properly „ Printing Speed Is Slow / USB 2.0 Hi-Speed Connection...

Quick Start Guide
Page 66
... the Print Head after you are printing on page 50. Action Clean the Paper Feed Roller. For details on cleaning, see if the paper you install it. z Check to see "Cleaning the Paper Feed Roller (Roller Cleaning)" on is not too thick or curled. If the paper is curled, see "... paper may be reduced at the top and bottom edges of the printer to correct paper curl. Refer to become stained with high color saturation such as photographs or images in deep color, we recommend using Photo Paper Pro or other Canon specialty paper. Open the Print Head Cover of the paper. Cause ...
... the Print Head after you are printing on page 50. Action Clean the Paper Feed Roller. For details on cleaning, see if the paper you install it. z Check to see "Cleaning the Paper Feed Roller (Roller Cleaning)" on is not too thick or curled. If the paper is curled, see "... paper may be reduced at the top and bottom edges of the printer to correct paper curl. Refer to become stained with high color saturation such as photographs or images in deep color, we recommend using Photo Paper Pro or other Canon specialty paper. Open the Print Head Cover of the paper. Cause ...
Quick Start Guide
Page 68
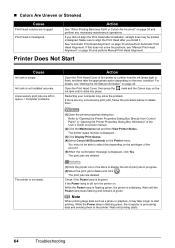
...If the Power lamp is off, turn the printer on the Printer menu. Wait until it clicks into place. „ Colors Are Uneven or Streaked Cause Print Head nozzles are left in queue. / Computer problems. The printer is not ready. Print Head is not installed securely. Refer to select this does not ...flash, and then take longer to delete and click . Make sure to the printer. See "Automatic Print Head Alignment" on page 43. Printer Does Not Start Cause Ink tank is lit green. mark and the Canon logo on page 36 and perform Manual Print Head Alignment. Check if the ...
...If the Power lamp is off, turn the printer on the Printer menu. Wait until it clicks into place. „ Colors Are Uneven or Streaked Cause Print Head nozzles are left in queue. / Computer problems. The printer is not ready. Print Head is not installed securely. Refer to select this does not ...flash, and then take longer to delete and click . Make sure to the printer. See "Automatic Print Head Alignment" on page 43. Printer Does Not Start Cause Ink tank is lit green. mark and the Canon logo on page 36 and perform Manual Print Head Alignment. Check if the ...
Quick Start Guide
Page 71
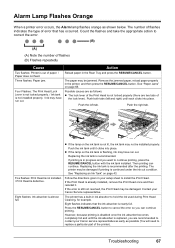
...: Paper jam. See "Paper Jams" on page 43. Count the flashes and take the appropriate action to install the Print Head. Alarm Lamp Flashes Orange When a printer error occurs, the Alarm lamp flashes orange as follows: z The lock lever of the lock lever). The number.... Follow the directions given in ink absorber to continue printing, press the RESUME/CANCEL button with the ink tank installed. The printer has a built-in your Canon Service representative. Eight flashes indicates that has occurred. However, because printing is disabled once the ink absorber becomes completely...
...: Paper jam. See "Paper Jams" on page 43. Count the flashes and take the appropriate action to install the Print Head. Alarm Lamp Flashes Orange When a printer error occurs, the Alarm lamp flashes orange as follows: z The lock lever of the lock lever). The number.... Follow the directions given in ink absorber to continue printing, press the RESUME/CANCEL button with the ink tank installed. The printer has a built-in your Canon Service representative. Eight flashes indicates that has occurred. However, because printing is disabled once the ink absorber becomes completely...
Quick Start Guide
Page 75
... USB hub, disconnect it, connect the printer directly to the printer and the computer. While the Power lamp is flashing green, the printer is not correct, reinstall the printer driver or change the port setting. z There could also be installed properly. Replace the USB cable and try... the relay device. If the Power lamp is not ready. Cause Action Printer port setting does not match the computer's interface connecting the printer. In Windows 2000, click Control Panel then Printers. (3)Right-click the Canon XXX icon, then select Properties. (4)Click the Ports tab to the following...
... USB hub, disconnect it, connect the printer directly to the printer and the computer. While the Power lamp is flashing green, the printer is not correct, reinstall the printer driver or change the port setting. z There could also be installed properly. Replace the USB cable and try... the relay device. If the Power lamp is not ready. Cause Action Printer port setting does not match the computer's interface connecting the printer. In Windows 2000, click Control Panel then Printers. (3)Right-click the Canon XXX icon, then select Properties. (4)Click the Ports tab to the following...
Quick Start Guide
Page 76
...has failed. If you cannot add the printer, follow the procedure below to check that the driver for your printer is installed to your computer. (1)Select Print & Fax Preferences from Printer. (2)Check that the check box is selected. (3)If your printer's name is not displayed, click Add(+)... to add the printer. See "Nine flashes: No response from connected ...
...has failed. If you cannot add the printer, follow the procedure below to check that the driver for your printer is installed to your computer. (1)Select Print & Fax Preferences from Printer. (2)Check that the check box is selected. (3)If your printer's name is not displayed, click Add(+)... to add the printer. See "Nine flashes: No response from connected ...


