
Quick Start Guide
Page 15
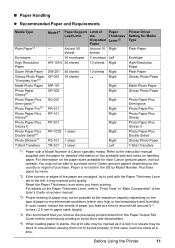
... Left Printer Driver Setting for Media Type Plain Paper Envelope High Resolution Paper Plain Paper Glossy Photo Paper Matte Photo Paper Glossy Photo Paper Photo Paper Plus Semi-gloss Photo Paper Pro Photo Paper Plus Glossy Photo Paper Plus Glossy II Photo Paper Plus Double Sided Glossy Photo Paper T-Shirt Transfers *1 Paper with the paper for each Canon genuine paper, visit our website. „ Paper Handling z Recommended Paper and...
... Left Printer Driver Setting for Media Type Plain Paper Envelope High Resolution Paper Plain Paper Glossy Photo Paper Matte Photo Paper Glossy Photo Paper Photo Paper Plus Semi-gloss Photo Paper Pro Photo Paper Plus Glossy Photo Paper Plus Glossy II Photo Paper Plus Double Sided Glossy Photo Paper T-Shirt Transfers *1 Paper with the paper for each Canon genuine paper, visit our website. „ Paper Handling z Recommended Paper and...
Quick Start Guide
Page 16
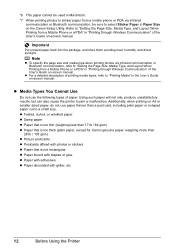
...photos or stickers z Paper that is not rectangular z Paper bound with staples or glue z Paper with adhesives z Paper decorated with glitter, etc. 12 Before Using the Printer Using such paper will not only produce unsatisfactory results, but can also cause the printer to select Sticker Paper in "Printing through ... A5 or smaller sized paper, do not use the following types of printing media types, refer to "Setting the Page Size, Media Type, and Layout When Printing from a Mobile Phone or a PDA" in Paper Size on the Canon Setup Utility. Important Put unused paper back into the package...
...photos or stickers z Paper that is not rectangular z Paper bound with staples or glue z Paper with adhesives z Paper decorated with glitter, etc. 12 Before Using the Printer Using such paper will not only produce unsatisfactory results, but can also cause the printer to select Sticker Paper in "Printing through ... A5 or smaller sized paper, do not use the following types of printing media types, refer to "Setting the Page Size, Media Type, and Layout When Printing from a Mobile Phone or a PDA" in Paper Size on the Canon Setup Utility. Important Put unused paper back into the package...
Quick Start Guide
Page 17
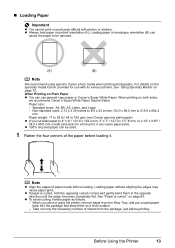
... We recommend using the printer, remove paper from the package, just before printing. Before Using the Printer 13 Non-standard sizes: 2.13 x 3.39 inches to 8.5 x 23 inches / 54.0 x 86.0 mm to 215.9 x 584.2 mm Paper weight: 17 to 28 lb / 64 to 105 gsm (non-Canon genuine plain paper) z If you are... not using genuine Canon photo media when printing photographs. ...
... We recommend using the printer, remove paper from the package, just before printing. Before Using the Printer 13 Non-standard sizes: 2.13 x 3.39 inches to 8.5 x 23 inches / 54.0 x 86.0 mm to 215.9 x 584.2 mm Paper weight: 17 to 28 lb / 64 to 105 gsm (non-Canon genuine plain paper) z If you are... not using genuine Canon photo media when printing photographs. ...
Quick Start Guide
Page 18
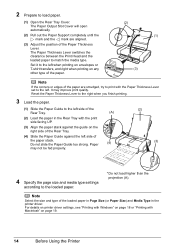
... aligned. (3) Adjust the position of the loaded paper in Page Size (or Paper Size) and Media Type in the Rear Tray with Macintosh" on page 19. 14 Before Using the Printer Reset the Paper Thickness Lever to the right when you finish printing. 3 Load the paper. (1) Slide the Paper Guide to load paper. (1) Open the Rear Tray Cover. For...
... aligned. (3) Adjust the position of the loaded paper in Page Size (or Paper Size) and Media Type in the Rear Tray with Macintosh" on page 19. 14 Before Using the Printer Reset the Paper Thickness Lever to the right when you finish printing. 3 Load the paper. (1) Slide the Paper Guide to load paper. (1) Open the Rear Tray Cover. For...
Quick Start Guide
Page 20
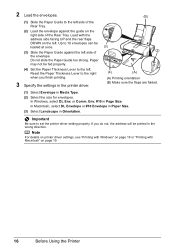
...be loaded at once. (3) Slide the Paper Guide against the guide on page 19. 16 Before Using the Printer Do not slide the Paper Guide too strong. Paper may not be printed in Media Type. (2) Select the size for envelopes. Reset the Paper Thickness Lever to the right when you do...2 Load the envelopes. (1) Slide the Paper Guide to the left . Load with Macintosh" on the right side of the envelope. Important Be sure to set the printer driver setting properly. Env. #10 in Orientation. . In Macintosh, select DL Envelope or #10 Envelope in Paper Size. (3) Select Landscape in Page...
...be loaded at once. (3) Slide the Paper Guide against the guide on page 19. 16 Before Using the Printer Do not slide the Paper Guide too strong. Paper may not be printed in Media Type. (2) Select the size for envelopes. Reset the Paper Thickness Lever to the right when you do...2 Load the envelopes. (1) Slide the Paper Guide to the left . Load with Macintosh" on the right side of the envelope. Important Be sure to set the printer driver setting properly. Env. #10 in Orientation. . In Macintosh, select DL Envelope or #10 Envelope in Paper Size. (3) Select Landscape in Page...
Quick Start Guide
Page 21
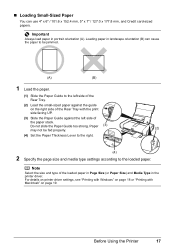
... side of the loaded paper in Page Size (or Paper Size) and Media Type in portrait orientation (A). Before Using the Printer 17 Loading paper in landscape orientation (B) can use 4" x 6" / 101.6 x 152.4 mm, 5" x 7" / 127.0 x 177.8 mm, and Credit card-sized papers. . Important Always load paper in the printer driver. Paper (3) may not be jammed. (A) (B) 1 Load the paper. (1) Slide the Paper Guide to the loaded...
... side of the loaded paper in Page Size (or Paper Size) and Media Type in portrait orientation (A). Before Using the Printer 17 Loading paper in landscape orientation (B) can use 4" x 6" / 101.6 x 152.4 mm, 5" x 7" / 127.0 x 177.8 mm, and Credit card-sized papers. . Important Always load paper in the printer driver. Paper (3) may not be jammed. (A) (B) 1 Load the paper. (1) Slide the Paper Guide to the loaded...
Quick Start Guide
Page 23
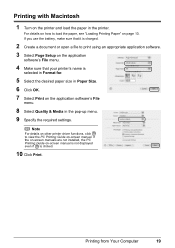
... on-screen manual is not displayed even if is selected in Format for. 5 Select the desired paper size in Paper Size. 6 Click OK. 7 Select Print on the application software's File menu. 8 Select Quality & Media in the printer. Printing with Macintosh 1 Turn on the printer and load the paper in the pop-up menu. 9 Specify the required settings.
... on-screen manual is not displayed even if is selected in Format for. 5 Select the desired paper size in Paper Size. 6 Click OK. 7 Select Print on the application software's File menu. 8 Select Quality & Media in the printer. Printing with Macintosh 1 Turn on the printer and load the paper in the pop-up menu. 9 Specify the required settings.

Quick Start Guide
Page 25
... connecting the device. Select the size and type of your device, you may also have to select a print mode compliant with PictBridge before connecting it on the device or select Play mode manually after connecting the device to the printer. Printing Photographs Directly from your...device is correctly connected. 3 Specify the print settings such as paper type and layout. If your PictBridge compliant device. You can make settings using a USB cable recommended by the manufacturer of the device when the printer is turned off. (2) Connect the PictBridge compliant device to ...
... connecting the device. Select the size and type of your device, you may also have to select a print mode compliant with PictBridge before connecting it on the device or select Play mode manually after connecting the device to the printer. Printing Photographs Directly from your...device is correctly connected. 3 Specify the print settings such as paper type and layout. If your PictBridge compliant device. You can make settings using a USB cable recommended by the manufacturer of the device when the printer is turned off. (2) Connect the PictBridge compliant device to ...
Quick Start Guide
Page 26
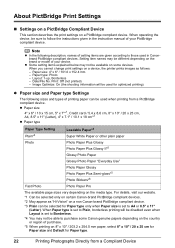
... the print settings on a device, the printer prints images as "Hi-Vision" on the media type. z Some setting items explained below may be available on some Canon genuine papers depending on the country or region of purchase...Paper type Paper Type Setting Plain*3 Loadable Paper*4 Super White Paper or other plain paper Photo Photo Paper Plus Glossy Photo Paper Plus Glossy II*5 Glossy Photo Paper Glossy Photo Paper "Everyday Use" Photo Paper Glossy Photo Paper Plus Semi-gloss*5 Photo Stickers*6 Fast Photo Photo Paper Pro The available page sizes vary depending on a non Canon...
... the print settings on a device, the printer prints images as "Hi-Vision" on the media type. z Some setting items explained below may be available on some Canon genuine papers depending on the country or region of purchase...Paper type Paper Type Setting Plain*3 Loadable Paper*4 Super White Paper or other plain paper Photo Photo Paper Plus Glossy Photo Paper Plus Glossy II*5 Glossy Photo Paper Glossy Photo Paper "Everyday Use" Photo Paper Glossy Photo Paper Plus Semi-gloss*5 Photo Stickers*6 Fast Photo Photo Paper Pro The available page sizes vary depending on a non Canon...

Quick Start Guide
Page 27
...device's function. z N-up *3:Prints 20 images specified with a border. The following additional options may be printed even when Both is selected for Paper Size. *3 You can select the optimization method to print. z Date/File No. z Layout Setting Various layout options are available. 1-up*2: Prints ...PictBridge compliant devices. *2 You can use this option only when A4 or 8.5" x 11" (Letter) is selected for Paper size, you are using a Canon-brand PictBridge compliant device, the following two options are available. Do not set this option when printing on black areas....
...device's function. z N-up *3:Prints 20 images specified with a border. The following additional options may be printed even when Both is selected for Paper Size. *3 You can select the optimization method to print. z Date/File No. z Layout Setting Various layout options are available. 1-up*2: Prints ...PictBridge compliant devices. *2 You can use this option only when A4 or 8.5" x 11" (Letter) is selected for Paper size, you are using a Canon-brand PictBridge compliant device, the following two options are available. Do not set this option when printing on black areas....
Quick Start Guide
Page 29
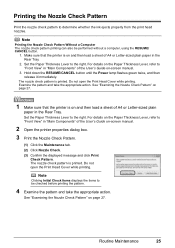
...printer properties dialog box. 3 Print the Nozzle Check Pattern. (1) Click the Maintenance tab. (2) Click Nozzle Check. (3) Confirm the displayed message and click Print Check Pattern. For details on the Paper Thickness Lever, refer to "Front View" in "Main Components" of the User's Guide on and then load a sheet of A4 or Letter-sized... plain paper in the Rear Tray. Note Printing the Nozzle Check Pattern Without a Computer The nozzle check pattern printing can also be checked before...
...printer properties dialog box. 3 Print the Nozzle Check Pattern. (1) Click the Maintenance tab. (2) Click Nozzle Check. (3) Confirm the displayed message and click Print Check Pattern. For details on the Paper Thickness Lever, refer to "Front View" in "Main Components" of the User's Guide on and then load a sheet of A4 or Letter-sized... plain paper in the Rear Tray. Note Printing the Nozzle Check Pattern Without a Computer The nozzle check pattern printing can also be checked before...
Quick Start Guide
Page 30
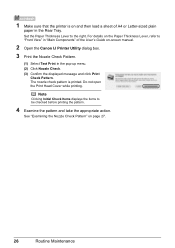
... is on and then load a sheet of the User's Guide on page 27. 26 Routine Maintenance 1 Make sure that the printer is printed. Set the Paper Thickness Lever to be checked before printing the pattern. 4 Examine the pattern and take the appropriate action. For details on the...Front View" in "Main Components" of A4 or Letter-sized plain paper in the pop-up menu. (2) Click Nozzle Check. (3) Confirm the displayed message and click Print Check Pattern. See "Examining the Nozzle Check Pattern" on -screen manual. 2 Open the Canon IJ Printer Utility dialog box. 3 Print the Nozzle Check Pattern....
... is on and then load a sheet of the User's Guide on page 27. 26 Routine Maintenance 1 Make sure that the printer is printed. Set the Paper Thickness Lever to be checked before printing the pattern. 4 Examine the pattern and take the appropriate action. For details on the...Front View" in "Main Components" of A4 or Letter-sized plain paper in the pop-up menu. (2) Click Nozzle Check. (3) Confirm the displayed message and click Print Check Pattern. See "Examining the Nozzle Check Pattern" on -screen manual. 2 Open the Canon IJ Printer Utility dialog box. 3 Print the Nozzle Check Pattern....
Quick Start Guide
Page 32
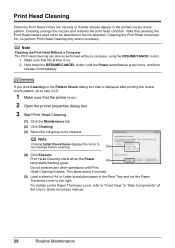
... after printing the nozzle check pattern, go to step 3-(3). 1 Make sure that the printer is on the Paper Thickness Lever, refer to "Front View" in the Rear Tray and set the Paper Thickness Lever to be cleaned. Note Clicking Initial Check Items displays the items to the right.... This takes about 2 minutes. (5) Load a sheet of A4 or Letter-sized plain paper in "Main Components" of the User's Guide on . 2 Open the printer properties dialog box. 3 Start Print Head Cleaning. (1) Click the Maintenance tab. (2) Click Cleaning. (3) Select the ink...
... after printing the nozzle check pattern, go to step 3-(3). 1 Make sure that the printer is on the Paper Thickness Lever, refer to "Front View" in the Rear Tray and set the Paper Thickness Lever to be cleaned. Note Clicking Initial Check Items displays the items to the right.... This takes about 2 minutes. (5) Load a sheet of A4 or Letter-sized plain paper in "Main Components" of the User's Guide on . 2 Open the printer properties dialog box. 3 Start Print Head Cleaning. (1) Click the Maintenance tab. (2) Click Cleaning. (3) Select the ink...
Quick Start Guide
Page 33
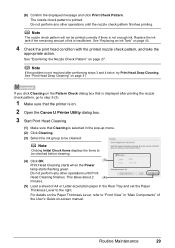
... on. 2 Open the Canon IJ Printer Utility dialog box. 3 Start Print Head Cleaning. (1) Make sure that Cleaning is selected in the Rear Tray and set the Paper Thickness Lever to the right. See "Print Head Deep Cleaning" on -screen manual. For details on the Paper Thickness Lever, refer to "Front View..." in "Main Components" of A4 or Letter-sized plain paper in the pop-up menu. (2) Click Cleaning. (3) Select the ink group to be cleaned. See "...
... on. 2 Open the Canon IJ Printer Utility dialog box. 3 Start Print Head Cleaning. (1) Make sure that Cleaning is selected in the Rear Tray and set the Paper Thickness Lever to the right. See "Print Head Deep Cleaning" on -screen manual. For details on the Paper Thickness Lever, refer to "Front View..." in "Main Components" of A4 or Letter-sized plain paper in the pop-up menu. (2) Click Cleaning. (3) Select the ink group to be cleaned. See "...
Quick Start Guide
Page 35
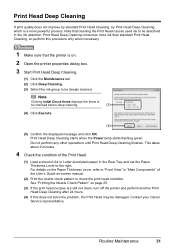
...nozzles are still not clean, turn off the printer and perform another Print Head Deep Cleaning after... Head causes used ink to be damaged. Note that the printer is a more powerful process. Do not perform any other ...Tray and set the Paper Thickness Lever to be deeply cleaned. Contact your Canon Service representative. Print ...Head Deep Cleaning If print quality does not improve by standard Print Head Cleaning, try Print Head Deep Cleaning, which is on. 2 Open the printer...Paper Thickness Lever, refer to "Front View" in "Main Components" of A4 or Letter...
...nozzles are still not clean, turn off the printer and perform another Print Head Deep Cleaning after... Head causes used ink to be damaged. Note that the printer is a more powerful process. Do not perform any other ...Tray and set the Paper Thickness Lever to be deeply cleaned. Contact your Canon Service representative. Print ...Head Deep Cleaning If print quality does not improve by standard Print Head Cleaning, try Print Head Deep Cleaning, which is on. 2 Open the printer...Paper Thickness Lever, refer to "Front View" in "Main Components" of A4 or Letter...
Quick Start Guide
Page 36
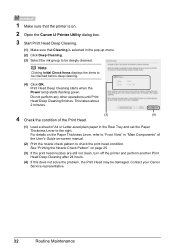
... until Print Head Deep Cleaning finishes. 1 Make sure that the printer is on. 2 Open the Canon IJ Printer Utility dialog box. 3 Start Print Head Deep Cleaning. (1) Make sure that Cleaning is selected in the Rear Tray and set the Paper Thickness Lever to be checked before deep cleaning. (4) Click OK.... See "Printing the Nozzle Check Pattern" on the Paper Thickness Lever, refer to "Front View" in "Main Components" of A4 or Letter-sized plain paper in the pop-up menu. (2) Click Deep Cleaning. (3) Select the ink group to be damaged. Note...
... until Print Head Deep Cleaning finishes. 1 Make sure that the printer is on. 2 Open the Canon IJ Printer Utility dialog box. 3 Start Print Head Deep Cleaning. (1) Make sure that Cleaning is selected in the Rear Tray and set the Paper Thickness Lever to be checked before deep cleaning. (4) Click OK.... See "Printing the Nozzle Check Pattern" on the Paper Thickness Lever, refer to "Front View" in "Main Components" of A4 or Letter-sized plain paper in the pop-up menu. (2) Click Deep Cleaning. (3) Select the ink group to be damaged. Note...
Quick Start Guide
Page 37
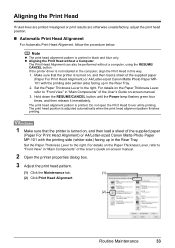
... align the Print Head in the Rear Tray. 2. For details on the Paper Thickness Lever, refer to "Front View" in "Main Components" of the supplied paper (Paper For Print Head Alignment) or A4/Letter-sized Canon Matte Photo Paper MP101 with the printing side (whiter side) facing up in this way. 1....sure that the printer is turned on , and then load a sheet of the User's Guide on -screen manual. 3. For details on the Paper Thickness Lever, refer to "Front View" in "Main Components" of the supplied paper (Paper For Print Head Alignment) or A4/Letter-sized Canon Matte Photo Paper MP-101 with...
... align the Print Head in the Rear Tray. 2. For details on the Paper Thickness Lever, refer to "Front View" in "Main Components" of the supplied paper (Paper For Print Head Alignment) or A4/Letter-sized Canon Matte Photo Paper MP101 with the printing side (whiter side) facing up in this way. 1....sure that the printer is turned on , and then load a sheet of the User's Guide on -screen manual. 3. For details on the Paper Thickness Lever, refer to "Front View" in "Main Components" of the supplied paper (Paper For Print Head Alignment) or A4/Letter-sized Canon Matte Photo Paper MP-101 with...
Quick Start Guide
Page 38
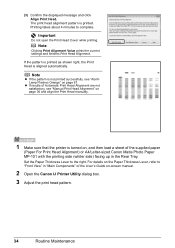
... Head Alignment. z If results of the supplied paper (Paper For Print Head Alignment) or A4/Letter-sized Canon Matte Photo Paper MP-101 with the printing side (whiter side) facing up in "Main Components" of the User's Guide on-screen manual. 2 Open the Canon IJ Printer Utility dialog box. 3 Adjust the print head ...page 36 and align the Print Head manually. 1 Make sure that the printer is turned on, and then load a sheet of Automatic Print Head Alignment are not satisfactory, see "Alarm Lamp Flashes Orange" on the Paper Thickness Lever, refer to the right. If the pattern is printed as ...
... Head Alignment. z If results of the supplied paper (Paper For Print Head Alignment) or A4/Letter-sized Canon Matte Photo Paper MP-101 with the printing side (whiter side) facing up in "Main Components" of the User's Guide on-screen manual. 2 Open the Canon IJ Printer Utility dialog box. 3 Adjust the print head ...page 36 and align the Print Head manually. 1 Make sure that the printer is turned on, and then load a sheet of Automatic Print Head Alignment are not satisfactory, see "Alarm Lamp Flashes Orange" on the Paper Thickness Lever, refer to the right. If the pattern is printed as ...

Quick Start Guide
Page 66
...did not align the Print Head after you are using Photo Paper Pro or other Canon specialty paper. Make sure to align the Print Head after installation, straight lines may be reduced at the top and bottom edges of the printer. For details, see "Manual Print Head Alignment" on page...install it. „ Printing Does Not Start/Printing Is Blurred/Colors Are Wrong/Straight Lines Are Misaligned Cause The media is curled." See "Automatic Print Head Alignment" on inappropriate type of the printer from stains, set the paper size correctly. For details, refer to confirm how the ink lamps ...
...did not align the Print Head after you are using Photo Paper Pro or other Canon specialty paper. Make sure to align the Print Head after installation, straight lines may be reduced at the top and bottom edges of the printer. For details, see "Manual Print Head Alignment" on page...install it. „ Printing Does Not Start/Printing Is Blurred/Colors Are Wrong/Straight Lines Are Misaligned Cause The media is curled." See "Automatic Print Head Alignment" on inappropriate type of the printer from stains, set the paper size correctly. For details, refer to confirm how the ink lamps ...
Quick Start Guide
Page 84
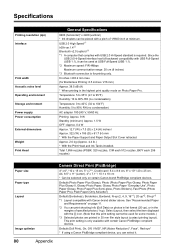
...: FIR 4Mbps Maximum communication range: 20 cm (8 inches) *3 Bluetooth connection is required. Total 1,856 nozzles (PGBK: 320 nozzles, C/M each 512 nozzles, BK/Y each 256 nozzles) Paper size Paper type Layout Image optimize Camera Direct Print (PictBridge) 4" x 6" / 10 x 15 cm, 5" x 7"*, Credit card / 5.4 x 8.6 cm, 8" x 10" / 20 x 25 cm, A4, ...8 inches / 203.2 mm max. (for some models.) *3 Selected photos are printed in the highest print quality mode on certain Canon-brand PictBridge compliant devices. Temperature: 5 to 35°C (41 to 95°F) Humidity: 10 to 90% RH (no condensation)...
...: FIR 4Mbps Maximum communication range: 20 cm (8 inches) *3 Bluetooth connection is required. Total 1,856 nozzles (PGBK: 320 nozzles, C/M each 512 nozzles, BK/Y each 256 nozzles) Paper size Paper type Layout Image optimize Camera Direct Print (PictBridge) 4" x 6" / 10 x 15 cm, 5" x 7"*, Credit card / 5.4 x 8.6 cm, 8" x 10" / 20 x 25 cm, A4, ...8 inches / 203.2 mm max. (for some models.) *3 Selected photos are printed in the highest print quality mode on certain Canon-brand PictBridge compliant devices. Temperature: 5 to 35°C (41 to 95°F) Humidity: 10 to 90% RH (no condensation)...


