
Quick Start Guide
Page 5
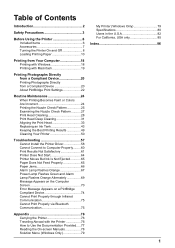
...Printer On and Off 8 Loading Printing Paper 10 Printing from Your Computer 18 Printing with Windows 18 Printing with Macintosh 19 Printing Photographs Directly from a Compliant Device 20 Printing Photographs Directly from a Compliant Device 20 About PictBridge Print Settings 22 Routine Maintenance 24 When Printing Becomes Faint or Colors...Best Printing Results 49 Cleaning Your Printer 50 Troubleshooting 57 Cannot Install the Printer Driver 58 Cannot Connect to Computer Properly.........60 Print Results Not Satisfactory 61 Printer Does Not Start 64 Printer Moves But Ink Is Not ...
...Printer On and Off 8 Loading Printing Paper 10 Printing from Your Computer 18 Printing with Windows 18 Printing with Macintosh 19 Printing Photographs Directly from a Compliant Device 20 Printing Photographs Directly from a Compliant Device 20 About PictBridge Print Settings 22 Routine Maintenance 24 When Printing Becomes Faint or Colors...Best Printing Results 49 Cleaning Your Printer 50 Troubleshooting 57 Cannot Install the Printer Driver 58 Cannot Connect to Computer Properly.........60 Print Results Not Satisfactory 61 Printer Does Not Start 64 Printer Moves But Ink Is Not ...
Quick Start Guide
Page 13
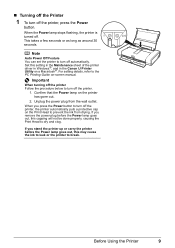
...Off Feature You can set the printer to dry and clog. If you stand the printer up or carry the printer before the Power lamp goes out, this setting in the Maintenance sheet of the printer driver in Windows®, and in the Canon IJ Printer Utility on the printer has gone out. 2. Set ...this capping will not be done properly, causing the Print Head to turn off automatically. When the Power lamp stops flashing, the printer is turned off. If you...
...Off Feature You can set the printer to dry and clog. If you stand the printer up or carry the printer before the Power lamp goes out, this setting in the Maintenance sheet of the printer driver in Windows®, and in the Canon IJ Printer Utility on the printer has gone out. 2. Set ...this capping will not be done properly, causing the Print Head to turn off automatically. When the Power lamp stops flashing, the printer is turned off. If you...
Quick Start Guide
Page 18
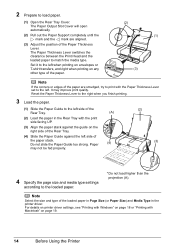
.... (1) Open the Rear Tray Cover. 2 Prepare to the left side of the Rear Tray. (2) Load the paper in the printer driver. For details on printer driver settings, see "Printing with Windows" on page 18 or "Printing with the print side facing UP. (3) Align the paper stack against the left when printing on ... Macintosh" on the right side of the Rear Tray. (4) Slide the Paper Guide against the guide on page 19. 14 Before Using the Printer Do not slide the Paper Guide too strong. The Paper Output Slot Cover will open automatically. (2) Pull out the Paper Support completely until the...
.... (1) Open the Rear Tray Cover. 2 Prepare to the left side of the Rear Tray. (2) Load the paper in the printer driver. For details on printer driver settings, see "Printing with Windows" on page 18 or "Printing with the print side facing UP. (3) Align the paper stack against the left when printing on ... Macintosh" on the right side of the Rear Tray. (4) Slide the Paper Guide against the guide on page 19. 14 Before Using the Printer Do not slide the Paper Guide too strong. The Paper Output Slot Cover will open automatically. (2) Pull out the Paper Support completely until the...
Quick Start Guide
Page 20
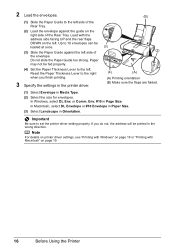
... properly. Paper may not be printed in Media Type. (2) Select the size for envelopes. In Windows, select DL Env. or Comm. Note For details on printer driver settings, see "Printing with Windows" on page 18 or "Printing with the address side facing UP and the rear flaps DOWN on page 19. 16 Before... Using the Printer Reset the Paper Thickness Lever to the right when you do not, the ...
... properly. Paper may not be printed in Media Type. (2) Select the size for envelopes. In Windows, select DL Env. or Comm. Note For details on printer driver settings, see "Printing with Windows" on page 18 or "Printing with the address side facing UP and the rear flaps DOWN on page 19. 16 Before... Using the Printer Reset the Paper Thickness Lever to the right when you do not, the ...
Quick Start Guide
Page 21
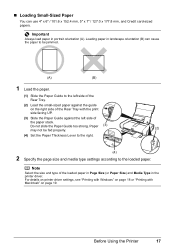
...against the left side of the loaded paper in Page Size (or Paper Size) and Media Type in the printer driver. For details on printer driver settings, see "Printing with Windows" on page 19. Paper (3) may not be jammed. (A) (B) 1 Load the paper. (1) Slide the... Paper Guide to the loaded paper. . Before Using the Printer 17 Important Always load paper in landscape orientation (B) can use 4" x 6" / 101.6 x 152.4 mm, 5" x 7" ...
...against the left side of the loaded paper in Page Size (or Paper Size) and Media Type in the printer driver. For details on printer driver settings, see "Printing with Windows" on page 19. Paper (3) may not be jammed. (A) (B) 1 Load the paper. (1) Slide the... Paper Guide to the loaded paper. . Before Using the Printer 17 Important Always load paper in landscape orientation (B) can use 4" x 6" / 101.6 x 152.4 mm, 5" x 7" ...
Quick Start Guide
Page 22
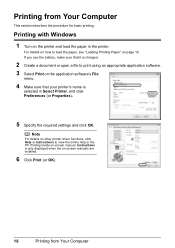
Instructions is selected in the printer. Note For details on other printer driver functions, click Help or Instructions to load the paper, see "Loading Printing Paper" on -screen manual. For details on how to view the online help ... Print on the application software's File menu. 4 Make sure that your printer's name is only displayed when the on the printer and load the paper in Select Printer, and click Preferences (or Properties). 5 Specify the required settings and click OK. Printing with Windows 1 Turn on -screen manuals are installed. 6 Click Print (or OK). 18...
Instructions is selected in the printer. Note For details on other printer driver functions, click Help or Instructions to load the paper, see "Loading Printing Paper" on -screen manual. For details on how to view the online help ... Print on the application software's File menu. 4 Make sure that your printer's name is only displayed when the on the printer and load the paper in Select Printer, and click Preferences (or Properties). 5 Specify the required settings and click OK. Printing with Windows 1 Turn on -screen manuals are installed. 6 Click Print (or OK). 18...
Quick Start Guide
Page 63
...: z Remove the CD-ROM from your computer before reinstalling. Contact a Canon Service representative. Cause Action Installation does not start installation. In Windows XP, click Start then My Computer. In Windows 2000, double-click the My Computer icon on the desktop. (2)Double-click... the CD-ROM icon on your desktop to install the drivers. If other discs are displayed. If the drivers were not installed correctly, uninstall the printer driver...
...: z Remove the CD-ROM from your computer before reinstalling. Contact a Canon Service representative. Cause Action Installation does not start installation. In Windows XP, click Start then My Computer. In Windows 2000, double-click the My Computer icon on the desktop. (2)Double-click... the CD-ROM icon on your desktop to install the drivers. If other discs are displayed. If the drivers were not installed correctly, uninstall the printer driver...
Quick Start Guide
Page 75
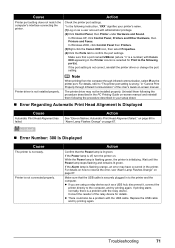
...lamp is initializing. In Windows XP, click Control Panel, Printers and Other Hardware, then Printers and Faxes. Printer driver is not connected properly. The printer driver may have occurred in your printer's name. (1)Log on -screen manual and reinstall them following port(s). Printer is not installed properly....If you are using a relay device such as the printer port. In Windows 2000, click Control Panel then Printers. (3)Right-click the Canon XXX icon, then select Properties. (4)Click the Ports tab to "The printer port setting is selected for details. Note When printing from...
...lamp is initializing. In Windows XP, click Control Panel, Printers and Other Hardware, then Printers and Faxes. Printer driver is not connected properly. The printer driver may have occurred in your printer's name. (1)Log on -screen manual and reinstall them following port(s). Printer is not installed properly....If you are using a relay device such as the printer port. In Windows 2000, click Control Panel then Printers. (3)Right-click the Canon XXX icon, then select Properties. (4)Click the Ports tab to "The printer port setting is selected for details. Note When printing from...
Quick Start Guide
Page 83
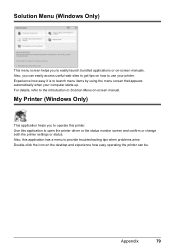
... easily access useful web sites to get tips on how to open the printer driver or the status monitor screen and confirm or change both the printer settings or status. My Printer (Windows Only) This application helps you to provide troubleshooting tips when problems arise. Also, you to ...easily launch bundled applications or on -screen manual. Use this printer. Appendix 79 Experience how easy it is...
... easily access useful web sites to get tips on how to open the printer driver or the status monitor screen and confirm or change both the printer settings or status. My Printer (Windows Only) This application helps you to provide troubleshooting tips when problems arise. Also, you to ...easily launch bundled applications or on -screen manual. Use this printer. Appendix 79 Experience how easy it is...
Easy Setup Instructions
Page 2
... number, which is loaded in "Troubleshooting" of Canon printers. l When the User Registration screen appears, click Next. i When the Printer Connection screen appears, confirm the displayed message and ... paper (Paper For Print Head Alignment MP-101) is located on as "Windows Vista") installation. The printer driver, On-screen Manuals, and application software are now complete. l When the Installation...Note • If you need to install the software. Serial Number n When the PIXMA Extended Survey Program screen appears, confirm the message. Remove the Setup CD-ROM after ...
... number, which is loaded in "Troubleshooting" of Canon printers. l When the User Registration screen appears, click Next. i When the Printer Connection screen appears, confirm the displayed message and ... paper (Paper For Print Head Alignment MP-101) is located on as "Windows Vista") installation. The printer driver, On-screen Manuals, and application software are now complete. l When the Installation...Note • If you need to install the software. Serial Number n When the PIXMA Extended Survey Program screen appears, confirm the message. Remove the Setup CD-ROM after ...


